
|
|
|
Accounts Receivable Statements
Accounts receivable statements are print, file, email, or fax reports showing amounts owed by AR account holders. They are typically prepared for billing purposes. OPERA makes it possible to produce AR statements on an as-needed basis (this is sometimes called "on-demand"), for either one account at a time or in batch for two or more selected accounts.
To prepare batch statements, select AR>Batch Processing>Statements. The Statements screen appears. (See Statements Screen and Additional Batch Statement Screen Features, below.) This screen allows you to select the account or accounts for which you wish to prepare statements and to customize the statement content.
To prepare a statement for a single account, select the Statements option from the Account Maintenance Options menu or from the Account Posting Options menu. (The Account Maintenance Options menu is accessible from the AR Account Search screen. The Account Posting Options menu is accessible from the AR Account screen.) See Statements Screen, below.
To prepare a statement that includes selected invoices and payments from a single account, open the AR Account screen for the account. Select one or more individual invoices and/or payments for which you want to prepare a statement by marking the invoice(s) and/or payment(s) with an X in the X column. (Even if you are printing a statement for a single transaction, you must mark it with an X.) Then select the Statements option from the Account Posting Options menu. See Statements Screen, below.
Note: The most recent date on which a statement was prepared is displayed on the Setup Account screen in the Last Statement Sent field. If the statement was faxed, the fax number used appears in the Last Statement Sent To field.
Note: The Statement History screen (AR>Statement History) provides a record of previously generated statements and reminder letters that can be previewed, printed or faxed.
The Statements screen is the same for single statement production and for batch statement production, except that the Statements screen for batch statements has sorting options and search criteria, which are described in Additional Batch Statement Screen Features, below.
When the AR>Statement Numbering application parameter is set to Y, OPERA automatically assigns a unique (to the property) number to the AR statement at the time it is generated. This allows the property to see which invoices have been included in each generated statement and to search for invoices using the statement number. In addition, payments can be applied per statement. Once an invoice is attached to a statement, you must use the Unlink feature on the Account Maintenance screen to remove the invoice from the statement before that invoice can be included in a different statement.
When you are generating a statement using the Statement Numbering feature, the actual number to be assigned will not be visible when you Preview the statement. Only when Print. File, Email, or Fax is selected will the statement number be generated.
Note: The sample_statement_numbering report form must be used when implementing the AR Statement Numbering feature. Use of this report for statement printing is required in order for OPERA to properly display statement number on the printed AR statement and in the Statement field on the Account Maintenance screen for invoices included in the statement. All the account types must have the sample_statement_numbering report configured on the account type setup in configuration accessed via Configuration>AR>AR Account Types.
Note: When the AR>Statement Numbering parameter is active, the Balance Brought Forward Statement Mode, if selected for the account type on the Account Type setup screen, is ignored. In addition, if the AR>Statement Numbering parameter is active, the AR>AR Invoices Printed Check Mark application parameter is ignored. (The AR Invoices Printed Checkmark feature allows display of invoices on the Account Maintenance screen depending on whether they have been included in a printed statement or not.)
Note: With Statement Numbering active, when the user who is working from the Account Maintenance screen selects invoices having statement numbers and then attempts to use the Statement button from the Account Posting Options menu to create a new statement, the following message appears: "The selected invoices currently have a statement number. Please use the Statement History option to print/preview these statements." Select OK to return to the Account Maintenance screen. (This message is displayed only when explicitly selecting invoices with statement numbers from the Account Maintenance screen, then using the Statement option from the Account Posting Options menu.)
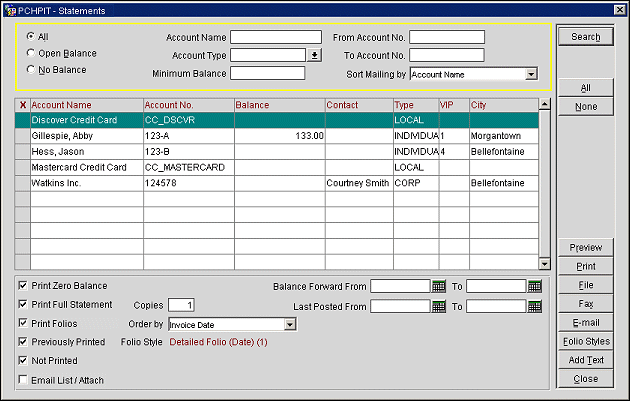
The Statements screen consists of a grid listing the AR account or accounts you have selected, and a set of options that you may use to control the content, appearance, and number of copies of the statements you prepare. The buttons allow you to choose the method to be used to generate the statements.
The Statements screen grid includes the following information for each account.
X. An X in this column indicates that the record is selected for an AR statement function. Click in the X column to select the record. Or you may select the record by highlighting it and selecting the spacebar. If you are choosing only one record for a function, you may simply highlight the record without placing an X in this column. Select the All or None buttons to select or un-select all records.
Account Name. AR account name.
Account Number. The AR account number.
Balance. The current outstanding balance for the account.
Contact. The account contact as specified on the Setup Account screen.
Type. The AR account type. Account types are defined in Configuration>AR>Account Types. Some examples of AR account types are: CORP = Corporate, LOCAL = Local Business, CATER = Catering, TRAV = Travel Agents, and BNQT = Banquets.
VIP. The VIP code attached to the account profile, if any. (Available when the Profiles>VIP application function is set to Y.)
City. The city portion of the AR account address specified on the Setup Account screen. The AR address specified on the Setup Account screen may differ from the address specified on the Profile screen as more than one address can exist for the AR Account (see Addresses for details).
In the lower part of the Statements screen, the following options appear. Use these features to control the content of the statement.
Print Zero Balance. When selecting this option, OPERA will print Invoices with a Balance of 0 (i.e., which are paid in full ) also on the statement as long as they are not purged, otherwise OPERA will only print invoices which have an open balance at the invoice level (invoices that are not paid in full).
Note: This check box is enabled when the AR>AR Use Debit Credit application parameter is set to N. If the parameter is set to Y, the check box is selected and disabled. When using a balance forward statement and using a running total in the Statements, this parameter should be turned on so the running total for each line item on the statement will match the aging totals on the statements. If this parameter is turned on when printing Statement, it will print in Debit and Credit Format and not Amount and paid format for each line item.
Balance Forward From. (The Balance Brought Forward Statement Mode is enabled per account type. The Balance Forward feature is ignored if the AR>Statement Numbering application parameter is set to Y.) The date specified in this field determines the balance forward date and balance forward total that is printed on the statement. (A balance forward shows the net amount for all invoices and payments (debits and credits) prior to the balance forward date as a single total, rather than itemizing them individually on the statement.) For example, if you enter 09-02-03 in this field, all debits and credits prior to 09-02-03 will be shown on the statement as a net total amount identified by "Balance as of 09-02-03". Invoices and payments dated 09-02--03 and later will be individually itemized and added to the balance forward amount. Use the calendar tool to select a date or enter the date manually.
Note: The last statement date and total amount from the last statement will be printed on the statement as the balance forward date and balance forward, respectively, by default, unless overridden by a date in the Balance Forward From field.
Note: If the account type for this account uses the Individual Open Items Statement Mode (see Account Types Setup), the statement will show all open invoices making up the outstanding balance listed as individual line items. You may override this by entering a Balance Forward From date.
Balance Forward To. The date in this field will be the final date for invoices and payments to be included on this statement. For example, if you enter 09-15-03 in this field, debits and credits dated 09-16-03 or later will not be included on the statement. The default is the current business date. Use the calendar tool to select a date or enter the date manually. This date must be later than the Balance Forward From.
Last Posted From/To. Select dates to indicate a date range of transactions you wish to cover in this statement. Use the calendar tool to select a date or enter the date manually. For example, if you set Last Activity to 10-01- 03 and To to 10-31-03, the statement would include all invoices whose final transaction is dated between 10-01-03 and 10-31-03. Any payments dated within this period would also be included on the statement.
Note: Typically, you would use either Balance Forward From and Balance Forward To, or Last Posted From and Last Posted To, to specify the date range to be covered on the statement, but not both.
Print Full Statement. (Available when generating Print output only. This setting is ignored when Preview, Fax, or Email output is generated.) This feature is used when you have accessed the Statements screen by selecting the Statement button from the Account Posting Options menu (this menu is accessed by selecting the Options button on the AR Account screen). Un-check this check box if you wish to prepare a statement that includes only the invoice(s) and/or payment(s) you have marked with an X in the X column on the AR Account screen. (The check box is un-checked by default when you have made at least one selection from the AR Account screen by making it with an X.) If you decide to override any selections you have made on the AR Account screen and print a statement that includes all invoices and payments listed on that screen, select this check box.
Print Folios. This check box will be selected by default if the Print Separate Folios radio button is selected on the Account Type Setup screen for the account type associated with this AR account. When this option is selected, the Folio Styles button is available to allow you to select the folio style you wish to use. (See Folio Styles for details.) The selected (or default) Folio Style appears next to the check box when it is checked.
Note: Only folios having a folio number assigned to them will be printed. Folios that do not have a folio number (such as those that were entered via Configuration>AR>Enter Old Balances) will not be printed.
If the Print Folios check box is manually selected/unselected for the account, the default option for this check box will be restored to its initial value when the user exits out of the screen and re-enters.
On the AR Batch Statement screen if user manually checks or unchecks the Print Folios check box, that selection will override the default behavior of the Print Folios check box and will be applied to all the account types irrespective of if the Print Separate Folios is selected or not on the account type configuration.
Copies. For printed statements only. Enter the number of copies to be printed.
Previously Printed. Available when the AR>AR Invoices Printed Check Mark application parameter is set to Y. Not available if the AR>Statement Numbering application parameter is set to Y. Only include invoices as line items on the statement if those invoices have previously been printed on a statement. When using the AR Invoices Printed Check Mark functionality, the Statement Mode must be set to Individual Open Items in the Configuration>AR>Account Types.
Not Printed. Available when the AR>AR Invoices Printed Check Mark application parameter is set to Y. Not available if the AR>Statement Numbering application parameter is set to Y. Only include invoices as line items on the statement if those invoices have not been previously printed on a statement. When using the AR Invoices Printed Check Mark functionality, the Statement Mode must be set to Individual Open Items in the Configuration>AR>Account Types.
Note: Whether or not an invoice is considered to have been printed as a line item on a statement is determined by your response to the prompt: "Did the statement(s) print successfully?" which appears when printing has completed. If you respond Yes, all invoices included on the successfully printed statement(s) are internally flagged as "printed" if they have not already been flagged as printed during a previous statement printing. These invoices will not appear as line items on statement(s) printed with the Not Printed check box selected. If you respond No, any invoices that have not been previously included on a successfully printed statement are not flagged as "printed." These invoices will again appear as line items on statement(s) printed with the Not Printed check box selected.
Email List/Attach. Available when the General>File Attachments application function is set to Y and a value has been defined for the General>Email Attachment Directory Name application setting, select this check box to email the selected AR Statements as an attached file to one or multiple email addresses. When this check box is selected and the Email button is chosen, then the Email/Fax Destination screen is displayed to select the email addresses. See Email/Fax Destinations for details.
Order By. Select the down arrow to choose the ordering of line item invoices printed on the statement. If folios are to be printed (Print Invoices check box selected), invoices will be printed in the same order. Options include:
Note: If you make a selection other than the default (Invoice Date) Balance Brought Forward functionality is not available, regardless of whether the Balance Forward From/To fields are completed..
When you have chosen the statement or statements you wish to generate, select the button that corresponds to the method you wish to use to generate the statements.
Note: If the AR account type specifies Print Separate Folios or Print Invoices with Details, the Preview, Fax and Email functions will ignore these settings. Only the statement for the selected account is generated.
Print/File/Fax/Email. Generate the statement using the method indicated by the button.
Print. Print statements on the local printer. This is the default output mode if Fax or Email is selected and no fax number or email address is available.
File. Generate a PDF file for each statement. You may print the file and/or save it to a location you specify.
Fax. Generate and send a fax for each statement.
Email. Generate and send an email for each statement. When this button is selected and the Email List/Attach check box is selected, then the Email/Fax Destination screen is displayed to select the email addresses. See Email/Fax Destinations for details.
Select Preview to review the statement(s) before generating.
The fax number/email address used to send the statement is, by default, the fax number/email address specified on the Setup Account screen. If there is no fax number/email address specified on the Setup Account screen, the information defaults to the fax number/email address specified on the account profile. If no fax number/email address is configured on the account profile, the output mode defaults to Print and the statement is printed on the local printer.
When using the Fax option to fax AR statements via batch processing, if any of the AR accounts selected to process in the Statements screen do not have a fax number either on the Account setup or the Account Profile screen, once the batch processing of statements is initiated OPERA does not interrupt the process for inputting missing fax numbers; instead, the whole process is completed as a batch and then whichever AR accounts are not processed in this batch process are displayed as an exception list with an option to print the statements for those unprocessed AR accounts.
Note: Your OPERA system must have properly installed and configured interfaces in order to use the fax and email communication methods. If there is a problem with the interface configuration, the Fax/Email Exceptions screen appears allowing you to print the statement.
Add Text. Select this button to enter an optional text message that you wish to display on the final page of the statement, for example, "Thank you for prompt payment" or "Call Annette if you have any questions about this bill".
Folio Styles. Select this button to choose a folio style if folios are being printed with statements (that is , if Print Folios is selected). See Folio Styles for details.
Note: The standard default statement shows the account balance as of the current business date. It also includes an aging summary that shows how long outstanding balances have been "on the books" for each aging level set up for your property. Be aware that the default statement may have been customized for your property.
To prepare a statement for a single account, select the Statements option from the Account Maintenance Options menu or from the Account Posting Options menu. (The Account Maintenance Options menu is accessible from the AR Account Search screen. The Account Posting Options menu is accessible from the AR Account screen.)
If you are generating the statement(s) by selecting the Fax button or the Email button, the Email/Fax Destination screen appears. Use this screen to add or verify the current fax number or email address for sending the statement(s). You may edit this address. If no fax/email address is available, you are prompted to enter the information before proceeding.
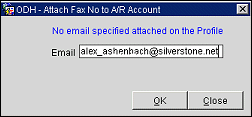
The fax number/email address used to send the statement is, by default, the fax number/email address specified on the Setup Account screen. If there is no fax number/email address specified on the Setup Account screen, the information defaults to the fax number/email address specified on the account profile. If no fax number or email address is recorded for the account, you are prompted to enter the information in the field provided. If no fax number/email address is entered, the output mode defaults to Print and the statement is printed on the local printer.
Note: Your OPERA system must have properly installed and configured interfaces in order to use the fax and email communication methods.
After you enter a fax number or email address and click OK, a message asks if you wish to add the fax number/email address to the AR Account information on the Setup Account screen. Select Yes to include the information in the account record, or select No to continue without adding the fax number or email address to the account.
Once you have chosen the output mode, select OK to display the Reference Currency screen. (Available when the General>Multi- currency application function is set to Y.) The reference currency is the currency used to show the balance due on the statement; by default, the reference currency selected for this account on the Setup Account screen is shown. For the convenience of the account-holder, however, you may wish to change the reference currency here.
For details on the statement (i.e., invoice amounts) OPERA uses either the check out date (if the transaction is associated with a reservation) or the posting date for the exchange rate between the local currency and the reference currency. If no exchange rate is found, OPERA uses the exchange rate for the current business date. For aging totals, OPERA uses the exchange rate for the current business date.
To change the currency used as the reference currency on the statement, select the down arrow. From the list of currencies, select a currency to be used for the statement reference currency. When you have chosen a reference currency, select OK to print or fax the statement.
In order to display an additional column on the statement for a reference currency, other than the property's default currency, the statement must be customized with the following merge codes:
See Customizing Reports for additional information on statement merge codes.
The Statements screen for batch statement production is similar to the Statements screen used for single-account statement production, except for additional search criteria and sort options. When you select AR>Batch Processing> Statements, the Statements screen appears.
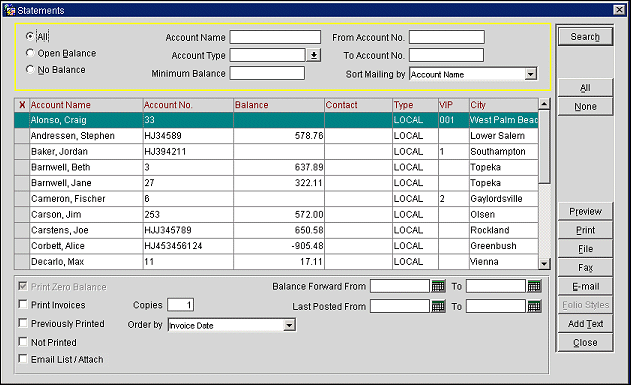
By default, all AR accounts are listed if the Include in Batch Statement check box is selected (the default) on the Setup Account screen. You may use the search criteria to filter the display of accounts available for selection.
When statements are being printed for mailing, use the Sort Mailing By options to organize the print output for easier handling.
Select the Print button (or the Fax button, if you selected the Fax mode) to print statements for the accounts you have selected. Select the Print All button (or the Fax All button if you selected the Fax mode) to print or fax statements for all accounts listed in the grid, without having to make any selections.
Messages appear in the lower part of the screen as each selected statement is output. A "Completed" message informs you when all selected statements have been sent to the printer or fax interface.
Scope of Search. Select a radio button to indicate how broad you wish the search to be.
All. Show accounts having an open balance and accounts having a zero balance. This is the default.
Open Balance. Show accounts having an outstanding balance only.
No Balance. Show accounts having a zero balance only.
Account Name. Enter all or the first part of the profile name to which the account is attached.
From Account Number/To Account Number. If you are searching for a specific AR account and you know its number, enter the account number in the From Account Number field. If you are searching for a range of AR account numbers, enter the first account number in the From Account Number field and the last account number in the To Account Number field.
Account Type. Each AR account is assigned an account type. Account types are defined in Configuration>AR>Account Types. Some examples of AR account types are: CORP = Corporate, LOCAL = Local Business, CATER = Catering, TRAV = Travel Agents, and BNQT = Banquets. Selecting an account type helps you to categorize your accounts receivable accounts for searching and reporting. Select the down arrow to display the AR Account Types list of values.
Minimum Balance. Enter an amount to show accounts having an outstanding balance of that amount or greater. Entering an amount here overrides the No Balance radio button, if selected.
Sort Mailing By (Print Mode Only). When printing statements, select the down arrow and make a choice to indicate how you would like the printed copies sorted. Select the Search button to organize the grid display according to your choice.
Account Name. Sort alphabetically by AR account name. Individual guest accounts are alphabetized by the guest's last name. This is the default.
AR Account Number. Sort by AR account number. Accounts having account numbers starting with an alphabetic character are output, in alphabetic order, following all statements having account numbers starting with numbers.
Country + Postal Code. Sort by the country, then postal code as provided by the AR address or, if no AR address is specified, by the primary address on the profile. If a postal code is not available, statement will be sorted by country, then alphabetically by city.
See Also