
|
|
|
Cashier Setup
Select the Configuration>Cashiering>Cashiers option to define and manage cashier IDs for your property cashiers. The Cashier Setup screen appears.
The Cashier Setup screen also appears when you select the Cashier ID field down arrow on the Edit User screen. When the Cashier Setup screen is accessed in this way, you may configure new cashier IDs as well as selecting existing cashier IDs for the user you are configuring.
Note: When OPERA is accessed in an ASP hosted environment, cashier IDs can be made "global" or visible across all chains by assigning the user to a Supervisor user group (these users are known as "super users"). Users assigned to non-Supervisor user groups have chain-specific cashier IDs which are visible only within their chain. Hence, in ASP hosted environments, cashier IDs are not visible until the user is assigned to a user group.
A cashier ID is required for many Cashiering functions if the Cashiering>Bypass Cashier Login application parameter is set to N (this is the default).
Each user who accesses the Cashiering functions of OPERA must use a cashier ID, along with their user ID, to log into Cashiering. The cashier ID is used to track each posting made to a guest or AR account. As each posting is associated with a cashier ID, financial reporting can then be generated from each cashier number.
The Cashier Setup screen allows you to select existing cashier ID information for editing and add new cashier IDs.
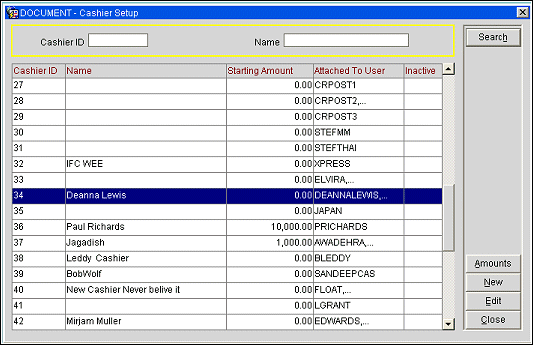
Use the following search options to find a specific cashier ID. Enter your search criteria and select the Search button.
Cashier ID. Enter the cashier ID.
Name. Enter the name of the cashier ID.
The Cashier Setup screen shows the following information:
Cashier ID. Numeric code for the cashier ID.
Name. Name assigned to the code.
Starting Amount. Beginning amount in the cashier's cash drawer (local currency).
Attached to User. Username of the OPERA user to whom the Cashier ID is assigned. An ellipsis (...) following the Username indicates that the cashier ID is assigned to more than one user.
Inactive. An X in this column indicates that the cashier ID is inactive.
New. Select the New button to configure a new cashier ID.
Edit. To edit an existing cashier ID, highlight your choice and select the Edit button.
Amounts. Select the Amounts button to set starting amounts in foreign currencies for the highlighted cashier. (Available when the Cashiering>Foreign Currency Handling application function is set to Y.) See, Starting Amounts in Foreign Currencies, below.
Note: The Amounts button will be unavailable is the cashier you have selected is open. The cashier must be closed before you can set starting amounts (Cashiering>Cashier Shift Functions>Cashier Shift Close).
OK. Available when you have accessed the Cashier Setup screen by selecting the down arrow on the Cashier ID field on the Edit User screen (see Edit Users). Highlight an available cashier ID and select OK to associate the cashier ID with the user you are configuring.
Note: When the Cashiering>Exclusive Cashier ID application parameter is set to Y, a specific cashier ID can be assigned to only one user (the user is identified in the Attached to User column). The OK button will be unavailable when the record for an already assigned cashier ID is highlighted. When this parameter is set to N (the default), you may assign a specific cashier ID to multiple users at the property where the cashier ID was created.
Cashier IDs may be assigned explicitly to users, or they may be chosen from a "pool" of available cashier IDs at the time the employee logs in to Cashiering. The Cashiering>Floating Cashier ID application parameter determines how cashier IDs are treated in OPERA. Whether or not this parameter is active also affects some of the information you will provide when setting up cashier IDs.
Note: When the Floating Cashier ID application parameter is set to Y, at any point in OPERA where a cashier login is required, the user who does not have an assigned cashier ID will be prompted to choose from the list of all available cashier IDs (which includes both floating cashier IDs and those assigned non-exclusively to users). If the cashier ID selected by the user is not a floating cashier ID, and that user later attempts to check in a reservation, he will be prompted again to select a cashier ID before check in can proceed.
Select the New button from the Cashier Setup screen to create a new cashier ID. To edit an existing cashier ID, highlight your choice on the Cashier Setup screen and select the Edit button. The Cashier - New or Cashier - Edit screen appears.
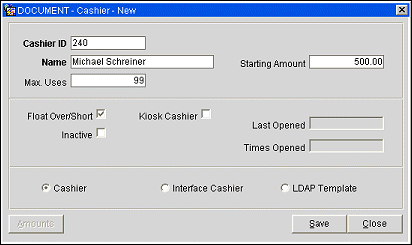
Provide the following information and select the Save button.
Cashier ID. Code number assigned to the cashier ID (999999 is the highest number that may be assigned).
Name. Name of the cashier ID. This may be the name of a person, the name of a shift, or some other descriptive term to be associated with this cashier ID.
Starting Amount. Enter the local currency starting balance assigned to the cash drawer for employees signing on with this cashier ID. If you choose to work with fixed starting balances, you would enter the opening amount of each cashier's float (or bank) in this field. This is the amount which the employee retains in the cash drawer and carries forward to the next day. If the property policy is that cashiers must completely empty their cash drawer each night and deposit all the money in their banks in the safe, then the property is working without fixed starting balances and no entry is required here. The starting amount will be reflected on the Cashier Closure Report.
Note: If starting amounts are provided in multiple currencies, see Starting Amounts in Foreign Currencies, below.
Max Uses. Number of times users can close and re-open their cashier in one business day. At the end of each shift, the cashier is balanced and closed. Once closed it must be re-opened before a user is allowed to post another transaction. You may use any number from 0 to 9999 (unlimited). For security purposes, you may wish to restrict users to 1 or 2 uses per business day. Enter the number 1 here if you do not want a cashier reopened after it has been closed.
Reserved. (Available if the Cashiering>Floating Cashier ID application parameter is set to Y.) Select the down arrow to choose the property where this cashier ID may be used to log in. On the Cashier Login screen, the Cashier ID list of values from which the user may select will include all cashier IDs that have a "reserved" property that matches the cashier's login property. This field may not be changed while a cashier is open using this cashier ID, or if the cashier ID is explicitly associated with one or more users.
Float Over Short. Select this checkbox if the cashier is able to drop above or below the required drop amount. OPERA maintains a running total of any differences that may occur between the amount of cash that was posted by the cashier and the amount that the cashier actually entered during cashier closing. OPERA adds or subtracts the difference (depending on whether the cash amount is over or short) and updates the total accordingly.
Kiosk Cashier. Select this check box if the cashier ID is reserved for use by one or more kiosk applications. If the Cashiering>Floating Cashier ID application parameter is set to Y, this cashier ID will not be available for selection from the Cashier ID list of values on the Cashier Login screen.
Exclusive Use. (Available if the Cashiering>Floating Cashier ID application parameter is set to Y.) Select this check box if the cashier ID is not to appear in the Cashier ID list of values on the Cashier Login screen.
Last Opened. (Read only.) Date and time that the current cashier's drawer was last opened. OPERA maintains the information in this field and updates it automatically each time the cashier is opened.
Times Opened. Total number of times that the current cashier's till has been opened. OPERA maintains the information in this field and updates it automatically each time the cashier is opened.
Inactive. Select this check box to mark a cashier ID as inactive. If a cashier ID is attached to a user or a parameter the ID cannot be inactivated and the message Dependencies exist will be displayed.
Cashier. Select this radio button to configure this cashier ID for a standard user cashier. This is the default.
Interface Cashier. Select this radio button if the cashier ID is reserved for use by one or more interfaces. If the Cashiering>Floating Cashier ID application parameter is set to Y, this cashier ID will not be available for selection from the Cashier ID list of values on the Cashier Login screen.
LDAP Template. Select this radio button if this cashier ID screen is to be used as a template for automatically creating cashier IDs for users who access OPERA via LDAP login. These users will inherit the attributes set on the template (e.g., Starting Amount, Max Uses, etc.). The Name will be pulled from the login username and a Cashier ID number will be selected by the system. Only one LDAP Template can be created. See LDAP Integration for details.
Amounts. When the Cashiering>Foreign Currency Handling application function is set to Y, select the Amounts button to set starting amounts in various currencies if multi-currency is used at the property. Please refer to the Starting Amounts in Foreign Currencies section below.
Save. Select to save the new or updated information for the cashier.
Note: Please remember that even though you select save to exit out of the Cashier Setup screen, any changes or new cashiers that have been created are not saved until the Save, OK, or Yes (on the save changes message prompt) button is selected on the Edit User screen.
Close. Select to close out of Cashier Setup screen.
Select the Amounts button to set starting amounts in various currencies if multi-currency is used at the property. (This feature is available if the Cashiering>Foreign Currency Handling application function is set to Y.)
Note: The Amounts button will be unavailable if the cashier you have selected is open. The cashier must be closed before you can set starting amounts (Cashiering>Cashier Shift Functions>Cashier Shift Close).
The Cashier Starting Amounts screen appears.
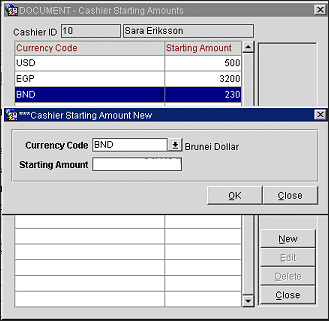
Select the New button to add a foreign currency starting amount. To edit a starting amount in a foreign currency, highlight your choice and select the Edit button. The Cashier Starting Amount - New or Cashier Starting Amount - Edit screen appears.
Provide the following information and select the OK button.
Currency Code. Select the down arrow to choose a currency code. (These codes are set up through System Configuration>Cashiering>Foreign Currency>Foreign Currency Codes.
Starting Amount. Enter the starting amount in the cashier’s drawer for this currency.
See Also