
Data Extraction Query Results
The Extract Results screen appears when you select Miscellaneous>Data Extraction>Data Extraction Query, select the query you wish review and then click the Process button. This screen shows your query results — the records that have been returned by your database query. The total number of records found is shown in parentheses in the title bar. Which specific data fields are shown in the search results grid depends on the query that you processed.
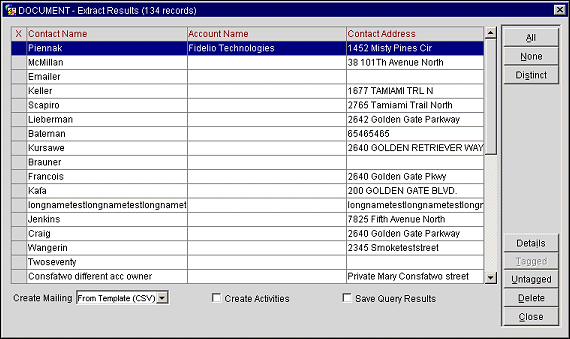
All/None. Use either the All or None buttons to select all records, or to de-select records.
Distinct. This functionality will tag data extraction results based on a unique identifier such as an Account or Contact (ID). For example, if you have run a query based on the business block data source but you only want to select one record per Contact, you would press the Distinct button in the Extract Results screen and select Contact Name. OPERA will scan the results and only tag 1 business block per Contact."
Details. Allows you to display the OPERA "source" screen (for example, a Profile screen or a Reservation screen depending on the query source) from which data for the highlighted item was drawn. If there is more than one screen available (for example, Profiles and Reservations), a dialog allows you to choose the screen you want to view. Source screens may be edited, if you wish. When you close the screen, you are returned to the Extract Results screen.
Tagged. Use the Tagged button to select records that are marked with an X. See Viewing Source Screens and Selecting Query Results for more details.
Untagged. Use the Untagged button to select records that are NOT marked with an X.
Delete. Select the Delete button to remove a record from the results list.
Close. Select Close to exit from this screen.
Use this screen to review the records returned by your search. After selecting the records you want to use, you may:
Create a mailing immediately using an existing or new Microsoft Word template. The template can use the query results that may be in either CSV or HTML format . Select From Template (CSV) or From Template (HTML) from the Create Mailing options. In addition, if you choose the Save Query Results checkbox, the query results can be given a unique name and saved for re-use later on; the query results may be accessed by selecting Miscellaneous> Mailings>Extract Results to display the Data Extract Results screen.
Create a data merge file in CSV or HTML format, without merging the data into a template at this time. Select Mergefile CSV or Mergefile HTML from the Create Mailing options. The merge file can be viewed and, if you like, used as a data source in Microsoft Word and other mail-merge programs. The merge file can also be imported into spreadsheet and/or database programs such as Access and Excel. In addition, if you choose the Save Query Results checkbox, the query results can be given a unique name and saved for re-use later on; the query results may be accessed by selecting Miscellaneous> Mailings>Extract Results to display the Data Extract Results screen.
Create activities for accounts and contacts. Create an activity related to this query. You might use this option, for example, to create a reminder to yourself to follow up on a mailing based on this query. This option is available only if your data source includes Accounts and Contacts tables.
When choosing query results for inclusion in a merge file, you can take either of two approaches: you may select all items that you have marked with an X in the left-hand column, or you may select all items that are not marked with an X in the left-hand column. Use whichever method is easiest when working with a particular set of information. If you wish to use all items that are marked with an X, make your selections, then choose the Tagged button to begin creating the mail-merge document or merge file with only the tagged items. To use all items that are not marked with an X, make your selections, then choose the Untagged button. The All and None buttons may be used to quickly mark or un-mark selections.
Choose From Template (CSV) or From Template (HTML) from the Create Mailing options, and select the Tagged or Untagged button to create a mail-merge document from a Microsoft Word doc template. The Attachments screen appears.
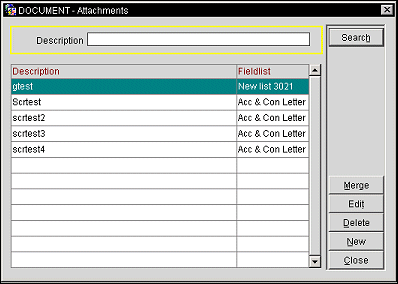
This screen lists a description of your existing Word templates (which are a type of "attachment" in OPERA), along with the field list used by each. The field list is a set of fields that have been selected from among the fields available from a data source used in your data extraction query. Click in the Fieldlist column to see the name of the template doc file, the file size, and the date when it was created or last modified.
You may select an already existing Word template, edit an existing template, or create a new template at this time.
Merge. Highlight an existing template and select Merge to use the extract results you just created, along with the named field list, to produce a merge file; this merge file is automatically used as the data source with the selected template. Macros must be enabled in your Word application in order to perform the merge. Merge does not give you an opportunity to make changes to the template before performing the merge.
Note: If you wish to modify the Word document for this mail merge only, you may close the merged document, edit the doc template, then create the merged document again by using the Merge button in Word. Any changes to the template made in this way will not be reflected in the template stored in the OPERA database. Use the Open option discussed below if you wish to make permanent changes to the Word template.
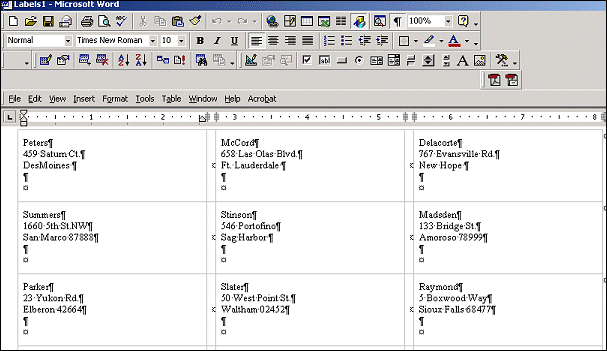
Open. Highlight a template and select Open to edit the template before performing the merge. When you use Open, you may make changes to the template and save the changed template when you are done. Using this option allows you to work with the Word template similar to the way you would if you were setting up a mail merge outside of OPERA.
When you return to the Attachment screen after editing the template, and possibly creating a merge document, the OK and Cancel options are presented. Select OK to initiate an upload to save your template changes for future use. Select Cancel to discard any changes you have made to the template.
New. Create a new Microsoft Word mail merge template. To create a new template you must first select (or create) the field list to be used along with your data extract results to create the merge file for use with the template. A field list is a selection of fields from the data source of the data extraction query. Working with the Merge Field List screen is discussed in the following section. The merge file will also determine what field variables you may insert in the Word template (via Word's Insert Merge Field option). Using this option allows you to work with the Word template similar to the way you would if you were setting up a mail merge outside of OPERA.
When you return to the Attachment screen after making the new template, and possibly creating a merge document, the OK and Cancel options are presented. Select OK to initiate an upload to save your template for future use. Select Cancel to discard the template.
A merge file is a subset of the data which was pulled from the database by your data extraction query. The data fields in this subset are defined by the merge field list. A merge file can be used as a data source in Microsoft Word and other mail-merge programs. The merge file can also be imported into spreadsheet and/or database programs such as Access and Excel.
Choose Mergefile in CSV or Mergefile in HTML from the Create Mailing options, and select the Tagged or Untagged button to create a merge file in the selected format. (Select the Save Query Results checkbox if you wish to save the merge file in the format you chose.) The Merge Field List screen appears.
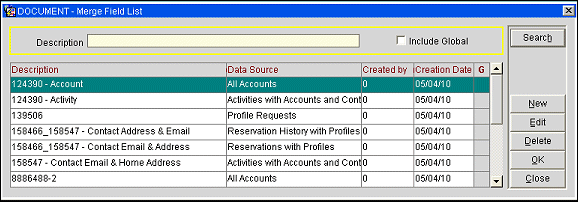
You may select an existing field list, edit an existing field list, or create a new field list for your merge file.
Select the Include Global check box to include field lists that were created as globally available (available to all properties in the chain). These field lists will have an X in the G (Global) column of the search results grid.
To create the merge file using an existing field list and your data extract results, highlight your choice of field list and select the OK button.

A field list is a selection of fields from the data source used in a data extraction query. The field list is used with your data extraction results to create a merge file.
To edit an existing field list, highlight your choice and select the Edit button. To create a new field list, select the New button. The Field List screen appears.
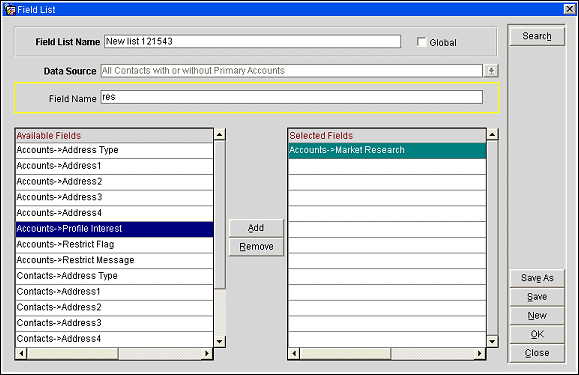
Each field list you create must have a name. A default name appears in the Field List Name field, but you may edit this name if you wish.
This screen shows all the fields available from the data source used for your data extraction query. (The data source is identified in the Data Source field at the top of the screen.) Highlight your field choices in the Available Fields list and use the Add button to move each field from the Available Fields list to the Selected Fields list. To remove a field from the Selected Fields list, highlight your choice and select the Remove button.
Global. Select this check box if you wish make the field list global (available to all properties in the chain).
Select Save to save the field list in the Selected Fields list under the name shown in the Field List Name field. You may create several field lists, each with different choices of fields, while working with this one data source. To do so, use the Save As button to save each collection of fields in the Selected Fields list under a different name.
Select the New button to clear the Selected Fields list and begin a new field list.
When you are done, select OK to return to the Merge Field List screen. The new or edited field list will appear on the Merge Field List screen. Highlight the field list and select OK on the Merge Field List screen to create the merge file using that field list and your data extract results.
Note: This option is available only if the query data source includes Accounts or Contacts tables.
When the query data source includes account or contact information, the Create Activities check box appears in the lower part of the Extract Results screen.

By selecting this check box you have the option to create an activity that is attached to the accounts chosen from the query results. You might, for example, want to note that a particular mailing was sent to those accounts on this date, with a reminder to follow up in two weeks. See Creating Activities Using Data Extraction for further details.
See About Activities for details on use of activities.
The Profile Requests feature allows you to request that email or print (mail) information products — such as brochures, event fliers, rate cards, and so on — be sent to the guest via email or print. The feature also allows you to see when the request was processed, and to resend requests if necessary. This feature is accessed by selecting the Requests button from the Profile screen's Profile Options menu or from the Profile Search screen. (To make this feature available, the Profiles>Profile Requests application function must be set to Y. See Profile Requests for additional details on using profile requests.)
You may also create a profile request from the data extraction Extract Results screen and automatically tag those profile requests as completed, if desired. When the query source includes Profile Requests, the Profile Request field appears in the lower left-hand corner of the Extract Results screen. The down arrow offers the following options:
Select your choice from these options to process the query results as a profile request.
When you select the Tagged or Untagged button, you are prompted to choose the profile request Request Type (information product), and the Send Method. Select the OK button when you are done.
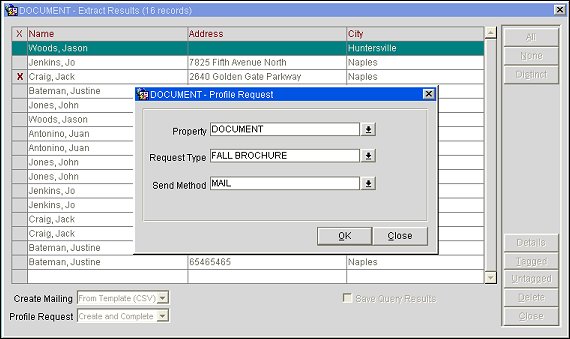
From this point, if you wish, you may continue with creating the mailing.
See Also