|
|
|
Receiving Email from Exchange Server (S&C)
Note: This feature has been certified with Microsoft Exchange Server 2007 only.
With OPERA Exchange Email feature, inbound email and attachments received by the Microsoft Exchange Mail Server can be retrieved from within OPERA and attached to Contacts and Accounts. This feature is available when the OPS_<version_number> or OPC<version_number> Sales & Catering license code is active. To enable this feature, an Inbound Exchange Server name must be specified on the General Delivery Method screen. (Configuration>Property>Delivery Methods>General. See Delivery Method Maintenance for details.)
Note: Because this feature retrieves emails directly from the Exchange Server, it is necessary that the user accessing email via this feature have an IMAP mail client configured in order to leave a copy of the email messages on the server for OPERA to retrieve. (IMAP stands for Internet Message Access Protocol. E-mail clients using IMAP generally leave messages on the server until the user explicitly deletes them. This and other facets of IMAP operation allow multiple clients to access the same mailbox.)
Note: Emails retrieved in OPERA using the Exchange Email feature will remain in the user's Inbox on the Exchange Server. Emails retrieved and read from within OPERA using this feature will be displayed as being "read" on the Exchange Server. Emails retrieved and deleted from within OPERA using this feature will be stored on the Exchange Server in the user's Deleted folder. This feature is not intended to replicate the full functionality of a standard email client.
Once an email is read using the Exchange Email feature, the email message remains in your Exchange Server Inbox and is marked as read. Emails that are deleted via the Exchange Email feature are moved to your Deleted folder on the Exchange Server.
To access the Exchange Email feature, select Miscellaneous>Emails from the menu bar options. The first time you access Exchange Email the OPERA Email Login screen is displayed.

When you provide the information requested by this screen, you will create an entry in the OPERA database that will allow you to automatically access the Exchange Email feature as this email user, without a separate login step. Provide the following information and select the Login button. Keep in mind that the Login button on the Emails screen will allow you to log in under another user name for your current session without changing the default login that you set up here.
Email User. By default, the Email User field will display your primary email address from your OPERA User setup screen's Communications field. (See Communication Information for details.)
Note: This field will be blank if you do not have a primary email address specified as one of your User setup Communications values. You will be required to log in each time you access the Exchange Email feature.
Password. Enter your email password in the Password field.
This feature allows users to read email from within OPERA and to attach emails and/or email attachments to contacts and accounts. To access this feature, select Miscellaneous>Emails from the menu bar options. The Emails screen appears.
This screen shows the emails available to the logged on user. The display will be automatically updated when the screen first appears; the display may be refreshed by selecting the Refresh button.
To locate specific email messages enter the following search options and select the Search button. (Select the Clear button to remove all search options.)
Email From. Email a few letters of the email address to display emails that have a matching string in the address of the sender.
Subject. Enter a few letters of the subject to display emails that have a matching string in their Subject line.
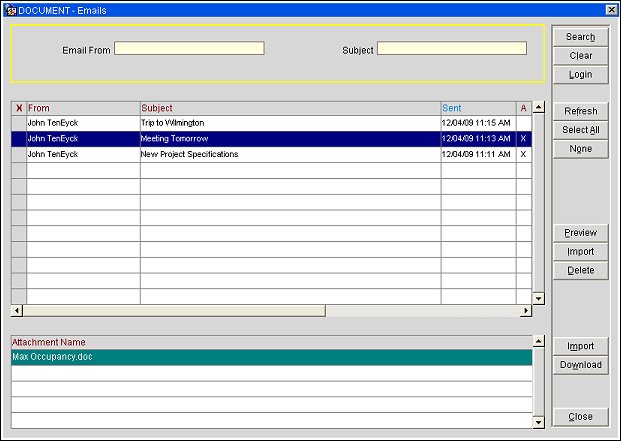
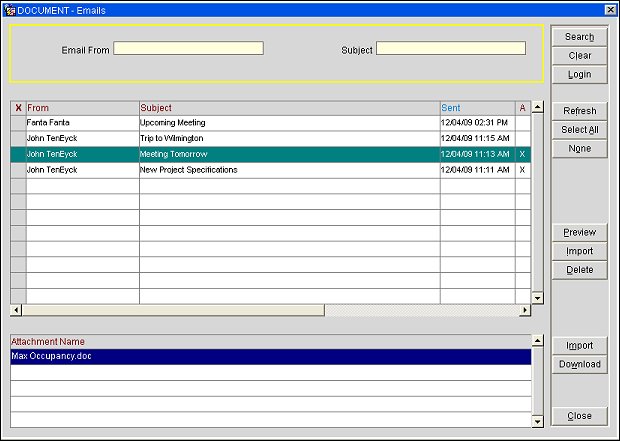
The Emails screen has two sections. The top portion is a list of the emails that have been received into OPERA from the Exchange Server. The lower portion shows the names of any attachments associated with the email that is highlighted in the upper portion of the screen.
The following fields are displayed on the Emails screen.
X. An X in this field indicates that this email has been selected for the Delete function. Use the All and None buttons to select all emails or un-select all emails.
From. Email address of the sender.
Subject. Email subject line.
Sent. Date and time when the email was sent by the sender.
A. An X in this column indicates that the email has one or more attachments. When this email is highlighted, a list of attachments appears in the lower grid.
To. The email address of the recipient.
R. An X in this column indicates that the email has been read.
Search/Clear. Enter your search criteria and select the Search button to locate specific emails. Use the Clear button to remove all search options. Selecting Search without any search options entered will display all emails that have been received.
Refresh. Select this button to refresh the email display (fetch new emails from the Exchange Server). When you first access the Emails screen, the display will be automatically refreshed to display emails currently in your Exchange Server Inbox. Thereafter, you may manually refresh the display by using this button.
Select All/None. Use these buttons to mark all emails or to un-select all emails when you are using the Delete feature.
Login. Select this button to log in to the Exchange Server as a different user for the current session. This user will remain logged into the Exchange Server until you log in as a different user or until you exit the Exchange Email feature.
Preview. Highlight an email message and select the Preview button to display the email message in a new browser window.
Note: The Exchange Email feature can receive only emails that have a body that is no larger than 64K. When you attempt to preview an email that exceeds this maximum size, the message "Email exceeds size restrictions and cannot be displayed" appears in the browser window.
Delete. Highlight the email you wish to delete (or mark an X in the X column if you wish to delete multiple emails) and select the Delete button. You are prompted to confirm the delete action. Emails that are deleted via the Exchange Email feature are moved to your Deleted folder on the Exchange Server.
Import. Use the Import function to attach emails and/or their attachments to contacts and accounts. You may attach both the email and its attachments (if any) by importing from the top grid. Or you may attach only the email attachment to the contact and account by importing from the lower grid. See Importing Emails, below.
Download. Store an attachment file on your local drive. See Downloading Attachments, below.
Use the Import function to attach emails and/or their attachments to contacts and accounts. You may attach both the email and its attachments (if any) by importing from the top grid. Or you may attach only the email attachment to the contact and account by importing from the lower grid.
To attach an email and its attachments (if any) to a contact and its account, highlight the email in the upper grid and select the upper grid Import button. The Contact Search screen appears. Search for and select the contact to which you wish to attach the email and select the OK button on the Contact Search screen. The selected email and its attachments will be displayed in the contact's and the account's Emails Sent Out List screen.
The text of the message that is highlighted in the grid is displayed in the scrollable text area below the grid.
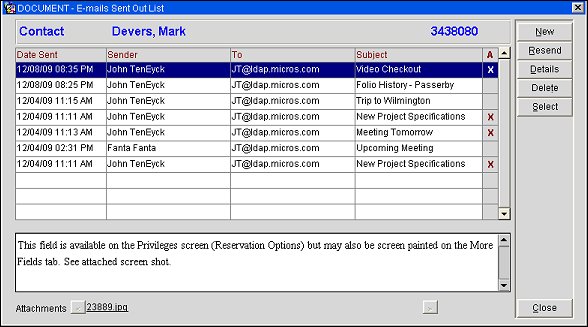
Note: Only messages that have been sent from OPERA can be displayed in the text area. The text area is not available for imported messages. To see these messages, highlight the message and select the Details button to display the email message in a new browser window.
To attach an email attachment to a contact and its account, highlight the email in the upper grid so that its attachments are listed in the lower grid. Highlight the attachment you want to attach and select the lower grid Import button.
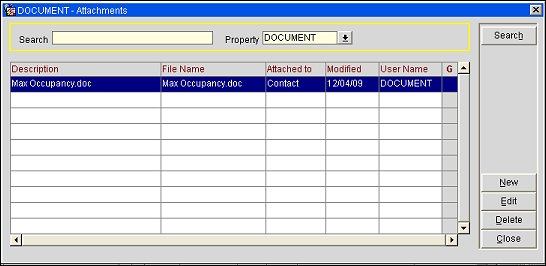
The Contact Search screen appears. Search for and select the contact to which you wish to attach the email and select the OK button on the Contact Search screen. The selected attachment will be displayed in the contact's and the account's Attachments screen.
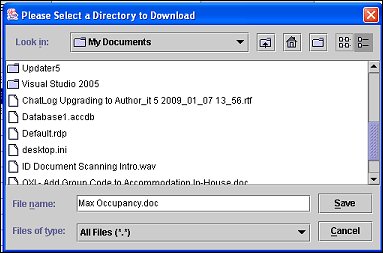
To download an attachment and store it on your local drive or network location, highlight the attachment you wish to download in the lower grid. Select the Download button. The Download screen appears.
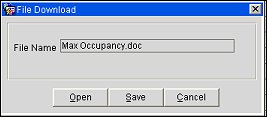
Select the Open button to review the attachment.
Select the Save button to save the file to a local drive or network location.