
|
|
|
Fast Posting
The Fast Posting Cashiering option allows you to post one or more charges to any number of guests, without having to open the Billing screen for each guest individually. This feature is useful, for example, when quickly posting charges for a service provided to many guests such as laundry or dry cleaning.
The Fast Posting menu option allows you to perform only posting functions and does not provide access to any other Billing screen functionality.
Select Cashiering>Fast Posting to add charges to a guest's bill. The Transaction Posting screen displays.
Note: The Cashiering>Bypass Cashier Login application parameter may be used to speed access to Cashiering functions for users having a cashier ID associated with their user ID. If the Cashiering>Bypass Cashier Login application parameter is set to Y, and if you have previously logged in to Cashiering and the Cashier is still open, the Cashier Login screen does not appear when subsequently accessing Cashiering functions. If Bypass Cashier Login is set to N (the default), you are prompted for a Cashier Login each time a Cashiering function is accessed.
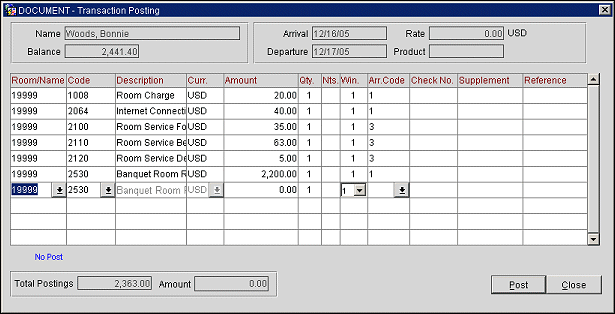
The top frame displays the following view-only information about the guest to whom you are currently posting a charge (these fields are blank until you have selected the guest's room):
Balance. The guest's current account balance.
Arrival. The guest's arrival date.
Departure. The guest's departure date.
Rate. The guest's room rate and the currency in which the room rate is quoted.
Package. The package codes attached to the guest reservation.
To post a new transaction, provide the following information in the grid portion of the screen, then select the Post button or press Enter; you will be moved to the next line and prompted for another posting. You may post as many transactions as you like to one or more guest bills.
Room/Name. Enter the room number of the guest to whose account you are posting the transaction, or the last name of the guest. If you are uncertain of the room number or last name, select the down arrow or press F9 to display the In House Guest Search screen. When you select a room, the guest's name appears in the top frame of the Transaction Posting screen. If you enter a name, the room number of the guest replaces the name when you tab out of the field. If you enter an invalid/unoccupied room number or the last name of a guest that is not in house or not recognized, the In House Guest Search screen appears, allowing you to select from the list of available guests. Up to 40 characters may be entered in this field.
Code. Transaction code for the item to be posted. You may select the code from the LOV, or, if you know the code, you may enter it manually. You may also enter the first 1, 2, or 3 digits of the code and press Tab; OPERA will display a list of all transaction codes that start with the number or numbers you entered. If you enter an invalid transaction code, the LOV appears, allowing you to select a valid code.
Note: Once you have selected the Post button or pressed Enter to post the transaction, the following line displays the last-used room number and transaction code to increase the speed in posting multiple charges to the same room, or to allow you to use the same transaction code for multiple rooms. You can, of course, edit these defaults when posting the next charge.
Description. Description of the transaction code appears here automatically. Any changes you make will appear on the guest's Billing screen and will be printed on the folio.
Amount. Amount for the item posted. You may post positive or negative amounts.
Qty. Quantity of the item posted. The Amount field in the lower portion of the screen automatically calculates the total amount (Quantity x Amount). You may enter positive or negative values.
Nts. Number of nights associated with the posting. Available when the OPP_GCA OPERA Comp Accounting license is active and when posting a Lodging type transaction code that has the Track Nights check box selected. (Nights information is used in developing data for comp analysis reporting.) Your cursor will skip this field if your permissions do not allow you to enter a number of nights.
Win. The Billing screen window in which the transaction is to be posted. The default is window 1. You may select another window from the LOV. (When you select a window, the posting on the following line will continue to use the new window number until you change it.) If the window you select has not yet been opened on the guest's Billing screen, it will automatically be created. If the window number you choose to open is not next in sequence (e.g., if you pick window 4 and there is not yet a window 3 open), OPERA creates the intervening window(s) as well as the window to which you are posting the transaction. If routing instructions have been defined, the transaction is automatically placed in the pre-defined window. (See Managing the Billing Screen for details.)
Arr. Code. Select an Arrangement Code for the transaction. An Arrangement Code is a folio grouping code that controls the display of this transaction on the folio. For example, the total cost for all transactions with the "Expenses" Arrangement Code might be shown on a single line on the folio with the description "Expenses". (The folio style you choose controls whether and how the Arrangement Code is used. See Folio Styles for details.) If the transaction code you select is already assigned to a folio grouping, the appropriate Arrangement Code will automatically appear here. You may edit this entry if you like or select another code from the LOV.
Check No. If the POS is down, and transactions are not being posted automatically by the interface, the check number may be entered manually.
Note: If the Cashiering>Rollup Transactions application parameter is set to Y, entries related to the same check (e.g., Restaurant Food and Tax) on the Billing screen will be rolled up into a single line item. The entry will have a plus sign ( + ) in the Code field, with the check number following the Description. Double-click on the plus to display the individual postings included under that check number. If the ROLLUP YN Cashiering application parameter is set to N, then the Check Number radio button on the Transfer Type form will be disabled.
Supplement. Additional information regarding the transaction. If you are posting a negative amount, the reason or explanation should be entered here.
Reference. Transaction reference information.
As you post transactions, the following view-only information appears in the lower portion of the screen:
Description. Description of the transaction code.
Total Postings. Displays the amount of total postings for this session.
Amount. Displays the total amount of the transaction, multiplying the amount by the quantity entered.
Transaction Posting screen lamps applicable to the guest to whose bill you are posting appear in the lower left side of the screen (See Indicator Lamps for complete list and details). For example, if the No Post flag is set on the guest's reservation, the No Post lamp appears on this screen.
Post. Posts the transaction to the guest account.
Note: If the No Post flag has been set on the guest's reservation Privileges screen, the warning prompt: "<Room number> has no post flag on. Do you want to post anyway?" appears after selecting the guest's name from the In House Search screen. You must select Yes to proceed with the transaction posting, or No to exit out of Fast Posting.
When the Post button is selected, the value set for the Cashiering>Print Receipt application setting determines the options available to you for printing receipts.
Note: When the General>Profile Language application function is set to Y, if the specific receipt type does not exist for the Language that is attached to guest profile, then the following error message is displayed and the printing is stopped:
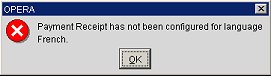
If the language associated with a Profile is changed after the receipt was generated using a specific language, then the same message is displayed if there is no receipt configured using the new/changed language.
When the General>Profile Language application function is set to N, then the report will continue processing the printing using the Language configured for the property.
The number of copies defaults to the number that is setup for the receipt in Configuration>Setup>Report Setup>Reports (See Report Setup for details). The settings are:
Note: If the Cashiering>Print Receipt application setting is set to Always, a payment receipt will not be generated for payments made to the direct bill Payment Code (that is, payments associated with the transaction code specified by the Cashiering>AR Settlement Trn Code application setting).
Note: Payment receipts can be printed in the guest's language as specified on the guest's profile if the General>Profile Language application function is set to Y. You must also have set up payment receipt reports in the appropriate languages and associated each with a language (see Configuration>Setup>Report Setup).
Close. Exit the screen without making any changes.
See Also