
|
|
|
Configuring the MeetingMatrix Interface
MeetingMatrix™ interface configuration consists of two main parts:
Facilities Linking Configuration - MeetingMatrix refers to properties as "facilities." There is typically a separate MeetingMatrix facility, set up at MeetingMatrix install time, for each OPERA property where function spaces are available. In multi-property OPERA installations (where license code MHOT is active) you must associate, or link, the OPERA properties in your multi-property cluster to the corresponding MeetingMatrix facilities. For standalone OPERA installations, only the single property needs to be linked to the MeetingMatrix facility. OPERA properties must be linked to MeetingMatrix facilities before proceeding to Room Cross- reference Configuration.
Cross-reference Configuration - Using the Rooms Cross-reference Configuration screen, you can associate a MeetingMatrix room layout template with each OPERA function space at a property. You can also associate OPERA setup styles with MeetingMatrix seating styles by using the Styles Cross-reference Configuration screen. In addition, before starting the MeetingMatrix interface configuration, you will have associated OPERA resource items (such as tables, chairs, risers, podiums, etc.) with a corresponding MeetingMatrix resource object. As part of Cross-reference Configuration you may make manual modifications to the default resource object size specifications (for example, to the height of a podium or diameter of a cocktail table) using the Resources Cross-reference Configuration screens.
Note: For additional information on setting up OPERA resource items and associating them with MeetingMatrix resource objects, see Linking OPERA Resource Items and MeetingMatrix Resource Objects, below.
To link OPERA properties to MeetingMatrix facilities, select Configuration> Catering> MeetingMatrix Configuration> Facilities. The OPERA MeetingMatrix Configuration - Facility Linking screen appears.
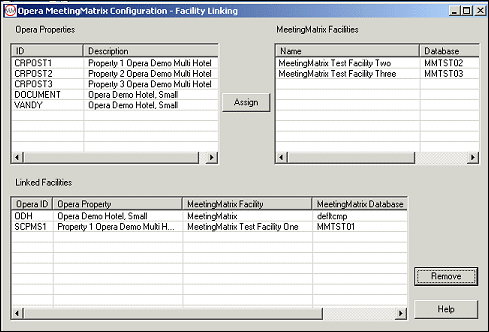
This screen consists of three grids. In the upper-left, the OPERA Properties grid shows the ID and description of the OPERA properties that belong to your multi-property cluster (as defined on the Alternates tab on the Property Configuration screen), if the OPERA multi-property license (MHOT) is active at your property. If the multi-property license is not active, only your property will be listed in this grid.
In the upper right, the MeetingMatrix Facilities grid shows the names of the MeetingMatrix facilities configured for your installation by the MeetingMatrix and OPERA installation staffs.
In the lower part of the screen, the Linked Facilities grid shows the OPERA properties and their corresponding MeetingMatrix facility associations. Each property can be linked to one facility.
To close this screen, click the X in the upper right corner of the screen.
To link an OPERA property and a MeetingMatrix facility, click on a property in the OPERA Properties grid. The selected item will be highlighted. Then, in the MeetingMatrix Facility grid, click on the facility that corresponds to the highlighted property. The facility will be highlighted. (When you highlight the MeetingMatrix facility, the OPERA property highlight turns gray.) Finally, select the Assign button.
The OPERA property and MeetingMatrix facility are now linked and will be shown in the Linked Facilities grid in the lower part of the screen.
To remove the association between an OPERA property and a MeetingMatrix facility, highlight the association you wish to break in the Linked Facilities grid. Select the Remove button. The linked property and facility are removed from the Linked Facility grid and the property and facility are returned to their respective grids.

MeetingMatrix Cross-reference Configuration must be performed when MeetingMatrix is first installed and configured in order to cross-reference function spaces to MeetingMatrix room templates, to cross-reference OPERA room setup styles with MeetingMatrix seating styles, and to make any needed modifications to resource object size specifications. Cross-reference Configuration is also used whenever there is a change to the function spaces or to the setup styles. For example, if you add a function space or discontinue a particular setup style, you would need to re-configure these elements using MeetingMatrix Cross-reference Configuration.
When you access MeetingMatrix Cross-reference Configuration, a message advises you if there have been any changes to OPERA that would require changes to the Cross- reference Configuration elements. You then have a choice whether or not to continue with MeetingMatrix Cross-reference Configuration.
The OPERA MeetingMatrix Configuration screen is the starting point for Cross-reference Configuration. To access the screen, select Configuration> Catering> MeetingMatrix Configuration> Cross Reference. The screen has three tabs: Rooms, Styles, and Resources. The activities associated with each tab are described in the following sections.
Rooms Tab: To cross-reference function spaces to MeetingMatrix room templates use the Rooms Cross-reference Configuration feature. This is usually done only once. You may, however, need to add or remove cross-references as function space availability changes at your properties.
Styles Tab: To cross-reference OPERA room setup styles with MeetingMatrix seating styles use the Styles Cross-reference Configuration feature. This is usually done only once, unless setup styles are added or discontinued.
Resources Tab: Resources such as tables, chairs, risers, podiums, etc., can be included in designs by selecting icons from the MeetingMatrix control panel. To modify size specifications for resource objects, use the Resources Cross-reference Configuration feature.
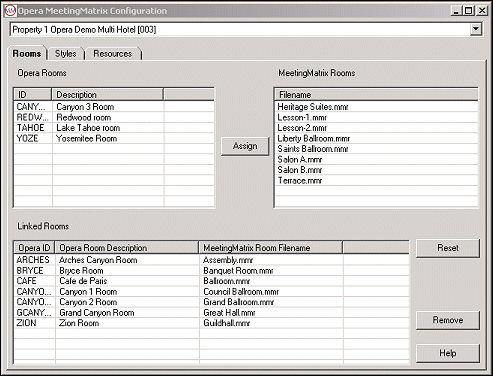
To cross-reference property function spaces to MeetingMatrix room templates (drawing files having a .mmr extension), select Configuration> Catering> MeetingMatrix Configuration> Cross Reference. The OPERA MeetingMatrix Configuration screen appears, open to the Rooms tab.
Note: Before you can begin Rooms Cross-reference Configuration, be sure that function space room layout templates (.mmr files) have been created using the MeetingMatrix design tools. These templates will form the basis for the individual client layouts, which may or may not involve customization per event.
At the top of the screen is a drop-down list of properties. Select the property for which you wish to cross-reference function spaces. By default, the property to which you are logged on is selected.
This screen consists of three grids. In the upper-left, the OPERA Rooms grid shows the ID and description of the OPERA function spaces that belong to the property selected from the drop-down list at the top of the screen.
In the upper right, the MeetingMatrix Rooms grid shows the names of the MeetingMatrix room templates prepared for your installation of MeetingMatrix. These files are set up at MeetingMatrix installation time.
In the lower part of the screen, the Linked Rooms grid shows the OPERA function spaces and their corresponding MeetingMatrix room associations.
To close this screen, click the X in the upper right corner of the screen.
To link an OPERA function space and a MeetingMatrix room template, click on a function space in the OPERA Rooms grid. The selected item will be highlighted. Then, in the MeetingMatrix Rooms grid, click on the room template that corresponds to the highlighted OPERA function space. The room template will be highlighted. (When you highlight the MeetingMatrix Room filename, the OPERA function space highlight turns gray.) Finally, select the Assign button.
The OPERA function space and MeetingMatrix room template are now cross-referenced and will be shown in the Linked Rooms grid in the lower part of the screen.
If you decide not to cross-reference the OPERA function space and the MeetingMatrix room template, select the Reset button to un-highlight your selections.
To remove the association between an OPERA function space and a MeetingMatrix room template, highlight the association you wish to break in the Linked Rooms grid. Select the Remove button. The linked function space and room template are removed from the Linked Rooms grid and the function space and room template are returned to their respective grids.
To cross-reference your OPERA setup styles to corresponding MeetingMatrix seating styles, select Configuration> Catering> MeetingMatrix Configuration> Cross Reference. The OPERA MeetingMatrix Configuration screen appears; select the Styles tab.
Once this configuration step has been completed, the proper graphical representation of the OPERA setup styles will be available for customizing event function space layout diagrams.
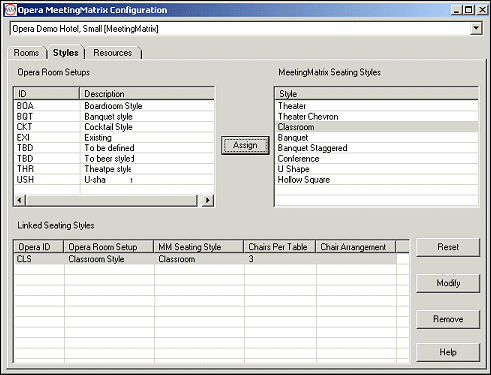
At the top of the screen is a drop-down list of properties. Select the property for which you wish to cross-reference setup styles and seating styles. By default, the property to which you are logged on is selected.
This screen consists of three grids. In the upper-left, the OPERA Room Setups grid shows the ID and description of the OPERA setup styles that belong to the property selected from the drop-down list at the top of the screen. (The setup styles are configured in OPERA before starting MeetingMatrix interface configuration. The seating styles are configured in MeetingMatrix before starting MeetingMatrix interface configuration. See MeetingMatrix Interface - Pre-Configuration Requirements for details.)
In the upper right, the MeetingMatrix Seating Styles grid shows the names of the MeetingMatrix seating styles.
In the lower part of the screen, the Linked Seating Styles grid shows the OPERA setup styles and their corresponding MeetingMatrix seating style associations. Each OPERA setup style may be associated with only one MeetingMatrix seating style.
To close this screen, click the X in the upper right corner of the screen.
To cross-reference an OPERA setup style and a MeetingMatrix seating style, click on a setup style in the OPERA Rooms Setup grid. The selected item will be highlighted. Then, in the MeetingMatrix Seating Styles grid, click on the seating style that corresponds to the highlighted OPERA setup style. The seating style will be highlighted. (When you highlight the MeetingMatrix seating style, the OPERA setup style highlight turns gray.) Finally, select the Assign button.
The OPERA setup style and MeetingMatrix seating style are now cross-referenced and will be shown in the Linked Seating Styles grid in the lower part of the screen.
Note: If a MeetingMatrix seating style does not exist for the OPERA setup style you wish to cross- reference, select the closest style. You can make necessary modifications on the client layout.
If you decide not to cross-reference the OPERA setup style and the MeetingMatrix seating style, select the Reset button to un-highlight your selections.
To remove the association between an OPERA function space and a MeetingMatrix room template, highlight the association you wish to break in the Linked Rooms grid. Select the Remove button. The linked function space and room template are removed from the Linked Rooms grid and the function space and room template are returned to their respective grids.
If you wish to modify the number of chairs per table and/or the chair arrangement for a particular seating style, click on the linked setup-seating style item from the Linked Seating Styles grid to highlight your choice and select the Modify button. The Seating Style screen appears.
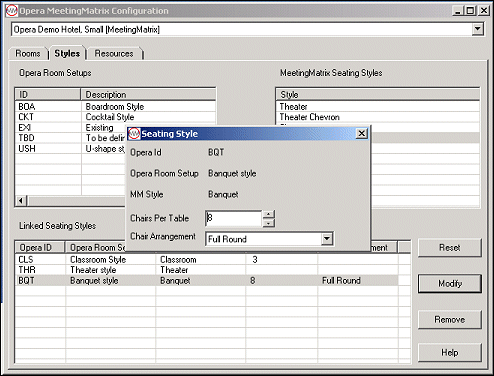
Make the necessary changes to the following fields.
Chairs per Table. Enter the number of chairs per table, or use the up and down arrows to select the number.
Chair Arrangement. Select the down arrow to choose a chair arrangement for this seating style.
Note: The Chairs per Table and Chair Arrangement options must have been specified for a particular seating style in the MeetingMatrix Seating Wizard in order for these features to appear for editing here. Either or both of these fields will not appear on this screen if the option was not originally configured in the MeetingMatrix Seating Wizard. See the MeetingMatrix documentation for details on the Seating Wizard.
To close this screen, click the X in the upper right corner of the screen.
Resource objects are items such as tables, chairs, risers, podiums, catering facilities, audio-visual equipment, decorative items, etc., that can be included in designs by selecting them from the MeetingMatrix control panel and placing them in function space layout drawings when you are customizing a layout for a client. Resource objects can also be automatically included in the layout for a particular seating style by specifying the resources when you configure the seating style with the MeetingMatrix Seating Wizard. (The use of the Seating Wizard is described in the MeetingMatrix documentation.)
Prior to MeetingMatrix interface configuration, you should have used the OPERA Edit Item screen (Configuration>Catering>Items) to associate each resource item offered by your property with a corresponding MeetingMatrix resource object. This is done by selecting a resource object from the MeetingMatrix Object list of values on the Edit Item screen.
Note: For additional information on setting up OPERA resource items and associating them with MeetingMatrix resource objects, see Linking OPERA Resource Items and MeetingMatrix Resource Objects, below.
When the resource items and resource objects have been associated in this way, MeetingMatrix assigns default size specifications to the resources. If the dimensions of your resource items differ from the MeetingMatrix defaults, you may make manual modifications to the standard size specifications (for example, to the height of a podium or diameter of a cocktail table) using the Resources Cross-reference Configuration feature.
To modify resource object specifications, select Configuration> Catering> MeetingMatrix Configuration> Cross Reference. The OPERA MeetingMatrix Configuration screen appears; select the Resources tab.
To close this screen, click the X in the upper right corner of the screen.
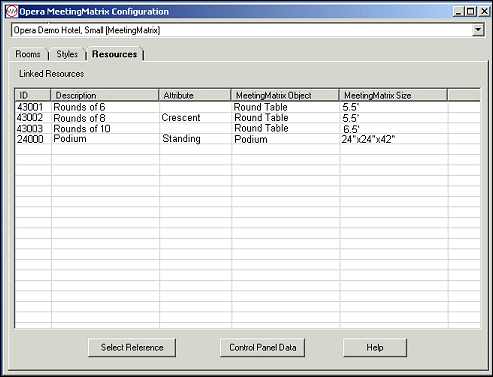
At the top of the screen is a drop-down list of properties. Select the property for which you wish to modify resource object specifications. By default, the property to which you are logged on is selected.
The Linked Resources grid lists all OPERA resource items that have been associated with MeetingMatrix resource objects.
If a resource you offer has size specifications that differ from those of the MeetingMatrix resource object, you may change those specifications so that the resource remains "to scale" when it is used in a layout. For example, if the podium at your property is 36" x 36" x 42", instead of the MeetingMatrix resource object's default 24" x 24" x 42", you can make the change using the Resources Cross-reference Configuration feature
To change the size specifications for a resource object, highlight the item and select the Select Reference button. The Resource Editor screen appears for that resource.
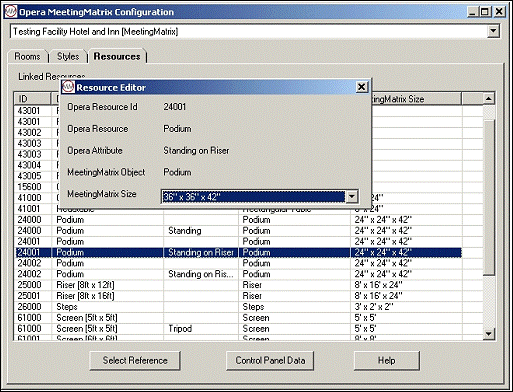
Make the necessary changes to the MeetingMatrix Size field. Select the down arrow to choose from the available sizes for the specific resource object you have selected.
If the size you need is not shown in the drop down list, choose the closest match. If there is no close match, or if your measurements must be exact, close the Resource Editor screen and select the Control Panel Data button to go to the MeetingMatrix control panel. Use the Resources tab on the MeetingMatrix control panel to modify the available sizes for this resource. You may also add entirely new resource objects, and delete resource objects from the MeetingMatrix control panel. (See the MeetingMatrix documentation for details on how to add, delete, and modify resource objects from the MeetingMatrix control panel.)
In order to automatically place resource items into layouts for specific setup styles, those resource items must have been linked to the appropriate MeetingMatrix resource objects prior to configuring the seating styles in the MeetingMatrix Seating Wizard. For example, if you normally include a speaker's podium in the setup for a group meeting, you may want to have a podium automatically added to the layout drawings when you prepare a drawing for a client who is holding a meeting in one of your function spaces. (Of course, if the podium is not needed in specific instances, it can be deleted from the drawing.)
For this reason, in a typical install, you would cross-reference OPERA resource items to MeetingMatrix resource objects before configuring seating styles using the Seating Wizard. However, you can also link newly added or changed resource items to their MeetingMatrix resource object counterparts later, after you initially install and configure your MeetingMatrix interface.
Identifying a MeetingMatrix resource object with an OPERA resource item is done using the OPERA Edit Item screen. To access this screen, select Configuration>Catering>Item Inventory Setup to display the Resource Item Setup screen.
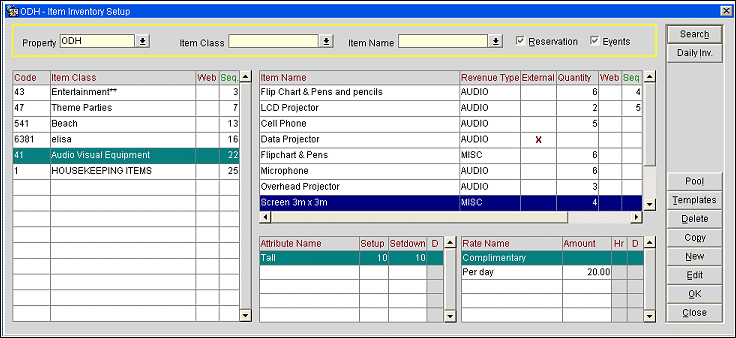
From this screen highlight a resource item and select the Edit button to display the Edit Item screen.)

Select the down arrow in the MeetingMatrix Object field to choose the resource object that you wish to link to the current OPERA resource item.
See Also