
|
|
|
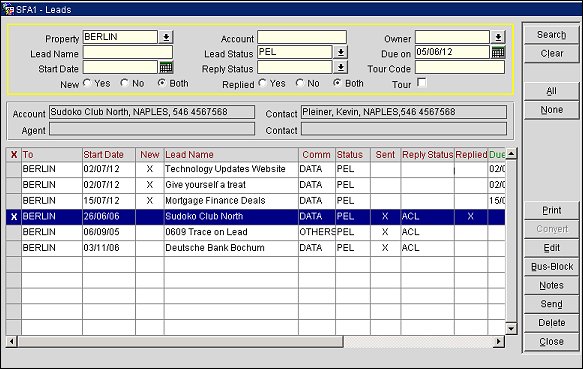
Leads Screen (LEADRECV)
When the Lead>Lead Functionality application function is set to Y, quick access to complete leads information can be selected by Business Management>Leads in Sales and Catering or Reservations>Blocks>Leads in PMS. The Leads screen displays, showing a list of all leads distributed to all properties. You can see at a glance which leads have been sent (and possibly re-sent), whether or not replies have been received, the reply status, and the overall lead status.
Note: Bookings received in SFA via OXI-HUB will be compared to existing leads for the property where the booking originated. When a lead is found that has the same Block Code and exact same booking dates, the incoming booking is automatically merged into the lead and linked to the existing lead master. All booking details are retained, but the lead owner initials will be applied to the booking. This process can also be accomplished manually by using the Merge function in SFA Business Block Options.
However, it is possible to switch automatic merging of bookings into existing leads off or on in SFA. When the application parameter Lead>Automatic Lead Merge is set to Y, then incoming bookings from remote properties will automatically be merged into their corresponding leads provided the booking dates and block code are EXACTLY same for the booking and the lead.
If application parameter Lead>Automatic Lead Merge is set to N, the incoming bookings with the exact same dates and exact same block code as an existing lead will fail in OXI-HUB with a message indicating that the booking and lead could not be merged due to the application parameter value being N.
The Leads screen provides search criteria to help you find the leads you are interested in (for example, all leads for that particular business block or all leads for a business block that have not been replied to, and so on). In addition, the Leads screen is the starting point for adding new leads, sending and resending leads, editing leads and adding lead notes. When no search criteria is specified, only the leads from the current business date forward or leads with no due date are displayed.
Note: A streamlined version of the Leads screen, which displays leads for a particular business block only, is available by selecting the Leads button from the Business Block screen.
When receiving leads from an external system (e.g., ISITES) in SFA, the lead master is automatically created and the lead is forwarded to the correct property based on the configured lead contacts for the lead property in SFA. This works for both email and data leads.
Note: In order for data leads to be forwarded, the external sender (e.g., ISITES) needs to be configured as PUBLISHER in the External System configuration for the remote property. See External Business Events Systems Setup for further details.
Property. When in a multi-property environment, select the down arrow to choose the property for the leads you wish to identify.
Owner. Select the down arrow to display a list of user IDs. From this list you may choose the ID of the user whose leads you wish to identify (that is, the user who is the owner of the business block with which the leads are associated).
Lead Name. Type the full or partial name of the lead.
Lead Status. Select the down arrow to choose the current lead status of the leads you wish to identify:
Note: When the flag Send Leads as Bookings is checked on the (Property Details - Hotel Contacts tab), Leads for the appropriate property will immediately convert to bookings and the receiving property gains full control. Any changes made to the booking at the property level will initiate Business Events that will communicate these changes back to SFA.
Due On. Use the calendar tool to select the reply-by date for the leads you wish to identify. You may also type the date in this field. A search for Leads based on this criteria will return results equal to or greater than the date selected. The default for this field is the current business date. To include leads without due date in the search results, this field must be left blank.
Start Date. Select the date when the booking will be arriving or leave it blank to search all dates.
Reply Status. Select the down arrow to choose the current lead reply status of the leads you wish to identify:
Tour Code. Available if the Blocks>Tour Series application function is set to Y. Enter all or part of a tour code to display all leads related to that tour series.
Note: To send leads for a tour series, sort by the Tour Code option. Then use the All button to select all leads, or mark the leads you wish to send individually. See Adding, Sending, and Resending Leads for details.
Tour. Available if the Blocks>Tour Series application function is set to Y. Select this check box to display all leads associated with a tour series.
New. Select a radio button to control search for new leads.
Replied. Select a radio button to indicate whether you wish to identify leads to which a reply has been received.
The following fields are displayed on the Leads screen for each lead.
X. Use the X to select or more leads at once to either send or delete them.
To. The property to which the lead is addressed.
Start Date. Date the booking will be arriving.
New. An X in this column indicates a new lead.
Lead Name. The name of the lead.
Comm. Communication method used for the lead.
Status. The current lead status. This can be one of the following:
Sent. An X in this column indicates that the lead has been sent to the property identified in the To field.
Reply Status. The current lead reply status. This is the disposition of the lead following evaluation by the receiving property. Reply Status can be any of the following:
Replied. An X in this column indicates that a reply has been received for this lead.
Due On. The date by which a lead reply is expected from the receiving property.
Owner. The property that owns the lead.
Lead ID. ID number assigned to the lead for reference.
From. The property that sent the lead.
The following functions are available from this screen.
Note: When the application function Blocks>Alternate Dates is active and alternate dates exist for a lead, a lamp will display when the lead is highlighted and on the Lead itself. Click on the lamp to access to the Alternate Dates directly.
Search. Use the Search button to return a list of Leads based on the selected search criteria.
All/None. Use the All or None buttons to select/de-select the leads in the display grid.
Convert. When this screen is opened in SFA and the lead that is highlighted is a lead for a Fidelio V6/V7 property, this function displays; otherwise it is not generally available. This button allows you to convert a lead into a booking and as part of this conversion process, send this booking to a Fidelio V6/V7 property.
Accept. Available at the property level only, the Accept button allows you to Accept multiple leads selected from the grid at once.
Turndown. Available at the property level only, the Turndown button allows you to turn down multiple leads selected from the grid at once.
Edit. Editing the highlighted lead. You can modify lead details like addressees, communication methods, expected response time, or lead status. See Edit Leads for details.
Bus. Block. Access the Business Block screen for the highlighted lead. From this screen you may prepare a new lead for this booking. See Adding and Sending Leads for details.
Notes. Enter lead notes. Only notes that are specific for one property should be entered here. Notes that are valid for all properties should be entered on the business block level rather than on the lead level. See Adding and Sending Leads - Lead Notes for details.
Send. Send the highlighted lead using the communication method specified for the receiving property on the Lead screen. If the Email or Fax communication methods are selected, the sending process creates a report, converts the report into HTML format, and sends it via the configured mail server to the appropriate email address or fax number. If Print is specified as the communication method, the report will be printed to the local printer; the printed copy can then be manually faxed to the recipient, or mailed as a follow-up to a phone contact according to organizational procedures. See Adding and Sending Leads for details.
Resend. Re-send the highlighted lead. This button is available if the lead is already marked with an X in the Sent column.
Print. Displays reports in the SFA report group. Select and print a report.
Delete. Delete the highlighted lead. A message will prompt you to confirm the action. It is possible to delete multiple leads at once from the Lead Search screen. In order to do this, check the records that should be deleted and click Delete. All checked records will be deleted if the following conditions are fulfilled for each appropriate record:
See Also