
|
|
|
Schedule
For the Schedule step in the wizard, you will open the OPERA Scheduler by selecting the Schedule button and schedule a job to run, which will deploy the campaign. A unique job ID is assigned to each campaign in OPERA.
Select the Schedule button to open OPERA Scheduler and schedule a job to run for deploying the campaign. Select the Next button to proceed to the next step in the wizard.
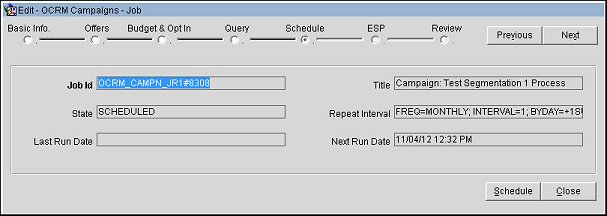
The following read-only information is displayed for the job.
Job Id. The unique Job Id. This Id, containing the job name and number, is assigned by the system to the process.
State. Indicates if the job is completed, disabled or scheduled for another run.
Last Run Date. The date and time the OPERA Scheduler last processed the job.
Title. The title of the job.
Repeat Interval. The repeat interval for the Scheduler to run the job. This is the frequency, interval and day that the campaign will deploy. Referring to the screen above, the campaign will deploy once per month and on the 1st of every month.
Next Run Date. The next date and time the OPERA Scheduler is scheduled to run the job.
Previous. Select to return to the previous step in the wizard.
Next. Select to move to the next step in the wizard.
Schedule. Select to open the Schedule screen and schedule a job to run for the campaign.
Close. Select to exit the wizard.
Select the Schedule button to define the schedule for the campaign to run.
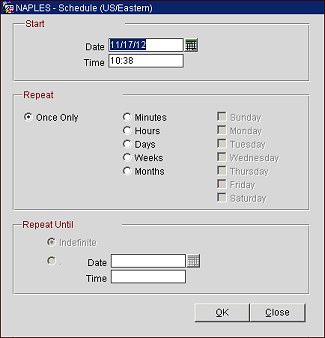
Define the start date and time for the campaign to run.
Date. Select the calendar button and choose a start date.
Time. Enter a start time for the campaign to run.
Define if the campaign will only run once or if it will repeat.
Once Only. Select to only deploy the campaign once.
Minute. Select to deploy the campaign every X number of minutes. Enter the number of minutes in the Every field (e.g., 30 indicates the job will run every 30 minutes.)
Hours. Select to deploy the campaign every X number of hours. Enter the number of hours in the Every field (e.g., 12 indicates the job will run every 12 ours.)
Days. Select to deploy the campaign every X number of days. Enter the number of days in the Every field (e.g., 5 indicates the job will run every 5 days.)
Weeks. Select to deploy the campaign every X number of weeks. Enter the number of weeks in the Every field and select the individual days of the week using the check boxes next to this field (e.g., 2 and Monday indicates the job will run every 2 weeks on Monday.)
Months. Select to deploy the campaign every X number of months. Enter the number of months in the Every field and select a value from the Repeat on the field. This value can be one of the following: Specified day and time, First, Second, Third, Fourth, or Last.
Define the date and time the campaign job will cease to repeat.
Indefinite. Select if the job is to repeat an indefinite number of times.
Date. Select the calendar button and choose the date on which the job will cease to repeat.
Time. Enter the time when the job will cease to repeat.