
|
|
|
Fast Posting - OVOS
When the OPV_<version number> Opera Vacation Ownership System license code is active, the Fast Posting option allows you to post one or more charges to any number of owners, without having to open each individual owner account. This feature is useful, for example, for quickly posting charges for a service provided to the owner or a maintenance item performed on the unit as posting the power bill every month. Also, use this feature to quickly post a payment from the owner on their account balance.
Note: Please remember that Owner Check Payments cannot be made from the Fast Posting screen, but must be made from the Owner Checks screen. See Owner Checks for details.
Select Ownership>Accounts>Fast Posting to post charges or payments to the owner/co-owner's account and in the AR Ledger.

The Fast Posting screen displays the following information.
Account No. Select the down arrow to choose an account number(s) to search for.
Account Type. Select the down arrow to choose an account type(s) to display in the results.
Contract No. Type the contract number of the contract.
Owners. Type the name(s) of the owner(s) or fractional owner(s) to search for.
Room Class. When the General>Room Class application function is set to Y, select the down arrow to choose which classes of rooms to search for.
Room Type. Select the down arrow to choose the types of rooms to display in the search results.
Unit. Select the down arrow to signify the specific unit(s) to search for.
Floor. Select the down arrow to search for one or more floors.
Both. Select the radio button to display both the Rental and Non-Rental units in the search results.
Non-Rental Only. Select the radio button to display only the Non-Rental units in the search results.
Rental Only. Select the radio button to display only rental units.
Neg. Balance. Select the check box to include negative balances in the search results.
Co-Owner. Select the check box to display the units with co-owners and their names in the results.
Potential Revenue. Available when the Ownership>Nightly Revenue Split application parameter is set to N, select the check box to search for rooms that are occupied with arrival date less than the current business date. Based on the values returned, a temporary column value should be populated reflecting the split revenue value for these occupied rooms.
Inactive. Select to include all accounts that have an inactive date on the attached contract less than the current business date in the account search.
All Accounts. Select the check box to include all of the accounts in the results.
Balance As Of. Select the calendar button to choose a date to display the accounts that have a balance as of the date selected. If no date is specified in this field, then the current balance is displayed.
Note: When no search criteria are selected, accounts that are not attached to any contracts will also be included in the search results.
X. When displayed, the account is selected. To select an account, just click in the field.
Account Name. The name that has been assigned to the account.
Alt. Name. When the General>Alternate Name application function is set to Y, this column displays the alternate name for the account.
Account No. The number assigned to the account.
Balance. Displays the current balance for the account.
Total Balance. Displays the total balance for the account, including any AR Revenue that is being held.
Unit. Displays all of the units that are attached to the account.
Type. Displays the type of account it is.
Search. Select to search for the entered criteria.
All. Select to choose all of the rooms in the Search Results Grid to recalculate their points.
None. Select to un-select all of the rooms that have been selected in the Search Results Grid.
Charge. Select to post a charge to the account (See Fast Posting Charge Screen below for details).
Payment. Select to post a payment to the account (See Fast Posting Payment Screen below for details).
Close. Select to close out of the Fast Posting functionality.
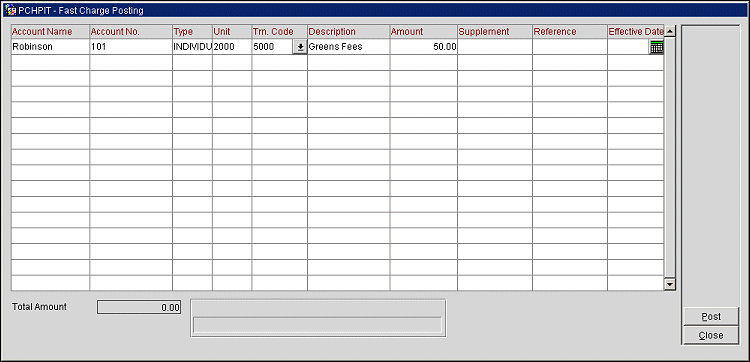
Provide the following information and select the Post button to apply the charge to the account.
Account Name. The name that has been assigned to the account.
Account No. The number that has been assigned to the account.
Type. Displays the type of account it is.
Unit. Displays the number of the unit.
Trn. Code. The transaction code for the item to be posted. You may select the code from the LOV, or if you know the code, you may enter it manually. You may also enter the first 1, 2, or 3 digits of the code and press the Tab key; Opera will display a list of all transaction codes that start with the number or numbers you entered. If you enter an invalid transaction code, the LOV appears, allowing you to select a valid code.
Note: Once you have selected the Post button or pressed the Enter key to post the transaction, the following line displays the last- used room number and transaction code to increase the speed when posting multiple charges to the same room, or to allow you to use the same transaction code for multiple rooms. You can, of course, edit these defaults when posting the next charge.
Description. A description of the transaction code appears here automatically. Any changes you make will appear on the guest's Billing screen and will be printed on the folio.
Amount. The amount of the item posted. The system defaults to 0.00, unless a default price has been specified for this transaction code.
Negative amounts may be posted to reverse a charge. When posting a negative amount, enter a minus sign before the amount or before the quantity. Negative amounts require an entry in the Supplemental field. When a negative amount is entered, the posting will have the opposite effect of how the transaction code was defined.
Supplement. Additional information regarding the transaction. If you are posting a negative amount, the reason or explanation should be entered here.
Reference. Transaction reference information.
Effective Date. Available when the Ownership>Effective Date application parameter is set to Y, select the date in which to make the posting to. When posting with an Effective Date, the user will only be able to post for any date that is less than the business date.
Total Amount. Displays the running total of all the values in Amount field for all records.
Post. Select to post the new charge to the account. Once the amount is charged to the account, the user is prompted to review the details of the charge. Click Yes to review or click No to continue.
Close. Select to exit out of the Fast Posting Charge screen.
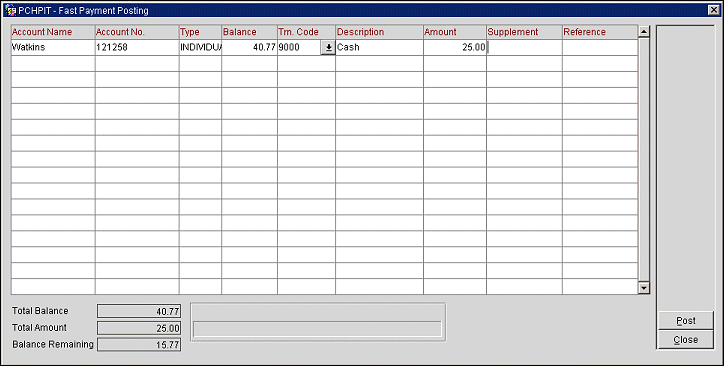
Provide the following information and select the Post button to apply the payment to the account.
Account Name. The name that has been assigned to the account.
Account No. The number that has been assigned to the account.
Type. Displays the type of account.
Balance. Displays the dollar figure balance for the unit.
Trn. Code. The transaction code for the method of payment being used. Only transaction codes that have been configured as an AR Payment transaction code can be selected. See Transaction Codes for details.
Description. The description of the code automatically displays when the payment method is selected.
Amount. Enter the amount of the payment being posted to the account.
Supplement. Additional information regarding the transaction.
Reference. Transaction reference information.
Total Balance. Displays the total of all the values in Balance field for all records.
Total Amount. Displays the running total of all the values in Amount field for all records.
Balance Remaining. Displays the value based on Total Balance - Total Amount.
Post. Select to post the payment to the account. Once the amount is paid to the account, the user is prompted to review the details of the payment. Select the Yes button to review or the No to continue.
Close. Select to exit out of the Fast Posting Payment screen.
See Also