Queue Reservations
The Queue Reservations/Queue Rooms feature is made accessible by setting the Rooms Management>Queue Rooms application function to Y.
At times, guests arrive before their selected room or a room of their chosen room type is available for assignment. The resulting “backlog” can cause confusion at the front desk and, worst of all, guest dissatisfaction unless the situation is handled equitably and expeditiously. The OPERA Queue Reservations/Queue Rooms feature helps you manage room assignment fairly, and get guests into their rooms faster by coordinating front desk and housekeeping efforts.
Note: A reservation can be placed into the queue only if the reservation is not checked in and the guest’s arrival date equals the property business date.
When you attempt to check in guests before their accommodations are available — for example, if the assigned room is still occupied or all rooms of the desired room type are dirty — the Queue Reservations feature tells you that there is a rooms queue and prompts you whether you wish to continue with check-in or stop the check-in so that you can put the reservation on queue.
Note: The queue message is not displayed if the reservation being checked in has a room number already assigned to it, regardless of room type. This is due to the fact that the reservation has a specific room assigned to it and is not waiting on just any room type.

To continue with check-in, select Yes.
To put the reservation on queue, select No; then choose the Queue button for the reservation from the Reservation Options menu. (The Reservation Options menu is available from the Reservation Search screen, from the Arrivals Search screen, and from the Reservation screen.) A prompt will ask: "Place reservation on queue?" Select Yes.
Note: The Queue option is not available for reservations for which the room type is configured as Pseudo Room Type. (See Room Type Configuration for details.)
For walk-in reservations that want a room type that has no clean rooms, then the user receives the Queue prompt prior to creating the walk-in reservation. Answering Yes to this prompt will not create the reservations and the user is returned to the Rate Query screen without the option to create the reservation.
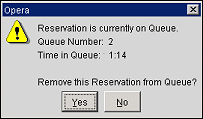
A message appears telling you the position of the reservation on the queue.
For reservations already on queue, selecting the Queue button on the Reservation Options menu shows the queue position for the reservation and allows you to remove the reservation from the queue. Select Yes to remove the reservation from the queue. The amount of time that the reservation has been in Queue is displayed, but is also displayed in the User Activity Log when it is removed from Queue.

You may also check the queue position — but not remove the reservation from the queue — by selecting the Queue lamp on the Reservation screen or the Reservation Search screen, or the Queue Reservations screen.
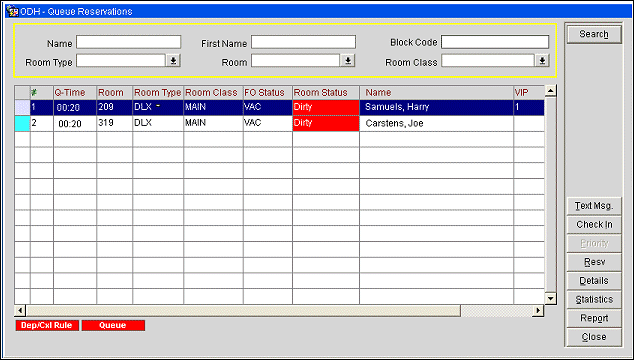
The Queue Reservations screen serves as a reminder to Front Desk personnel of the reservations that are awaiting room assignment. Queued reservations are given a priority based on time in queue. Front Desk staff can refer to the queue list when deciding which guests should be checked in next; guests can be checked in directly from the Queue Reservations screen.
Select Front Desk>Queue Reservations to access the Queue Reservations screen.

Select the Queue lamp to display the updated queue time for the highlighted reservation and to dynamically update all queue times.
To locate specific reservations, enter your filter criteria and select the Search button.
Name. Enter all or the first part of the guest's last name.
First Name. Enter all or the first part of the guest's first name.
Room Type. Select the down arrow to choose a room type.
Room. Select the down arrow to choose the room number.
Block Code. Available when the Blocks>Business Blocks or Blocks>Quick Business Blocks application function is set to Y, enter a block code for the business block that the reservation is a part of to search for.
Room Class. Select the down arrow to choose the room class. Available when the General>Room Class application function is set to Y.
The following fields are available for each reservation in the queue. Click on a column header to re-sort the queue by that field.
Color. Depending on the setting for the Reservations>Reservation Color Codes application setting, displays the user defined color associated with the Reservation, Market Code, or VIP Level as a quick reference to the user. (See Reservation Color Codes, Market Codes, or VIP Levels for details).
#. Priority number.
Q-Time. Hours and minutes the reservation has been in queue.
Room. Room number, if assigned.
Room Type. Room type assigned to the reservation.
Room Class. Room class to which the room type belongs. Available if the General>Room Class application function is set to Y.
FO Status. If a room is assigned to the reservation, the front office status of the room (e.g., Vacant, Occupied).
Room Status. If a room is assigned to the reservation, the housekeeping room status (e.g., Dirty, Pick Up, Clean).
Name. Guest's name.
VIP. Guest's VIP status.
Block Code. Available when the Blocks>Business Blocks or Blocks>Quick Business Blocks application function is set to Y, displays the block code of the business block that the reservation is a part of.
Text Sent. If a text message was sent to notify the guest that their room is available for check in, the time when the message was sent appears here. See Sending Text Messages to Queued Guests, below. If you repeat the notification, the time shown in this column is updated.
Text Msg. When the General>Text Message Handling application function is set to Y, this button allows you to send text messages to the guest's mobile phone. (This button will be unavailable if the text message delivery method has not been configured for the property. See Text Message Delivery Configuration.) Select this button to send a text message to the guest's mobile phone to notify them when their room is available for check in. See Sending Text Messages to Queued Guests, below.
Check In. Check in the highlighted reservation. The Payment screen appears.
Priority. (Available only if the reservation is not priority 1.) Move the highlighted reservation to the top of the queue (for example, based in VIP status).
Resv. Display the Reservation screen for the highlighted reservation.
Details. Display the Rooms Edit screen for the guest's room. Available when a room number is assigned to the guest.
Statistics. Display a detailed view of the current reservations in queue. See Queue Reservations Statistics, below.
Report. Prepare the Queue Reservations report.
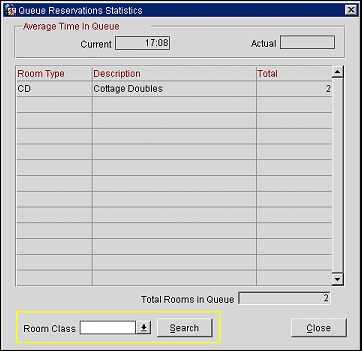
The Queue Reservations Statistics screen appears when you select the Statistics button on the Queue Reservations screen.

If the General>Room Class application function is set to Y, you may sort this display by room class. Select the down arrow to choose the room class and select the Search button. The display will show only room types that belong to the room class you select.
At the top of the screen the following information is shown:
Current. Average time a reservation has been in queue for all reservations in the current queue.
Actual. Average time a reservation was actually on queue before being checked in. This time is derived based on all reservations that have been checked in from the queue during the current business date.
For room types included in the current queue, this screen shows the room type, the description of the room type, and the number of reservations in queue for that room type.
Beneath the grid is the total number of rooms in queue.
Note: This feature may be used in conjunction with the use of text messaging to notify Housekeeping staff when a guest is waiting for a particular room to be prepared for check in. See Sending Queue Rush Text Messages to an Attendant discussed in the Queue Rush Rooms topic.
When the General>Text Message Handling application function is set to Y, you may send a text message to a guest whose reservation is on queue in order to notify them when their room is available for check in. (To use this feature, the Text Message Delivery Method must also be configured for the property.)
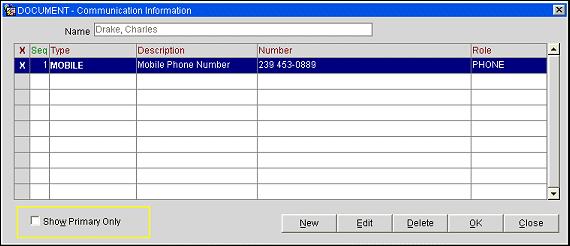
To send a text message to the guest, highlight the guest's reservation on the Queue Reservation screen and select the Text Msg button. The Communication Information screen appears. Use this screen to either select a mobile phone number that is already attached to the guest's profile, or to enter a new mobile phone number for the guest. When accessed from the Queue Messages screen, the Communication Information screen only displays address information assigned to the PHONE role. If you create a new entry on this screen, it will be automatically assigned to the MOBILE type. A default queue reservation text message is provided by OPERA, but it may be customized (see Delivery Method Maintenance for details).
Highlight the mobile phone number you wish to use, or enter a new number using the New button. When you are done, select the OK button.

A "Text message sent successfully" message will notify you when the message has been delivered to your service provider for transmission to the guest's mobile phone. In addition, a time notation appears in the Queue Reservation screen Text Sent column for the reservation. If the text message cannot be delivered to your service provider for any reason, a "Text message failed" message is displayed.
Show Me
![]() Putting a Reservation on Queue
Putting a Reservation on Queue
See Also