
 Part 2: Create and Deploy an Advertising Beacon
This tutorial walks you through developing an Oracle Mobile Application Framework (MAF) application that monitors and detects iBeacons on both iOS and Android devices. You will learn how to develop an iOS app that advertises an iBeacon identifier. During the lab you will also learn how to develop AMX pages, incorporate 3rd party Cordova plugins, and make practical use of local notifications with MAF apps.
In the first part you create a beacon client MAF application that uses a Cordova plugin as a bridge between the device’s bluetooth capabilities and the MAF application. Because the Cordova plugin’s API is written in JavaScript, you include JavaScript to communicate between the MAF application and the plugin. You'll also include a local notification so that if the application is in the background or the device is asleep, the user will become aware that the device has entered a beacon region.
In the second part of the tutorial, you create another application that acts as a beacon that will advertise its location. To test the applications from this tutorial, you must deploy each application to a separate device that supports Bluetooth Low Energy. One device will act as the beacon and advertise, while the other device will use an application to monitor and detect the advertisements. The device running the advertising beacon must be an iOS device. The device running the client application may either be an Android or iOS device. Note that the device running the advertising application must be an iOS device. This tutorial deploys and tests applications on iOS devices.
| Purpose | Download Files
|
|---|---|
In order to complete this tutorial you must have JDeveloper 12.1.3 and MAF 2.1.1 installed. Then download a file archive and unzip it into a temporary place on your machine. This archive contains code and the Cordova plugin you will need during the tutorial. The file should be saved and unzipped in a temporary directory located in the same hard drive partition as your JDeveloper/mywork directory. The zip file also contains solution applications. |
 |
Here are the main application components you'll create in this tutorial.
| Component | File name | Details
|
|---|---|---|
| Cordova plugin to support Beacons | cordova-plugin-ibeacon-master |
|
| JavaScript interface to Cordova plugin | beacon.js |
|
| Enable the application to receive local notifications | LifecycleListenerImpl.java NativeLocalNotificationListener.java |
|
| Data structure, Access classes and Data controls | Beacon.java BeaconManager.java DataControls.dcx |
|
| Page to interact with the beacon | beacon.amx |
|
In this section, you create a beacon client MAF application. Then you'll download and add a Cordova beacon plugin to the application.
-
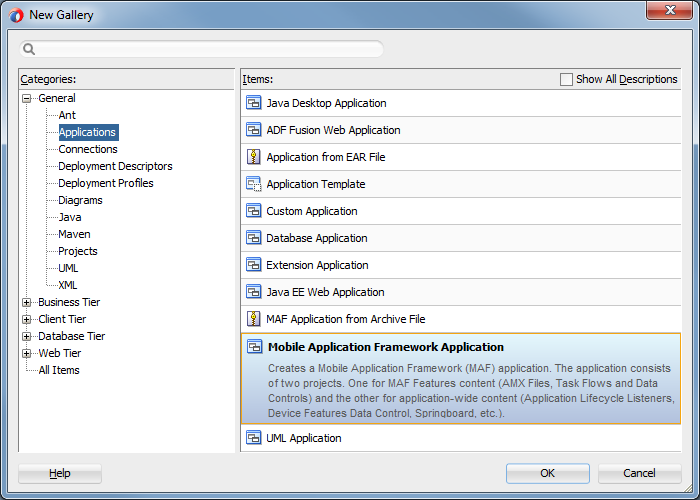
Using the New Gallery, create a new Mobile Application Framework Application.
-
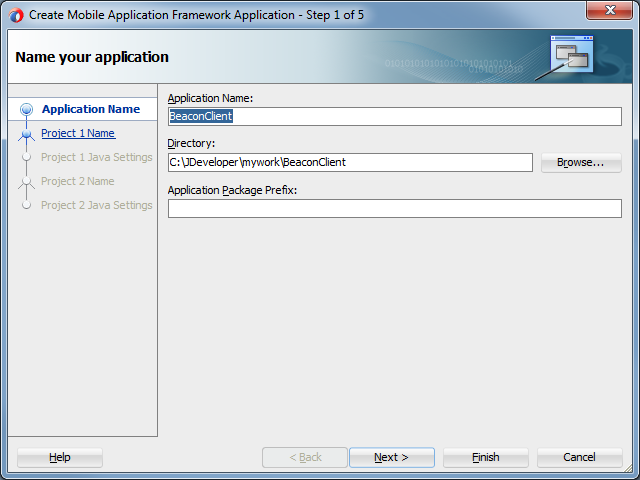
Name it BeaconClient and click Finish.
-
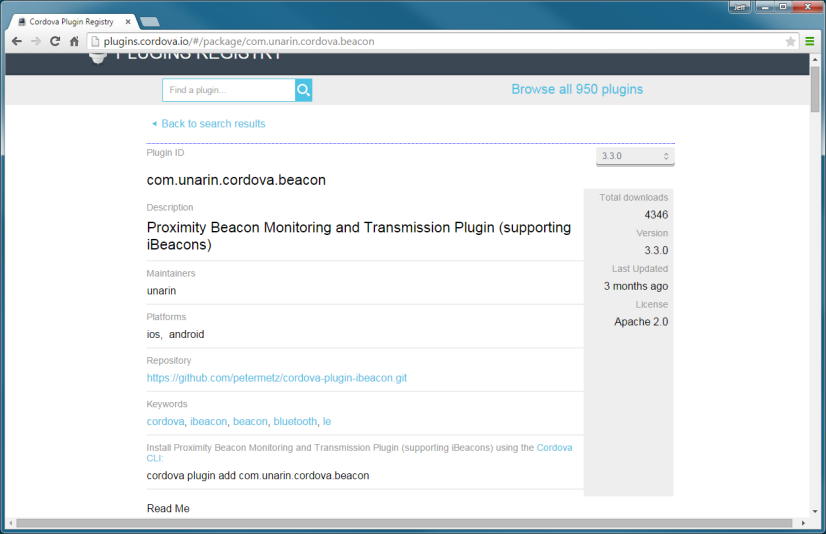
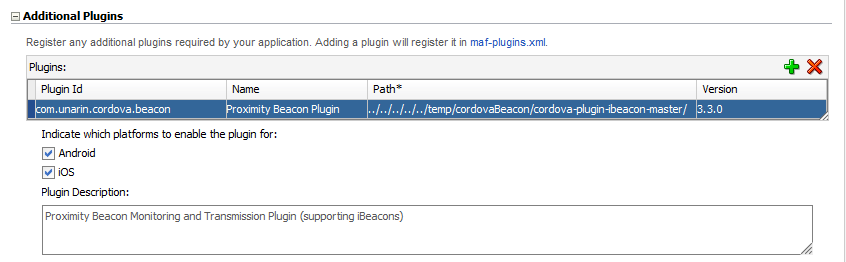
Next, add a Cordova plugin containing iBeacon functionality. There are different ones you may use, but for this tutorial we used a plugin based on the Proximity Beacon Monitoring and Transmission Plugin. This plugin is good for both iOS and Android devices.
The plugin we'll use is located in the lab.zip file you downloaded earlier. The unzipped file includes a /cordova-plugin-ibeacon-master/ directory you'll add to the application.
-
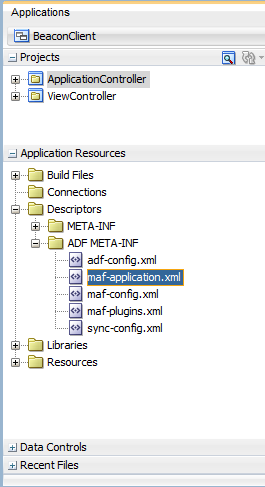
Back in your BeaconClient MAF application, add the plugin to the application.
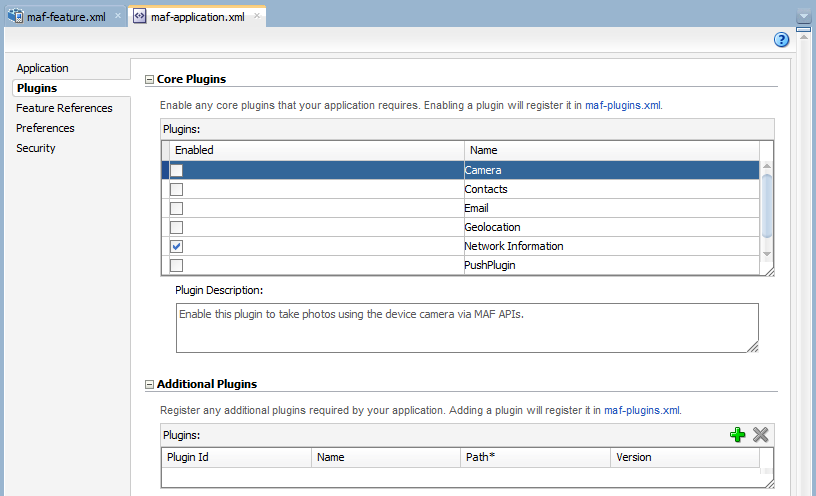
In the Application Resources panel, expand the Descriptors - ADF META-INF nodes and open the maf-application.xml.
Then select the Plugins tab.
-
Set the location of the plugin. At the bottom, in the Additional Plugins area, click the green plus sign and navigate to the directory of the unzipped file (/cordova-plugin-ibeacon-master/) and select it.
You may also set the platforms the plugin is good for. Since this plugin is good for either iOS and Android, keep the default values.
-
Save all your work.
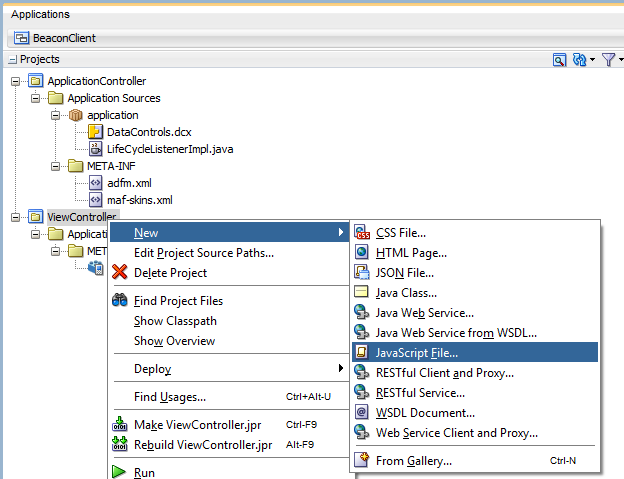
SInce the Cordova plugin is written in JavaScript, you need to add some code to interact with the interface and perform business logic.
-
Right-click the ViewController project and select New - JavaScript file.
-
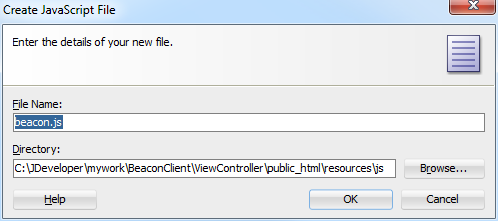
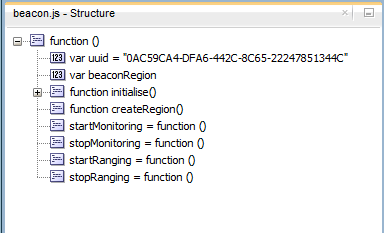
Name the file beacon.js and click OK.
-
Add the code to your file. You can copy the code from the beaconJS.txt file in the downloaded labs.zip file. If you did not download it earlier, you can do so here. Save and unzip the file to a temp directory in the same partition as your JDeveloper/mywork directory.
The code does a few different things.
1: Specifies the region identifier
2: Starts monitoring when the application starts
3: Monitors for entrance and exit of a beacon region
4: Fires local notification
5: Detects beacons with ranging
6: Adds found beacons to list

-
Save all your work.
When the application is in the background, you want to notify the user that the device has entered or exited a beacon region. Set the application to receive local notifications when a beacon region is entered or exited.
-
First, add a local notification event listener during application startup.
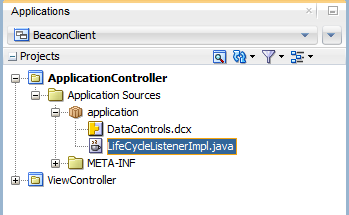
In the Applications window, expand the ApplicationController - Application Sources - application nodes and double-click the LifecycleListenerImpl.java file.
-
Modify the start method to include the event code below. This initiates the listener and since you haven't created the NativeLocalNotificationListener yet, a wavy red line should appear under it.
public void start()
{EventSource evtSource = EventSourceFactory.getEventSource(
EventSourceFactory.NATIVE_LOCAL_NOTIFICATION_EVENT_SOURCE_NAME);
evtSource.addListener(new NativeLocalNotificationListener());}
Allow the two import statements to be added.
import oracle.adfmf.framework.event.EventSource;
import oracle.adfmf.framework.event.EventSourceFactory;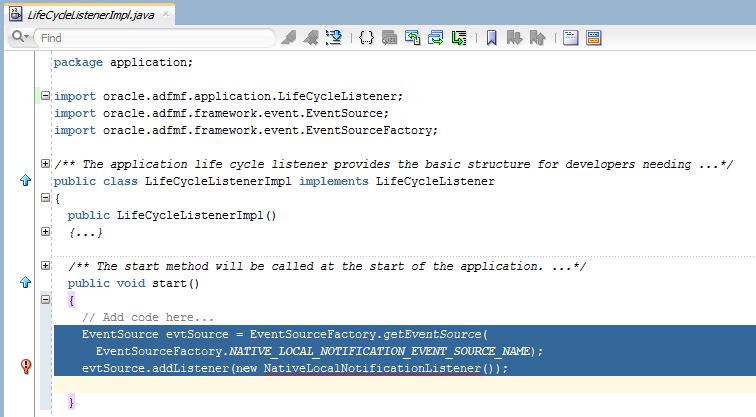
-
Next, create a new Java class (NativeLocalNotificationListener) for the local notification event listener.
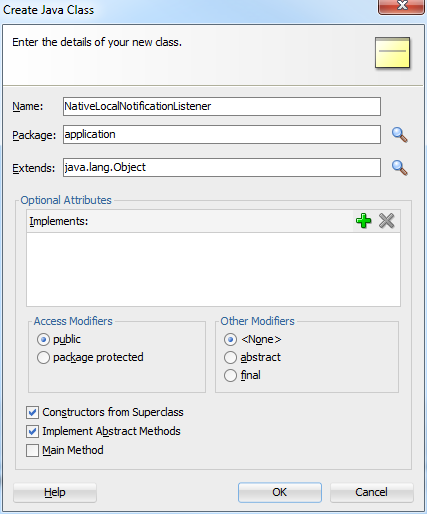
Right-click the ApplicationController project and select New - Java Class.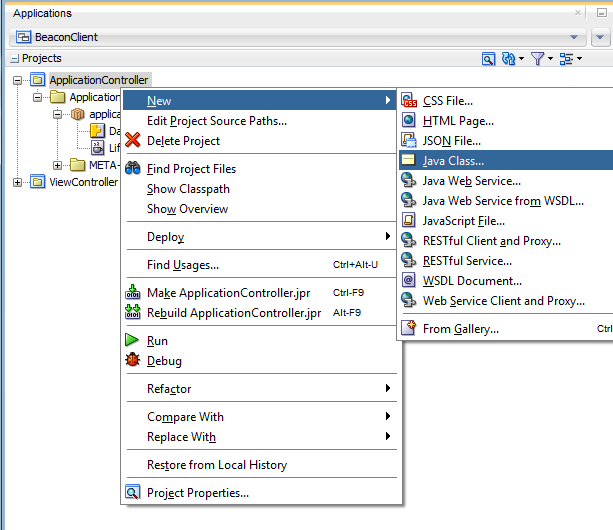
-
Name it NativeLocalNotificationListener and click OK.
-
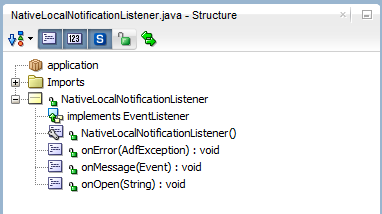
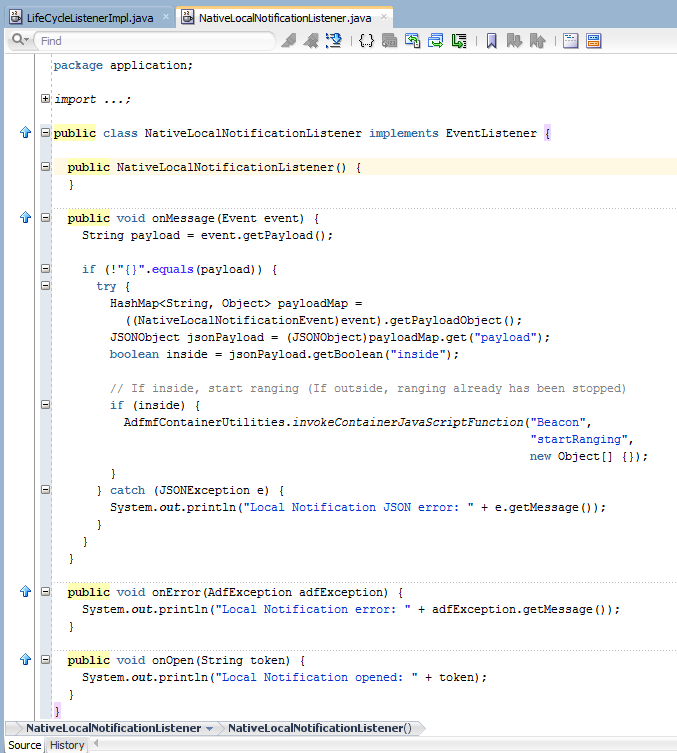
Navigate to the location where you unzipped the lab file and open the NativeLocalNotificationListener.txt file. Copy and replace all the code below from the file into your file.
The code determines if the device is inside the beacon region and then sends out a notification.
If you did not download the file earlier, you can do so here.
-
Save all your work.
Next, you'll create a couple of classes, one to define the beacon properties and access methods, and a second to start and stop monitoring for a beacon region. The second bean will also keep a list of the beacons it finds.
-
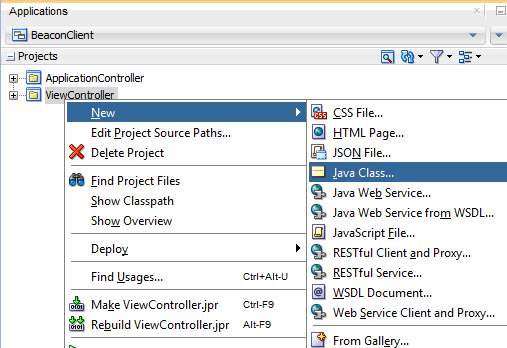
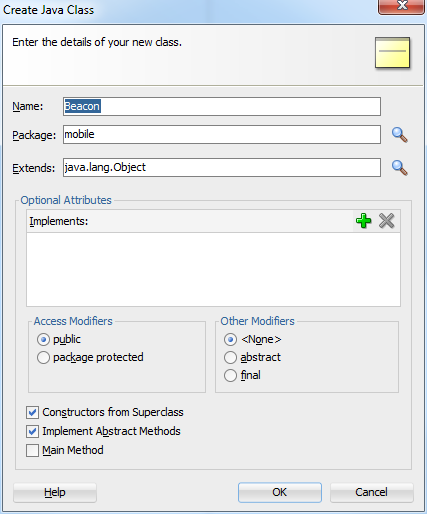
Do the next few things in the ViewController project. Right-click the ViewController project and select New - Java Class from the menu.
-
Name the class, Beacon and click OK.
-
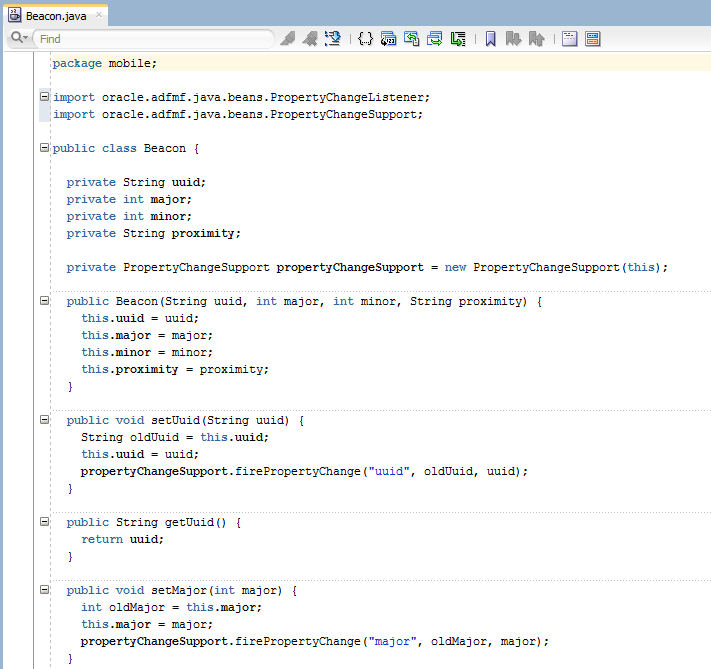
From the /labs/ zip file location, open the beaconJava.txt file. Copy all of it and replace the MAF code with the one from the file.
This file defines the beacon's five properties: uuid, major, minor, proximity, and identifier and all their getter and setter methods.

-
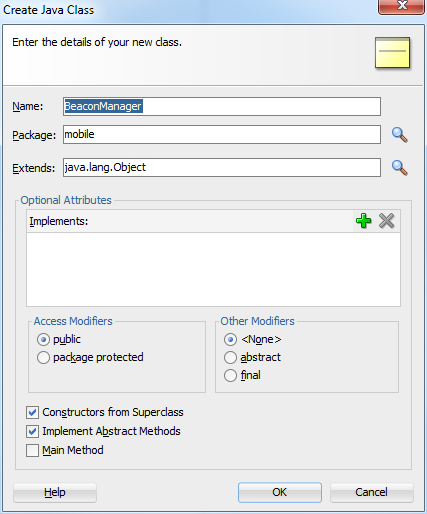
Next, create a class to start/stop monitoring and manage the beacon list. Again, right-click the ViewController project and select New - Java Class from the menu.
-
Name the class, BeaconManager and click OK.
-
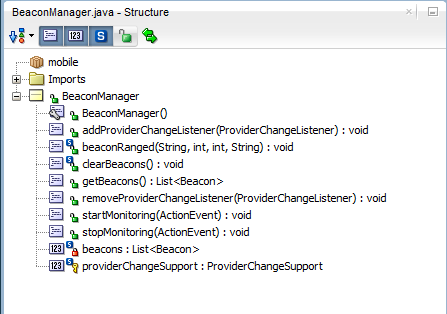
Like earlier, from the /labs/ zip file location, open the beaconManagerJava.txt file. Copy all of it and replace the MAF code with the code from the file.

-
Save all your work.
In this section, create a data control from the BeanManager class and ease development of the UI.
-
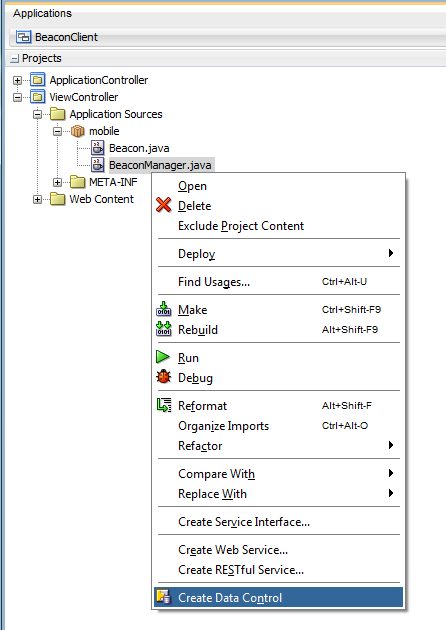
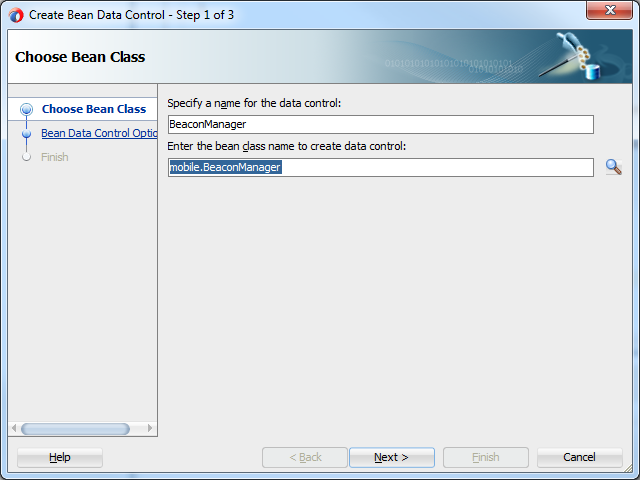
Right-click the BeaconManager.java file and select Create Data Control from the menu.
-
In the Create Bean Data Control wizard, click Next and then Finish.
-
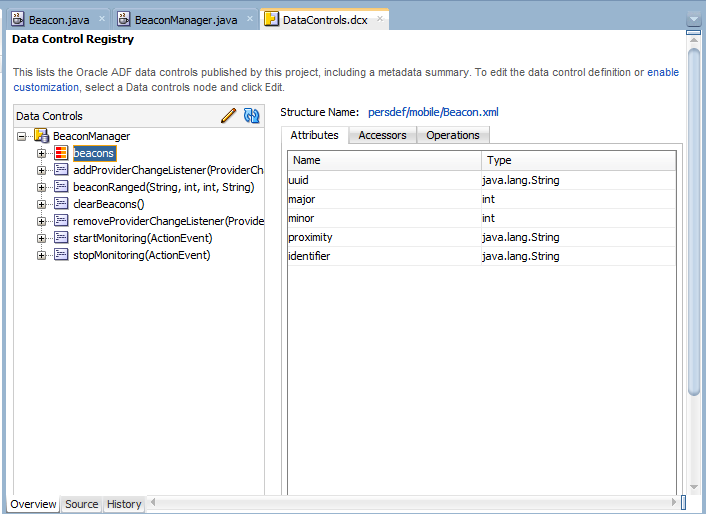
The file containing the definitions for the data controls (DataControls.dcx) is displayed in the editor. Expand the BeaconManager node to see the beacons collection, and the methods to monitor and track beacons. If you select the beacons collection, the five beacon attributes are visible.
-
Save your work.
-
Clean up the IDE a bit by closing all the editor tabs.
Below the menu bar, move the mouse to the right side of the last tab. Then right-click and select Close All.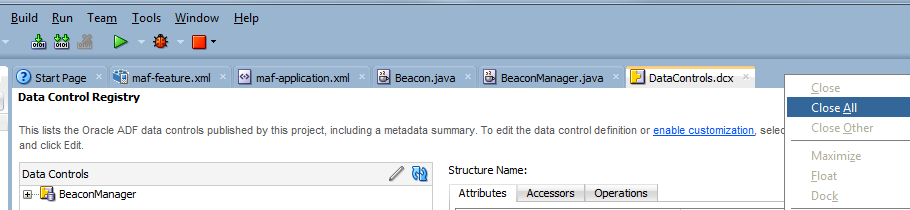
Next, create a MAF feature that includes an AMX page. The UI includes buttons to start and stop monitoring for a beacon region, notification of the region that is being monitored, and details of any beacons once the device is within the beacon region.
-
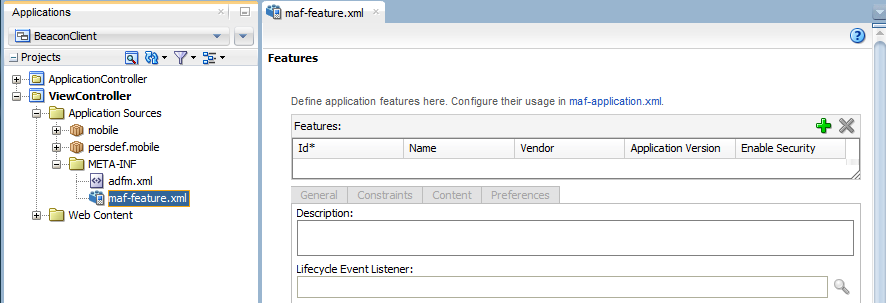
Create a new feature as the launching point for the page. Open the maf-feature.xml page in the editor.
-
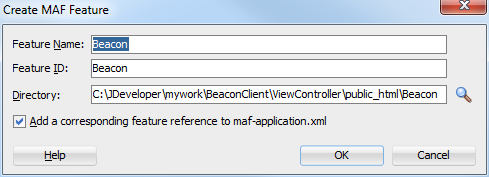
Click the green plus sign on the right to create a new feature.

-
Name the feature Beacon and click OK.
-
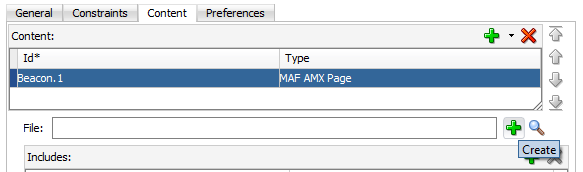
Add an AMX page as the feature's content. Click the Content tab and ensure the Type property is set to MAF AMX Page. Then click the green plus sign to the right of the File property to create the page.
-
Name the page Beacon.amx and deselect the Primary Action page facet. Only the Header and Secondary Action facets should be selected.
Then click OK.
-
Create and define page facet components.
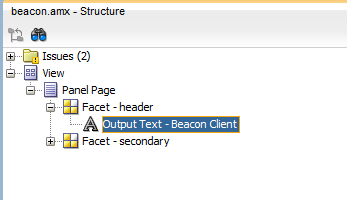
Set the Facet-header output text components value to Beacon Client.
-
Delete the button in the secondary facet.
In the Data Controls window, expand the BeaconManager node and select the startMonitoring operation. Then drag it onto the Structure window and drop it on the Secondary facet.
In the popup menu, select MAF button.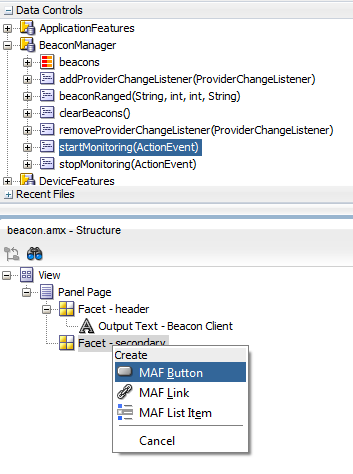
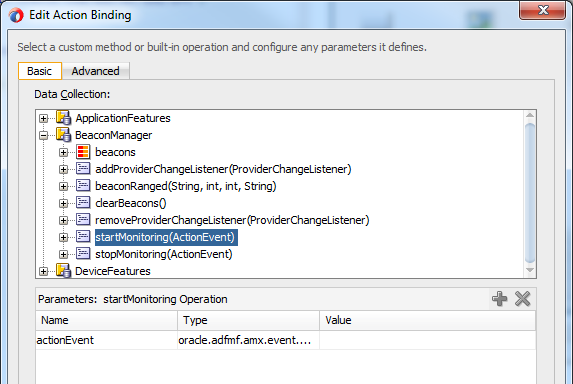
-
In the Edit Action Binding pane, click OK.
-
We only want this button to appear when the application is not monitoring for any beacons.
Select the Button and set the Rendered property to #{applicationScope.monitoring != true}. Also set the Text property to Start.
Save your work.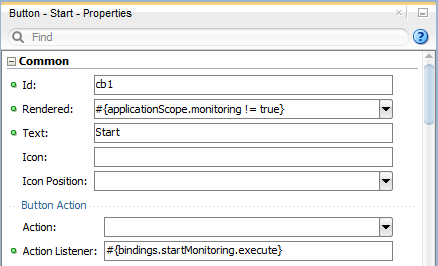
-
Add another button to the secondary facet to stop monitoring.
From the Data Controls, drag the stopMonitoring operation onto the Structure window and drop it on the Secondary facet. In the popup menu, select MAF Button.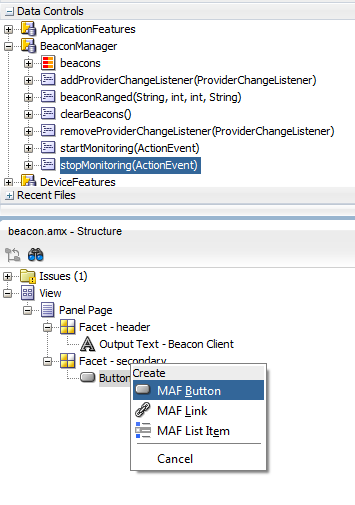
In the Edit Action Binding pane, click OK.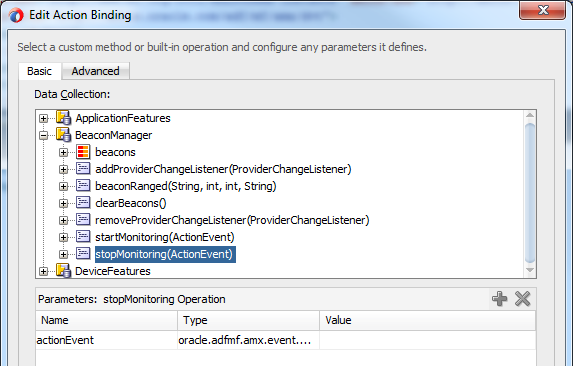
-
Again, like with the Start button, we only want the button to appear when the system is monitoring.
Select the stopMonitoring button and set the Rendered property to #{applicationScope.monitoring == true} and the Text property to Stop.
Save your work.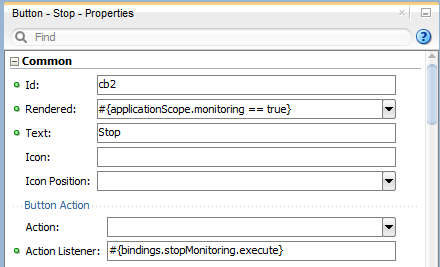
-
In the next few steps, you'll add four output components to show the status of monitoring and ranging.
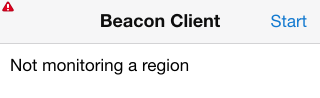
First add an output text component to the Panel Page to show when the device is not monitoring for beacons.
From the Components pane, expand the Text and Selection area and drag an Output Text component onto the Structure window, then drop it on the Panel Page.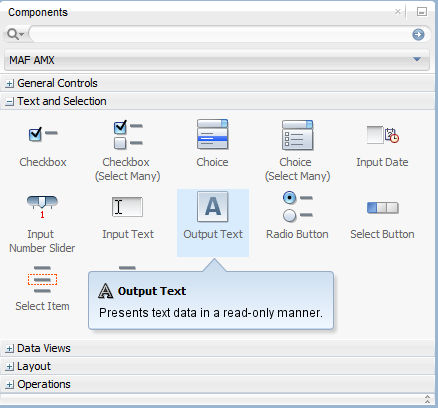
-
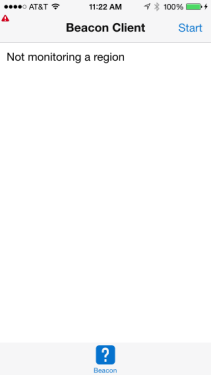
Select the output text and set the following properties to display some text when the device is not monitoring. The first image above shows a design-time view, while the second image shows a runtime view when the device is not monitoring.
Rendered : #{applicationScope.monitoring != true}
Text : Not monitoring a region.
Save your work.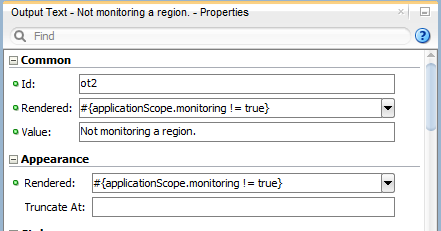
-
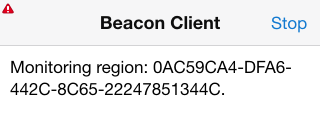
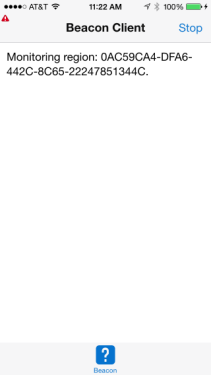
Add another output text component below the first one. Then set properties for it to display the region details when the device is monitoring. Again, the first image shows a design time view and the second image shows the page at runtime when the device is monitoring.
Rendered : #{applicationScope.monitoring == true && applicationScope.ranging != true}
Value : Monitoring region: #{applicationScope.region}
Save your work.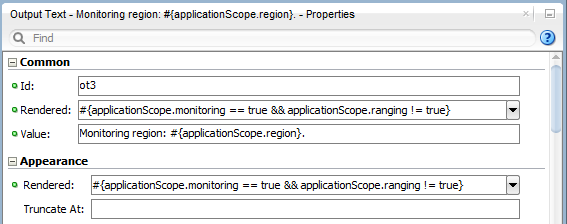
-
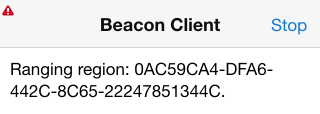
Add a third output text component to the Panel Page and set the properties to display text when the device has crossed into a region and is now in ranging mode.
Rendered : #{applicationScope.ranging == true}
Value : Ranging region: #{applicationScope.region}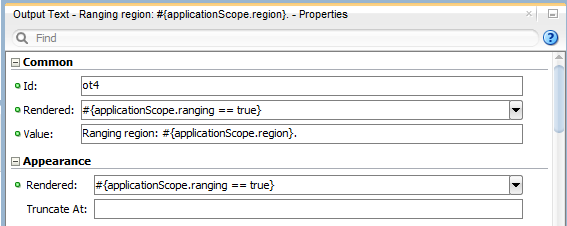
-
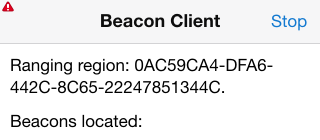
Add a fourth output text component to the page to display some header text once a beacon is found.
Rendered : #{applicationScope.ranging == true}
Value : Beacons located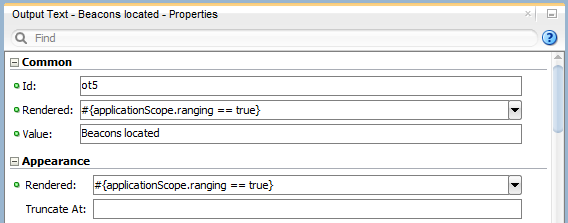
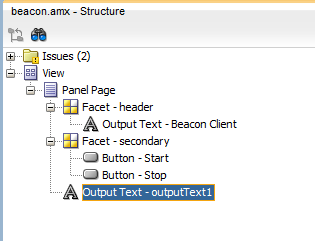
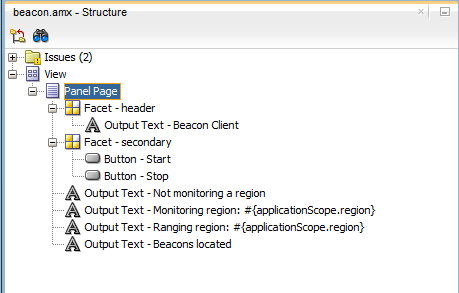
Your Structure window, containing the four output text components, should look like the image below.
-
The next thing to add to the page is a list of all the beacons advertising in an entered region.
From the Data Controls, drag the beacons collection onto the Structure window and drop it on the Panel Page. In the popup menu, select MAF List View.
-
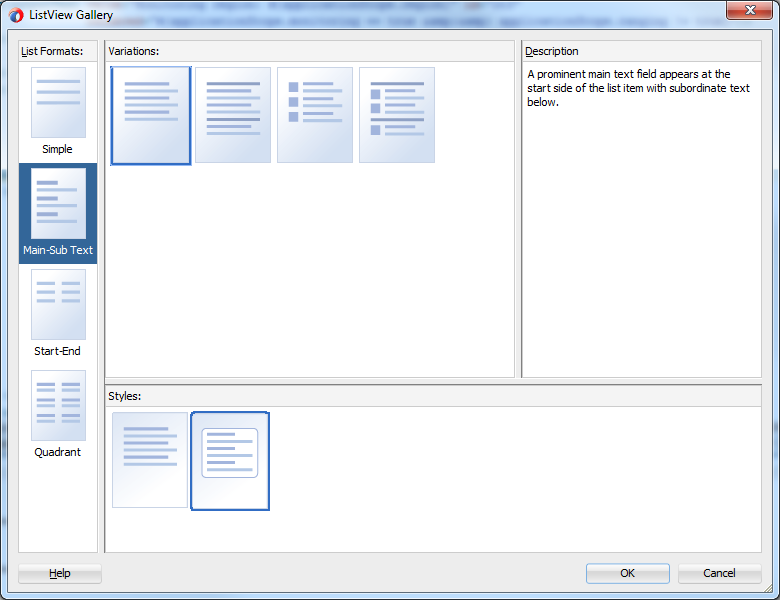
In the ListView Gallery, use the Main-Sub Text and the first Variation and the second Style. Then click OK.
-
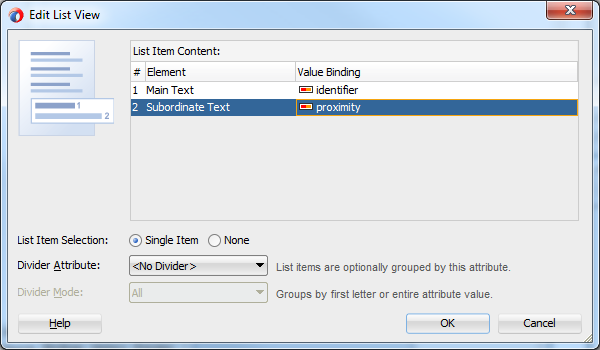
For each beacon, we want to display the identifier and the proximity, so in the Edit List View pane, set the first element's value binding to identifier and the second's to be proximity. Then click OK.
-
Next, set the list to only appear when the application is in ranging mode.
Select the List View component and set the Rendered property to #{applicationScope.ranging == true} and the Style Class to adfmf-listView-insetList.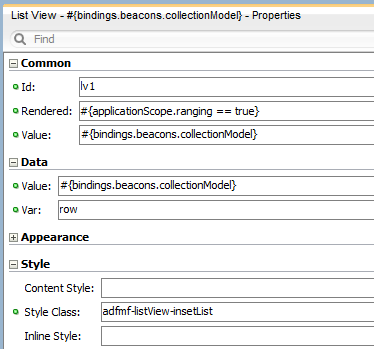
-
Save all your work.
-
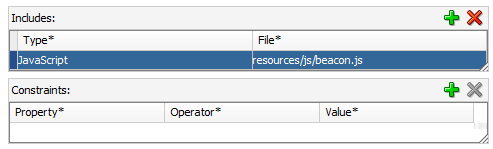
Finally, include the JavaScript code in the new feature.
Reopen the maf-feature.xml file and select the Beacon feature. Then click the Content tab, scroll down to the Includes area, and click the green plus sign.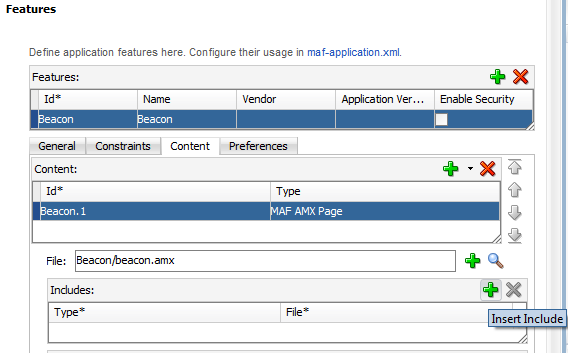
-
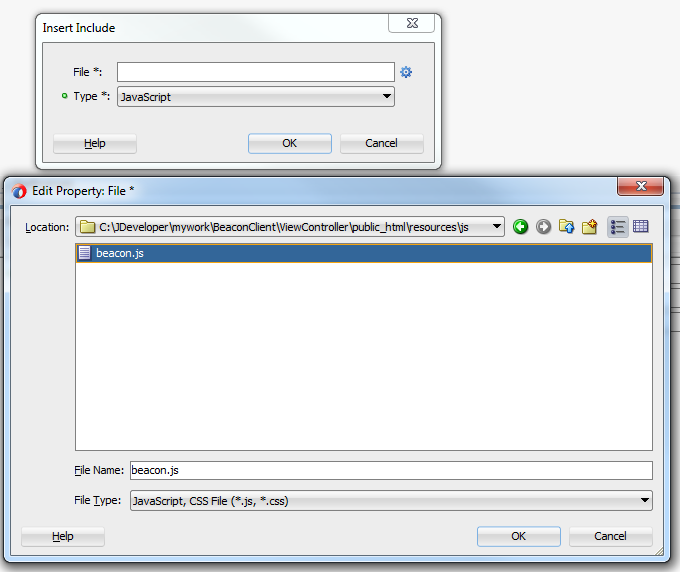
In the Insert Include dialog box, click the blue gear to the right of the File property. Then navigate to the resources\js Directory and select the beacon.js file.
-
Then click OK to close the Edit Property pane and then click OK again to close the Insert Include pane.
-
Save all you work. You have now completed the AMX page.
To test the functionality you've developed, you must deploy this application to an iOS or Android device as it will not work with a simulator or emulator. In this section you'll create a deployment profile and deploy to a device. When deploying to an iOS device, you must have a certificate and provisioning file. This section does not cover installing and configuring these components. In some of these steps you'll see both the iOS and Android screen shots.
-
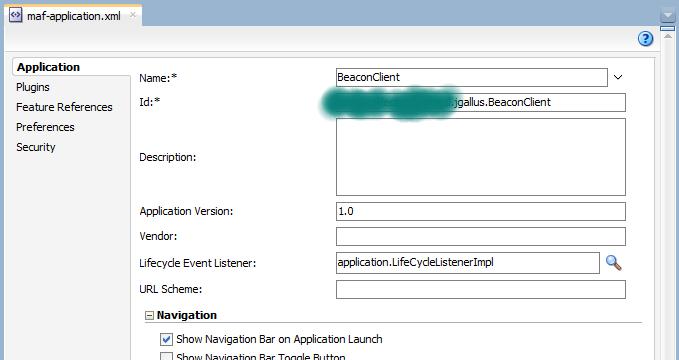
If you are deploying to an iOS device, you need to set the application's Id to match the App ID specified in your provisioning profile. This must be done for iOS deployments, ONLY. If you are deploying to Android devices, then continue on to the next step.
Open the maf-application.xml file and click the Application tab.
Then set the Id property to a value that matches the App Id specified in your provisioning profile. The image below shows only the last part of the id.
-
Move focus away from the Id property and then save all your work.
-
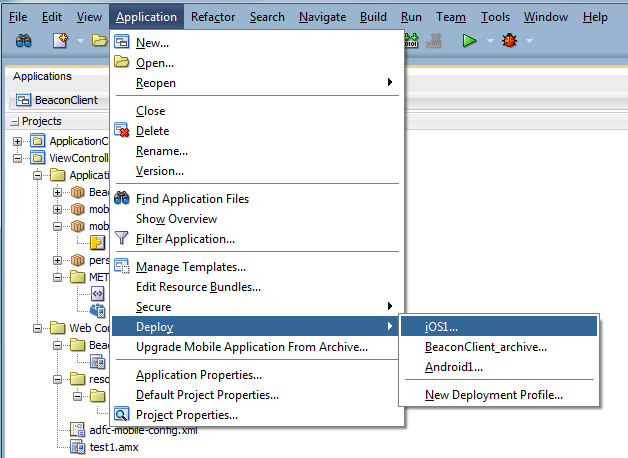
Deploy the application.
From the menu, select Application - Deploy - iOS1 (or Android1) depending on the device you're deploying to.
-
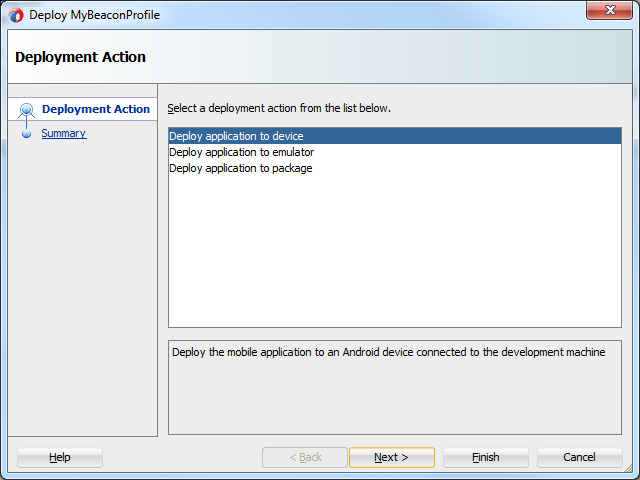
With the Android deployment, select Deploy application to device and click OK.
With the iOS deployment, select Deploy distribution package and click OK.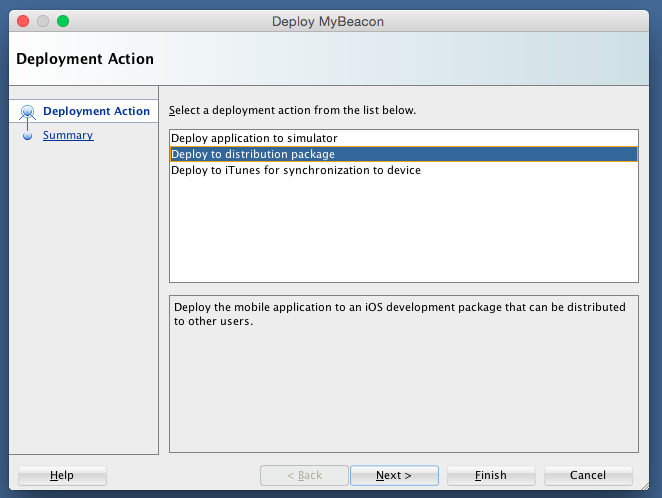
-
After the application is deployed, you need to move it onto a device. With Android devices, you just plug in the device, then drag and drop it onto the device.
For iOS it's a little different and you need iTunes to help. The next three steps describe how to move the application from your Mac to the iOS device.
If you are deploying to iOS, plug in your device and open iTunes.
From the menu, select File - Add to Library.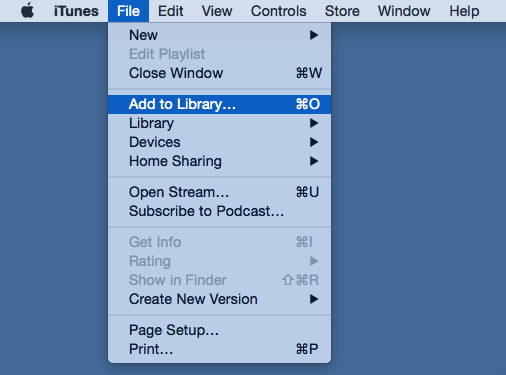
-
You need to find the .ipa file JDeveloper created.
Navigate to the directory where you created the application and expand /deploy/iOS1/ directory. Then select BeaconClient.ipa and click Open.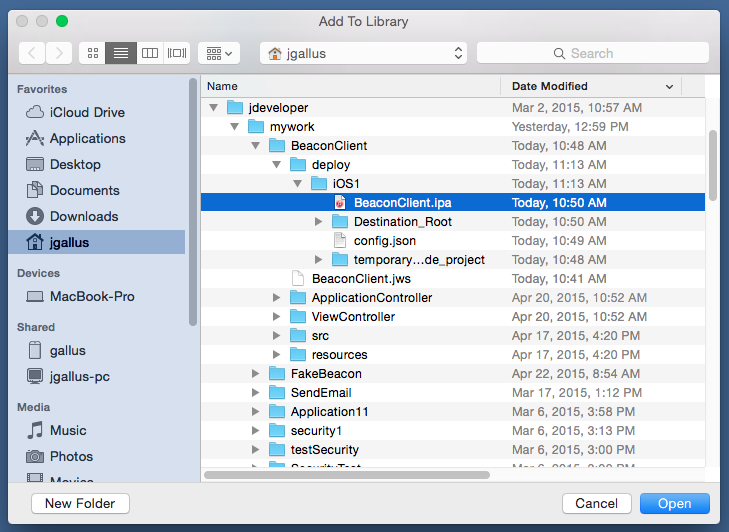
-
In iTunes, select your device, then select the Apps node.
Then scroll down till you see the BeaconClient application. Click Install and then Apply.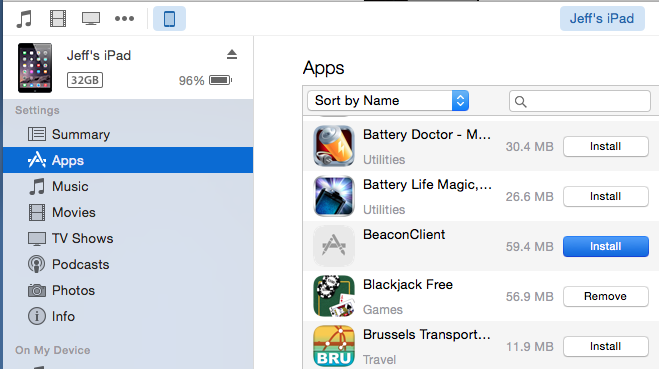
-
When the synchronization is complete, find the BeaconClient icon.

-
Double-click it and you will launch the application. Click the Start button, and you will see the beacon region you are monitoring. Since there is no beacon region advertising, the application will not start looking for beacons. Only when the device is within a beacon region will the application go into ranging mode.
In the next part of the tutorial, you'll create another MAF application that, once deployed, will act as a beacon. Then the behavior of the BeaconClient will be different.