 Read more...
The REST Service used in the tutorial is built on top of the Oracle HR sample schema and exposes an XML and JSON payload. To setup this REST service you need access to an Oracle database with the Oracle HR schema installed.
The tutorial steps you through the development of a JavaBean to query and expose data collections from the REST-JSON web service and then you will expose that Java bean as a MAF POJO Data Control. The MAF Rest Service Adapter is used to access to the REST-JSON services.
REST Services with a JSON (JavaScript Object Notation) format of response and payload is a popular solution for building mobile business services because, it minimizes the overhead on the mobile communication channel, is easy to work with and build, and does not require a persistent user session on the server. As a mobile application solution developer, REST is a technology you will probably use in your own mobile enterprise to expose existing business services – Enterprise JavaBeans (EJB), Oracle ADF Business Components or Service Oriented Architecture (SOA) and so forth – to mobile devices.
| Assumptions: |
|---|
To complete this tutorial you must have installed JDeveloper 12.1.3 and have installed the MAF Extension. You must also have the Android SDK version 4.2.2 API level 17 installed. If you choose, you can deploy the application to a connected Android device. The tutorial demonstrates deploying the application to an Android emulator. You launch the emulator using the Android Virtual Device (AVD) Manager, which is part of Android SDK Tools. If you are using an iOS environment, you can use the following tutorial to set up the development environment: Set Up and Configure an iOS Environment. If you are using an Android environment, you can use the following tutorial: Set Up and Configure an Android Environment. You must have access to an Oracle enterprise or XE database that has the Oracle HR sample schema installed and unlocked. This tutorial is for people who are new to REST services, but is not a. For your convenience, most of the implementation code is provided for you in text files you find in the tutorial’s DOC / CODE_TXT folder. That way it will save you from typing the code lines directly, you can simply copy and paste. We'll explain what each piece of code does as we go along. |
Sample Implementation Overview
The sample application that you build by following the hands-on instructions uses helper classes on the mobile client to access the remote JSON REST service and to parse the JSON payload into Java objects.
This tutorial guides you through the steps of creating a sample Oracle Mobile Application Framework (MAF) application based on a REST-JSON web service.
To save you from typing and to keep you focused on building the mobile application, most of the Java content has been pre-built for you to copy and paste the code when needed. This tutorial reinforces spending time developing a sensible client infrastructure which simplifies your work and supports MAF best practices.
The image below, shows the class hierarchy used by this sample. The DeptEmpDC data service class exposes collections of departments and employee data as well as methods to manipulate data, which is create, update and delete. The data service class is what you expose as the MAF data control – thus the file name postfix “DC”.
The DepartmentsEntity and EmployeesEntity classes represent data objects, also known as entities. These are the classes that carry departments and employee state and are used in MAF to display and update data.
When data is read to or from REST services, some additional processing is required. In our example, two helper classes (DepartmentsResultArray and EmployeesResultArray) take care of the JSON conversion. Each class mimics the structure of a specific JSON payload so that a MAF specific framework class can be used to copy the contents of a JSON payload into the Java object structure.
The DepartmentsEntityToJson class and the equivalent for the employees entity class translates Java objects back to a JSON format for the write operations.
Finally the DeptEmpURI class contains methods that return the request URIs for a specific REST request like search, update, read and delete. The helper class actually saves the developer to need to know about the available REST URIs on the server side. The class abstracts mobile application development from the server side REST implementation.
The RestCallerUtil class wraps the MAF calls to the REST service, thus further simplifying the REST interaction, avoiding you to write unnecessary boilerplate code over and over again.

This is not a tutorial on writing REST services and thus this document only explains what the service does and how to deploy the service to a local Weblogic Server instance.
First, you need to open the sample workspace that contains the REST service sources and then configure the database connection to point to your local database and HR schema.
-
Unzip the tutorial maf_rest_json_files zip file to the machine that has Oracle JDeveloper installed.
-
Copy the TutorialHrRestService sample resource folder located in the MAF REST Tutorial/ MAF_REST_SRC directory to a local directory path that does not have a blank character in its name. Note that failing to do so may cause a problem when testing the MAF mobile application on the Android emulator.
-
Open Oracle JDeveloper 12.1.3
-
Select Application > Open from the menu.
-
Browse to the location you copied the TutorialHrRestService folder to, open it and select the TutorialHrRestService.jws workspace file.
Press OK to open the file in JDeveloper. -
Oracle JDeveloper should show two projects: EjbHrModel, the EJB project that queries and updates the database, and RestService, the JAX-RS annotated POJO project that exposes functionality of the EjbHrModel project as REST service.
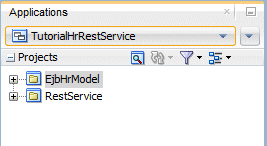
The EJB model that is exposed by the REST service is built on top of the Departments and Employees tables in the Oracle HR sample schema.
-
Select Window > Database > Databases from the JDeveloper menu to open the database configuration browser window.
-
Click the Databases tab in the JDeveloper Applications window.
Then expand the TutorialHrRestService node and select the hrconn entry with the right mouse button. -
In the opened menu, select Properties.
-
In the opened Edit Database Connections dialog, change the configuration settings for Username, Password, Host Name, JDBC Port and SID according to your local database setup and HR schema installation. If you run an XE database, the pre-configured setting may already be sufficient.
-
Click the Test Connection button to verify the database connection working
Then, OK the dialog when your connection works.
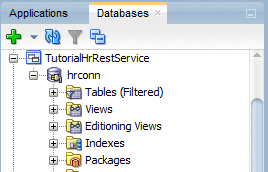
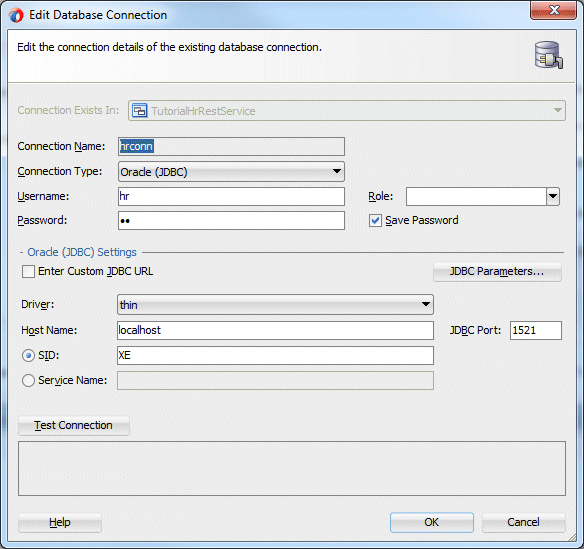

.
For this tutorial, the integrated WLS in Oracle JDeveloper is used for deploying and testing the REST service.
-
Start the Oracle WebLogic Server (WLS) by selecting Run -> Start Server Instance (IntegratedWebLogicServer).
-
If this is the first time you’ve run the integrated Oracle WLS, a Create Default Domain dialog box will open. Create and set the password for the default Oracle WLS domain.
Note: For the integrated Oracle Web Logic Server to listen for all of the aliases that point to your machine including "localhost" and the IP address of your computer, don't select an address from (Listen Address). -
Click OK to save your changes and to create and configure the default domain for Oracle ADF. The Oracle WebLogic Server will create a default domain and start the server..
-
Wait for the integrated Oracle WLS to start before proceeding to the steps in the next section. The first time you start the server, it builds the WLS domain, which may take several minutes.
Working with REST is all about working with resources addressed by uniform resource locators (URLs). The term resource is abstract in REST and can range from a person, an order, or a booking to a list of employees, rows queried from a database table, and more.
In this tutorial service, the resources that are exposed are Departments and Employees from the HR schema. The data query is performed by an EJB / Toplink model that is exposed to the mobile client through a REST service developed with JAX-RS annotated POJO classes. In the following you will explore and test the REST service using the Oracle JDeveloper HTTP Analyzer to learn about the configured REST URIs and how to work with them.
-
In Oracle JDeveloper, switch to the Applications tab and expand the RestService project node.
-
Expand the Application Resources node and the maf.code.corner.sample.rs package within
You see four packages -
Expand the services package node and select the HrRestService entry with the right mouse button.
Then, select Test Web Service from the context menu to run the REST service in the JDeveloper Http Analyzer.
-
JDeveloper deploys the TEST service to the integrated WLS server instance and should open the HTTP Analyzer for you. The HTTP Analyzer allows you to browse the available REST URI mappings and to run them to verify the service.
If not already displayed, open the JDeveloper log window using Window > Log from the menu. The log window shows the progress of the REST service deployment but also all errors that potentially may occur when testing the REST service.
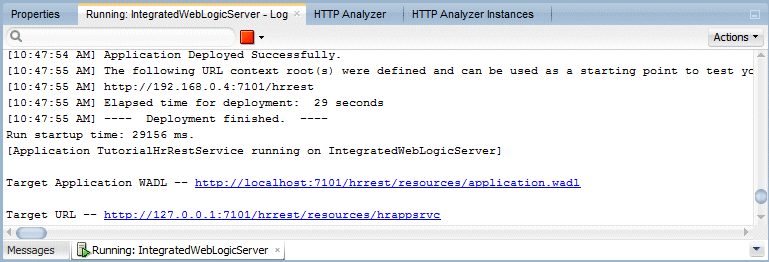
In case of a successful deployment you should see two links at the end of the log messages, a WADL (Web Application Description Language) reference and the Target URL reference showing the REST Service root URL. The root URL, http://127.0.0.1:7101/hrrest/resources/hrappsrvc, will be needed later in MAF to create the REST connection. The WADL file provides a description of the REST service, listing all the methods and responses. You can click the WADL link and then test the REST service from there if you like.[Application TutorialHrRestService running on IntegratedWebLogicServer]
Target Application WADL -- http://localhost:7101/hrrest/resources/application.wadl
Target URL -- http://127.0.0.1:7101/hrrest/resources/hrappsrvc

-
The Http Analyzer should open directly after deployment displaying the URL, WADL URI and possible operations.

-
In the Operations property, open the list of available operations to see a list of methods and REST URI mappings.
Then, expand the departments node and select the getDepartmentsList GET entry.
Hint: If you don't see the list, ensure the REST Structure tab at the bottom of the HTTP Analyzer window is selected.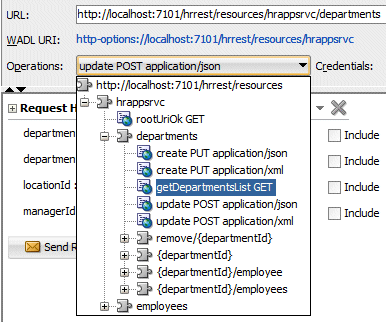
-
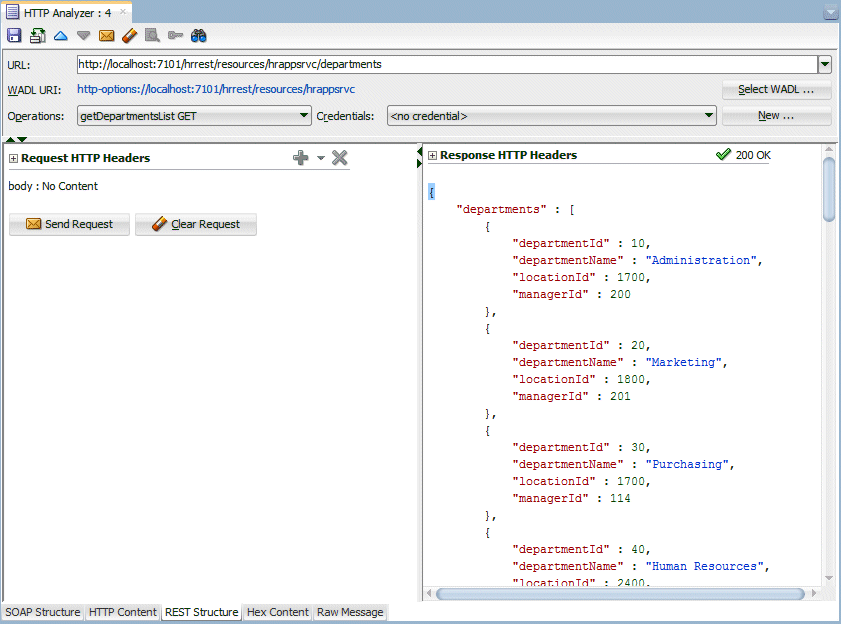
Notice the value of URL field: http://localhost:7101/hrrest/resources/hrappsrvc/departments. The URL field shows the REST URL that the GET request use. The getDepartmentsList is the method that is mapped to the URI, an implementation detail you see in the HTTP analyzer during testing but not later in MAF.
Press the Send Request button to issue a GET request to the deployed service URL.

-
Based on the configuration, you should see a JSON response showing a list of departments, similar to the image below.
-
Expand the Request HTTP Headers section above the Send Request button.

-
Change the value for the Accept header property so it only contains application/xml. Then, click into another header field to accept the change the to Accept header
-
Press the Send Request button again and you should see the same list of departments returned from the REST service, this time in XML format.

-
Next, lets create a new department. In the Operations list, select create PUT application/json to indicate the type of JSON formatted REST request.
Like earlier , the request is issued to the http://localhost:7101/hrrest/resources/hrappsrvc/departments REST URL. This time however the http method used is PUT, which is mapped to a method in the REST Java implementation that creates a new department.
Complete the input form as shown in the image below and press the Send Request button. As a response you should see the message displayed below the Response HTTP Headers label on the right side of the analyzer.

-
In JDeveloper, select Window > Database > Databases from the menu. Expand the TutorialHrRestService > hrconn > Tables nodes.

-
Double click on the Departments table entry.
Then, click on the Data tab at the bottom of the table overview editor and scroll down to find the newly created record.
Then, close the Departments table tab and switch back to the HTTP Analyzer.
-
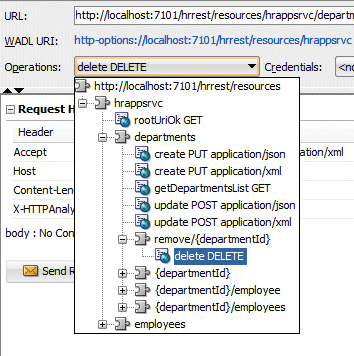
In the Operations list, expand the departments > remove/{departmentId} node and select the delete DELETE entry.
-
Notice the change in the URL field
http://localhost:7101/hrrest/resources/hrappsrvc/departments/remove/departmentId
Replace the departmentId part of the URL with the value 1234, so it now reads: http://localhost:7101/hrrest/resources/hrappsrvc/departments/remove/1234
In the URL, the departmentId appendix is a URL parameter that the REST service interprets for the DELETE method.

-
Click the Send Request button again for the REST service to remove department 1234. In the HTTP Analyzer tab, you should see a 200 OK message for the DELETE method, as the response. This indicates the row has been deleted from the database.

If you check the data in the Departments tab, you'll see the training department is no longer listed.

-
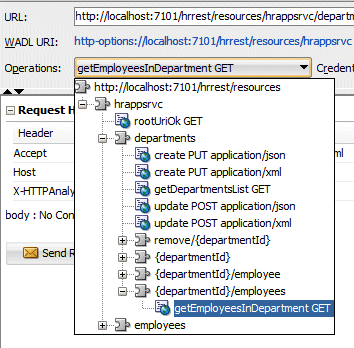
Open the Operations list again and expand the departments > {departmentId}/employees node. Then, select the getEmployeesInDepartment GET entry.
-
Change the URL field value from
http://localhost:7101/hrrest/resources/hrappsrvc/departments/departmentId/employees
to
http://localhost:7101/hrrest/resources/hrappsrvc/departments/60/employees
which will query all employees working in the IT department (60) and press the Send Request button. As a result a JSON formatted response should be shown as in the image below.
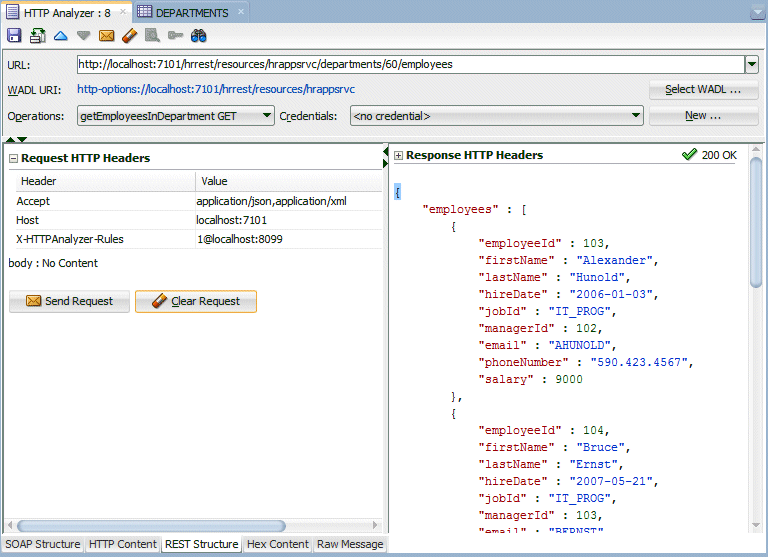
Note: The response payload is JSON as configured in the REST service for requests that accept JSON and XML.
If you change the Accept header value for the request to application/xml only then the same request would return XML as the response format.
Also the JSON string is displayed with a “{“ at the beginning and a “}“ at the end with the “employees” string containing the employee collection.
In JSON, collections are surrounded with square brackets “[“ and “]” and objects are again surrounded by curly braces, “{“ and “}“.Also, JSON payloads are quite flexible and can contain a mix of single key:value pairs, collections or objects.
-
As an optional task, go back to the log window and click on the WADL link displayed in the log output to open the WADL overview editor record.
Use the WADL dialog to further explore and test (pressing the Test button next to a URI entry) the REST Service. The test button brings you back to the HTTP analyzer with the URL set to the request URI you want to test.

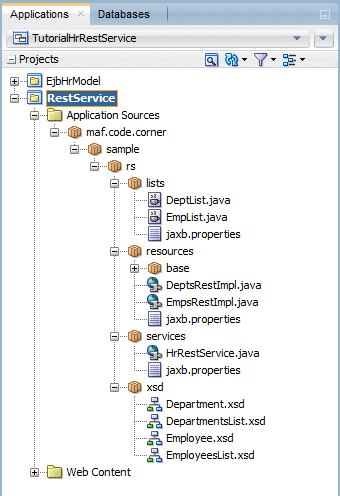
lists : Contains helper classes, to work with JAXB for Java object to XML and JSON conversion
resources : Holds the implementation classes of the departments and employees resources. This is where JAX-RS annotations are added to configure and map methods to REST URIs. For readability and manageability, the actual code that accesses the EJB layer is defined in classes in the base package. The two classes in the resources package only contain REST specific code and annotations
services : Contains Departments and Employees resources which are accessible from a single root service, the HrRestService. This class contains the root URI annotation and beside of this dispatches to the two classes in the resources package. The HrRestService.java class is the REST service that you will actually run and test.
xsd : The XSD schema files are required if you wanted to configure the REST service with its XML payload in MAF. Doing so tells the JDeveloper IDE which payload structure is returned or expected by a REST URI call allowing the correct data control structure to be generated automatically.
In this step, create the MAF mobile client workspace to hold all the component for application.
-
In JDeveloper, select File > New > Application from the menu and in the New Gallery, select General > Applications > Mobile Application Framework Application.
Then click OK. -
Set the Application Name to MAFREST and maf.code.corner.hr as the Application Package Prefix.
Make sure the Directory property does not contain any blank characters, as this may cause problems during deployment.
Then click Finish (this will keep the default naming conventions, which is ApplicationController and ViewController for the workspace projects). -
The applications needs to access the web services through the device's network.
In Application Resources, open the in maf-application.xml and in the Device Access, select the Network checkbox.


Your MAF application needs a connection to access the REST service. In a real world situation, the REST service could be housed on a remote server, with the database on a different one. However in this tutorial, everything is local to the development machine. Here is the root URL to access the REST service:
http://127.0.0.1:7101/hrrest/resources/hrappsrvc
Note: If the URL of the deployed REST service changes, you can easily change the root URL or set it to contain either the host name or IP address.
In this next section, create the connection to access the REST service..
-
With the right mouse button, click onto the ViewController project node and select New > From Gallery.
Expand the General > Connections nodes and select the REST Connection item.
Click OK.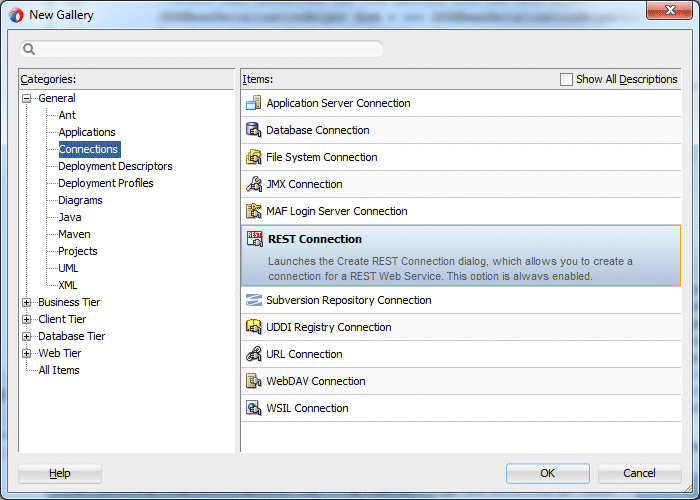
-
Use the values below to populate the Create REST Connection dialog and click the Test Connection to verify access to the REST service.
Name DeptEmpRestConn URL Endpoint http://127.0.0.1:7101/hrrest/resources/hrappsrvc
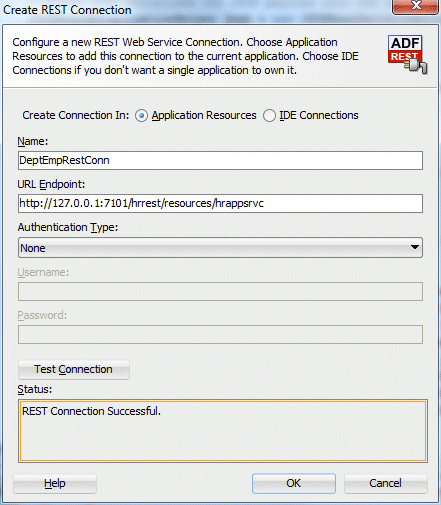
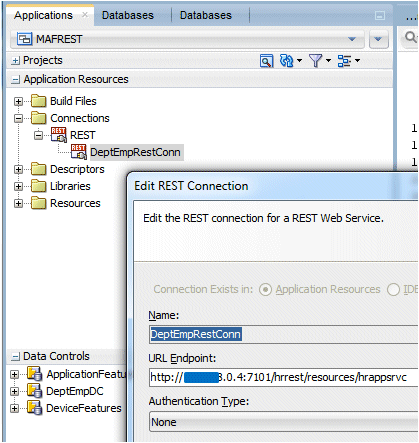
Note: You can modify your REST, or any, connection by expanding the Application Resources > Connections > REST nodes and selecting DeptEmpRestConn. Then, right click on it and select the Properties menu option.
In the rest of the tutorial, you will work with the connection name and not the physical REST URL that it represents.
-
If you use the Android emulator for testing, localhost (127.0.0.1) will not work for testing and you need to use 10.0.2.2 as the host address. This is a special alias to your host loopback interface. Set the REST connection as shown in the image below and change the localhost (127.0.0.1) reference to 10.0.2.2.
Note: Alternatively to 10.0.2.2 you can use the real IP address that is assigned to your computer (assuming your computer is in a network).
You have now completed the first part of this tutorial. In the next part, you add the classes to implement the client infrastructure.

 Expand all | Hide all

 Part 2: Building the MAF REST infrastructure
