Like all endeavors, it's important to work with a good infrastructure. A good first step with MAF applications, is to develop the client infrastructure that access remote services.
With the REST services used in this tutorial, you need to think about data objects (entities) that are required to hold the data information queried from the service, and any helper classes that make your life easier. In order to create these classes, a bit of insight is required into how MAF works and how REST-JSON services are integrated. Before you create these Java helper classes, lets look at what they are and do.
The next section of this tutorial will guide you through building an easy to use infrastructure for interacting with the HR Rest Service.
For this tutorial you will first create five categories of Java classes listed below
| Helper class | Purpose |
|---|---|
| Data control class | A JavaBean that exposes methods to query and update the remote REST service |
| Data objects | Java objects for the Departments and Employees resource |
| JSON helper classes | Java classes that represent the JSON structure (a collection of departments or employees with a single property name), as well as a class representing JSON objects for update and create operations. In addition you need classes that help parsing payload and responses from Java to JSON and from JSON to Java |
| URI helper | REST works with Uniform Resource Identifiers (URIs) to address the resources. To simplify maintenance it’s a good idea to save these URIs in a central place and reference then with meaningful names. For example, the URI to request all departments in this sample is <host>:port/jee_path/resources/hrappsrvc/departments. Though this is easy to remember, parameterized URIs may be more complex in their structure, requiring you to know about the REST service. So in this tutorial you will create a method that returns this URI via a simpler synonym. public static String getAllDepartmentsURI( ){}; |
| Utility class | To simplify the calls to the MAF REST adapter, a utility class is created that wraps the so called “boilerplate code”, containing the reoccurring setup code you need to build into all calls to the REST-JSON services |
In this step, create all five categories of Java helper classes. In this step, you'll mainly create the classes and in step 2 you'll add the code to implement them.
-
To create the Departments and Employees data objects (entity).
Select the ViewController project with the right mouse button and then select New > Java Class from the menu.
-
Create the Departments entity and provide the following information to the dialog fields.
Leave the remaining values at their default and click OK.Name DepartmentsEntity Package maf.code.corner.hr.mobile.entities Extends java.lang.Object 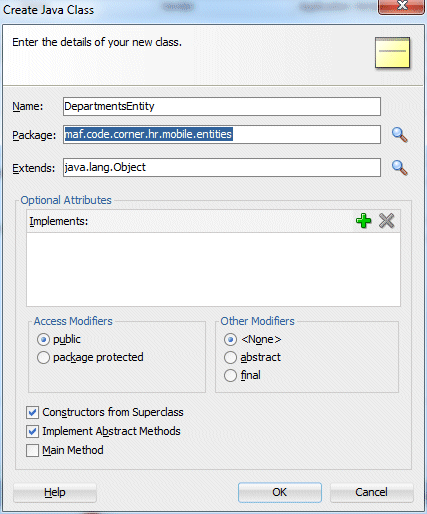
-
Create the Employees entity and provide the following information to the dialog fields.
Leave the remaining values at their default and click OK.Name EmployeesEntity Package maf.code.corner.hr.mobile.entities Extends java.lang.Object 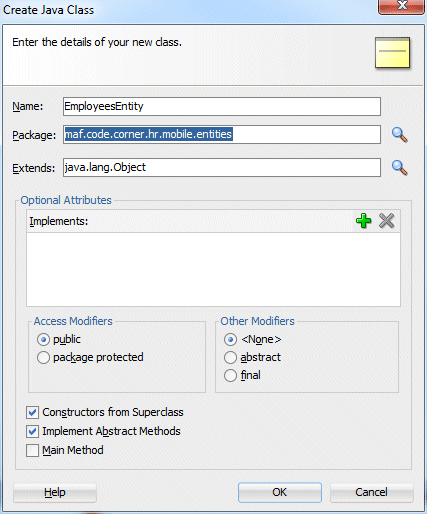
-
Open the DepartmentsEntity class with a double click onto the Java file.
Add the following properties on top of the Java class right after the Java class declaration.
private Integer departmentId = null;
private String departmentName = null;
private Integer locationId = null;
private Integer managerId = null;Note: To save you from typing, the tutorial DOC/CODE_TXT directory has various code snippets for you to copy and paste.
In this case, you can copy the properties above from DepartmentsEntity.txt -
Use the right mouse button and click into the Java class but below the class constructor and select Generate Accessors.
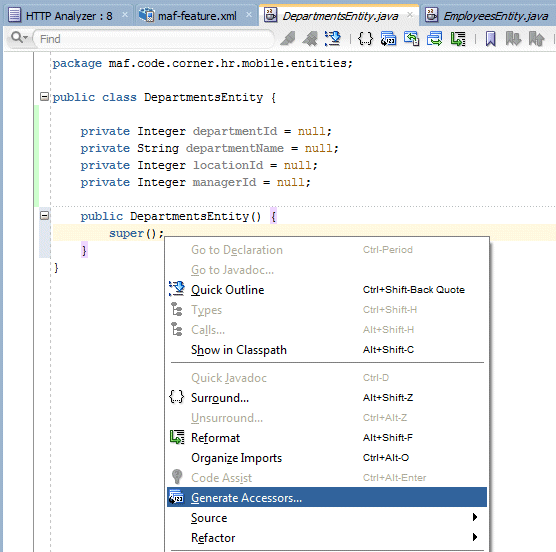
-
In the opened dialog, ensure you generate accessors for all properties in the class. Also make sure that the Scope property is set to public and that you select the Notify listeners when property changes checkbox. This latter setting ensures that your MAF is notified of any entity value changes and will therefore be able to tell the UI to refresh and show the changed value.
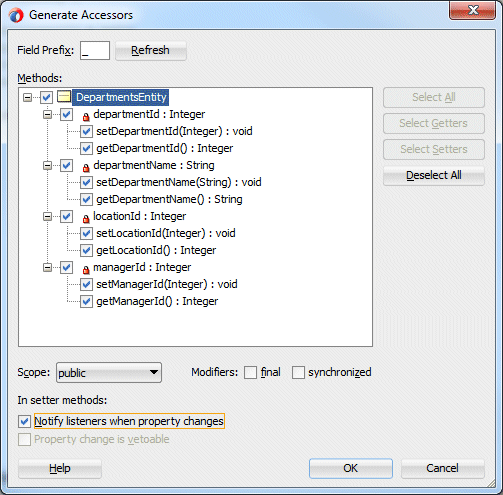
-
At the end of the file, add a clone method to easily create a physical copy of the object. We could put the method in the data control class, but putting it here is a bettter practice.
Copy the code from the cloneDepartment.txt in to the end of the DepartmentEntity.java class.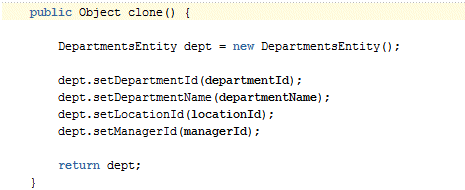
-
Repeat the previous three steps (create a class, add properties, generate accessors-notify listeners) but for the EmployeesEntity class using the following properties (use the properties from the EmployeesEntity.txt in the tutorial DOC/CODE_TXT folder).
An import statement for the java.util.Date class should automatically be added. If not, then select the Date type and press alt-key+enter –key (on Windows).private Double commissionPct = null;
private String email = null;
private Integer employeeId = null;
private String firstName = null;
private Date hireDate = null;
private String jobId = null;
private String lastName = null;
private Integer managerId = null;
private String phoneNumber = null;
private Integer salary = null;Then, generate the accessors and save all your work.
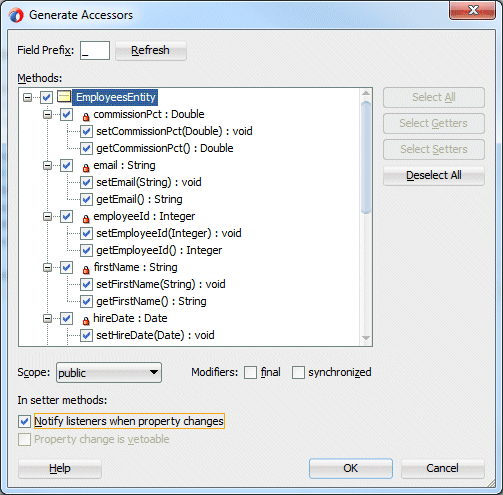
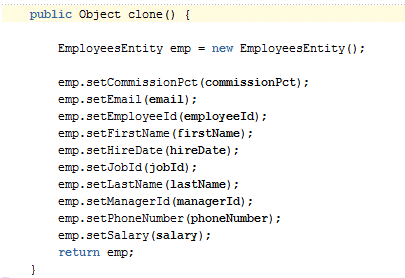
Like with Departments, at the end of the file, add a clone method to easily create a physical copy of the employee object. Copy the code from the cloneEmployee.txt in to the end of the EmployeeEntity.java class.
-
In this tutorial, the URI helper class is specific for the shape of the REST services it uses. In the following steps, create the class and then copy and paste the content from the DeptEmpURIs.txt file in the tutorial DOC / CODE_TXT folder.
As before, select the ViewController project with the right mouse button and select New > Java Class from the menu and in the Java class creation dialog provide the following values.Name DeptEmpURIs Package maf.code.corner.hr.mobile.uri Extends java.lang.Object 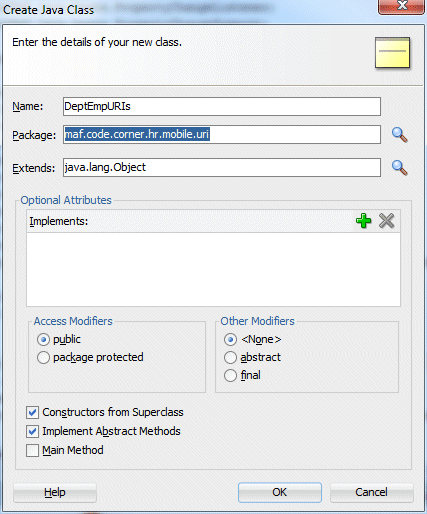
-
Replace the Java class content with the content you find in the DeptEmpURIs.txt file in the tutorial DOC/CODE_TXT folder using use your package declaration.
Take some time and familiarize yourself with the URIs defined in the class. Notice how every method also indicates the HTTP verb it uses. Again, this helper class is a suggestion for the tutorial but may be a helpful template or valuable as a developer's guideline.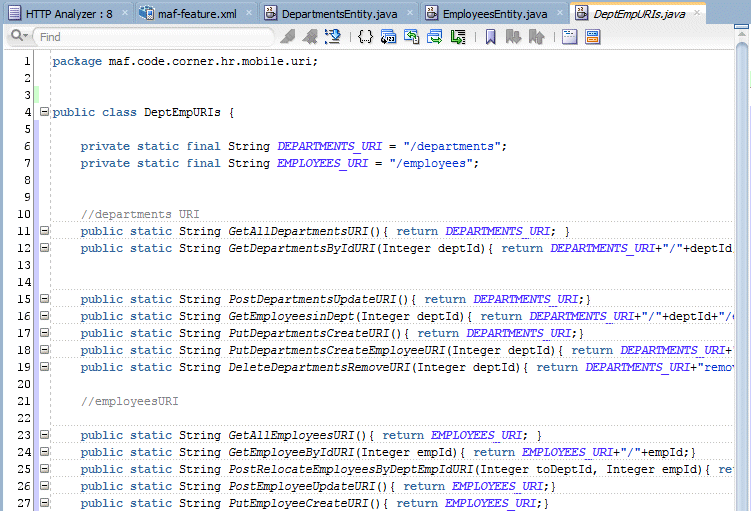
-
There are a number of classes found in the JSON helper category. Again, the code is provided in the tutorial DOC/CODE_TXT folder. However, it's recommended that you read and understand the provided source code rather than simply copying it. this way you'll know what you need to do when applying the same principles to your own REST-JSON projects.
In the ViewController project, create the following Java class file following the step explained earlier and then add the code from the corresponding file in the DOC / CODE_TXT folder.
Create a class that converts a Departments entity to a JSON stringName DepartmentEntityToJson Package maf.code.corner.hr.mobile.json.helper Extends java.lang.Object
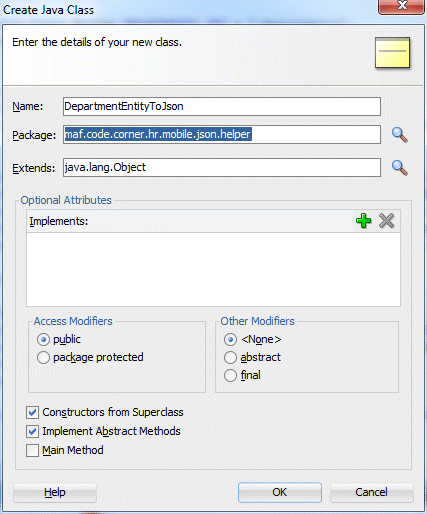
-
Create a class that converts an Employees entity to a JSON string.
Name EmployeesEntityToJson Package maf.code.corner.hr.mobile.json.helper Extends java.lang.Object
-
Create a class that converts a JSON array to DepartmentsArray
Name JsonArrayToDepartmentsArray Package maf.code.corner.hr.mobile.json.helper Extends java.lang.Object
-
Create a class that converts a a JSON array to EmployeesArray.
Name JsonArrayToEmployeesArray Package maf.code.corner.hr.mobile.json.helper Extends java.lang.Object
-
Create a class that represents a JSON Departments array structure.
Name DepartmentsResultArray Package maf.code.corner.hr.mobile.json.dao Extends java.lang.Object
-
Create a class that represents a JSON Employees array structure.
Name EmployeesResultArray Package maf.code.corner.hr.mobile.json.dao Extends java.lang.Object
-
Save your work. The image below shows the classes and package structure you created.
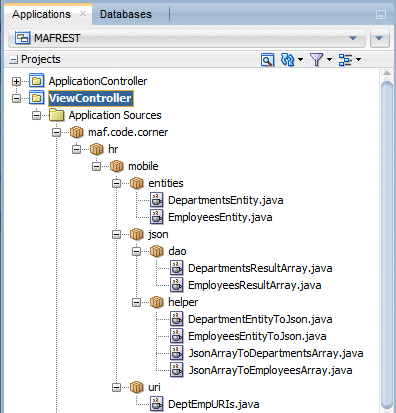
-
To call REST services that have no XML payload, MAF's infrastructure provides a RestServiceAdapter class.
Think of the RestServiceAdapter class as a Java command line browser for REST services, similar to the HTTP analyzer that you earlier used for testing the REST service. In Java you basically tell the RestServiceAdapter class which URI to call, the accepted media type (JSON in this tutorial), the http method (or verb) and the content type (the payload format in case the REST request contains arguments).
Create a class with the following values.Name RestCallerUtil Package maf.code.corner.hr.mobile.util Extends java.lang.Object
-
There is one final class you need to create to complete the client infrastructure preparation. This Java class will be exposed on the data control panel.
Create a class with the following values.
The class name extension "DC" doesn’t automatically turn this class into a data control, an extra step is required to do this later later. The “DC” suffix is a naming convention that helps to quickly identify those classes in a Java project hierarchy that represent data controls.Name DeptEmpDC Package maf.code.corner.hr.mobile.datacontrol Extends java.lang.Object Summary
If you are new to MAF and have worked through the tutorial steps up to this point, you may have the impression that MAF applications need a lot of Java code.
In MAFs defense, it is worth noting that REST-JSON services are a special case and do require more code to be written. If you were using REST-XML or SOAP most all the development is declarative. This is simply because of the (relatively) unstructured nature of JSON as a protocol
What you have defined so far is a clean client model that you later use to declaratively build the rest of the mobile application on. Starting off with a solid foundation like this is a much better approach than building a single monolithic Java file to access the REST-JSON services. You now have a well-organized Java object structure that should look like in the image below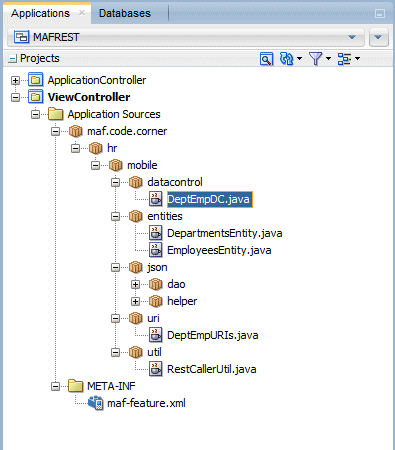
In this next section you'll implement the Java helper classes you just created.
-
Open the RestCallerUtil class with a double click on the file name in the JDeveloper application navigator.
-
Open and copy the code from the RestCallerUtil.txt file. from the tutorial DOC/CODE_TXT folder, into the RestCallerUtil file. Replace all the existing code in the file except, the package declaration which needs to remain as maf.code.corner.hr.mobile.util.
Lets look at the implementation code and how it operates. -
In an earlier step, you copied the code from the text file. Now lets look at the implementation code and how it operates. -
In JDeveloper, open the DepartmentsResultArray.java file and place the cursor in a row below the class declaration (but before the constructor) and type
-
Press alt + enter-key (on Windows) or alt +
 + i (on OS/X) to import the DepartmentsEntity class.
 -
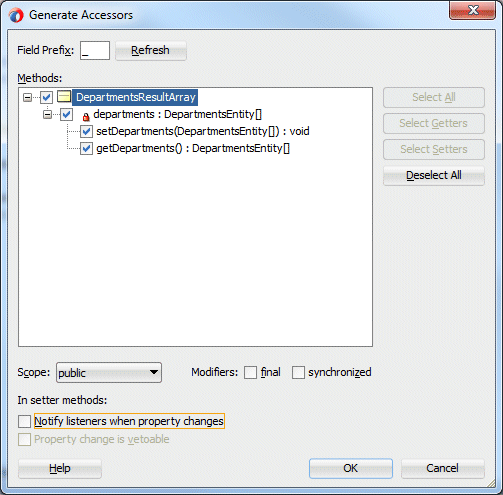
Place the cursor in a row below the public constructor and press the right mouse button. Then, select Generate Accessors from the menu.
-
Select the departments property checkbox (after which the set/get methods checkboxes are automatically selected). Ensure the Notify listeners when property changes option is deselected as show in the image below.
The EmployeesResultArray.java class has the same functionality, except using employees. -
Open and look at how the DepartmentsResultArray implementation code operates.
-
Repeat the previous steps for the EmployeesResultArray.java class. This time in the code, type:
-
In JDeveloper, open the DepartmentEntityToJson.java file
-
On the file system, find and open the DepartmentEntityToJson.txt file in the tutorial’s DOC / CODE_TXT directory.
-
Copy the content of the text file into your Java class, replacing the existing content except the package declaration.
DepartmentEntityToJson
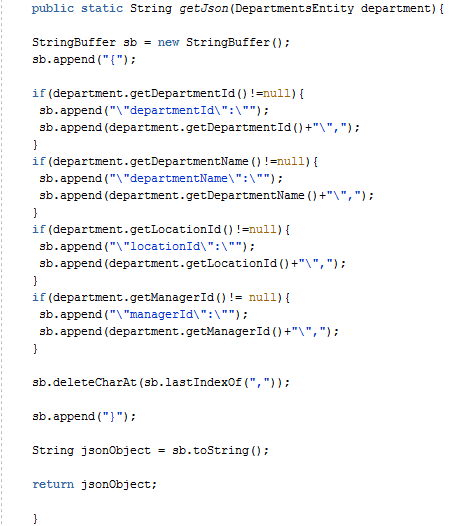
The DepartmentEntityToJson class translates department objects into JSON strings. The department JSON string, which you can analyze using the HTTP analyzer in Oracle JDeveloper, has the following format

Taking the department object as an input argument, the getJson method in this class produces a JSON string translation as shown below
Note: You don’t necessarily need to save this code in a separate helper class. A separate helper class is chosen in this tutorial to make the individual steps more obvious.
-
Repeat the previous steps for the EmployeesEntityToJson.java class, which has its implementation code in EmployeesEntityToJson.txt within the tutorial DOC / CODE_TXT folder.
Note: JDeveloper flags code lines that need additional imports with a red underline. To import the classes, press alt + enter-key (or equivalent). When in doubt about which class to import from a list of classes with the same name, choose the class that is in the “oracle.adfmf” package.
2: Translating JSON string arrays to entity arrays
Earlier you created the DepartmentsResultArray and EmployeesResultArray classes to hold the JSON result objects returned from a REST query. Now its time to provide the implementation code to the two classes. -
In JDeveloper, open the JsonArrayToDepartmentsArray.java file
-
On the file system, find and open the JsonArrayToDepartmentsArray.txt file in the tutorial’s DOC / CODE_TXT directory.
-
Copy the content of the text file into your Java class, replacing the existing content except the package declaration
-
Repeat the process using the JsonArrayToEmployeesArray.java and text file.
-
Examine the JsonArray files.
The RestCallerUtil class wraps the MAF RestServiceAdapter adapter class to provide a simplified URL to the service requests
RestCallerUtil

The invokeRestRequest method wraps the MAF RestServiceAdapter adapter and provides a simplified API for calling the remote REST service. The arguments that you pass to the method include the httpMethod, (GET, POST, PUT or DELETE,) the requestURI that identifies the REST resource that the operation is performed on, and – optionally – a payload, as required for PUT and POST updates.
First, the method attempts to obtain an instance of the MAF RestServiceAdapter and then to read the REST service connection details.

With the connection set, the next step is to specify the request parameters. Some of the parameters are hard coded as they are not expected to change in this sample application. For example, the REST response format is JSON and will not change.
The settings that change their value are those passed to the method as input arguments.

With this, the REST service call is all set and can be executed, which is done in the code line below.

JSON payloads are in string format and thus the response that is returned from the REST call (if any) is of type java.lang.String.
Note that REST-JSON is pretty flexible and many developers use the response to also send error codes instead of using HTTP error codes. If this is the case then the response structure will reflect this, which is something to keep in mind when parsing the response into data objects.
Here's the JSON payload for the REST service used in the tutorial.
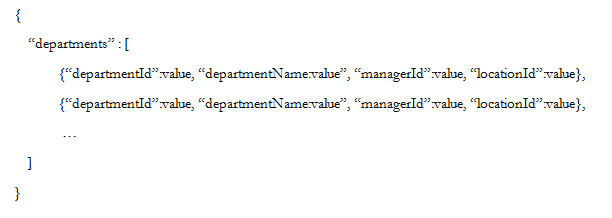
A similar payload is returned for employees.

One of the public methods, invokeRead(…) is defined in the utility class and is the API that works with your MAF application. This method further simplifies the REST access in that it makes assumptions based of the request type. For example, GET requests in REST don’t have a payload and therefore the method doesn’t expose this on the public facing API.
Internally, before calling the private invokeRestRequest method, it sets all the required argument values such as GET for a get request and the payload to null.
In our case, there are three other public APIs – one for each HTTP method.
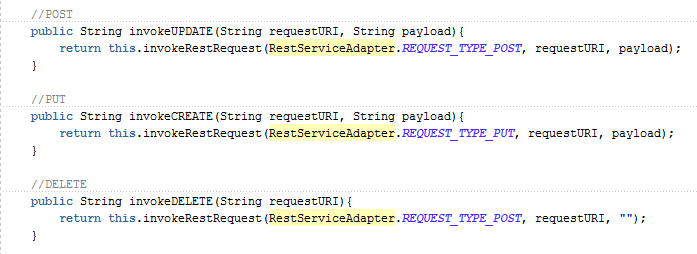
Note: The custom REST caller utility class simplifies later application development in that it wraps the complex call to the REST service with a simplistic API. An abstraction like this will pay back very quickly, when working in teams.
The DeptEmpURI class is a helper class that wraps all REST URI for this tutorial, exposing them as descriptive methods. The benefits of a class like this include:
• All the URIs are registered in a central place
• Development teams building MAF applications based on your REST access don’t need to understand the actual composition of your REST URIs
• You have a place to document your REST Service APIs
DeptEmpURI
The REST-JSON service in this tutorial has a single root resource “hrappsrvc” from where it diverts into two sub-resources for departments and employees. These two URIs are registered as

The methods in this class use the information above to compose parts of the REST URI. Note that the complete REST URL requires the hostname, port, Java EE path and name of the root resource. This information however is registered as the REST connection so that it can be accessed when you actually do the REST call.
We won't discuss all of the exposed methods in this class but want to give an example for why such a class makes sense.

Remember that REST is about dynamic URLs, which means that the resource and the action a client invokes on the service are encoded in the URL.
For the service in this tutorial this means that when you queries all departments, you may want to drill down into seeing the employees in a specific department. The URI for this has the form of
host:port(javaEE_path/htappsrvc/departments/<deptId>/employees
You can see how wrapping this URL into a public method allows you to create a generic function that you can provide department ID as the parameter to.
For a MAF application to be able to parse JSON string responses into Java objects, JavaBean classes that “mimic” the structure of the JSON response string in their bean properties are required.
private DepartmentsEntity[] departments = null;
DepartmentsResultArray
For MAF to parse JSON strings into Java objects, you need to have Java classes available that have the JSON response structure built into their properties along with the required setter/getter methods. For the departments collection in this tutorial, the JSON response looks as shown below:
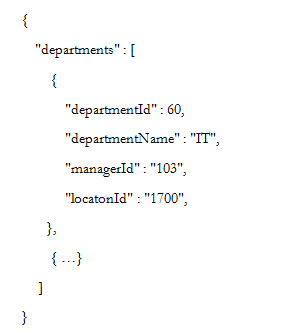
To parse the JSON returned list of department into a Java object, the DepartmentsResult class has a property departments of type DepartmentEntity[] defined. The DepartmentEntity object represents a single department object and has pair of getter and setter methods defined for each attribute.
Note: If the JSON response contained additional information beyond the pure data result structure, for example error codes or URL references to other REST resources, then this information also needs to be modeled in the DepartmentsResult structure as well if the information should become available in MAF.
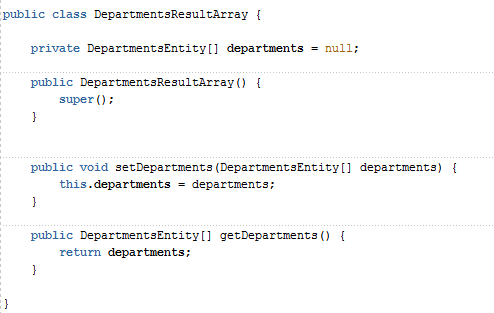
For this tutorial, the response string is “flat” meaning that only a single collection with data objects is returned. Therefore a single property of type DepartmentEntity[] is sufficient.
Note: If at this time you are a little lost, don’t worry. Things will become clearer when you start putting these classes into context. Creating infrastructure classes is like creating hand-woven carpets. It takes some time before individual stitches show as a beautiful pattern.
private EmployeeEntity[] employees = null;
Make sure to generate the employee accessors and save all your work
There are two specific types of helper classes required:
1: A class that translates objects into JSON strings for POST and PUT method calls to create or insert data
2: A class that translates the JSON array response into a entity array that MAF can work with
1: Translating objects into JSON strings
JSON is a string notation, which means that any object that you want to encode in JSON needs to be “translated” into a string representation. This tutorial has departments and employees, as well as their collections represented as Java objects.
The server side object-“translation” to JSON is handled with JAX-B, which is not available on the MAF client. Here we need to find a custom solution, which for the purposes of this tutorial is deliberately simple and uses the helper classes you are now going to implement.
With all the copy & paste happening don’t forget to look at the code you've been reusing and think about how you might apply something similar in your own custom project.
Here is a method from the JsonArrayToEmployeeArray class which accepts a JSON string argument to return an array of employees.
The EmployeesResultArray class you created earlier receives the REST-JSON response from the web service.

The JSONBeanSerializationHelper object is a MAF framework class that serializes JSON structures into Java objects, the EmployeesResultArray and DepartmentsResultArray classes in this tutorial.
As a reminder, the two classes “mimic” the JSON object and collection structure of the REST response.

The next lines then serializes the JSON string into the EmployeesResultArray object.

The remaining code lines catch any exceptions to report into the log files. If things go well then the employees array is returned to the caller.

Summary
So far you've invested a fair bit of time preparing the client model. As we mentioned before, getting this right will save you time and effort later.
You focused on creating helper classes that wrap the processes involved in querying a REST-JSON web service from MAF. The classes are individual for the REST-JSON service provided with the tutorial but the concepts are transferable to your own projects.
For many custom mobile application projects, the person building the client model also is the developer building the mobile UI for it. However, from a code organization point of view there is an interesting alternative provided in MAF. MAF allows developers to build new mobile applications based on application archive files, the Mobile Application Archive (MAA) files.
MAA files allow developers to create a common model for the services they need to access and then deploy these in a MAA archives for other developers to extend to build mobile applications from. A limitation to be aware of here is that an application can be only extended from a single MAA file and that the Java resources inside of the archive are of course compiled so they cannot be edited at design time, although, they can of course be extended in standard Java fashion.
As an additional exercise, step back from the infrastructure work that you have carried out so far and think about how you would propose development guidelines for building reusable mobile client models. Take a piece of paper and draw out a picture for how you think the code should be arranged and what you think could be in a reusable MAA file. Imagine that is a proposal for the organization of a large mobile application project.
There is only one class that you haven't touched yet, the DeptEmpDC.java class. This is the JavaBean that you'll expose as the data control.
Data controls in MAF expose the service data model to the mobile client developer. The functionalities that the data control needs to expose for this tutorial are:
- Query all departments
- Query employees for a department
- Create a new employee for a department
- Update an employee
- Remove an employee
Note: This tutorial does implement any data caching and instead directs all UI-data queries to the remote REST service. Caching is recommended for all real-world mobile application projects and can be implemented on the data control level using Java objects for temporary in-memory caching or SQLite for offline-caching.
-
In JDeveloper, open DeptEmpDC.java in the source code editor.
-
On the file system, open DeptEmpDC.txt located in the tutorial’s DOC/CODE_TEXT folder and copy the content into the DeptEmpDC.java file replacing the existing content except for the package name.
-
Wait for any file imports to complete.
-
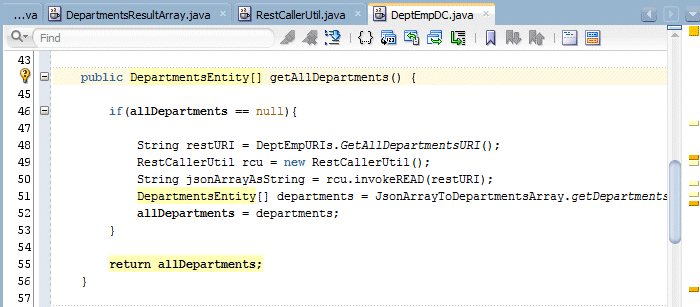
Find the public DepartmentsEntity[] getAllDepartments() method, which is the only method that is not yet implemented in this class. We'll use the implementation of this method to show the benefit of all of your careful preparation. The txt file contains this code, so read along to understand how the code work.
-
In a line above the return statement there is a if condition that checks for (allDepartments == null){ … }. Though in this tutorial we don’t cover caching strategies, the DeptEmpDC uses in memory caching for departments data queried from the REST service. The department data is read-only in this tutorial.
-
In this if-condition you are going to query the REST service for all departments data. The first line of code you need is to obtain the REST URI for the departments query.
THis line of code performs this function:
-
The next thing to do is to query the REST service, again there is a helper to assist you.
These two lines of code invoke the remote REST service and return a list of departments as a JSON array string.
The next two lines of code accomplish this.. -
The last step to complete the method is to convert the JSON string into an array of employee entities.
-
Compare your allDepartments() method with the one shown below. It should look identical
-
Spend some time studying the implementations of the createEmployee, updateEmployee and removeEmployee methods that also use these infrastructure classes to keep the actual lines of code in the data control methods to a minimum.
-
Save all your work.
-
Remember, a particular class is not automatically a data control, it has to be configured to be so. This process of configuration is referred to as the “create data control” process. For this tutorial you will configure the DeptEmpDC class as a POJO data control.
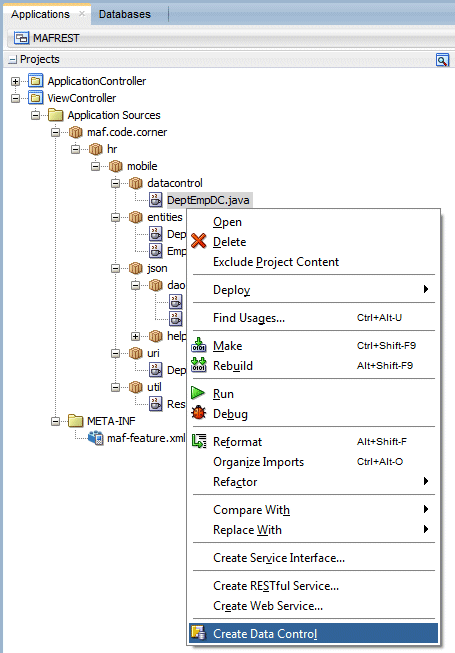
In the Applications window, select the DeptEmpDC file and press the right mouse button. -
From the menu, select Create Data Control to generate a MAF data control.
-
In JDeveloper, open the Data Controls panel. You may see nothing, depending what you've been doing previously in the IDE. To update the panel and view the data control that you have just created click the refresh button (the icon with the two blue arrows).
Expand the DeptEmpDC node and the panel should now look like this. Here are the APIs that will be available to the UI developer.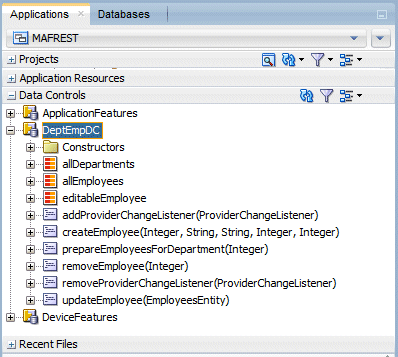
-
Save all your work.
String restURI = DeptEmpURIs.GetAllDepartmentsURI();
Note: the helper class returns “/departments” as a string, which is simple and you could have typed it directly in. However, have a look at some of the more complex methods (for example createEmployee(…) )and you will see why it is a good idea to create these wrapper classes as helpers.
RestCallerUtil rcu = new RestCallerUtil();
String jsonArrayAsString = rcu.invokeREAD(restURI);
DepartmentsEntity[] departments = JsonArrayToDepartmentsArray.getDepartmentsArray(jsonArrayAsString);
allDepartments = departments;
The DeptEmpDC class is the POJO object that exposes the REST service functionality to MAF as a data control. The class contains the following methods

To display the the allDepartments query as a collection in the MAF data control, a setter and getter method is needed for the allDepartments property, which is of type DepartmentsEntity[]. The setter is required and therefore left empty, all we need is the get-method to read data from the REST service.

Just like the allDepartments attribute, the allEmployees attribute is exposed by a setter and getter pair so it shows as a collection in the MAF data control. In the implementation, the getAllEmployees method always returns a list of employees for the current selected department. This information has to be supplied by the mobile application, invoking the prepareEmployeesForDepartment method.
The reason why the allEmployees information is exposed as a collection instead of a result set returned by a method invocation is to enable provider change events to be fired to instantly refresh employee data displayed on a page (which makes sense if the departments data and the employee data are displayed on the same page – for example in a tablet design).

This method queries employees for a specific department from the remote REST service and saves the result set in the allEmployees property. You can refer to this kind of master-detail as “deferred master-detail” as the detail rows are not queried embedded in the parent data object but on demand when the parent object is selected.

Both methods pass a JSON object to the remote service to either create a new employee or update an existing. The HTTP methods associated with these calls are PUT and POST

Calls a REST service URI to remove a resource. The HTTP method associated with this call is DELETE

The setEditableEmployees method creates a copy of the object passed for edit. Without copying the employee data we would work on a object reference of the existing object, which makes it difficult to undo the user edits.
These two methods are helper methods that implement a MAF pattern to support form-cancel. In mobile applications, any change added in an input text field is immediately saved in the underlying data object. To cancel a data change actually requires resetting the data object using a copy of the original data. Alternatively the edit could be performed on a separate collection so that only when the user presses submit at the end, the data changes are persisted in the collection.
The latter approach is what these two methods support. When navigating to the edit form, then instead of editing the allEmployees collection, users edit the editableEmployee collection. To cancel the edit, all that a user needs to do is to navigate away from the edit form page.
Click Next to accept the default name and bean class name, then Finish to complete the data control creation process.

 Expand all |
Hide all


