| Oracle® Health Sciences Data Management Workbench User's Guide Release 2.4 E52292-02 |
|
|
PDF · Mobi · ePub |
Home > User's Guide > Creating Clinical Data Models
| Oracle® Health Sciences Data Management Workbench User's Guide Release 2.4 E52292-02 |
|
|
PDF · Mobi · ePub |
Home > User's Guide > Creating Clinical Data Models
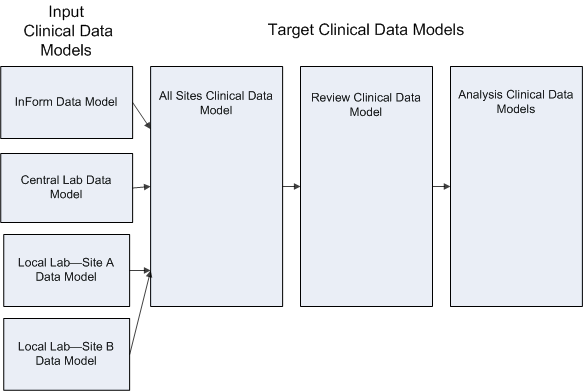
An Oracle Health Sciences Data Management Workbench (Oracle DMW) clinical data model is a logical group of tables.
You must create a clinical data model for each external data sourceâOracle Health Sciences InForm or labâin each study.
You copy or create additional models with data structures better suited to reviewing, analyzing, or reporting dataâfor example, your company's internal standard or CDISC standards SDTM or ODMâand transform raw clinical data to these structures in an appropriate sequence.
Library Models You can develop a library of clinical data models that are available for reuse in any study. If you update a library model, you can synchronize study models that were created based on the library model. However, if you have made changes in the study data model, you will lose them if you synchronize with the library model.
Study Models You can create a clinical data model for use in a particular study by:
Copying an existing library or study model into the study.
Applying a study template that contains the models you want.
Creating the model manually and creating tables by uploading SAS or text files from which the system can read the data structure and create tables to match; see "Required Syntax for Table Metadata Text Files" for more information. You can also add tables and columns manually.
Navigating to a Clinical Data Model
For study models, select the study and lifecycle area context in the Home page and then go to the Study Configuration page.
For library models, go to the Library page and select a Study Type.
In the Clinical Data Model field, type part or all of the model's name and press Enter. The system lists all models in the study or library whose name contains the string you typed.
Select the clinical data model you want by clicking its name or pressing the Down arrow. Press Enter.
To create a clinical data model:
On the Home page, select the study and the Development lifecycle and click Study Configuration.
Click the Add icon for Clinical Data Models. The Create Clinical Data Model window appears.
Enter a name and description for the model; see "Naming Objects" for restrictions.
Select the model type:
Input if its data will be loaded from outside Oracle DMW, from InForm or a lab.
Target if its data will be derived from another model in the system. Skip to Step 6.
If you selected Input, select an Input Type:
InForm to load data from InForm. Skip the next steps and see "Configuring the Oracle Health Sciences InForm Connector".
File to load data from files, as from a lab. Select a single File Type to be loaded into this model: SAS or Text.
After creating the model, see "Configuring File Watcher".
Under Select from source select:
None to define tables and columns manually.
Load from file to create tables by uploading files. The system can create tables from SAS Transport (CPort or XPort) files, or a .zip file that contains one or more SAS datasets or text metadata (.mdd) files. Metadata files are the only way to create tables with all blinding attributes set; see "Required Syntax for Table Metadata Text Files".
Note:
You can create a table initially from a metadata file and subsequently load data into it from a SAS file.Browse to the file and select it.
Library Data Model to copy a library model. Additional fields appear. Select the library model.
You can type all or part of the name of the model you want to copy and/or the library that contains it to filter the models displayed. The library is the therapeutic area or whatever other category your company uses. The system displays checked-in models to which you have View access.
If a library model is updated in the future, you can automatically make the same updates in the study model. However, any local changes you have made are lost.
Study Data Model to copy a model from a studyâthe current study or a different one. Additional fields appear.
You can filter by typing all or part of the name of the study you want to copy from, its therapeutic area, or the model you want to copy. The system displays checked-in models to which you have View access.
Select Business Area to allow visualization tools access to the data contained in the new clinical data model. See "Setting Up a Data Visualization Tool" for more information.
Click OK.
If the model is an input model, configure its method of importing data:
For InForm models, go to InForm Configuration; see "Configuring the Oracle Health Sciences InForm Connector".
For File models, go to Watcher Configuration; see "Configuring File Watcher".
Click the Install Model icon. You must install the model before you can load data. The model must be installable.
A model is not installable if it does not have any tables or if any of its tables are not installable. A table is not installable if it has no columns.
In addition, the table must have a primary key constraint and if the table has a Blinding Flag set to Yes, blinding must be completely defined. These requirements do not prevent the installation of the model, but you should complete these specifications and then install or reinstall the model.
There are several ways to add tables.
When you copy tables, the system also copies:
Each validation check that reads from the selected tables, if all its source tables are included in the Copy operation.
Each public custom listing that reads from the selected tables, if all its source tables are included in the Copy operation.
If you do not select all the tables required by a validation check that is part of an ordered batch, you receive a warning. For other validation checks and custom listings, you do not receive a warning: if all source tables are not selected, the checks and listings are simply not copied. You can copy validation checks and public custom listings separately.
To copy a table:
Select the model into which you want to copy tables and click Check Out.
In the Tables tab, click the Copy Tables icon.
Select the source: either Study Data Model or Library Data Model. The system displays all such models to which you have access. You can filter by typing part or all of the name of the Therapeutic Area (or other category), Study (if you selected Study Data Model) and Model.
Click Clear Filters to remove all typed text and revert to the full list.
Select a model. The system displays all its tables.
Select tables. Use Ctrl+click or Shift+click to select multiple tables.
If you want the selected tables to replace tables with the same name that already exist in the current model, select Overwrite the same table names. Otherwise the system leaves the existing tables as they are, copies the selected tables and adds _1 (or an increment of 1) to the name of each copied table that has the same name as an existing table. Any validation checks and custom listings copied with the table are mapped to the copied table.
Click OK.
You can upload certain types of files (see below) into a clinical data model to automatically create a table in the same structure as in the file.
Select the model and click the Check Out icon. (If someone else has checked it out, you cannot work on it.)
Click the Add icon in the Tables pane. The Add Table window opens.
Under Select from source, select Load from file. A Browse field appears.
Browse to the file you want to load and click Browse. The file must be one of the following and must be compatible with the File Input Type setting for the model:
SAS datasetâcreates one table
SAS CPort fileâcreates multiple tables
SAS XPort fileâcreates multiple tables
MDD fileâcreates one table
Zipped file containing one or more SAS datasets or .mdd metadata files (one dataset or .mdd file per table).
You can include data files in the zipped file; either SAS datasets or, with .mdd files, .txt or .csv files in the required format; see "Required Syntax for Table Metadata Text Files".
Notes:
All tables that contain clinical data must have a primary key.Click OK. See "Setting Blinding-Related Attributes" and "Setting the Data Processing Attribute".
To support filtering data and discrepancies by subject and visit and tracking subject visit completeness using flags and custom programs, you must include one Subject Visit table in at least one clinical data model in each study and associate it with the Subject Visit table SDTM identifier.
Oracle DMW includes an SDTM-compatible Subject Visit Table and Subject Table that you can copy. Alternatively, you can designate existing tables as your Subject Visit and Subject tables as long as they comply with the requirements in the following sections.
The system uses only the Subject Visit table to support filters.
Note:
To support full filter functionality, add the following columns to the default Subject Visit table and associate each with an SDTM ID: SUBJID, COUNTRY, SITENAME, SITEID, INVNAM, INVID, EPOCH, VISIT, VISITNUM, VISITDY, and SVSTDTC. See "How Filters Work".To copy the default Subject Visit or Subject table into a clinical data model:
In the Study Configuration page, select the clinical data model, check it out, and click the Copy Subject/Visit Table icon in the top row of icons. The Copy Subject/Visit from Library window opens.
Select one:
Copy from Library: Allows you to copy a Subject, Subject Visit, or both tables created in a library clinical data model by your company; see "Subject Visit Table Requirements".
Then select the study typeâtherapeutic area or other categoryâthat contains the library model whose tables you want to copy, and then select the library model.
Default Structure: Allows you to copy the Subject, Subject Visit, or both tables that are shipped with Oracle DMW. The table and columns are already associated with the appropriate SDTM identifiers; see "Default Subject Visit Table Metadata" and "Default Subject Table Metadata".
Select which tables to copy: Subject, Subject Visit, or Both.
Click OK.
If you designate an existing table as the Subject Visit table, it must satisfy these Subject Visit Table Requirements. Alternatively, you can copy the shipped Subject table; see Default Subject Visit Table Metadata.
If you designate another table as the SDTM Subject table:
Its primary key must include the Unique Subject ID and Visit Number columns in that order, and no other columns.
These columns must be linked to USUBJID and VISITNUM SDTM identifiers.
The table must be linked to the SDTM SUBJECTVISIT identifier.
See "Defining Tables to Support Filtering in the Listings Pages" for additional requirements.
The shipped, or default, Subject Visit table follows SDTM specifications.
Primary Key The shipped Subject Visit table's primary key is the USUBJID and VISITNUM columns.
Columns The default Subject Visit table contains these columns.
STUDYID (Study Identifier) is the unique ID of the study.
DOMAIN (Domain Abbreviation) is an abbreviation for the CDISC domainâfor example AE, CM. In the Subject Visit table the value must be SV.
USUBJID (Unique Subject Identifier) is the unique ID for each subject across all studies for all applications or submissions involving the product.
VISITNUM (Visit Number) is the clinical encounter number; a numeric version of VISIT, used for sorting. Decimal numbering may be useful for inserting unplanned visits.
VISIT (Visit Name) is the protocol-defined description of the clinical encounter of description of unplanned visit. May be used in addition to VISITNUM and/or VISITDY as a text description of the clinical encounter.
VISITDY (Planned Study Day of Visit) is the planned study day of the start of the visit based on RFSTDTC in Demographics.
SVSTDTC (Start Date/Time of Visit) is the start date/time of a subject's visit, represented in ISO 8601 character format.
SVENDTC (Study Day of End of Visit) is the end date/time of a subject's visit, represented in ISO 8601 character format.
SVSTDY (Study Day of Start of Visit) is the study day of start of visit relative to the sponsor-defined RFSTDTC.
SVENDY (Study Day of End of Visit) is the study day of end of visit relative to the sponsor-defined RFSTDTC.
SVUPDES (Description of Unplanned Visit) is a description of what happened to the subject during an unplanned visit. Null for protocol-defined visits.
Note:
The system does not use the Subject table internally.The shipped Subject table is based on the CDISC SDTM Implementation Guide (Version 3.1.2). It includes all SDTM columns and also COUNTRY and SITE_ID columns.
If you designate another table as the SDTM Subject table:
Its primary key must include the Subject ID and no other columns.
The Subject ID column must be linked to the SUBJID SDTM identifiers.
Primary Key The shipped Subject table's primary key is the unique subject ID across studies, called USUBJID.
Columns The shipped Subject table columns are:
STUDYID is the unique ID of the study.
DOMAIN is an abbreviation for the SDTM Domain.
USUBJID is the unique ID for each subject across studies. This is the primary key of the table.
SESEQ is the sequence number.
ELEMENT is a basic building block for time within a study.
ETCD is the element code.
SESTDTC is the start timestamp of the element, including date and time.
SEENDTC is the end timestamp of the element, including date and time.
TAETORD in the planned order of elements within a study arm.
EPOCH is a set of elements.
SEUPDES is a description of an unplanned element.
Users can create and reuse filters in the Listings pages to display only the data they need to work on at a particular time; see "Creating and Using Filters". To support this functionality, you must define tables as follows:
The Filter logic looks first at the Subject Visit table and finds each distinct Subject/Visit combination that meets the criteria of the filter. It then displays those Subject/Visits in the table that the user is viewing in the Listings page.
The user must specify the clinical data model that contains the Subject Visit table to use. The table can be in any clinical data model, but the user must have view privileges on the table. Therefore, if you have one group of users with security privileges to only one clinical data model and another group of users with access only to a different model, you need to have a Subject Visit table in both models or grant all users access to the Subject Visit table in one model. You can grant access to a single table in a model; see "Applying Security".
You must create at least one Subject Visit table in one clinical data model that has the SDTM ID for Study Visit table and meets the Subject Visit Table Requirements.
In addition, the user can filter on values in certain Subject Visit table columns only if the Subject Visit table contains the columns and the columns are linked to the following SDTM identifiers: COUNTRY, SITENAME, SITEID, INVNAM, INVID, EPOCH, VISIT, VISITNUM, VISITDY, SVSTDTC, SUBJID, USUBJID. See "Using SDTM Identifiers for Columns".
To support full filter functionality, all tables users may need to view in the Listings or Discrepancies pages must contain columns linked to the following SDTM identifiers: SUBJID, USUBJID, VISIT, VISITNUM.
Filter logic creates a join between the Subject Visit table and the table being viewed on the column shown in the following table.
Table 3-1 Columns Required in All Viewed Tables to Support Filtering
| Page | Join Column for Subject Filters | Join Column for Visit Filters |
|---|---|---|
|
Listings |
USUBJID |
VISITNUM |
|
Discrepancies |
SUBJID |
VISIT |
Filter logic on the Listings page requires a join of the Subject Visit table with the table being viewed on the USUBJID and VISITNUM columns.
Filter logic on the Discrepancies page requires a join of the Subject Visit table with the table being viewed on the SUBJID and VISIT columns.
Therefore, all tables whose records users may need to view and act on must have columns for unique subject ID and visit number, and those columns must be linked to the corresponding SDTM identifiers USUBJID and VISITNUM.
To add tables to the clinical data model manually or to specify blinding and data processing attributes:
Select the model and click Check Out. (If someone else has checked it out, you cannot work on it.)
Note:
Do not make structural changes to tables in InForm models; see "Modifying an InForm Input Model" for information on the changes that are and are not allowed.In the Tables tab, click the Add Table or Modify Table icon. The Create (or Modify) Clinical Data Model Table window opens.
Enter values in the following fields:
Enter a name and description for the column; see "Naming Objects" for restrictions.
Oracle Name: By default, the system populates this with the value you entered for the name, truncated at 30 characters; see "Automatic Name Truncation".
Note:
If the Oracle name includes a space, the system replaces the space with an underscore (_) when you save. The system does not replace the spaces in the default SAS name.SAS Name: By default, the system populates this with the value you entered for the name, truncated at 32 characters; see "Automatic Name Truncation".
SAS Label: (Optional) By default, the system populates this with the value you entered for the name. It can be up to 256 characters.
Aliases: Enter one or more aliases, or alternate names for the column. If you want more than one alias, enter a comma-separated list with no spacesâfor example: dm,demo,demog,demography.
The system uses these in automapping transformations.
UOW (Unit of Work) Processing Type: See "Setting the Data Processing Attribute".
SDTM Identifier: If this table corresponds to an SDTM standard Subject or Subject Visit table, select its identifier from the list. See "Adding Subject Visit and Subject Tables" for information about requirements. Selecting an SDTM identifier supports filters on the Listings and Discrepancies pages.
Set blinding attributes; see "Setting Blinding-Related Attributes".
Click OK.
Blinded data is not displayed in Listings pages unless a user with special privileges requests to view it. Such viewing is audited. See "Data Blinding" for conceptual information.
Set a table's blinding attributes when you add or edit the table:
Blinded: Select if the table may ever contain any sensitive data that should be hidden.
Blinding Type (available only if Blinded is selected): Select one:
Table: Select to hide all data in the table, then click OK.
Column: Select to mask all values in one or more columns, or in cells where data in the row meets conditions you specify, then click OK.
Then select one column, click the Modify icon and specify the masking value. If you want to blind data only in rows that meet certain conditions, specify the conditions; see "Specifying Masking Attributes for a Column".
You can mask values in more than one column.
Row: Select to hide certain rows in their entirety.
Blinding Criteria (available only for row-level blinding): Click the Modify Blinding Criteria icon to specify which rows should be hidden from users with insufficient privileges. The Expression Builder window opens.
Build an expressionâfor example, to hide all rows whose Test column's value is LiverCount, select column Test, operator is, and value LiverCount.
Available operations include: <, <=, <>, =, >, >=, is, is not, is blank, is not blank.
You can add as many criteria as you need, combining criteria with and, or, not, or (). See "Using the Expression Builder for Transformations and Blinding Criteria" for more information.
Using Unit of Work (UOW) processing can speed up data loading and transformation execution; see Chapter 9, "Data Processing."
The attribute value of the target table determines the preferred processing type for loads and transformations writing to the table. For Unit of Work processing to actually occur in transformations, source tables must also be defined with the same UOW processing type.
You must define a primary key before you can set the UOW Process Type attribute. When you define a primary key, the UOW Process Type attribute value changes to Reload. Modify the table to specify the UOW Process Type value.
Select one of the following:
Non UOW: Jobs writing to the table will use Reload processing.
Subject: Jobs writing to the table will use try to use UOW processing with Subject as the unit of work. The table must have a column designated with the Subject SDTM Identifier, and must have a primary key that includes the Subject column.
Subject Visit: Jobs writing to the table will try to use UOW processing with Subject Visit as the unit of work. The table must have one column designated with the Subject SDTM Identifier and another with the Visit SDTM Identifier, and both columns must be included in the primary key.
Tip:
Always define tables as UOW if the Subject column is part of the primary key and as Subject Visit UOW if both columns are part of the primary key, because:Many tables serve as both sources and targets, and defining tables with UOW processing facilitates UOW processing when the table serves as a source, even if it is not possible to use UOW processing when the table is a target.
If a table is defined as UOW the system will use UOW processing if possible; if not it will use Reload processing.
All clinical data model tables must have a primary key. This is required to support data lineage tracing; see "How the System Tracks Data Lineage". If you create tables by uploading text files you can define constraints at the same time; see "Required Syntax for Table Metadata Text Files". InForm tables' constraints are imported as part of a metadata load and cannot be modified in the input model.
If you upload SAS files you must create the primary key and any other constraints manually:
Navigate to the model that contains the table and select the table in the Tables tab.
In the Constraints tab, click the Add icon.
Enter values:
Constraint: Enter a name for the constraint. It must be unique among constraints for the table and must not contain special characters or Oracle or SQL reserved words.
Description: (Optional)
Constraint Type: Select one:
Bitmap Index: A bitmap index stores rowids (row IDs) associated with a key value as a bitmap. Each bit in the bitmap corresponds to a possible rowid. If a particular bit is set, the row with the corresponding rowid contains the key value.
Check: The check constraint allows you to specify allowable values for a particular column. Enter one allowed value in the Add Value field and click the arrow icon to move the value into the right-hand column; repeat for each value.
If any row contains a different value for the column, the system does not insert the record but generates an error to the program writing to the table instance. If the program does not handle the error, the job fails.
Note:
You can also use code lists to specify allowed values for a column, but the system behavior is different: it inserts the record with the nonconforming value and reports a violation.Non-Unique Index: A non-unique index keeps rows sorted on the specified column or columns to speed up queries.
Primary Key: (Required) A primary key is a column or set of columns whose values identify a row in a table as unique. The system uses the primary key to trace data lineage; see "How the System Tracks Data Lineage".
Primary key columns cannot have a null value in any row.
The system creates an index based on the primary key, which it uses to enforce a unique constraint and to speed up queries on the table.
Select Supports Duplicate to support inserting records with the same primary key value within a single data load, which is normally not desirable but may be required in a few cases. Selecting this option ensures that all records are loaded and not deleted but requires careful checking of the data. See "Supporting Duplicate Primary Keys in a Load" for more information.
Unique Key: A unique key is similar to a primary key in that it can include one or more columns whose values identify a row as unique. The difference is that the system allows null values in the columns that are part of a unique key.
Any number of rows can include null (empty) values. A null in a column (or even all nullable columns in a composite unique key) satisfies the unique key constraint. However, you cannot have identical non-null values in the columns of a partially null composite unique key constraint.
Notes:
The Not Null constraint is handled as an attribute called Nullable for each column.For more information on Oracle constraints, see Oracle® Database SQL Language Reference 11g Release 2 (11.2) at http://docs.oracle.com/cd/E11882_01/server.112/e26088.pdf
Columns: To include a column in the constraint, select it from the list on the left and use the Arrow icon to move it to the right.
Click OK.
To code source data to terminology terms using Oracle Thesaurus Management System (TMS), you must link the column (CRF field) to the TMS Set that specifies the information to derive from TMS to Oracle DMW, and add columns to the same table to hold the derived values.
Note:
In all three lifecycle areas, you can send data to TMS, derive data for terms that can be automatically coded and send derived data to the source system, and create discrepancies in TMS for terms that cannot be automatically coded. However, only in the Production lifecycle does TMS create omissions that TMS users can code manually. See "Setting Up Coding in TMS" for more information.The study must be set up for TMS processing, with a TMS domain specified for each terminology, or dictionary to be used for the study; see "Associating a Study with a TMS Domain Element".
An appropriate TMS Set must exist; see "Defining TMS Sets".
To link a TMS Set to a table:
Navigate to the data model and select the target table.
Click the TMS tab, then click the Add icon. The Add TMS Column Association window appears.
Select the TMS Set to use. The system displays the TMS Set description, base dictionary, and primary column name, which is the name of the dictionary level defined as the coding level in your TMS installation.
Select the primary column. The system displays all VARCHAR2 data type columns in the clinical data model table. Select the one whose value you want to have coded in TMS.
The system displays the derived columns defined for the selected TMS Set.
In the Column Name field for each one, select the table column to map to each TMS Set derived column.
If you have not yet added columns to the table to receive the derived data from TMS, click OK, then add the columns in the Columns tab, then click the Edit icon in the TMS tab and select them for the TMS Set derived columns.
Click OK.
You can add columns to a table as part of creating the table itself when you upload a file; see "Adding Tables from a File"
To add columns to a table manually:
In the Column tab, click the Add icon. The Create Clinical Data Model Column window opens. The system checks out the table if it is not already checked out.
Enter values in the following fields:
Enter a Name and Description for the column; see "Naming Objects" for restrictions.
Oracle Data Type: Select the appropriate data type: Varchar2, Number, or Date. All standard rules for Oracle data types apply.
DATE. For each Date value, Oracle stores the following information: century, year, month, date, hour, minute, and second. Although date and time information can be represented in both character and number datatypes, the Date datatype has special associated properties.
NUMBER. Stores zero, positive, and negative fixed and floating-point numbers. A Number column can contain a number with or without a decimal marker and/or a sign (-).
VARCHAR2. Specifies a variable-length character string. For each row, the system stores each value in the column as a variable-length field unless a value exceeds the column's maximum length, in which case the system returns an error.
Length: The requirements vary according to the data type:
DATE: No length required.
VARCHAR2: (Required) The default value is 50. The value must be between 1 and 4000.
NUMBER: (Required) The default value is 10. The maximum value is 38.
If the data type is Number you must also enter a value for Precision; the total number of digits to the right of the decimal point allowed. For example, if Precision is set to 2 and a data value of 34.333 is entered in this column, the system stores the data value as 34.33. Oracle guarantees the portability of numbers with precision ranging from 1 to 38.
SDTM Identifier: If the column corresponds to one of the standard identifiers supported by DMW and has a compatible data type, it is good practice to select it from the list because the system uses this information in several ways; see "Using SDTM Identifiers for Columns".
Oracle Name: By default, the system populates this with the value you entered for the name, truncated at 30 characters; see "Automatic Name Truncation". See "Naming Objects" for restrictions.
Note:
If the Oracle name includes a space, the system replaces the space with an underscore (_) when you save. The system does not replace the spaces in the default SAS name.SAS Name: By default, the system populates this with the value you entered for the name, truncated at 32 characters; see "Automatic Name Truncation".
SAS Label: (Optional) By default, the system populates this with the value you entered for the name. It can be up to 256 characters.
SAS Format: By default, the system enters a dollar sign ($) followed by the value you entered in the Length field.
Default Value: (Optional). Enter a value to serve as the default for this column.
Aliases: Enter one or more aliases, or alternate names for the column. If you want more than one alias, enter a comma-separated list with no spaces; for example: dm,demo,demog,demography
The system uses these in automapping transformations.
Nullable: If selected, having a value in this column is not required. This is the default value. If not selected, all rows must have a value in this column.
Code List (Optional): If the column should be populated with a limited set of values that are defined in a code list, select the appropriate therapeutic area (or other category) and then the code list. You can apply a code list only to columns with a data type of varchar2.
Note:
If the table may need to be pivoted from a horizontal (short fat) structure to a vertical (tall skinny) structureâor the reverseâduring a transformation, the pivot column must be associated with a code list; see "Pivot".Enter masking attribute values; available only if the table has a blinding type of Column; see "Specifying Masking Attributes for a Column".
Click OK.
If a column corresponds to one of the standard identifiers supported by DMW and has a compatible data type, it is good practice select it from the list. The system uses these identifiers:
In the Automap feature for transformations.
USUBJID and VISITNUM SDTM identifiers are required in any table to support filtering records in the Listings pages.
USUBJID and VISITNUM SDTM identifiers are required in tables supporting Subject Visit Unit of Work processing.
SUBJID is required in tables supporting Subject Unit of Work processing.
Oracle DMW supports these identifiers:
Actual Visit Date (Not an SDTM variable; date)
Country of Investigator Site (COUNTRY; varchar2)
Visit Cycle (EPOCH; varchar2)
Investigator ID (INVID; varchar2)
Investigator Name (INVNAM; varchar2)
Site ID (SITEID; varchar2)
Site Name (Not an SDTM variable; varchar2)
Study ID (STUDYID; varchar2)
Subject ID within study (SUBJID; varchar2)
Unique Subject ID across studies (USUBJID; varchar2)
Visit Name (VISIT; varchar2)
Visit Day (VISITDY; varchar2)
Visit Number (VISITNUM; number)
Visit Start Date (SVSTDTC; varchar2)
If you selected a blinding type of Column for a table, at least one of the columns in the table must have a masking level specified.
Select the column and click the Modify icon. In the Modify Clinical Data Model Column window, select the Binding Attributes tab.
Select a Masking Level:
Cell: Masks the real data only in certain rows in this column.
Column: Masks the real data in this column in every row.
None: No rows are masked in this column.
Masking Value: Do one of the following to specify what values to display instead of the real values:
Enter a constant value to be displayed in every row.
Click the Modify Masking Value icon to create an expression to generate multiple values for the system to display; see "Using the Expression Builder for Transformations and Blinding Criteria".
Masking Criteria (for cell-level masking): Click the Modify Masking Criteria icon to specify the criteria for blinding cells in the column; see "Using the Expression Builder for Transformations and Blinding Criteria".
Note:
Define row-level blinding at the table level. See "Setting Blinding-Related Attributes."The system uses a database connection to import data and metadata from the study's InForm reporting database, and a web service to send discrepancies back to InForm as queries. You must specify both for each Oracle DMW lifecycle area.
You can load data from any InForm lifecycle into any Oracle DMW lifecycle except production, which requires that you assert that you are loading data from an InForm lifecycle database. Oracle DMW will send discrepancies back to InForm only if the lifecycle stages match. InForm's UAT lifecycle matches the Quality Control lifecycle in Oracle DMW.
Prerequisite Create the InForm input clinical data model for the study; see "Creating a Study Clinical Data Model".
Note:
You must be working in the Development lifecycle context, selected on the Home page, in order to configure the InForm Connector for any lifecycle area. The current lifecycle context is displayed at the top of the page.In the InForm Configuration tab of the InForm clinical data model, specify a remote location and web service location to use for each Oracle DMW lifecycle:
Remote Location: Select the InForm reporting database from which to load data. See "Adding or Modifying a Remote Location".
Remote Study Account Name: Enter the name of the database account that owns the study's InForm reporting database and RDE views.
Note:
You can change the InForm configuration for any lifecycle to use a different remote location and/or remote study account name. If you do, the system runs a metadata comparison between the InForm model in Oracle DMW and the InForm metadata at the new location. If it finds differences, the metadata comparison report is displayed and you may either cancel the changes or accept them, in which case data loading is suspended. You must reload metadata before resuming data loading.InForm LifeCycle: Select the InForm lifecycle stageâDevelopment, UAT, or Productionâof the study account name.
Webservice Location: Select the appropriate web service location. You can add a new web service location if you are working in the Development lifecycle; see "Adding or Modifying a Web Service Location".
InForm URL: Enter the URL for the study's InForm websiteâfor example:
http://your_InForm_server.your_company.com/your_trial/pfts.dll
This is required to support "Link to InForm" actions in the Discrepancies and Listings pages.
After you enter a value, the Test URL icon appears. Click it. If the InForm login screen opens, the URL is correct. (The new window may open behind the current one.)
Schedule Production Data Load: In production only, select the check box to schedule data loads at regular intervals in a production environment. This option is available only if you have data load privileges and the current lifecycle context is Production; see "Scheduling Data Loads in the Production Lifecycle Area".
In all lifecycle areas you can load data manually as needed by clicking the Load Data icon if you have the required privileges; see "Loading Data".
Save.
Note:
To complete the InForm configuration; see:You can select internal InForm tables and views to be available in this study. You cannot change these selections after you load metadata. Your administrator makes the default selections. You can override the default selections except for tables and views that are required by the system. Their check mark is displayed as gray. See "Available InForm Tables and Views" for the full list.
You can use selected tables and views as sources in data transformations from one model to another. To view their data, go to the Listings page.
To select tables and views:
In the InForm Configuration tab, click the Select InForm Operational Data and Metadata Tables icon.
The system displays all available InForm tables and views alphabetically. To sort by type, click the heading of the Internal Data Model column.
Select and deselect until you have selected exactly the tables and views you want for this study.
Note:
This selection cannot be changed after you save.Save.
To load metadata, click the Load InForm Metadata icon. To check the progress of the job, click the Refresh icon and check the Status column.
Note:
Select the internal InForm tables you want to use in the study before loading metadata. You cannot change the selection afterward. See "Selecting Internal InForm Tables and Views"The Load InForm Metadata icon is available only in the context of the Development lifecycle (selected on the Home page) and only to users with special privileges for metadata loading; see "InForm Configuration Privileges".
See "Blinding Data in Input Models" to set up importing InForm hidden items as blinded.
In its initial run, the Load Metadata job creates one table in the InForm input clinical data model for each view in the reporting database that is registered in the RD_DATADICTIONARY table. The tables have the same structure as the InForm views plus additional columns and column attributes required in Oracle DMW. See "How the System Tracks Data Lineage" for more information.
In an InForm model's InForm Configuration tab, click Load Data to immediately load the latest data from InForm.
The system loads data into the lifecycle area currently in contextâthe one you selected on the Home page, now displayed at the top of the page.
The InForm lifecycle stage of the data being loaded depends on the setting of the Remote Study Account field, whose lifecycle stage is indicated in the InForm Lifecycle field.
Data Loading Rules You can load data at any InForm lifecycle stage into a model's Development or QC lifecycle area. You can load only InForm Production data into a model's Production lifecycle area.
To load data into either the QC or Production lifecycle area:
The validation status of the model must be equal to or greater than the model's lifecycle stage; that is, a QC lifecycle model must have a validation status of QC or Production, and a Production lifecycle model must have a validation status of Production.
The most current version of the model must be installed.
Data loading must be enabled, not suspended.
Click the Suspend icon to stop any scheduled data loads and prevent manually loading data.
The system replaces the Suspend icon with the Resume icon. Click the Resume icon to allow manual and scheduled data loading.
You must suspend data loading to load metadata, install the model, or change the remote location, account, or web service for any lifecycle area.
If the lifecycle context is Production and you have Production data loading privileges, you can schedule data loads:
Check in and install the model if it has not already been checked in and installed in Production.
If the Status column says Data loading may proceed, click the Suspend icon.
Specify a Fetch Frequency: the number of minutes between automatic data loads.
Note:
A data load will not start until the previous one completes.Save.
Click the Resume icon. The first scheduled data load starts immediately.
You can compare the metadataâtable and column structureâin any Oracle DMW InForm model lifecycle area to any InForm lifecycle database for the same study.
For example, before you promote an InForm clinical data model from Development to Quality Control, compare the Development model's metadata to the InForm UAT lifecycle metadata. When you promote the InForm model to a higher lifecycle, the system runs the same comparison automatically and displays a report.
In the InForm Configuration tab, click the Compare Metadata icon.
In the Metadata Comparison window, select the metadata to compare:
For the Oracle DMW InForm data model: Development, Quality Control, or Production.
For InForm: Development, UAT, or Production.
Click Compare. The report appears on screen.
To save the report, click the Export All to Excel icon.
If the system finds no differences, it displays a message to that effect.
The system helps keep metadata consistent with InForm metadata in the same lifecycle, in case InForm data structures are changed during the course of the studyâfor example, CRF fields are added or increased in length to support a protocol amendment. The system detects these changes by querying the IRV_STUDYVERSION_REVISIONS table for either new versions or revisions without versioning (RWV).
The InForm reporting database extract (RDE) views are the source of truth for Oracle DMW. For example, if a protocol change occurs that results in forms and items being removed from a trial, the RDE views may still retain the views and columns that represent the removed items. If that is the case, they also remain in DMW even after reloading metadata.
If changes are detected during data loading, the system:
Prevents promoting the InForm model to a higher validation status.
Suspends data loading in this lifecycle area where it was detected. If this was Production, it displays a message on the Home page.
You should load metadata and then resume data loading.
During metadata loading, the system:
Reloads the required static metadata tables: IRV tables and RD_DATADICTIONARY.
Compares the static metadata tables with the data stored in DME_IA_SRC_TABLES and DME_IA_SRC_COLUMNS to detect significant changes including:
New, missing, or changed reference path for an item
Changed data type
Increased data length for VARCHAR2 columns
Changes to column (item) blinding status
If significant changes are found, updates DME_IA_SRC_TABLES and DME_IA_SRC_COLUMNS, other extended metadata mapping tables, and the InForm input clinical data model tables. Note:
Tables are never dropped. If an RDE view is missing, the system marks the corresponding Oracle DMW table as Not Used.
Columns are never dropped. If an existing item is not included, it is marked Not Used. If a column data type is changed, a new column is created with the new data type.
Updating a column's blinding status may require updating its table's blinding status as well.
Displays the message "Metadata needs to be reloaded" and suspends data loading until it is done. A user with the required privileges must click the Load Metadata button to reload and synchronize metadata.
When you save changes to a remote location or remote study account, the system compares the metadata in the model with the new remote location or schema and displays the results.
If there are differences and you accept them, reload metadata to be sure Oracle DMW is synchronized with InForm.
The required privileges for InForm configuration, including metadata loading, are part of the roles Oracle DMW_STUDY_INFORM_CONFIG and Oracle DMW_STUDY_ADMIN.
Data loading, suspending, and resuming privileges are included in the roles Oracle DMW_STUDY_DEVELOPER, Oracle DMW_STUDY_QC, and Oracle DMW_STUDY_PROD for each lifecycle area, respectively, as well as Oracle DMW_STUDY_ADMIN.
For input clinical data models that load data from files, such as lab models, configure the File Watcher feature to look for data files that match your specifications in a location created for this purpose at intervals you specify. When the File Watcher service finds a file that matches your specifications in the relevant location it puts it in the queue for the Distributed Processing (DP) Server to load data from the file into the database tables of the input model.
Each study normally has six File Watchers, one for each combination of the two file typesâSAS and textâ and the three lifecycle stagesâDevelopment, Quality Control, and Production. Each of the six study File Watchers watches a single folder to detect files to load. It is also possible to use a three-Watcher setup, with both text and SAS files in the same folder. This is the setup used in the environment hosted by Oracle. See "Registering Folder Locations" for more information.
If two labs are sending text data to the same study, you have a different clinical data model for each lab, but files from both labs must be placed in the same folder for each lifecycle. To enable File Watcher to match each file with the correct data model, you must specify a unique file name pattern for each lab within the study.
You can configure File Watcher for a clinical data model either before or after installing the model.
Using Data Loads to Trigger Transformations Each data load can trigger downstream transformations and validation checks so that the data updates are automatically processed and propagated to your downstream models. To set this up, check the Can Trigger attribute for this model when you add it as a source to a transformation; see "Creating Model Mappings".
Prerequisite See "Setting Up and Monitoring File Watchers".
To configure the study File Watcher for the clinical data model:
In the Study Configuration page, navigate to the clinical data model's Watcher Configuration tab. The page displays the type of file being loaded (specified during clinical data model definition) and the three study File Watchers for that file type.
Enter data load parameter values for the selected file type:
In the Data Source field, select the name of the original source of the data being loaded, such as Lab XYZ.
Your administrator creates a list of data sources; see "Viewing and Setting Up Lab Data Sources".
Save. You must also create one or more file specifications; see "Creating File Specifications"
For SAS files there are two data load parameters:
Upload File Type: The allowed values are CPORT, XPORT, and SAS Dataset.
Max Errors: The number of errors allowed per dataset before the load fails.
For Text files you must specify either:
Fixed: If you specify Fixed format, the system uses the target table column length to determine the length of each data value. The file must contain the correct number of characters for each value in each record, in column order.
Delimited: The system uses a delimiter character you specify to determine when one column value ends and the next one begins. You must also specify:
Delimiter Character: For delimited files, enter the character to be inserted between column values in each rowâfor example, a comma (,) or a pipe (|).
Enclosing Character: If any data value may contain the delimiter character, you need to surround each data point with another character. Specify the character used to enclose each value. The default character is double quotation marks (").
Note:
With either Fixed or Delimited format the files can have an extension of either .txt or .csv, and you can upload multiple text files at the same time by including them in a .zip file. The system extracts and processes the files.For either type, specify:
Skip Records: To prevent loading records at the beginning of the file, enter the number of records you want the system to skip. The default value is zero (0).
Max Errors: Tolerance factor; the maximum number of invalid rows you are willing to tolerate before the load process with an error. The default value is 0. See "Format Checks on Loaded Files" for more information.
Rows Before Commit: Enter the number of rows you want the system to process before committing processed rows to the database.
Date Format: Enter the exact date format used in the data file, if any. Do not enter a value here if the data file does not contain a date field. When you start to type a value, the system displays a list of values from which to select.
File specifications determine which of the files that are detected by the Watcher will actually be loaded into the clinical data model lifecycle area. All of the study's files for a particular file type/lifecycle area combination are in the same watched folder, so you must use different file naming conventions for each clinical data model.
File specifications contain a file name pattern to watch for and a schedule for loading detected files that match that file name pattern.
When you create or update a File Specification, log in as a user with the security privileges required to load data into the corresponding lifecycle tables. The system uses the account that defined or most recently updated the File Specification to run the data load job.
Under File Specifications, click the Add icon and enter values:
Enter a name and description for the File Specification.
File Name: Enter a file name or regular expression for files to be loaded into the selected lifecycle stage for the clinical data model. All of the study's files for a particular lifecycle stage are in the same watched folder, so you must be sure that file names are unique across all models in the studyâfor example, use a naming convention includes the model name or corresponding lab name, but this is not required.
For example, Study A with file input models for three labs, where labs are expected to include a date just before the extension:
CentralLab_.*.zip
SpecialLab_.*.cport
LocalLab_.*.zip
Note:
File name pattern regular expressions use the POSIX standard Extended Regular Expression syntax found here:http://docs.oracle.com/cd/B28359_01/server.111/b28286/ap_posix001.htm.
An asterisk (*) in POSIX Extended Regular Expression syntax matches zero or more occurrences of the preceeding character. The dot (.) before the asterisk (*) in the examples above means "any character or no characters."
Be careful about case sensitivity.
Note:
In hosted environments, you must use a file naming convention of starting with the study folder name followed by an underscore. See "Creating and Modifying Study File Watchers" for more information.Note:
If you have multiple data files in the same .zip file, the individual files within it must have names that match their target table name.Lifecycle
Incremental: The system loads all data in the file, inserting new records, updating records with changes, and refreshing the timestamps of records that are reloaded without change. It does not delete any records.
Full: The system inserts, updates, and refreshes reloaded records as in incremental processing and in addition, compares the unique keys of records in the file to existing records and deletes any records that are not included in the file.
UOW Load: For each UOW (Unit of Workâeither subject or subject visit) that has any new or changed records, the system processes all records, inserting new records, updating records with changes, and refreshing the timestamps of records that are reloaded without change. The system does not process records for units of workâsubjects or subject visitsâthat have no new or changed records. The system deletes any existing records that are not reloaded within processed units of work. It does not delete records that are not present in the source if no other records from the same unit of work are reloaded.
Tip:
You may want to create two File Specifications, one for a frequent Incremental or UOW Load and another for a less frequent Full load. Incremental loads are faster and can be run on a subset of data. Full loads are more time-consuming but they detect when to delete data. Be careful to always load the complete set of current data when you use Full processing; see Chapter 9, "Data Processing".Note:
All deletions are "soft" deletions: records have an end timestamp equal to the load's date and time and are no longer available in the system. However, they still exist in the database and have an audit trail.Execution Priority: Enter the priority for loading data corresponding to this File Specification relative to others: Low, Normal, or High. The system uses this value to determine when to run these load jobs.
Dataload Type: Select Immediate or Scheduled.
Immediate: The Watcher searches continuously and queues the job as soon as it finds a file. This option loads data as soon as possible, continuously.
Scheduled: The Watcher searches at the interval you specify and queues the job as soon as it finds a file.
Frequency: If you selected Scheduled, select a frequency for the File Specification to look for a new data file in the specified location in days, hours, or minutes.
Start Date: If you selected Scheduled, enter the date and time when you want scheduled file watching to begin.
End Date: Enter the date and time when you want file watching to end. You can enter a date far in the future and change it at any time.
Click OK to save.
You can stop the system from watching for a particular filename pattern by selecting the file specification and clicking the appropriate icon:
If the file specification is currently running, select it and click the Suspend icon.
If the file specification is currently suspended, select it and click the Resume icon.
If you configured File Watcher for a model in Oracle DMW 2.3, you can upgrade it to the 2.3.1+ structure, which is simpler and more secure, by clicking the Migrate button.
Migrated Watchers look for files in the folders defined for the Study File Watchers; see "Creating and Modifying Study File Watchers". Existing File Specifications will continue to work but you may wish to delete these File Specifications and create new ones to coordinate with the 2.3.1+ Study File Watchers.
In the Detected Files tab you can see a list of all detected files and their status.
You can also load or reload and delete files from here, overriding any scheduled load or deletion, by selecting the file and clicking the Force Data Load or Delete File icon. This may be useful if a load failed and needs to be retried, or if a file was faulty.
You can see information about files that have been detected and submitted. Once a data load job has been started, you can see the job status in the Data Loads tab on the Home page; see "Viewing Data Load Information". To see the data, go to the Listings page.
For each detected file the system displays:
File Name
File Spec Name: The name of the File Specification
Status: The possible statuses are:
DETECTED: The file has been detected in the watched folder but has not yet been submitted. (The scheduled submission time is in the Data Load Date column.)
SUBMITTED: The file has been submitted. This status does not change when the load is completed. However, you can go to the Data Load tab on the Home page to see if the load was successful.
MISSING: The file was detected but deleted before or after it was submitted, but before the scheduled deletion date.
DELETED: The file was deleted by File Watcher as scheduled.
ARCHIVED: The file was archived by File Watcher as scheduled.
File Modified: The modification date of the file on the file system.
Data Load Date The scheduled data load data before the data has been loaded, with an icon to indicate "scheduled," and the actual data load data afterward.
Detection Date The date and time the file was detected, using the date and time in the Oracle DMW database.
Archive Date displays the scheduled archive date before the file is archived and the actual archive date afterward.
Error: Information about the problem.
Deletion Date displays the scheduled deletion date before the file is deleted and the actual deletion date afterward.
Date Missing: If file is overwritten or removed from the file system before it is archived or deleted, then the Date Missing is stored here.
See "Viewing Data Load Information" for job statuses. To see the data, go to the Listings page.
Before you can load data into a clinical data model you must install the model. This process creates a database schema for the model and creates actual database tables from the table metdata. You cannot run any transformation programs or validation checks until you install the model and the program.
When you install a clinical data model, the system creates or updates a query that selects all columns and rows from all tables in the data model, including any masked data. The system uses this view to display data on the Listings page. This view also serves as the starting point for custom listings.
Whenever you modify a clinical data model or any table contained in it, you must do so in the Development lifecycle area after checking out the model. When you have completed your changes, check in the model and install the new version.
Note:
When you install a transformation, the system also installs its target clinical data model.The system supports blinding sensitive data at several levels: whole tables, whole columns, and whole rows or cells meeting specified criteria. You can specify masking values for use with blinded columns and cells.
Note:
A cell is the intersection of a table column and row; a single data point for a record.Special privileges are required to view blinded data, to unblind data and to view unblinded data. See the Oracle Life Sciences Data Hub Implementation Guide for information about blinding-related security user privileges.
Blinding requirements vary by source type:
Text files: Tables created by uploading text metadata files can be created with some blinding-related attributes set; see "Required Syntax for Table Metadata Text Files".
SAS: Tables created by uploading SAS datasets are created as nonblinded. If data should be blinded, you must define blinding attributes manually for tables in the input data model.
Note:
You can create a table initially from a text metadata file with blinding attributes and subsequently load data into it from a SAS file.InForm: Hidden data in InForm has different behavior and rules than blinded data in Oracle DMW. By default, all InForm tables are created in Oracle DMW as not blinded.
Your administrator can change a profile value (see "Setting Blinding Behavior for InForm Hidden Items") so that by default all InForm hidden items are imported to Oracle DMW as blinded, with default masking values:
The character data masking value is xxxxx.
The numeric data masking value is 99999.
The date data masking value is 15-AUG-3501.
You can change the blinding and masking values in the individual Oracle DMW tables.
As you define downstream clinical data models for review and analysis, you must define the blinding attributes of tables and columns, rows, and cells that are targets of blinded source tables, including masking values.
The system does not allow you to map a blinded source table to a nonblinded target table unless you have special privileges and explicitly authorize the creation of the target table as nonblinded. This authorization is intended to be used only when the mapping is done in such a way that the target table contains no blinded data: only columns and rows containing nonblinded data are mapped to the target table. The authorization action is audited.
When you create a custom listing or a validation check, the system generates the target table. If any of the source tables are blinded, the system makes the whole target table blinded by default. To see any data on the Custom or VC Listings page, you must explicitly authorize the creation of the target table as nonblinded. You must then use the Expression Builder to mask specific columns, rows, or cells to ensure that no sensitive data that would break the blind is displayed. Special privileges are required for the authorization.
Note:
If the target table is blinded, users with the required privileges can view the real data (not the masking values) if they request to do so. Each such access is audited.A person with the required privileges can unblind the data in a table so that users with normal privileges can see the sensitive data, normally at the end of a study. Unblinding undoes all types of blinding: whole table, whole column, or row or cell values meeting specified criteria.
To change the validation status of a clinical data model, table, transformation, validation check, or saved custom listing:
Select the object and click the Modify Validation Status icon. The object must be checked in and installed to be promoted to a higher status. The validation status applies to the current, checked in version.
The Validation Status Update window opens, displaying the current validation status.
From the Validation Status drop-down list, select the new status:
Development: This is the default status for all new objects and is intended for objects being worked on or tested.
Quality Control: This is intended as the status for objects that have passed initial testing and are undergoing formal testing. This status corresponds to UAT in InForm.
Production: This is intended as the status for objects that have passed formal testing and are suitable for use in an active study.
Note:
For InForm clinical data models you can click the Compare Metadata icon to compare the model's metadata to the metadata in the InForm lifecycle to which you are promoting it. The system also calls the Compare Metadata job during the validation status upgrade process, which fails if there are significant differences.Click OK or, if your company's standards require supporting documentation such as test results or a requirements document to justify the change in validation status, click the Add icon in the Supporting Documents pane. The Add Supporting Document window opens.
Enter a name and description for the document and browse for the document on your computer, then click OK. The system uploads the document.
After you promote an object, it is visible in the new lifecycle context (change lifecycle context on the Home page to see it). However, you must install the object for the new version to take effect. See "Understanding the Validation Lifecycle and Installation" for more information.
For InForm clinical data models, the system runs the Compare Metadata Report before promoting the model. If there are differences, the report is displayed and the promotion cannot proceed.
To create and modify studies, clinical data models, tables, validation checks, and transformationsâall of which are metadata objectsâa user must belong to a user group with access to the object's parent, or owning, object. The user must also have a role in the user group with the privileges required to create or modify the object type. See "Object Ownership" and Appendix B, "Predefined Roles" for more information.
To view data, a user must:
Belong to a user group with access to the table containing the data.
Have a role in the user group with view privileges on tables.
Have a blinding-related application role that allows viewing nonblinded, unblinded, and/or currently blinded data.
When you assign a user group to an object, the user group assignment is inherited by all the objects contained in it. For example, when a user group is assigned to a study, the user group has access to all objects in a study. Or, when a user group is assigned to a clinical data model, it has access to all objects in the model, including the Development, Quality Control, and Production lifecycle areas. If you want a user group to have access to only one lifecycle area, you must either assign it explicitly to the one it should have access to, or assign it at a higher level and revoke its access to the areas it should not have access to. See "Setting Up Security" for more information.
For information about setting up user groups, roles, and user accounts, see the Oracle Life Sciences Data Hub System Administrator's Guide.
To change user group assignments to an object:
Select the object and click the Apply Security icon. The Apply Security window opens with the name of the object displayed and a list of all user groups currently associated with the object in any way. The Assignment Status column shows the current state of each user group's access to the object:
Inherited: The user group has access to the object because it was explicitly assigned to an object that directly or indirectly contains the current object.
Assigned: The user group has access to the object because it was explicitly assigned to the object.
Revoked: The user group does not have access to the object. Its inherited access has been revoked.
User groups that never had access to the object are not displayed.
In the Assign To field, select one:
Metadata: assigns the user group to the definitional metadata for the object. Access to object metadata is required to modify studies, clinical data models, tables, validation checks, and transformations.
Note:
To create models, transformations, and validation checks, the user needs to belong to a user group assigned to the study metadata, and have Create privileges on the object type to be createdâmodel, transformation, or validation checkâin its container. See "Predefined Object Security Roles" for more information.Development: This choice assigns the user group to the installed object in the Development lifecycle area database schema. This access is required for creating, modifying, or executing the object in the Development lifecycle area and loading or viewing data in the Development lifecycle area.
QC: This choice assigns the user group to the installed object in the Quality Control (QC) lifecycle area database schema. This access is required for testing or executing the object in the QC lifecycle area and loading or viewing data in the QC lifecycle area.
Production: This choice assigns the user group to the installed object in the Production lifecycle area database schema. This access is required for executing the object in the Production lifecycle area and loading or viewing data in the Production lifecycle area.
Make a user group assignment change:
To assign a user group that is not currently associated with the object, click Assign. The Assign User Group window appears. Query for the user group if necessary, then select it and click Apply.
To revoke the access of a user group that has an Inherited status, select the group and click Revoke.
To reinstate the access of a group whose status is Revoked, select the group and click Unrevoke.
To remove the access of a group whose status is Assigned, select the group and click Unassign.
See also "Adding and Modifying Tables Manually"
In target models and file-type input models you can create tables and columns initially by uploading SAS files, but if any modifications are required afterward you must make them manually in the user interface and reinstall the model.
Note:
DO NOT add or remove tables or columns or make any other structural changes to an InForm clinical data model. The InForm model must have exactly the same table and column structures as in InForm. If you change these structures in InForm, use the Load Metadata job in the InForm Configuration tab to synchronize the changes here. See "Modifying an InForm Input Model".However, nonstructural changes are allowed; see "Manual Changes Allowed in InForm Models".
To view or modify a clinical data model:
Navigate to the model in the Study Configuration or Library page.
To modify the model, click Check Out. The system creates a new version of the model for you to modify. This button is visible only if you have the privileges required to modify the model and the model has not been checked out by someone else.
Make changes. If you have the required privileges, you can:
Add, modify, or delete tables by clicking the appropriate icon and making the changes; see "Adding Tables to a Clinical Data Model".
Add, modify, or delete columns in a table by selecting the table in the upper pane, clicking the appropriate icon in the Columns tab, and making the changes; see "Adding Columns to a Table".
Add, modify, or delete constraints in a table by selecting the table in the upper pane, clicking the appropriate icon in the Constraints tab, and making the changes; see "Adding Constraints to a Table".
Update to Current Library Version If the study model was created from a library model and the library model has been updated, the Upgrade to Latest Version button appears. Click it to update your study model to the new library version.
Note:
Any changes that have been made to the study model will be lost.Update Validation Status Click this icon to change the validation status or to upload a supporting document for the validation status change; see "Updating Validation Status". The system displays this button only if you have the privileges required.
Click Install Model. You must install the model after you make changes; otherwise the system continues to use the old version. The model must have a status of Installable.
A model is not installable if it does not have any tables or if any of its tables are not installable. A table is not installable if it has no columns.
The InForm model must have exactly the same table structures as in InForm. You can change the attributes that apply only in Oracle DMW, but if metadata is reloaded from InForm either manually or automatically, your manual changes are lost. See "Loading InForm Metadata" for more information.
You cannot make any manual structural changes in an InForm clinical data model, including:
Adding or dropping tables or columns
Modifying table or column names
Modifying column data type, length, precision or nullable status
Adding or removing constraints or unique indexes
You can modify table and column attributes, including:
Blinding-related attributes
SAS-related attributes
Column and table aliases
To modify an InForm model:
Select the Development lifecycle on the Home page, then navigate to the study and model, and then click the InForm Configuration tab.
Click the Suspend Data Loading icon for the Development lifecycle. The Check Out icon appears.
Check out the model.
Make your changes. See:
"Adding and Modifying Tables Manually" for information on adding tables aliases and SDTM identifiersâbut do not add or remove tables or columns.
"Adding Columns to a Table" for information on adding column aliases, code lists, and SDTM identifiersâbut do not add or remove columns.
Click the Install Model icon. You must install the model after you make changes; otherwise the system continues to use the old version. The model must have a status of Installable.
A model is not installable if it does not have any tables or if any of its tables are not installable. A table is not installable if it has no columns.
If a clinical data model was created from a library model, and a new version of the library model exists, the Upgrade from Library Model icon appears. Click it to synchronize the study model with the library model.
Note:
Any changes you have made to the study model are lost if you upgrade.If a clinical data model is being used in Production but you have created a new version of it in the Development lifecycle, you can undo all changes and revert to the Production versionâfor example, if a protocol amendment is cancelled. For InForm models, the rolled-back Development model is installed as part of the process. If the older, Production version has fewer columns or shorter ones, for example, the rollback is "destructive" and all data is deleted from the model in Development.
Click the Roll Back Clinical Data Models to Production Version icon in the Clinical Data Model pane on the left of the Study Configuration page. A window appears.
Select one or more clinical data models to roll back. Use Ctrl+click or Shift+click to select multiple models.
Click Roll Back.
Click the Refresh icon periodically to see the Job ID, Log, and Job Status.
Check out the clinical data model if it is not already checked out.
Select the Edit icon in the Tables tab.
Edit table attributes; see "Adding and Modifying Tables Manually".
When you have made all your changes in the model, install the model.
To delete a clinical data model, select it in the Clinical Data Model pane and click the Remove icon. You can remove the whole model, including all its tables, at the same time. You must have the Remove Model privilege to do this.
After you have installed a study clinical data model and loaded data into its tables, you can view the data in the Listings page; see "Viewing All Study Data Using Default Listings".
|
Copyright © 2013, 2015, Oracle and/or its affiliates. All rights reserved. Legal Notices |
|