| Oracle® Life Sciences Data Hub Application Developer's Guide Release 2.4 E54089-01 |
|
|
PDF · Mobi · ePub |
| Oracle® Life Sciences Data Hub Application Developer's Guide Release 2.4 E54089-01 |
|
|
PDF · Mobi · ePub |
This section contains the following topics:
See "Defining Table Columns" for information on defining Columns.
In the Oracle Life Sciences Data Hub (Oracle LSH) a Variable is the definition source for both Table Columns and Parameters. Its attributes include data type, length, name, default value, and Nullable (Yes/No). These attributes form the basis of both Columns and Parameters; both Columns and Parameters are instances of Variables. Both have additional attributes. Parameters also serve as definitions for Parameter instances, making the only three-level definitional relationship among Oracle LSH objects.
You can use the same Variable as the definition source for multiple Columns and Parameters. This promotes consistency and compatibility: for example, if you base the Study Column of all Tables in a single data flow on the Study Variable, and the Study Parameter of all the Programs that read from and write to those Tables on the same Variable, the Columns and Parameters have the same data type and length, and Nullable setting.
The Nullable attribute, whose default value is Yes in a Variable, is expressed in opposite ways in the user interface for Columns and for Parameters. When you see a Variable whose Nullable attribute is set to Yes through a Column, you see a Nullable setting whose default value is Yes, like the Variable's. When you see the same Variable through a Parameter definition, you see a Required setting whose default value is No. This is the same attribute setting expressed in different ways: if a Variable is Nullable, it is not Required; if it is Required, it is not Nullable.
This section includes the following topics:
Oracle LSH creates Variables automatically based on the Oracle columns or SAS variables that you load or upload from an external system. In addition, you can create Oracle LSH Variables manually, either directly or as part of the process of creating a Table Column or a Parameter.
Oracle LSH creates Variables automatically based on equivalent metadata in external systems in two basic ways:
Oracle LSH creates Variables automatically when you define or run Load Sets to load data from an external system. These Variables have the same data type and length and other attributes as the external metadata on which they are based.
You can use these Variable definitions within the Application Area where they are created. You can also copy or move them into a Domain library for the purpose of reuse in other Application Areas, according to your organization's policies.
Oracle LSH creates Variables from Load Sets as follows:
SAS. When you define a SAS-type Load Set, you can choose to create the Load Set's Table Descriptors from the SAS Data Sets you want to load. Oracle LSH creates a Table definition for each SAS data set and an Oracle LSH Variable for each SAS variable. The Oracle LSH Variables and Table definitions are located in the same Application Area as the Load Set definition.
Oracle Tables and Views. When you define a Load Set of type Oracle Tables and Views, you can choose to create the Load Set's Table Descriptors from the Oracle tables or views you want to load. Oracle LSH creates a Table definition for each external Oracle table or view and a Variable for each external column. The Variables and Table definitions are located in the same Application Area as the Load Set definition.
Oracle Clinical Data Extract. When you define an Oracle Clinical Data Extract (DX) View Load Set (either Oracle or SAS), you can choose to upload the Load Set's Table Descriptors from the DX Views you want to load. Oracle LSH creates a Table definition for each DX View and a Variable for each Column. These Variables and Table definitions are located in the same Application Area as the Load Set definition.
Oracle Clinical Global Library. When you run a Global Library Load Set, Oracle LSH creates a Domain with the same name as the Oracle Clinical Domain whose Global Library you are loading (if it does not already exist) and converts all Oracle Clinical Questions to Oracle LSH Variables. If a Question is assigned a Discrete Value Group (DVG) in Oracle Clinical, Oracle LSH also creates a Parameter based on the Variable and gives it a list of values corresponding to the DVG values. Oracle LSH also creates a Table definition from each Question Group.
When you create a new Table in Oracle LSH, you have the option to upload the metadata of a SAS data set, including its variables. When you add a Column to an Oracle LSH Table, you have the option to upload a SAS variable. In both cases, the system converts each SAS variable to an Oracle LSH Variable.
You have the same options when you create a Table Descriptor, which is a Table instance contained in a Program or other executable object.
Every time you create a Column (in a Table Definition) or Parameter (in a Program, Report Set, or Workflow definition or directly in a Parameter Set definition ) you have the option to manually create a Variable or to select an existing Variable as the definition source of the Column or Parameter.
Note:
To promote consistency and compatibility, use existing Variables as often as possible. See "Defining and Using Parameter Sets" for more information.When you click Create LSH Variable in either the Create Parameter or Create Column screen, additional fields appear.
Enter values in the following fields:
Name. See "Naming Objects".
Description. See "Creating and Using Object Descriptions".
Data Type. Variables can have a data type of VARCHAR2, NUMBER, or DATE.
Length. The maximum number of bytes or characters of data that the Column can hold. The requirements vary according to the data type:
VARCHAR2. A value for length is required and must be between 1 and 4000 characters.
DATE. The system disregards the length value, if any.
NUMBER. A value for length is optional.You can leave the length and precision null, and LSH treats the number column as having the maximum possible length.
Precision. (This field appears only if you select a data type of NUMBER.) The total number of digits allowed, not including the decimal marker or a positive (+) or negative (-) sign. Its maximum value is 38.
Note:
Oracle LSH terminology differs from standard Oracle terminology, in which this attribute is called Scale.Oracle Name (up to 30 characters, uppercase, no spaces). Enter text or accept the default value. The system automatically creates the default from the text you entered in the Name field, converting it to uppercase, with underscores (_) substituted for spaces, truncated to 30 characters if necessary.
SAS Name. The SAS Name is used during execution by SAS technologies. The SAS Name can contain up to 32 characters.
If the value entered for the Name is 32 characters or less, the system uses it as the default value for the SAS Name.
SAS Label. Enter text or accept the default value. The system automatically creates the default from the text you entered in the Name field, converting it to uppercase, with underscores (_) substituted for spaces.
SAS Format. The SAS Format is used during execution by SAS technologies. SAS rules apply.
Default Value. This value becomes the default value of Columns and Parameters based on this Variable. The default is null.
Nullable. If set to Yes, Columns based on this Variable can contain a null value and Parameters based on this Variable are not Required. If set to No, by default Columns based on this Variable must contain a value in each row and Parameters based on this Variable must have a value at execution time. The default value is Yes.
You can change the Nullable value for Columns and the Required value for Parameters based on this Variable.
In the Classification section, select the following for both the definition and the instance:
Subtype. Select a subtype according to your company's policies.
Classification Values. See "Classifying Objects and Outputs" for instructions.
Click Apply to save your work and continue defining the Parameter or Column.
To modify a Variable, do the following:
In the Application Area or Domain where the Variable is located, click Manage Definitions. The system opens the Maintain screen for the Application Area or Domain.
Expand the node (+) for Variables.
Click the hyperlink of the Variable you want to modify. The LSH Variable screen opens.
Click Check Out. The system opens the Check Out screen.
Note:
If the Variable is already checked out, you cannot check it out.Enter a reason for change in the Comment field and click Apply. The system checks out the Variable.
Click Update. The system makes the fields editable.
Modify as necessary. You can modify all fields.
Click Apply. The system saves your changes.
If you wish, you can update one or more Parameters that reference this Variable to reference the new version by using the Upgrade All Instances function in the Actions drop-down list. See "Upgrading One or More Instances from the Definition".
This section contains the following topics:
You can click Update to modify any of these properties.
Name See "Naming Objects".
Description See "Creating and Using Object Descriptions" for further information.
Data Type Variables can have a data type of VARCHAR2, NUMBER, or DATE. See "Creating Variables Manually" for more information.
Length You can change the length of a VARCHAR2 or NUMBER Variable. See "Creating Variables Manually" for more information.
Precision See "Creating Variables Manually" for more information.
Oracle Name See "Creating Variables Manually" for more information.
SAS Name See "Creating Variables Manually" for more information.
SAS Label See "Creating Variables Manually" for more information.
SAS Format This is the SAS representation of the data type for this Variable. See "Creating Variables Manually" for more information.
Default Value This field shows the default value, if any, for the Parameter definition that refers to this Variable.
Nullable This field shows whether the Parameters of this Variable can contain null values or not. See "Creating Variables Manually" for more information.
Validation Status This field displays the current validation status of the Variable. If you have the necessary privileges, you can change the validation status by selecting Validation Supporting Information from the Actions drop-down list. See "Validating Objects and Outputs" for further information.
Status This field displays the installable status of the Variable. A Variable is always Installable. See Appendix A, "Installation Requirements for Each Object Type".
Checked Out Status This field displays the status of the Variable: either Checked Out or Checked In. See "Understanding Object Versions and Checkin/Checkout" for further information.
Checked Out By This field displays the username of the person who has the Variable checked out. See "Understanding Object Versions and Checkin/Checkout" for further information.
Latest Version If set to Yes, this is the latest version of the Variable definition.
Version This field displays the current version number of the Variable.
Version Label This field displays the version label, if any, for the Variable version.
Defining Columns is covered in "Defining Table Columns" in the chapter on Tables.
This section contains the following topics:
See also:
In Oracle LSH you must create a defined object called a Parameter for each input and output parameter in a Program's source code.
In Workflows and Report Sets you can define Parameters especially for the purpose of passing their value (to be set in the Execution Setup definition or at runtime) to other Parameters you specify within the Workflow or Report Set, reducing the number of Parameters to be set at runtime. You can also pass the value of an output Parameter of one Program in a Workflow or Report Set to the input value of another Parameter in the same Workflow or Report Set (see "Setting Up Parameter Value Propagation").
Note:
A Load Set, Data Mart, and Business Area contains Parameters defined by adapters used to create these objects. See "Setting Load Set Parameters", "Setting Data Mart Parameter Values", and "Setting Business Area Attributes and Parameters" for more details.A Parameter definition inherits attribute values from its source Variable (notably data type, length, and default value, if any) and has additional attributes such as Required, Visible, and Read Only, and its list of acceptable values, if any.
You can use Parameters to increase the reusability of a Program; for example, if you hardcode a value in source code and then want to change the value, you must create a new version of the Program definition and revalidate it. No revalidation of the Program definition is required when you rerun the same Program using a different Parameter value.
Your company may develop a library of standard Parameters that are compatible with standard Table Columns and available for reuse throughout Oracle LSH. Using standard Parameters and Table Columns facilitates reusing Programs on different data and streamlines Parameter value propagation in Workflows and Report Sets.
For example, you can create a Parameter Set containing Parameters based on the same Oracle LSH Variables as the Columns in each standard Table, so that when you search for a Parameter definition in a Program that will read from or write to a standard Table, you can search in the Parameter Set with the same name as the Table.
Some more examples of Parameter usage:
Run on different data. Define a standard study demography report Program definition and promote it to a Domain library. Create instances of this Program in multiple Application Areas, each of which contains data for a different study. Bind the value of the Study Parameter in the Execution Setup for each Program instance to the appropriate Study Parameter value.
Or create a required Parameter settable at runtime to determine whether a Program uses local lab range definitions, standard published reference ranges, or panic ranges.
Similarly, use a Parameter to determine whether you run a Program on all adverse events or only serious adverse events; or use a Parameter to determine whether you run a Program on all Oracle Clinical Data Clarification Forms (DCFs) or only those that have been outstanding for a certain time period.
Generate different report formats. Use a Parameter to generate multiple reports on the same data, each in a different format. For example, create a Parameter called Format with the values Table, Listing, and Figure. Write the source code so that if the input value of the Format Parameter is table, the program produces a table, and so on. If you want to include each format in a Report Set, but want each report to be in a separate Report Set Entry, you can define an instance of the same Program definition in each of three Report Set Entries and bind the Format Parameter to a different value in the Execution Setup of each Program instance.
Run on a subset of data. Use Parameters for subsetting data; that is, limiting the rows processed in a single Table. For example, from a single table that includes data on both male and female patients, you might choose to report data separately, processing only patients whose Sex Parameter value is Male or only patients whose Sex Parameter value is Female. To run the same Program both ways automatically, create two instances of it in a Workflow or Report Set and bind the value in the Execution Setup of each instance so that each instance uses a different value for the Sex Parameter.
When you generate a default Execution Setup for a Program, the system automatically includes a copy of all the Parameters you have defined.
You can modify Parameter settings in the Execution Setup to control the options available to the person submitting the Program for execution; for example, if a Parameter is set to Read-Only in the Execution Setup, a user submitting the Program for execution cannot change the value of that Parameter. Execution Setups contain a copy of the Parameters and changes made to Parameters in Execution Setups do not affect Parameter settings in a Program definition or a Parameter definition.
You can define multiple Execution Setups, each with different Parameter settings; see "Creating, Modifying, and Submitting Execution Setups".
Figure 6-1 Process of Creating the First Parameter Instance in a Program, Report Set, or Workflow
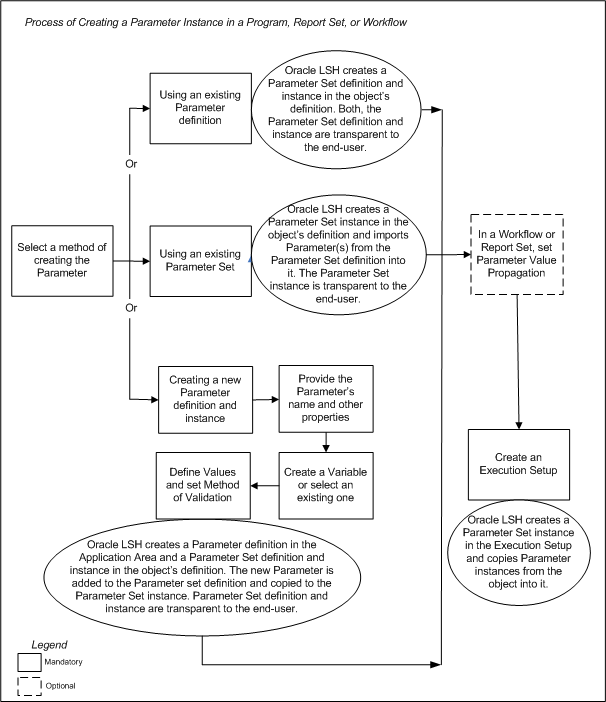
When you create a Parameter in a Program, Report Set, or Workflow, you are actually creating an instance of a Parameter definition. Follow the instructions below.
When you create a Parameter in an Application Area or Domain, you are creating a Parameter definition only, but you can follow the instructions at "Create a New Parameter Definition and Instance".
To create a new Parameter instance:
In the Parameter subtab of a Program, Report Set, or Workflow, click Add.
The system displays the Create Parameter screen.
Choose one of the following options:
Create a new Parameter definition and instance. Choose this option if no Parameter definition exists that can meet your needs.
Create an instance from an existing Parameter definition. Choose this option if a Parameter definition already exists that meets your needs. See "Finding an Appropriate Definition" and "Reusing Existing Definitions" for further information.
If you use an existing Parameter as a definition source, its source Variable and default values, list of allowable values, and/or validation rules are already defined.
Create Parameters from an existing Parameter Set. This option creates instances of all the Parameters in a single Parameter Set at once. This option appears only the first time you create a Parameter in a Program, Report Set, or Workflow. That is because an object can contain only a single Parameter Set. See "Defining and Using Parameter Sets" for more information on Parameter Sets.
Notes:
In principle, it is best to reuse Parameter definitions or their source Variables as often as possible. The last two options both reuse existing Parameter definitions. There are two advantages:promotes data type and length consistency along the data flow when Table Columns are also based on the same Variable
makes automatic Parameter value sharing in Workflows and Report Sets easier to set up
Depending on your choice, follow one of the following sets of instructions:
To create a new Parameter definition and instance at the same time, do the following:
Select Create a New Parameter Definition and Instance. Additional fields appear.
Enter values in the following fields:
Name. See "Naming Objects".
Note:
Do not use spaces in the name of any Parameter you create for use in a Report Set. This will cause an error in post-processing because the Parameter name becomes an HTML tag, and spaces are not allowed.Description. See "Creating and Using Object Descriptions".
Set the following attributes:
Visible (Required). If set to Yes, the Parameter is visible and its value can be changed. If set to No, it will not be visible at runtime and is therefore effectively bound to the value set in the Execution Setup definition.
Required (Required). If set to Yes, the Parameter must have a value; the system will not execute the Program if this Parameter does not have a value. If set to No, the system executes the Program even if the Parameter does not have a value.
Read Only (Optional, and only Visible Parameters can be Read Only). If set to Yes, the person submitting the Program for execution can see the Parameter's value but cannot change it. If set to No, the submitter can change the Parameter's value at runtime.
Input Output (Required). From the drop-down list, choose one of the following values: Input, Output, or Input/Output, to define the role of the Parameter in the Program. If set to Input, the Parameter can receive a value at runtime and pass it to the Program's source code. If set to Output, the Parameter value is generated by the Program and can be passed to another Program in the same Workflow or Report Set. If set to Input/Output, the Parameter can receive a value at runtime and pass it to the Program's source code, which may transform the value before reporting it.
Prompt (Optional). Use this field to specify the label to be displayed in the Execution Setup for this Parameter. If you do not specify a Prompt, the system uses the Parameter Name.
Note:
All the above attributes except Input/Output can be changed during the definition of the Execution Setup.Specify the LSH Variable to be used as a definition source for the Parameter. You can select an existing Variable or create a new one. See "About Variables, Parameters, and Columns" and "Creating Variables Manually".
Define the allowed and default values of the Parameter. See "Defining Allowed Values".
Define the validation rules for the Parameter. See "Setting Validation Rules".
Click Apply. The system returns you to the Parameters subtab of the Program Properties screen. To continue defining the Parameter, click its hyperlink. Follow instructions to Defining Parameter Details.
You can create multiple Parameters at the same time by creating instances of all the Parameters in a Parameter Set. This option appears only the first time you add a Parameter to a Program or other executables. See "Defining and Using Parameter Sets".
To create a new Parameter definition from an existing Parameter Set, do the following:
Select Create Parameters from an existing Parameter Set. Additional fields appear.
Click the Search icon for the Definition Source field to locate the Parameter Set that contains the Parameters you need. The Search and Select screen opens.
In the drop-down lists, select the Domain and Application Area in which to search for a Parameter Set.
If you know the exact name of the Parameter Set, you can enter it in the Name field.
Click Go. The system lists all Parameter Sets that meet the search criteria.
Click the Quick Select icon to select one Parameter Set. The system returns to the Create Parameter Instance screen.
Click Apply. The system returns you to the Parameters subtab of the Program Properties screen and, in the Program, creates instances of all the Parameters in the Parameter Set.
If necessary, you can remove Parameters you do not need by selecting them and clicking Remove.
To continue defining the Parameter, click its hyperlink. Follow instructions for Defining Parameter Details.
This section contains the following topics:
See also "Setting Up Parameter Value Propagation".
If you are defining a Parameter in the context of a Workflow or Report Set, you have a choice between the following methods of determining the Parameter value. You must choose one.
If you are defining a Parameter for a Program that is not part of a Workflow or Report Set, getting the Parameter's value from another Parameter is not possible and this choice does not appear.
Define Value. The Parameter's value must be set manually; either here, or in the Execution Setup, or at runtime. You can specify one of several ways to determine allowable value(s). See "Defining Allowed Values".
Get Value From Another Parameter. You can set up value propagation within a Workflow or Report Set so that this Parameter receives its value from another Parameter in the same Workflow or Report Set. See "Setting Up Value Propagation from the Target Parameter".
You can specify the values allowed for the Parameter in several ways, found in the List of Values drop-down list. The system displays the appropriate interface for defining each after you make a choice.
None. No list of allowable values is associated with the Parameter. The user can enter any value. You can define a Program to validate the value; see "Defining Programatically Generated Lists of Values and Value Validation".
You can specify a default value. To force the user to set a value at runtime, select Required and do not set a default value.
The system validates that the default value conforms to the Parameter's data type and length (defined in the source Variable). If the data type is Date, the system checks that it is in the format specified in User Preference.
Static List of Values. Create a list of specific values you want to allow for the Parameter. These values will appear as the only possible choices for the Parameter. Click Add Value to enter each value you want to allow. The system will display them in the list of values in the order in which they appear here.
You can select one value to be the default value if you want to. To force the user to set a value at runtime, select Required and do not set a default value.
The system validates that each value you define conforms to the Parameter's data type and length (defined in the source Variable).
Note:
Do not enter a comma (,) in the Parameter value string. The system interprets a comma as a delimiter between two different Parameter values.Classification List of Values. This option results in a list of allowable values that comprises the values at a particular level of a classification hierarchy.
Select a classification hierarchy and level. The system generates a list of values equal to the set of values defined for that hierarchy level. For example, if you choose the Project, Study, and Site hierarchy and the Study level, the list of values includes all the Study names.
If you define two Parameters in the same Program and base their allowed values on the same classification hierarchy, on two adjacent levels, the allowable values for the Parameter associated with the lower level are limited to those with a relation to the value chosen for the Parameter associated with the higher level.
For example, if you define two Parameters whose possible values are linked to the Project, Study, and Site hierarchy, with one associated with the Project level and the other associated with the Study level, the possible values for the Project level Parameter include all the Project values in the hierarchy. However, the possible values for the Study level Parameter are limited to those related to the particular Project value selected. If the value for the Project-level Parameter is Project 1, the list of values that appears for the Study-level Parameter includes only those studies that are part of Project 1. If you change the value of the Project level Parameter to Project 2, the list of values for the Study level Parameter changes to studies that are part of Project 2.
The same is true for Parameters linked to each lower level. In this example, you can define a third Parameter associated with the Site level whose values are limited to sites that are part of the particular study selected.
Program Generated List of Values. You can define an Oracle LSH Program, or Source Code within a Program, specifically for the purpose of dynamically generating a list of values for a Parameter. You must check in and install the Program.
You must write the source code in PL/SQL and use the following syntax to generate a list of values:
FUNCTION <function name> (pi_paramRef IN CDR_PARAMETER_OBJ_TYPE,
pi_paramColl IN CDR_PARAMETER_COLL)
RETURNS CDR_VALS_COLL;
Click the Search icon and specify the Program and Source Code you want to use to generate the list of values for the Parameter.
See "Defining Programatically Generated Lists of Values and Value Validation" for further information.
You can choose a method of validating the Parameter's value. If you select a method, the system validates the Parameter value when the Program is submitted for execution. If the Parameter has an invalid value, the system returns an error message and does not execute the Program.
Note:
If you set a default value, the system validates its data type and length each time you modify the Parameter.You can choose one of the following methods of validating the Parameter's value:
None. You can choose to accept any value entered by the user.
Programmatic. You can define an Oracle LSH Program specifically for the purpose of dynamically validating the Parameter value. You must check in and install the Program. See "Defining Programatically Generated Lists of Values and Value Validation" for further information.
Click the Search icon and specify the Program that contains the Source Code you want to use to validate the value of the Parameter.
Validate Against LOV. If you defined a static list of values for the Parameter, the system accepts the entered value only if it appears on that list.
This section contains the following topics:
You can reach this screen from Oracle LSH object definitions, instances, and Execution Setups. Click Update to make changes to any of the settings but note the following:
Changing Parameter properties from an object's instance is the same as changing Parameter properties from an object's definition. This is because Parameters belong to an object definition.
The changes you make to the Parameter properties become the default settings for all new Execution Setups for this object instance. But any existing Execution Setups do not get updated with the changed Parameter properties until you upgrade those Execution Setups. See Upgrading Execution Setup Structure and Parameters for information on upgrading Execution Setups.
If you are in an Execution Setup, the changes you make to the Parameter apply only to the Execution Setup.
See "Modifying Parameters" for information on modifying Parameter properties.
You can see the following instance properties:
Name You can click Update and modify the name. See "Naming Objects" for further information.
Description You can click Update and modify the description. See "Creating and Using Object Descriptions" for further information.
Visible If set to Yes, the Parameter is visible by default in the Execution Setup of the instance. If set to No, the Parameter is not visible by default. You can choose to keep this setting as Yes in an object definition or instance, and change it whenever required, in an Execution Setup.
Note:
Changes made to Parameter properties from an Execution Setup do not affect Parameter properties in the object's definition because Execution Setups maintain an independent copy of the Parameters.Required If set to Yes, you must provide a value for this Parameter in the Submission form for this instance. This setting is applicable only to visible Parameters. You can choose to keep this setting as No in an object definition or instance, and change it when required, in an Execution Setup.
Read Only If set to Yes, you cannot change the value of this Parameter. You can choose to set this property to No in an object definition or instance, and change it whenever required, in an Execution Setup.
Input / Output This setting indicates the type of Parameter. Parameters can be of type Input, Output, or Input/Output.
Prompt This is the display prompt for the Parameter. By default it is the same as the Parameter's name.
Definition You can upgrade to a new version of the same definition. See "Upgrading to a Different Definition Version from an Instance".
Version This field displays the current version number of the Parameter instance.For further information on object versions, see "Understanding Object Versions and Checkin/Checkout".
Validation Status This field displays the current validation status of the Parameter instance. See "Validating Objects and Outputs" for further information.
Status This field displays the installable status of the Parameter: Installable or Non Installable. The installable status of a Parameter depends on the installable status of its parent object. See Appendix A, "Installation Requirements for Each Object Type" for more details.
This section displays the following settings:
List of Values If you have provided a method to determine the Parameter's value, a list of values that are valid for the Parameter appear here. Else the value for this field is None.
Default Value If you have specified a default value for the Parameter, the value appears here.
See "Defining Allowed Values" for more details on defining values for Parameters.
Method of Validating Values If you have specified a method to validate Parameter values, that method name appears here. See "Setting Validation Rules" for more details.
Checked Out Status This field displays the status of the definition: either Checked Out or Checked In. All Parameter properties belong to the Parameter definition as well as the Parameter instance. You can modify all properties from the Parameter instance whether or not the Parameter definition is checked out. See "Understanding Object Versions and Checkin/Checkout" for further information.
Latest Version If set to Yes, this Parameter instance is pointing to the latest version of the Parameter definition. If set to No, this Parameter instance is pointing to an older version of the Parameter definition.
Version Label This field displays the version label, if any, for this definition version.
Validation Status This field displays the current validation status of the Parameter definition. If you are working directly in the definition in an Application Area or Domain and you have the necessary privileges, you can change the validation status by selecting Validation Supporting Information from the Actions drop-down list. If you are working in an instance of the Parameter in a Work Area, and you want to change the validation status of the definition, you must go to the definition. See "Validating Objects and Outputs" for further information.
Status This field displays the installable status of the Load Set: Installable or Non Installable. See Appendix A, "Installation Requirements for Each Object Type".
This section displays the properties of the Variable that the Parameter definition belongs to.
Data Type This field displays the data type of the Variable: VARCHAR2, NUMBER, or DATE.
Oracle Name This field displays the Oracle name of the Variable to which the Parameter definition belongs.
Length This field displays the length of VARHCAR2 or NUMBER type Variables.
SAS Name This field displays the SAS name of the Variable.
SAS Label This field displays the SAS label of the Variable.
SAS Format This field displays the SAS format of the Variable.
Update Click the Update button to modify the Parameter instance. See "Modifying a Parameter Instance".
This section contains the following topics:
You can set up Parameter value propagation only in the context of a Workflow or Report Set.
Within a Workflow or Report Set, you can set up automatic Parameter value propagation so that a Parameter contained in a Program instance in the Workflow or Report Set can receive its value automatically from another Parameter in the same Workflow or Report Set; either the output Parameter of another Program, or a Parameter created directly in the Workflow, Report Set, or Report Set Entry especially for this purpose.
Value propagation has two benefits:
Consistency. Value propagation ensures a consistent value among the Parameters you specify. For example, many Programs in a Report Set may have an input Parameter for the Study value. If the whole Report Set concerns only one study, you can set up value propagation from a special Value Propagation Parameter you define at the top Report Set level for this purpose, and all the study Parameters in the Report Set.
Ease of Submission. Value propagation makes it much easier to submit a Report Set or Workflow for submission because all Parameters defined as getting their value from another Parameter cannot be modified, and the person submitting the job is not required to enter a value for them.
You can set up value propagation in the definition of either the source or the target Parameter. If you want the value of a single Parameter to be propagated to multiple other Parameters, it is more efficient to set it up from the source Parameter.
The rules for defining value propagation are slightly different in Workflows and Report Sets.
Value Propagation in Workflows Because a Workflow has a set execution order, you must always propagate Parameter values from Parameters whose value is entered or generated earlier during Workflow execution to Parameters that require a value later in Workflow execution. That is, the source Parameter must be either defined at the top level of the Workflow or be an input Parameter of a Program executed before the Programs containing the target Parameters to which its value is propagated.
Value Propagation in Report Sets In Report Sets, the rules for value propagation are different depending on whether the source Parameter is defined directly in the Report Set/Report Set Entry, or is an output Parameter of a Program in a Report Set Entry:
Propagating values from Report Set or Report Set Entry Parameters. If you define a Parameter directly at the top level of the Report Set or in any Report Set Entry especially for the purpose of propagating its value to other Parameters in the Report Set or Report Set Entry, you must define the Parameter at the same level or a higher level from the Report Set Entries that contain the target Parameters.
Propagating values from Program output Parameters. Oracle LSH can adjust the execution order of a Report Set to accommodate the Parameter value propagation you define from the output Parameter of one Program to the input Parameter of another Program. You can define value propagation from a Program Parameter in a Report Set Entry that is displayed below a target Program Parameter's Report Set Entry. However, the system does not allow circular value propagation.
Note:
If you plan to use a triggered submission for a Workflow or Report Set, you must ensure that each Parameter contained in the Workflow or Report Set receives its value from a Parameter at the top level of the Workflow or Report Set or from an output Parameter generated by a Program within the Workflow or Report Set. For information on triggered submission, see "Using Message-Triggered Submission from External Systems".The following kinds of Parameters can serve as the source of the value in Parameter value propagation:
Program Output Parameters. You can use a Parameter value generated by one Program in a Report Set or Workflow to populate the value an input Parameter of one or more other Programs in the same Report Set or Workflow.
Report Set and Workflow Parameters. You can define Parameters especially for this purpose directly in a Report Set, Report Set Entry, or Workflow.
Report Set Overlay Template and Post-Processing Parameters. All Report Set Entries have the same set of predefined Parameters that the system uses to generate a single or multivolume PDF output. These Parameters are predefined to automatically pass their value to Parameters with the same name. You can explicitly set up value sharing for Post-Processing Parameters but not for Overlay Template Parameters; see "Creating and Setting Report Set Parameters" for further information.
You can set up value propagation either manually or automatically.
To define value propagation from the source Parameter manually, do the following:
On the Parameter instance's screen, click the Update button. The screen refreshes to make all fields editable.
Scroll down to the Value Propagation section. Click Add Parameters.
Choose from a list of Parameters. The system displays only Parameters that are either:
contained in the same Report Set or Workflow
(in a Report Set only) defined directly in a Report Set Entry or a Program in a Report Set Entry
In a Report Set, it is possible to feed a value from an output Parameter of one Program to an input Parameter in a Program in the Report Set. The system executes the Program that produces the output Parameter before executing the Program that uses the value for an input Parameter. The system prevents a circular reference.
Note:
It is possible to set a Parameter as a source for value propagation even if the target Parameter is not of the same data type or size or both. Such a mismatched value propagation causes the Workflow or Report Set to fail when executed. You must make sure you set up value propagation keeping in mind the data type and size of the source and target Parameters.You can set up automatic value propagation to Parameters that may be added in the future to the Report Set or Workflow.
When you add a Program that contains a Parameter with the same name to the Workflow or Report Set, the system automatically sets up value propagation to it from this Parameter, and displays a message informing you that it has done so.
For Report Sets, the system sets up automatic value propagation only to Parameters that are in the direct flow below the value source Parameter.
For Workflows, the system sets up automatic value propagation only to Parameters that occur downstream in the execution flow.
To set this up, select the Automatically Pass Value to Parameters With Same Name check box.
Alternatively, if you prefer not to use automatic propagation or if you want to pass the value to Parameters with a different name, you can set up value propagation Malay. See "Setting Up Value Propagation Manually".
This option is available only for Parameters contained in a Program that is part of a Report Set or Workflow, and for Parameters defined directly in a Report Set Entry. The Parameter's value must be passed to it by one of the following:
an output Parameter of a different Program in the same Report Set or Workflow
a Parameter created for this purpose in the Report Set or Workflow
in the case of post-processing Parameters in Report Sets, by the same predefined post-processing Parameter at the top of the Report Set or Report Set Entry
Do the following to set value propagation from the target Parameter:
On the Parameter's screen, click Update. The screen refreshes to make all fields editable.
Under Method of Determining Value, select Get Value From Another Parameter.
The system displays the Parameter field with a Search icon.
Click the Search icon. The system opens a screen listing all the eligible source value Parameters contained in the Report Set or Workflow.
Select a Parameter by clicking its radio button and clicking the Select button. The system enters the value source Parameter's name in the Parameter field and its type and location in the fields below. You can click on Parameter Details to see the whole definition of the value source Parameter.
Note:
The system uses the Parameter links you set up here to determine the execution order of Report Sets (which is not necessarily the same as the display order). The system prevents you from defining circular links.Defining a set of standard Parameter Sets facilitates creating Parameter instances in Program and other executable instances and facilitates setting up Parameter value propagation in Report Sets and Workflows.
As soon as you add a Parameter to a Program, Report Set, or Workflow, behind the scenes, the system creates a Parameter Set definition and instance in that executable's definition. The Parameter you create really gets added to the Parameter Set definition and instance. You can never see a Parameter Set instance in the user interface, but a Parameter exists exclusively inside a Parameter Set. In addition, each executable can contain only a single Parameter Set. This is why you see the option of creating a Parameter using an existing Parameter Set only once.
When you are working in a Program, Report Set, or Workflow, the simplest way to create multiple Parameter instances is to create instances of all the Parameters in a Parameter Set at the same time. However, you must create logical Parameter Sets in Application Areas or Domains in order to use this functionality.
See "Process of Creating the First Parameter Instance in a Program, Report Set, or Workflow".
If you define the first Parameters by selecting a Parameter Set, then the system creates an instance of that Parameter Set in the executable definition. The Parameter Set definition remains in the Application Area or Domain. This has implications for modifying the Parameters in your executable, as follows:
If you have Modify privileges on the Parameter Set definition in the Application Area or Domain, you can make structural changes to the Parameter Set, but behind the scenes the system checks out the Parameter Set definition, creates a new version of it, and makes the same changes in the new version so that the Parameter Set definition remains consistent with the Parameter Set instance in the executable. The next time someone uses the same Parameter Set definition, he or she will see the modified version as the most current. Structural changes include adding and removing a Parameter and changing the source definition of any Parameter.
If you do not have Modify privileges on the Parameter Set definition in the Application Area or Domain, you cannot add or remove Parameters from your executable, or change the source definition of any Parameter, because the Parameter Set instance and definition must remain synchronized.
Solution 1 To avoid either of these situations and yet benefit from standard Parameter Sets, before you create Parameters in a Program or other executable, copy the Parameter Set definition in its Application Area or Domain and paste it into your local Application Area. Create Parameters in your executable from the local Parameter Set definition. You can then add and remove Parameters and the changes will affect only the local copy of the Parameter Set definition.
Solution 2 Create a version label on the version of the Parameter Set that is the correct, standard version. Always search for Parameter Sets with Version Labels that are not null, and use the correct version.
You may want to take the time to develop standard Parameter Sets based on standard Variables, logically grouped and meaningfully named.
To create a Parameter Set definition manually, do the following:
In the Applications tab, navigate to the Application Area or Domain where you want to create the Parameter Set.
Click Manage Definitions. The system opens the Maintain Application Area (or Domain) Library screen.
From the Create drop-down list, select Parameter Set.
Click Go. The system opens the Create Parameter Set Definition screen.
Enter a Name and Description of the Parameter Set that will help other users determine whether to use this Parameter Set.
Click Apply. The system opens the Parameter Set screen.
Under Parameters at the bottom of the page, click Add. The system opens the Create Parameter screen.
Add as many Parameters as necessary. See instructions at "Creating a Parameter" and "Defining Parameter Details".
To make the Parameter Set available for use, check it in.
You can define Source Code within a Program to generate a list of values for a Parameter, or to validate a user-entered value. You can use the same Source Code for both purposes.
When you search for Source Code to use for a Parameter's programmatic LOV or value validation, the system does not impose the normal security requirements; you can select any sharable Source Code from any Program, whether or not you have standard security access to the Program.
The source code you write must be in PL/SQL and must reference CDR_VALS_COLL, a predefined Oracle database object of type Collection whose structure is effectively the same as a table's, with rows and columns. CDR_VALS_COLL has two columns, one for position (row number in the table) and one for value (the value to derive for the list of values or validation). You must write source code that creates as many positions as necessary and populates each with an appropriate value.
Note:
If the source code generates only one value, the system assigns that value to the Parameter automatically.CDR_VALS_COLL is effectively empty except when a Program populates it within the context of a particular user's session. Each user session "sees" its own collection only.
See example source code below.
To create a programmatically generated list of values for a Parameter, or to programmatically validate a Parameter value, do the following:
Create an Oracle LSH Program of type PL/SQL. See "Creating a Program".
Add a Source Code definition to the PL/SQL Program. See "Defining Source Code" and "Defining PL/SQL Programs".
In the Oracle Package field, enter the package name.
In the Oracle Procedure field, enter the function name. You are writing a function, not a procedure, but enter the function name in this field.
Add a source Table Descriptor for each Table instance your code will read from, if any. Map each Table Descriptor to the appropriate Table instance. See "Defining Table Descriptors" and "Mapping Table Descriptors to Table Instances".
Enter your PL/SQL source code in the Source Code field.
As with other PL/SQL source code in Oracle LSH, you must include the package spec as well as the package body in your source code.
Be sure to use the same names for the package and function that you entered in the Oracle Package and Oracle Procedure fields.
The syntax in Example 6-1 is required verbatim up to the beginning of the function, except for the package and function names. See the examples for further information.
Apply your changes, check in the Program definition, and install the Program instance in its Work Area.
In the Parameter definition, specify the name of the Program and Source Code that contain the code that will generate the LOV or validate the Parameter value. See "Defining Allowed Values" and "Setting Validation Rules".
In this example, the source code creates two rows in the collection CDR_VALS_COLL. Position 1 has the value Yes and position 2 has the value No. This example shows the essential elements required in as simple a way as possible. However, you would not want to use this particular source code because you could accomplish the same thing much more simply by defining a static list of values with two values: Yes and No.
The package spec is the first five lines of code, up to the slash (/). The package name is LOV and the function name is returnValues. Except for these names, for which you can substitute any names you choose, all the code above the beginning of the actual function (at begin) is required as is.
For each row in the collection the source code does the following in succession:
Creates the row itself by using an EXTEND command
Specifies the values for that row of the POSITION column
Specifies the values for that row of the VALUE column
Specifies that the function returns the value for position n
Example source code:
CREATE OR REPLACE package LOV as
FUNCTION returnValues (pi_tParam IN cdr_parameter_obj_type ,pi_cParamColl    IN cdr_parameter_coll) RETURN CDR_VALS_COLL;
end LOV;
/
CREATE OR REPLACE package body LOV as
FUNCTION returnValues (pi_tParam IN cdr_parameter_obj_type ,pi_cParamColl    IN cdr_parameter_coll) RETURN CDR_VALS_COLL IS
     valuesRecord     CDR_VAL_OBJ_TYPE  := new CDR_VAL_OBJ_TYPE(NULL,NULL);
     LOVCollection    CDR_VALS_COLL     := CDR_VALS_COLL();
 begin
        LOVCollection.EXTEND;
        valuesRecord.POSITION := 1;
        valuesRecord.VALUE    := 'Yes';
        LOVCollection(1) := valuesRecord;

        LOVCollection.EXTEND;
        valuesRecord.POSITION := 2;
        valuesRecord.VALUE    := 'No';
        LOVCollection(2) := valuesRecord;

     RETURN (LOVCollection);
end returnValues;
end LOV;
/
Example 6-2 Pulling Column Values from a Table Instance
In the real world you would use a programmatically generated LOV to pull the current values of a column in an Oracle LSH Table instance that meet a certain set of criteria. In this case, you add a source Table Descriptor to the Program and map it to the Table instance whose Column values you want to read.
In your source code you write a SELECT statement and WHERE clause to describe the criteria for the values you want to retrieve. You then use the EXTEND command to create n rows in the collection, where n is the number of values retrieved, and populate each row with a POSITION value and a VALUE value.
The types of changes you are able to make to a Parameter definition or instance depend on many different interdependent factors:
Some Parameter properties belong to the Parameter instance, some to the Parameter definition, and others to the Variable. These three definitional layers may each belong to a different container, and you may have different privileges on each.
To modify a Parameter within a Program or other executable object, you must have Modify privileges on the Program or other executable object itself, and that object must be checked out.
A Parameter Set instance must remain structurally the same as its Parameter Set definition. If you add or remove Parameter instances from a Parameter Set instance, the system automatically creates a new version of the Parameter Set definition and removes them there as well. You must have Modify privileges on the Parameter Set definition or you cannot add or remove Parameter instances from the Parameter Set instance, or change the source Parameter definition for Parameter instances within the Parameter Set instance.
If you are working in an Execution Setup, you can make very few changes to Parameters.
You can make the following changes in the following locations:
Parameter Definition Parameter definitions are located in two places: contained directly in an Application Area or contained directly in a Domain. In either of these locations, if you have the required privileges, you can do the following:
Update the properties of the Parameter definition itself.
Select a different source definition Variable for the Parameter definition.
Check out the source definition Variable through the Parameter definition, then go to the Variable and modify it. The Parameter definition references the new version of the Variable.
Parameter Instance in a Parameter Set Definition If you have the necessary privileges, you can go to a Parameter Set definition contained directly in a Domain or Application Area and modify the Parameter instances it contains. You can make the following changes:
If you have the necessary privileges on the Parameter definition, you check out the Parameter definition through the Parameter instance, the go to the Parameter definition and modify it. The Parameter instance references the new version of the Parameter definition.
Using the Update button, you can modify the properties belonging to the Parameter instance.
Parameter Instance in a Parameter Set Instance in an Executable Object Parameter Set instances are located in Programs and other executables and in Execution Setups. The following applies to Parameter Set instances that are located anywhere except in an Execution Setup:
If you created the Parameter Set instance in the executable by creating Parameters based on an existing Parameter Set, the Parameter Set definition is located in an Application Area or Domain. In this case:
You cannot check out the Parameter definition from a Parameter instance.
You can select a different source definition Parameter for the Parameter instance only if you have Modify privileges on the Parameter Set definition. This is a structural change, and the system automatically checks out the Parameter Set definition and creates a new version of it with the change.
Note:
Load Sets, Data Marts, Business Areas, and some Program types have predefined Parameter instances whose source definition Parameters are located in Adapter Areas. You should not modify these Parameters, and the administrator should set up security so that it is not possible to modify the Parameter definitions.If you created the Parameter Set instance in the executable by creating one Parameter at a timeâeither defining a new Parameter definition and instance, or creating an instance of an existing Parameterâthen both the Parameter Set definition and the Parameter Set instance are located in the same executable. In this case:
You can check out the source definition Parameter from the Parameter instance and make changes as necessary.
Any structural changes you makeâadding or removing Parameters, or selecting a different source definition Parameter for an instanceâare automatically applied to the Parameter Set definition as well as the Parameter Set instance.
Parameter Instance in a Parameter Set Instance in an Execution Setup You cannot update the Parameter instance or check out and modify the source definition Parameter from a Parameter instance contained in an Execution Setup.
To modify a Parameter instance in a Program or other executable, do the following:
Click the Parameters subtab to view the Parameter instances.
Click the hyperlink in the Name column of the Parameter you want to modify. The system displays the Parameter Instance screen.
Click Update. The system displays most fields as updatable.
Note:
You must check out the definition of the Program, Report Set, or Workflow that contains a Parameter instance before you can update its properties. If the executable definition is not checked out, the Parameter instance's Update button is not enabled.Modify the settings and/or source definition as necessary.
Click Apply. The system saves your changes in the Parameter instance only.
If you have the necessary privileges, you can modify a Parameter definition directly in the Application Area or Domain, or through an instance of the Parameter in a Parameter Set in an Application Area or Domain.
Note:
Never change anything in a Parameter definition from a Load Set, Data Mart, and Business Area. If you do, the adapter you used to create the Load Set, Data Mart, or Business Area, becomes invalid and either you cannot create any more objects of that adapter type, or the objects you create do not work.Modifying a Parameter Definition Directly in a Domain or Application Area To modify a Parameter definition directly in a Domain or Application Area, do the following:
Navigate to the Domain or Application Area in the Applications tab.
Click the Manage Definitions icon. The system opens the Maintain Library screen.
Click the Parameter node (+). The system displays all the Parameters in the Application Area library.
Click the hyperlink of the Parameter you want to modify. The system opens the Parameter Definition screen.
Click Check Out. The system checks out the Parameter and creates a new version of it.
Click Update. The system makes all the fields enterable.
Modify the settings as necessary. For an explanation of each setting, see "Create a New Parameter Definition and Instance" and "Defining Parameter Details".
If you need to change the attributes that belong to the Variable (Data Type, Length, and, for Number types, Precision) you can select a different Variable in the Definition field or, if you have Modify privileges on the source definition Variable, you can check it out through the Parameter definition and modify it as necessary. The Parameter definition references the new version of the Variable.
Click Apply. The system saves your changes.
Modifying a Parameter Definition through a Parameter Set When you modify a Parameter definition through an instance of it in a Parameter Set, the instance automatically points to the new version of the Parameter definition. To modify a Parameter definition through an instance of it in a Parameter Set, do the following:
Navigate to the Domain or Application Area in the Applications tab.
Click the Manage Definitions icon. The system opens the Maintain Library screen.
Click the Parameter Set node (+). The system displays all the Parameter Sets in the Application Area library.
Click the hyperlink of the Parameter Set that contains the Parameter you want to modify. The system opens the Parameter Set definition screen.
Click Check Out. The system checks out the Parameter Set and creates a new version of it.
Click the hyperlink of the Parameter you want to modify. The system opens the Parameter instance screen.
In the Parameter Definition section in the lower part of the screen, click Check Out. The system opens the Check Out screen.
Enter the reason you are checking out the Parameter definition in the Comment field and click Apply. The system returns you to the Parameter instance screen.
Click the hyperlink to the Parameter definition in the Definition field in the Instance Properties section at the top of the screen. The system opens the Parameter Definition screen.
Click Update. The system makes fields enterable.
Modify the settings as necessary. For an explanation of each setting, see "Create a New Parameter Definition and Instance" and "Defining Parameter Details".
If you need to change the attributes that belong to the Variable (Data Type, Length, and, for Number types, Precision) you can select a different Variable in the Definition field or, if you have Modify privileges on the source definition Variable, you can check it out through the Parameter definition and modify it as necessary. The Parameter definition references the new version of the Variable.
Click Apply. The system saves your changes.
|
Copyright © 2006, 2014, Oracle and/or its affiliates. All rights reserved. Legal Notices |
|