Understanding the All PeopleSoft Targets Homepage
The All PeopleSoft Targets page lists and displays the summary of all the PeopleSoft targets discovered and registered in Enterprise Manager. You can filter the view so that only specific target types are shown.
Access the All PeopleSoft Targets page to create, discover, organize, access, search, and monitor PeopleSoft targets ( ).
Note: The target types that are displayed depend on the access rights or privileges that have been set for the user.
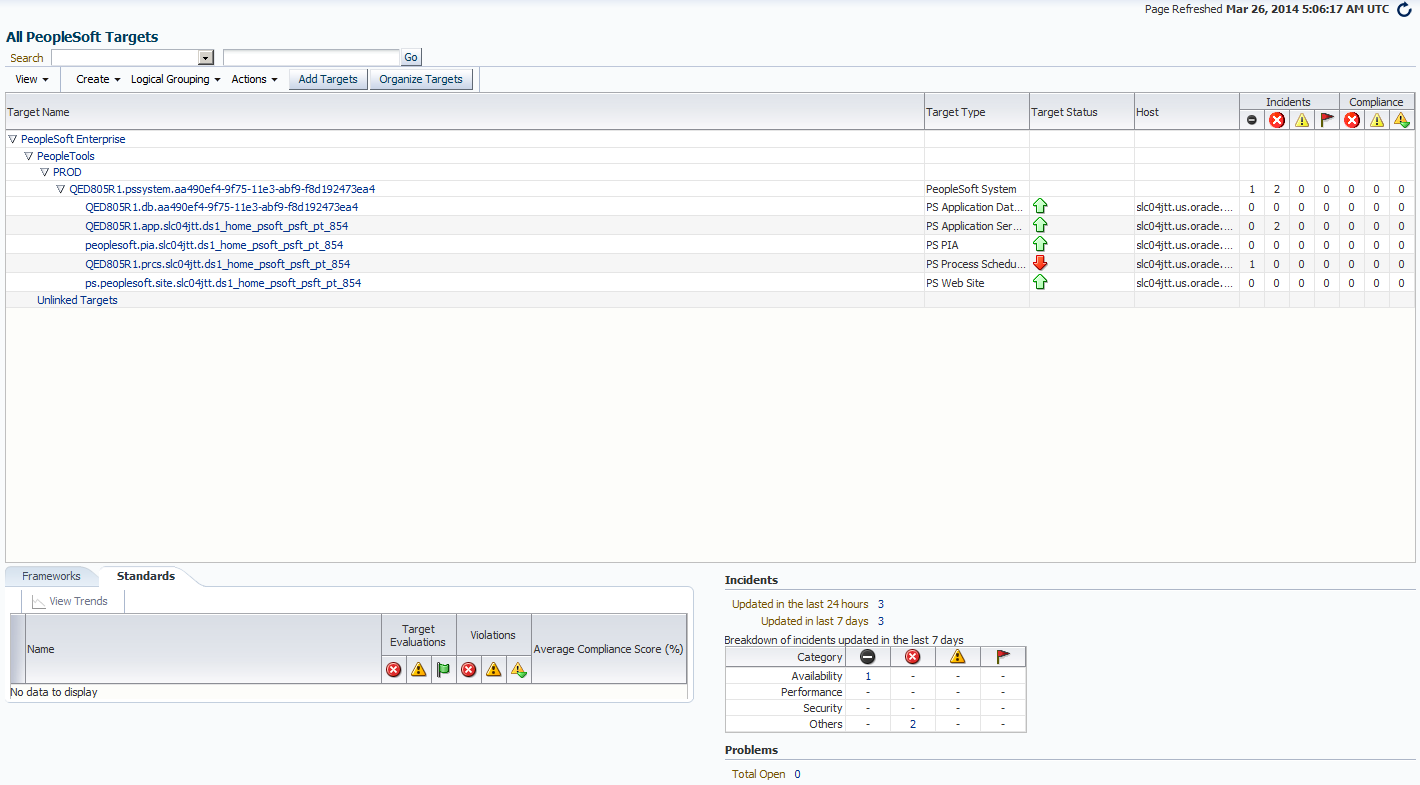
Image: All PeopleSoft Targets page
This example illustrates the fields and controls on the All PeopleSoft Targets page. You can find definitions for the fields and controls later on this page.
|
Field or Control |
Definition |
|---|---|
 |
Click this to show the most current status of the targets. . |
| Search |
Select a target type to search for a specify target. For example, to search for only application server domains, select PS Application Server Domain from the Search list and then click Go. |
| View |
Select a view type to determine how the PeopleSoft targets will be grouped. For more information about viewing target types, see Viewing PeopleSoft Targets on the All PeopleSoft Targets Page. |
| Create |
Use this to create an application server, process scheduler server, search server domain, and PIA domain from the Enterprise Manager Console. The commands that is submitted from the Enterprise Manager are handled by an API layer that captures the commands and submits the appropriate, native, command line options on the host for the server type. For example, submitting the "configure domain" option in Enterprise Manager runs the following PSADMIN command: psadmin -c configure -d domain For more information about creating PS Application Server targets, see Creating PeopleSoft Application Server Domain Targets. |
| Logical Grouping |
Click this to view the PeopleSoft targets by:
Note: PeopleSoft targets not belonging to any logical group appear under Unlinked Targets. If, for example, a PS Application Database with child targets is removed from the environment, the system moves the child targets to Unlinked Targets to indicate that they are "orphaned." Note: Just after discovery, PeopleSoft targets may appear under Unlinked Targets until after a successful configuration collection. |
| Actions |
Click this to start, stop or remove selected PeopleSoft targets. |
| Add Targets |
Click this to discover and register all valid PeopleSoft targets of your host in Enterprise Manager. See, Adding Targets and Understanding the Discovery Process. |
| Organize Targets |
Click this to access the Setup Logical Grouping page, where you can customize how PeopleSoft targets are grouped and displayed. For more information about organizing targets, see Organizing PeopleSoft Targets. |
| Target Name |
Lists the targets discovered. |
| Target Type |
Specify the target types. For more information about target types, see Understanding PeopleSoft Target Types. |
| Target Status |
Specifies whether the target is running or has stopped. |
| Host |
Specifies the host URL on which the target is running. |
| Incidents |
Displays incidents that are generated. An alert is generated when a metric threshold value is reached. The most recent alerts are listed first. By clicking a specific alert message, you can drill down to explicit details about the metric in the alert. |
| Compliance |
Delivers the rules and standards and deviations to system or application. For example, deviations about inappropriate settings and incorrect system configuration will be displayed. |
| Framework |
Click to displays the industry-specified best practices guideline that deals with the underlying IT infrastructure, applications, business services, processes and how they are organized, managed, and monitored. |
| Standard |
Click to displays the EM’s representation of a compliance control that must be tested against some set of IT infrastructure to determine if the control is being followed. |
| Incidents |
Displays incidents that are generated. An alert is generated when a metric threshold value is reached. The most recent alerts are listed first. By clicking a specific alert message, you can drill down to explicit details about the metric in the alert. |
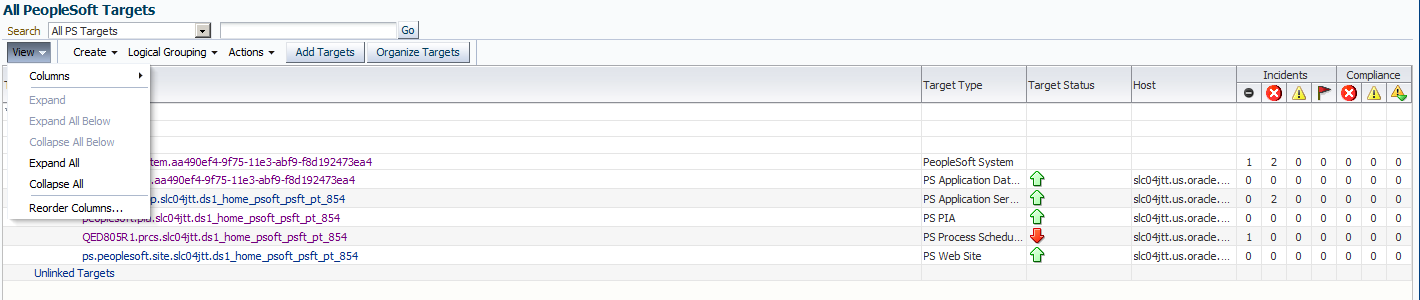
On the All PeopleSoft Targets homepage, click the View tab.
Image: All PeopleSoft Targets - View Tab
This example illustrates the fields and controls on the All PeopleSoft Targets page - View list. You can find the definition of the fields and controls later on this page.
|
Field or Control |
Definition |
|---|---|
| Column |
Click this to specify the columns on the All PeopleSoft Targets page. You can choose to show all the columns or display specific columns, such as, Target Type, Target Status, and Host. |
| Expand All |
Click this to expand the list of targets in the Target Name column. |
| Collapse All |
Click this to collapse the list of targets in the Target Name column. |
| Reorder Column |
Click this to reposition the columns. On the Reorder Column dialog box, click a column name and use the arrows to reorder. |
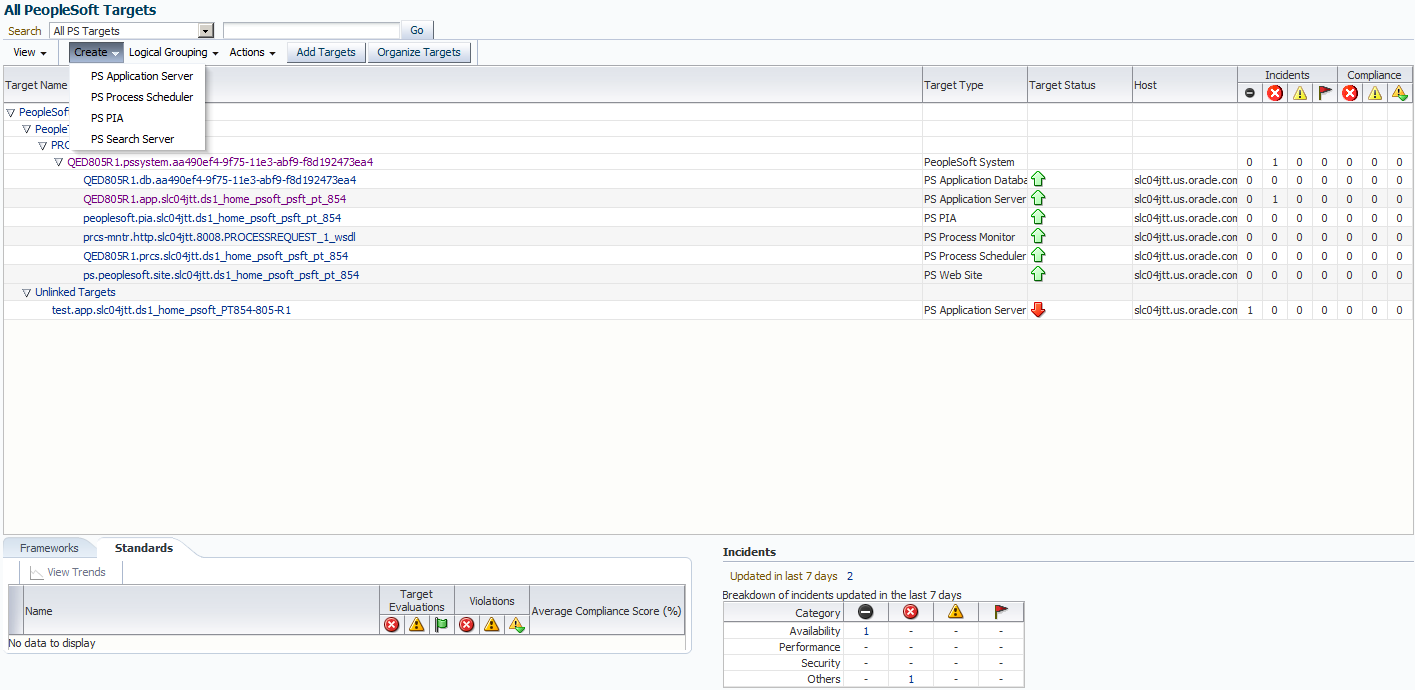
On the All PeopleSoft Targets homepage, click the Create tab.
Image: All PeopleSoft Targets - Create Tab
This example illustrates the fields and controls on the All PeopleSoft Targets page - Create list. You can find the definition of the fields and controls later on this page.
|
Field or Control |
Definition |
|---|---|
| PS Application Server | |
| PS Process Scheduler | |
| PS PIA | |
| PS Search Server |
The first discovery process should be run on a host containing any of the Tuxedo-based domain targets, which are PS Application Server, PS Process Scheduler, and PS Search Server Domains. The host should have the same time zone as the PS Application Database to which it's connected, and the same timezone of most of the other PeopleSoft servers or hosts. During this initial discovery, the system expects that the PS Application Database will be also be discovered.
The PeopleSoft Enterprise Manager Plug-in can monitor only PS Application Databases from Tuxedo domain targets that are in the same timezone. When the database is registered in Enterprise Manager, it must be the database of most of the Tuxedo domain targets.
For example, assume you have a PeopleSoft environment with four UNIX servers with PS Application Server domains in one timezone and one Windows server with a Process Scheduler domain in another timezone. You should execute the first discovery on one of the four UNIX servers. You should not execute the discovery first on the Windows server.
Note: You must first set up the preferred credential for the host before starting the discovery.
To add targets, follow these steps:
Select .
Image: Add PeopleSoft Targets : Discovery Inputs page
This example illustrates the fields and controls on the Add PeopleSoft Targets : Discovery Inputs page. You can find definition for the fields and controls later on this page.

From this page, you can select one or more target types for the discovery process running on a single host.
Field or Control
Definition
PeopleSoft Target Types All target types are selected by default. The PS_HOME/PS_CFG_HOME target check box cannot be cleared because Enterprise Manager must discover it first to establish the basis of the PeopleSoft system. When the PS_HOME and PS_CFG_HOME directories are found, the search continues for any PeopleSoft targets present (for example, an application server, web server, Process Scheduler, and so on).
A PS Web Site cannot be registered without a parent PS PIA target having been registered in a current or a previous discovery process.
Note: Beginning with PeopleTools 8.50, with decoupled PIA_HOMEs and PS_CFG_HOMEs, provide the path to PS_CFG_HOME or PIA_HOME. If PS_HOME is secure (read-only) it may not contain any targets. The discovery process will discover all the selected targets in the specified path.
Host Select the host on which your desired targets run. The system verifies that you have entered a valid host.
Note: The list of hosts only displays those hosts on which Enterprise Manager agents have been installed and registered with the OMS. By default, the system displays all hosts on which a registered Enterprise Manager agent exists, regardless of whether any PeopleSoft elements have been installed on that host.
Discovery Path Enter the paths from which the search (crawl) should begin. Separate multiple paths with a semicolon.
The path should include PS_HOME, PS_CFG_HOME, and PIA_HOME, (as appropriate for your installation). A path with spaces should be enclosed with double quotes. For example:
"c:\Program Files(x86)\psft\pt\853"
Note: The discovery path does not support UNC mapping. The discovery path should contain only local drives. The PeopleSoft Plug-in does support a remote/shared read-only PS_HOME (with a UNC path) for Windows (on PeopleTools 8.50 or later). PS_CFG_HOME should be a local folder and provided in the discovery path. If the PS_CFG_HOME points to a remote PS_HOME (UNC path), PeopleSoft plug-in discovers it.
Crawl Depth Specify the number of nested directories that an agent crawls during the discovery process. The default is 2.
Crawl depth applies to each directory entered in the discovery path. For example, if you specify a value of 3 and have more than one discovery path listed, the agent searches 3 levels in each directory.
Click Next. to enter the credentials for the host machine on which you want to run the discovery process.
You can either choose a preferred or a named credential for the selected host. The credential appearing on this screen would become the preferred and monitoring credential of the target.
Note: This credential for the host must match the user ID of the user who installed the PeopleTools environment on the host.
Click Next to view the discovery result on the Add PeopleSoft Targets : Discovery Results page.
Select a target and click Next to display the PeopleSoft targets whose databases are discovered.
The Add PeopleSoft Targets : Discover Database page appears showing a list of targets for which environment variables may need to be set.
On the Add PeopleSoft Targets : Discover Database page, specify any required environment variables.
Image: Add PeopleSoft Targets : Discover Database page
This example illustrates the fields and controls on the Add PeopleSoft Targets : Discovery Database page. You can find definition for the fields and controls later on this page.

Select a target and then set the parameters.
Field or Control
Definition
Set Environment Variables Click to configure settings that enable connection to an application database.
Target Name Name of the PS Application Server Domain, Process Scheduler Domain, or PS Search Server Domain that can have a PS Application Database.
This value displays as a link to the target homepage, which you can select to open in a new window.
Target Type The type of target being registered.
DB Type The type of database to which the target is connecting.
Environment Set Shows a green check mark when environment variables have been set for the database (if required for a specific database type). Shows a red X when environment variables have not been set.
The environment variables referred to in this field are database connectivity parameters and vary depending on the database type.
Databases Discovered Shows a green check mark when the application database is successfully discovered which means that Enterprise Manager can collect configuration data from the target and collect the PeopleSoft GUID from the application database.
Shows a red X when discovery is unsuccessful. Possible reasons are:
The environment variables have not been set correctly. Verify them on the Set Environment Variables page.
The database information is incorrect. Select the target to open it in a new window. Select the Administration tab, then Configure Domain to display configuration data. Validate database information here.
The configuration collection has failed. Select the link for the target in the Name column. The target homepage appears where you can check for metric collection errors displayed above the Incidents section.
Discover Related Databases Click this icon to initiate discovery.
Click OK on the Add PeopleSoft Targets : Discovery Summary page.
This registers the targets and the target discovered appears on the All PeopleSoft page.
Note: When the Percentage of Memory Growth parameter in the [PSAPPSRV] section of the application server domain configuration file (psappsrv.cfg) is uncommented, then the parameter needs to be uncommented in the corresponding metadata file, psappsrv.cfx, as well. This will ensure successful discovery of the PS Application Server Domain Target and Application Database Target when this parameter is uncommented.
Note: For Solaris platforms, to ensure successful discovery, unset LD_LIBRARY_PATH_64 environment variable. Do this by adding unset LD_LIBRARY_PATH_64 to the .profile or in the psemenv.sh script accordingly.
Note: For Windows platform, use the same user name as the host to log on. The discovery fails if the user enters the domain_name\user_name to log into the host.
Setting up Preferred Credential
To set up the preferred credential:
Select Setup, Security, Preferred Credentials.
Click a host to set the preferred credential.
Working With Target Naming Conventions
Enterprise Manager requires that all discovered targets be assigned a unique name that serves as the target's key.
|
Target Type |
Naming Convention |
Example |
|---|---|---|
|
PS Application Database |
<DBName>+db.+<PeopleSoft GUID> |
CRMPRD.db.66ce0b93-85bb-11d9- 92af-fa37c30c4526 where DBName = CRMPRD GUID = 66ce0b93-85bb-11d9-92af-fa37c30c4526 |
|
PS Application Server Domain |
<domain>+app+<host>+<PS_HOME> |
CNVCRM.app.server1.usr_local where domain = CNVCRM Host = server1 PS_HOME = /usr/local |
|
PS Process Scheduler Server Domain |
<domain>+prcs+<host>+<PS_CFG_HOME> |
CNVCRM.prcs.server1.usr_local |
|
PS Search Server Domain |
<domain>+srch+<host>+<PS_CFG_HOME> |
CNVCRM.srch.server1.usr_local |
|
PS PIA using WebLogic or WebSphere |
<PIA domain name>+pia+<host>+<PS_HOME> |
peoplesoft.pia.server1.usr_local where PIA domain name = peoplesoft |
|
PS Web Sites using WebLogic or WebSphere |
<site name.PIA domain name>+site+<host>+<PS_HOME> |
ps.peoplesoft.site.server1.usr_local where site name = ps |
|
PS Process Monitor |
prcs-mntr.<protocol>.<host>.<port>.<wsdl file name> |
prcs-mntr.http.pta137.10180. PROCESSREQUEST_1_wsdl |
Additional naming conventions:
If the host name has the fully qualified DNS name, the name server1.peoplesoft.com becomes server1.
A Windows path, for example C:\ptinstall\appserv, becomes c_ptinstall_appserv. Any dots (.) or colons (:) are removed, and backslashes (\) and spaces are replaced with an underscore (_).
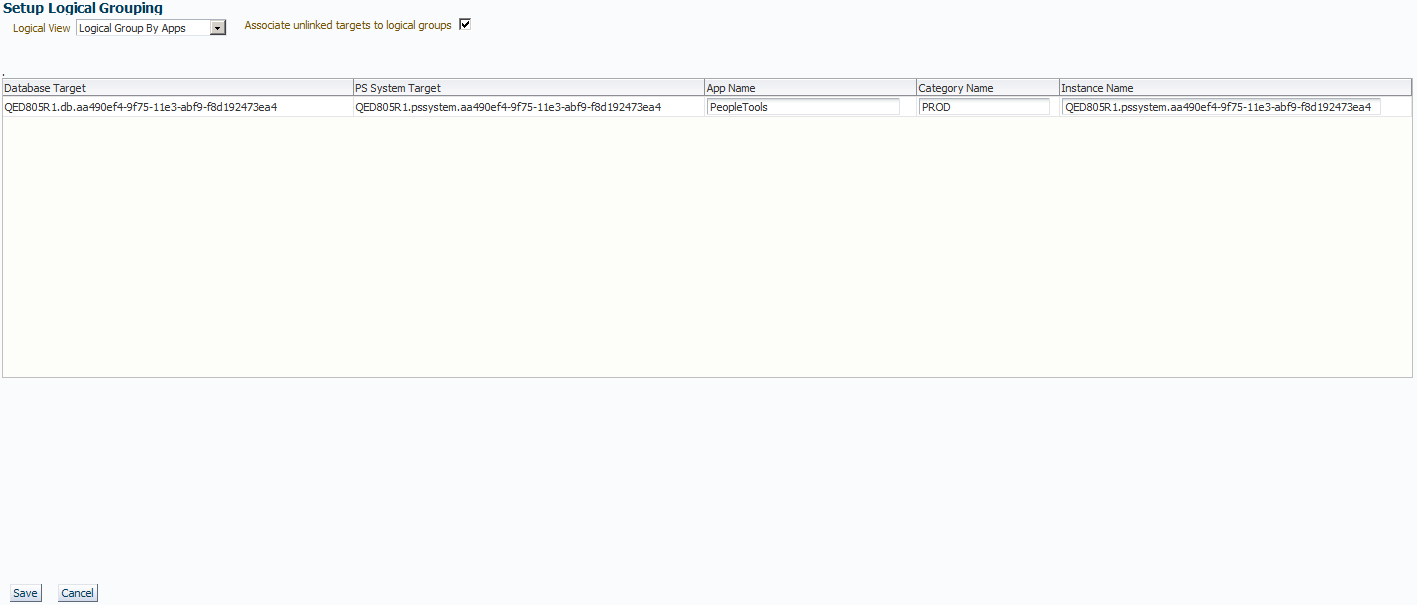
Access the Setup Logical Grouping page to customize how PeopleSoft targets are logically grouped and displayed. (Click the Organize Targets tab.)
Image: Setup Logical Grouping
This example illustrates the fields and controls on the Setup Logical Grouping page.
|
Field or Control |
Definition |
|---|---|
| Logical View |
Enables you to determine how the PeopleSoft targets will be grouped on the All PeopleSoft Targets page. The selection you choose determines the value of the View drop-down
Note: After PeopleSoft targets are discovered for the first time, Logical Group by Apps is enabled. |
| Associate unlinked targets to logical groups |
Select to add any targets currently under the Unlinked Targets category to your logical groups, based on the unlinked target's association with an existing database. |
| Database Target |
Displays the database target ID for the database associated with a system. |
| PS System Target |
Shows the system target ID associated with a specific PeopleSoft system. |
| App Name |
Enables you to modify display names for PeopleSoft application targets. By default, the system gathers this information from the database type, showing PeopleTools, HCM, CRM, and so on. If you want to modify this value, use the App Name edit box to add your custom value. Make sure use a consistent naming convention. |
| Category Name |
Enables you to modify display names for PeopleSoft application targets. By default, the assigned category name is PROD (for Production), but you may want to add values such as TEST, DEMO, and so on. If you want to modify this value, use the Category Name edit box to add your custom value. Make sure to use a consistent naming convention. |
| Instance Name |
Defaults to the PS System Target ID value, such as Q852107R.pssystem.22af5ff2-4af9-11e0-9d38-91c7730a9ea8. If you'd like to modify this value, use the Instance Name edit box to add your value. You might consider just using the database name, or some other shorter value. |
| Save |
You must click Save for any changes, including Logical View selection to take effect. |