Configuring Admission Transactions
To configure the admission transactions, use the Application Configuration component (SAD_ADM_APL_CONFIG).
This section discusses how to:
Map online application transactions to academic careers.
Set up application defaults for offline and online application transactions.
Set up prospect creation rules and defaults for offline and online application transactions
Set up home or unlisted schools for online application transactions.
|
Page Name |
Definition Name |
Navigation |
Usage |
|---|---|---|---|
|
Appl Config |
SAD_TRANSAC_MAP |
|
Map online application transactions to academic careers. |
|
Application Setup |
SAD_APL_CNT |
|
Define how the system should assign an application center and optionally assign 3Cs to an application by defining which Event ID should be used in the processing. The system uses this setup when you use File Parser to load applications in batch via a calculated field or when the user saves or submits an application through AAWS. |
|
Prospect Setup |
SAD_PRS_SETUP |
|
Define how the system should create a prospect record, and if a prospect record is created, how to assign default values to the prospect record. The system uses this setup when you use File Parser to process applications in batch via a calculated field or when the user saves or submits an application through AAWS. |
|
School Setup |
SAD_AWS_SCH_DFL |
|
Define how the system should process unlisted or home schools. The system uses this setup only when the user saves or submits an application through AAWS. |
Access the Appl Config page ().
Image: Appl Config page
This example illustrates the fields and controls on the Appl Config page. You can find definitions for the fields and controls later on this page.
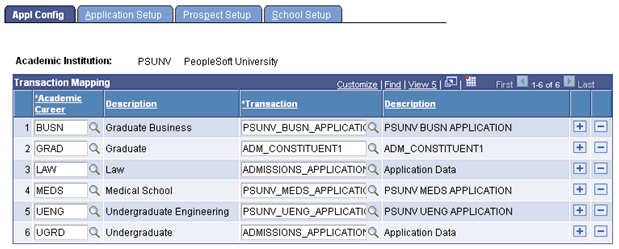
You can enter only online transactions (except for the new user registration transaction NEW_USER_REGISTRATION) in the Transaction field. To check whether a transaction has been marked as online or offline, use the Transaction Setup page (Set Up SACR, System Administration, Utilities, Constituent Transaction Mgmt, Transaction Setup).
Ensure that all academic careers for AAWS applications are mapped to a valid transaction on the Appl Config page.
When a user saves or submits an application through AAWS, the Campus Solutions system uses the Appl Config page to associate the application with a CTM online transaction. The system uses this association to run search/match and process the application data according to the settings on the Transaction Setup page.
Access the Application Setup page ().
Image: Application Setup page: Criteria tab (1 of 2)
This example illustrates the fields and controls on the Application Setup page: Criteria tab (1 of 2). You can find definitions for the fields and controls later on this page.
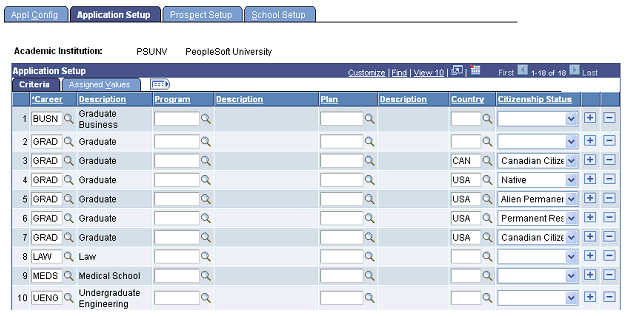
Image: Application Setup page: Criteria tab (2 of 2)
This example illustrates the fields and controls on the Application Setup page: Criteria tab (2 of 2). You can find definitions for the fields and controls later on this page.
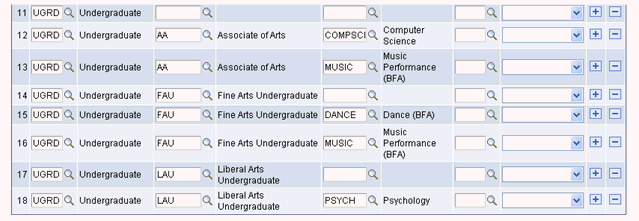
Image: Application Setup page: Assigned Values tab (1 of 2)
This example illustrates the fields and controls on the Application Setup page: Assigned Values tab (1 of 2). You can find definitions for the fields and controls later on this page.
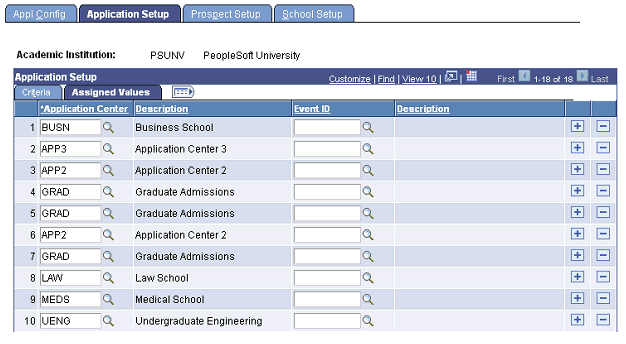
Image: Application Setup page: Assigned Values tab (2 of 2)
This example illustrates the fields and controls on the Application Setup page: Assigned Values tab (2 of 2). You can find definitions for the fields and controls later on this page.
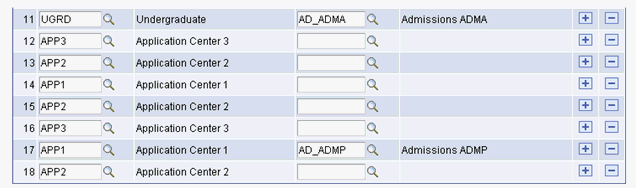
Ensure that all the academic career, program, and plan combinations for AAWS and File Parser applications are mapped to a valid application center on the Application Setup page.
Use the Criteria tab to define the selecting criteria — such as academic career, academic program, and academic plan — that constitutes a particular group of applications. Use the Assigned Values tab to define the application center and event ID that the system assigns to the particular application group. When the system receives an online application, it uses this mapping to determine which application center and event ID should be assigned to an application. For batch applications loaded through File Parser, a calculated field can be built on the File Mapping Definition to look at this setup to determine the application center to populate.
In the exhibit example — Application Setup page: Criteria tab (2 of 2) — you can see that for row 13, career is UGRD, program is AA and plan is Music. For the same row, in the exhibit example — Application Setup page: Assigned Values tab (2 of 2) — the application center is APP2. Assume that the system receives an application for a career of UGRD, program of AA, and plan of Music through AAWS or batch load. In such a case, the system assigns APP2 to this application.
The system requires an application center to create an admission application. Therefore, you must map each career with an application center on the Application Setup page. The system generates an error message if it receives an application through AAWS or batch load and it does not find the corresponding application center from this mapping. You can view this error message on the Application Transactions staging component. Note that the system assigns an application center from this mapping when an application is saved or submitted. The system assigns the 3C Event ID when an application is posted.
Note: You should complete this mapping for only Self-Service (applicant) mode. In the Administrator mode, the user provides the application center when creating an admission application. Therefore, this setup is not relevant for Administrator mode.
Criteria
|
Field or Control |
Definition |
|---|---|
| Career |
Enter the Career for which you want to assign an Application Center (and optionally, an Event ID). |
| Program |
Optionally, enter the Program for which you want to assign an Application Center (and optionally, an Event ID). If you leave this field blank, the system assigns the Application Center to all the Programs within the Career. For example, suppose you have two Application Centers: APP01 and APP02. Map the Career GRAD and Program MBA combination to the APP01 Application Center and map the GRAD Career to the APP02 Application Center. In such a case, the system assigns APP01 Application Center to an MBA application and assigns APP02 to other non MBA applications such as a MS or MA application. |
| Plan |
Optionally, if you have entered a program, enter the Plan for which you want to assign an Application Center (and optionally, an Event ID). If you leave this field blank, the system assigns the Application Center to all the Plans within the program. For example, suppose you have two Application Centers: APP03 and APP04. Map the Career GRAD, Program MS, and Plan Finance combination to the APP03 Application Center and map the GRAD Career and MS Program to APP04 Application Center. In such a case, the system assigns APP03 Application Center to an MS Finance application and assigns APP04 to other Master of Science applications such as MS in Biochemistry or MS in Physics. |
| Country and Citizenship Status |
Enter the Country and Citizenship Status if you want to assign an Application Center (and optionally, an Event ID) based on the applicant’s citizenship. For example, you could have the Career UGRD, Country USA, and Citizenship Status Alien Temporary mapped to an Undergrad International Office Application Center and GRAD, USA, and Alien Temporary mapped to a Graduate International Office Application Center. Note: If you enter a value in one of the two fields, you cannot leave the other field blank. For example, if you enter a Country, you must specify the Citizenship Status. |
Note: When determining the Application Center assignment, the system uses the following order: Citizenship Status, Plan, Program, and Career.
Assigned Values
Enter the Plan, and optionally the Event ID, for the row entered on the Criteria tab.
Only the Event IDs that have the administrative functions ADMA (admissions application) and ADMP (admissions program) are available. ADMP is available only if you select an academic Program on the Criteria tab. Define Event IDs on the Event Definition page.
Access the Prospect Setup page ().
Image: Prospect Setup page: Criteria tab
This example illustrates the fields and controls on the Prospect Setup page: Criteria tab. You can find definitions for the fields and controls later on this page.
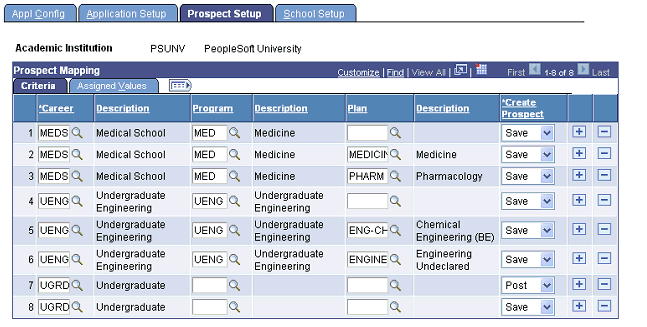
Image: Prospect Setup page: Assigned Values tab
This example illustrates the fields and controls on the Prospect Setup page: Assigned Values tab. You can find definitions for the fields and controls later on this page.
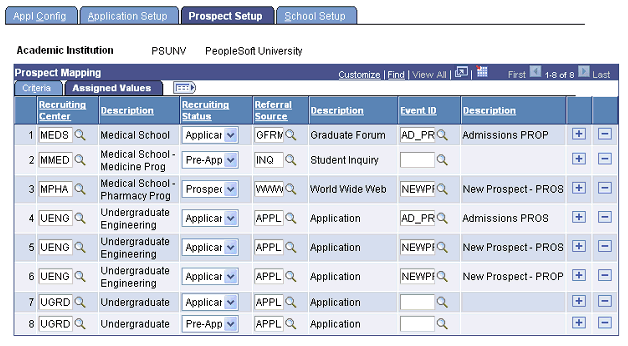
Use the Criteria tab to specify whether you want the system to create a prospect when the user saves an application through AAWS or when you post an application to the Campus Solutions database. Also, on this tab define the criteria for creating the prospect. Use the Assigned Values tab to specify the default values that the system assigns to the prospect. You must specify the Recruiting Center, Recruiting Status, and Referral Source values.
In the exhibit example — Prospect Setup page: Criteria tab — you can see that for row 3, career is MEDS, program is MED, plan is Pharmacology and Create Prospect value is SAVE. For the same row, in the exhibit example — Prospect Setup page: Assigned Values tab — values such as the recruiting center MPHA is assigned. Assume that a user saves a pharmacology application through AAWS. In such a case, the system creates a prospect record for the applicant and also assigns the default values such as the recruiting center MPHA to this newly created prospect record.
This is an optional setup. If you do not want to create a prospect record, when the application is saved or posted, leave the Prospect Setup page blank.
Note: To create prospect on save, the online application must ensure that the required constituent data is collected before the user saves the application. Also, ensure that the related transaction is set to run real time on save. If the related transaction is set to run on submit, then the Prospect Setup page displays a warning message if you choose the Save option for Create Prospect. For example, suppose you have a transaction UGRD_online_app and you have mapped this transaction to the UGRD career and GLAKE institution on Appl Config page. You have not selected the Run on Save check box on the Transaction Setup page for this transaction. In such a case, the Prospect Setup page displays a warning message if you select the Save option for the UGRD and GLAKE criteria. If the prospect setup is set to create a prospect on Save, but the transaction is not set to run real time on Save, you can still create the prospect record by running the Transaction Management process for Saved transactions.
Criteria
|
Field or Control |
Definition |
|---|---|
| Career |
Enter the career for which you want to create prospect records and assign default values. |
| Program |
Optionally, if you have entered a program, enter the plan for which you want to create prospect records and assign default values. If you leave this field blank, the prospect records are created for all the plans within the program or career. |
| Create Prospect |
Identify how you want to create prospect records for the career (and program and/or plan, if applicable):
|
If the prospect record already exists for the institution and career of the transaction, the system updates the prospect record to insert program and plan data that does not exist, and also inserts Housing Interest, Financial Aid Interest, Last School Attended and Graduation Date if not previously populated. If you have selected the Update Data check box in the From Application to Prospect section of the Installation Defaults - AD page, the system populates the Application Number and updates the Applied indicator for the existing prospect record. For more information on this check box:
Setting Up Admission Installation Defaults
Note: If you want to create prospects for all applications received for the criteria entered, enter a row for Save and a row for Post. This ensures that the system creates a prospect record when an application is not saved prior to submission.
Assigned Values
Enter the recruiting center, recruiting status, referral source and optionally the event ID, for the row entered on the Criteria tab.
Only the event IDs that have the administrative functions PROS (prospect) and PROP (prospect program) are available. PROP is available only if you select an academic program on the Criteria tab. Define event IDs on the Event Definition page.
Access the School Setup page ().
Image: School Setup page
This example illustrates the fields and controls on the School Setup page. You can find definitions for the fields and controls later on this page.

An online application may need to capture the applicant’s academic history. The online application may present a field with a list of schools, colleges, and universities that exist in the system’s External Organization table and the user may select a value from this list. However, two applicant categories exist, those who have attended an academic institution that is not listed in the list of values (unlisted schools) and those who are home schooled. The online application may present a text field or some other method to capture the home or unlisted school details. Use the School Setup page if you want to define how the system should process these unlisted or home schools.
Unlisted Schools
|
Field or Control |
Definition |
|---|---|
| Post Application Using Default |
Select if you want to specify a default organization ID for unlisted schools or if the applicant has not provided the school name. |
|
Field or Control |
Definition |
|---|---|
| Default Organization |
This field appears if you select the Post Application Using Default option. Specify the default organization ID to post with the application record. Note: If the application contains multiple rows of Unlisted School data, the default applies to the first processed row. Because External Organization ID is a key field, it is not possible to use the default more than once. In the event of multiple Unlisted Schools, the web service creates a reconciliation error in the staging component and requires manual reconciliation of the additional Unlisted School rows. |
| Require Manual Reconciliation |
Select if you want to manually correct an application that has an unlisted school or no school. If you select this option and the application transaction has an unlisted school or no school, the system retains the transaction in the staging table with a constituent status of Error. You have to resolve the error message, and then post the application. You can use the Application Transactions component to select an appropriate External Org ID and run the post process. Refer to the “Reviewing and Editing Staged Admission Application Transactions” section for more information about this component. See Reviewing and Editing Staged Admission Application Transactions |
Home School
|
Field or Control |
Definition |
|---|---|
| Post Application Using Default |
Select if you want to specify a default organization ID for home schools. |
| Default Organization |
This field appears if you select the Post Application Using Default option. Specify the default organization ID to post with the application record. Note: If the application contains multiple rows of Home School data, the default applies to the first processed row. Because External Organization ID is a key field, it is not possible to use the default more than once. In the event of multiple Home Schools, the web service creates a reconciliation error in the staging component, requiring manual reconciliation of the additional Home School rows. |
| Require Manual Reconciliation |
Select if you want to manually correct an application that has a home school. If you select this option and if the applicant has mentioned home school, the system retains the transaction in the staging table with a constituent status of Error. You have to resolve the error message and then post the application. You can use the Application Transactions component to select an appropriate External Org ID and run the post process. Refer to the “Reviewing and Editing Staged Admission Application Transactions” section for more information on about component. Reviewing and Editing Staged Admission Application Transactions |