Adding a Target
This section discusses how to add SAIP targets.
|
Page Name |
Definition Name |
Navigation |
Usage |
|---|---|---|---|
|
SAIP Target Setup |
SAE_TARGET_GENERAL |
|
Set up web service targets. |
Access the SAIP Target Setup page ().
Image: SAIP Target Setup page
This example illustrates the fields and controls on the SAIP Target Setup page. You can find definitions for the fields and controls later on this page.
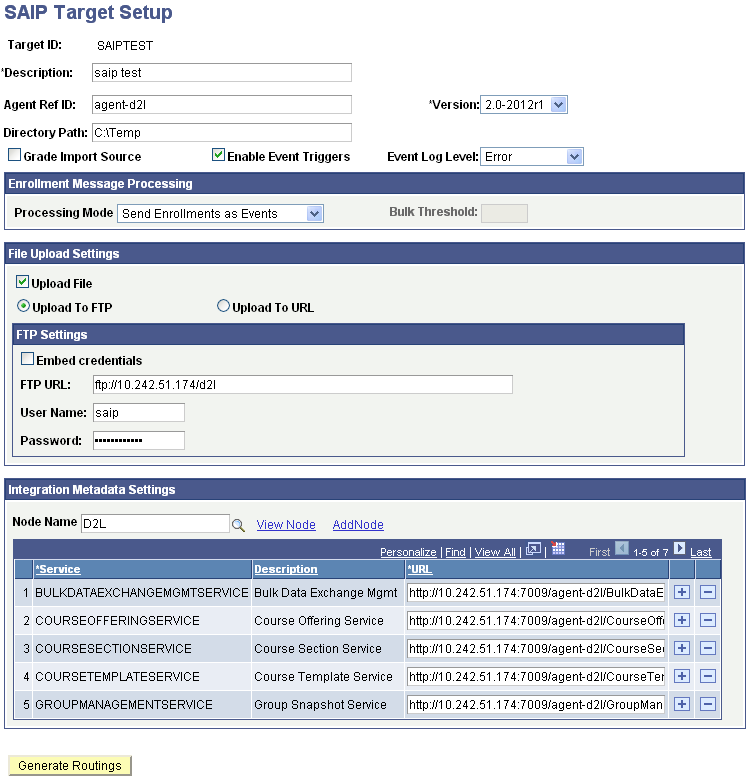
SAIP will autogenerate the routings in Integration Broker for each target.
|
Field or Control |
Definition |
|---|---|
| Target ID |
Set the target ID. |
| Description |
Set the target description. |
| Agent Ref ID |
This is an instance identifier used to differentiate, if necessary, between multiple end system reference agents. This value is also used by SAIP to associate incoming requests with targets. Based on the Learning Information Services 2.0 specification, sending systems can distinguish themselves by populating an IMS header value, imsx_sendingAgentIdentifer. SAIP checks this value against the Agent Ref ID string which is set in the Web Service Targets page for the target. Make sure to coordinate the value that is set here with the external LMS to ensure incoming messages can be correctly processed. |
| Version |
Select the version number that corresponds to the LIS version that the target system has implemented (for example, with Blackboard Learn SP8 select version 2.0-2011). Search My Oracle Support for SAIP documentation specific to your LMS vendor. |
| Directory Path |
If you want SAIP to place the snapshot XML file in file, you must specify that path here. If no directory path is specified, the XML file is placed in the application server's TEMP folder. |
| Grade Import Source |
Select to define the target as the source for the import of final grades into the grade roster. When this check box is selected, the Grade Import group box and the Import Grades button appear on the Grade Roster page (GRADE_ROSTER_TYPE) in the Student Records Grade Roster component (GRADE_ROSTER) and on the grade roster page in faculty self-service (SS_GRADE_ROSTER), provided that grade import has also been enabled on the SAIP Installation page (SAE_SETUP). You must click the Import Grades button on the Grade Roster page to run the import. When the check box is not selected, grade import is not available. You can select or clear this check box at any time after initialization without consequence. |
| Enable Event Triggers |
Select to enable all of the event-based triggers that are delivered preset within the SAIP system. |
Note: The Target ID must be globally unique across both LDAP and web service bindings.
Enrollment Message Processing
The enrollment message processing configuration provides options for how the event-driven integration model handles course enrollment (membership) messages for enrollment operations. Specifically, this configuration applies to enrollment operations that require the COBOL enrollment engine (Quick Enroll, Enrollment Request, Block Enrollment, and Mass Enrollment). Three Processing Mode options are available for enrollment message processing:
Send Enrollments as Events: this option configures SAIP to always send new course enrollments (memberships) as events (web service messages) to the target system.
Send Enrollments in Bulk: this option configures SAIP to always send new course enrollments (memberships) as a bulk data exchange.
Events with Bulk Threshold: this option configures SAIP to send events for new course enrollments unless the number of events exceeds a threshold that you set in the “Bulk Threshold” box
Important! This setting only impacts COBOL-based enrollment processes. These services use the Batch Event table. The Batch Event table is processed by a daemon; schedule the daemon to process with the SCCEVTLD Job (see Setting Up Enrollment and Course Batch Processing—set recurrence frequency, set event register, and set jobset definition). SAIP processes COBOL-based enrollments based on this job recurrence frequency . The processing daemon that checks the Batch Event table then triggers the appropriate enrollment message processing based on the target setup.
When you configure the Event Register you set a Chunk Size to determine how many rows from the Batch Event table are sent at a time. This is separate from the Enrollment Message Processing settings.
For example, you set Events with Bulk Threshold to 10. The daemon process determines that there are currently eight new enrollment transactions in the Batch Event table. These eight enrollment transactions will be processed by SAIP and delivered to the target as events. Then, on the next check of the Batch Event table (based on the recurrence definition you set), there are 15 enrollment transactions in the batch event table. These 15 transactions will be “batched” and sent as a bulk data exchange in SAIP. The bulk data exchange will automatically be triggered (it does not require you to “Push” or the LMS to “Pull”). You will be able to monitor, cancel, or resubmit this bulk data exchange in the Bulk Data Exchange Status page. Further, in this scenario if you have set your “chunk size” in the Event Register to 5- the system will send 3 bulk data exchange files.
File Upload Settings: Upload to FTP
When you select the Upload to FTP option, the FTP Settings group box becomes available:
|
Field or Control |
Definition |
|---|---|
| Embed Credentials |
Select to embed FTP credentials in the response URL. When an external system requests either a full or incremental snapshot, the SAIP generates the snapshot, places the snapshot in the specified destination, and returns a response to the requesting system that includes a URL to the snapshot's location. If that location is an FTP server, you may determine the authorization mechanism for access to the snapshot. When selected, the user name and password defined for the FTP URL are included in the response URL, enabling the requesting system to directly access the snapshot using just the URL. If not selected, you must configure your environment to otherwise allow the requesting system to log in to the FTP server to access the snapshot. |
| FTP URL, User Name, and Password |
If you want SAIP to place the snapshot on an FTP server, you must identify the server and settings here. If you select Upload to FTP, and a directory path is provided, the process looks for the XML file in the specified directory path, and uploads it from there. If you select Upload to FTP, but do not provide the directory path, the process looks for the XML file in the application server's TEMP folder, and uploads it from there. |
File Upload Settings: Upload to URL
With PeopleTools 8.51.07 and later, SAIP can use protocols such as FTPS, SFTP, HTTP and HTTPS to upload snapshot files.
The HTTP and HTTPS protocols allow you to use a web server for file transfer (for example, using a Java file upload servlet). The secure protocols such as FTPS provide a method for file transfer that is compliant with many university security policies. In the case where the target system is hosted by a third party, these secure file transfer protocols are typically required.
When you select the Upload to URL option, the URL Settings group box becomes available:
|
Field or Control |
Definition |
|---|---|
| URL Identifier |
Enter or search for the URL Identifier for your SAIP file uploads. This URL is configured through PeopleTools URL Administration. (See PeopleTools documentation for adding a new URL.) If you are using a secure protocol such as HTTPS or SFTP, ensure the appropriate digital certificates have been imported (See PeopleTools documentation for Digital Certificates). |
| View URLID and Add URLID |
After you enter your URL identifier, you can click the View URLID link to see the properties and make modifications. You can also click the Add URLID link which takes you directly to URL Maintenance where you can add a new URL Identifier. |
For further information about configuring URLs and secure URLs:
See PeopleTools: Supported Integration Technologies, “Using PeopleTools Utilities, Using Administration Utilities, URL Maintenance.”
Integration Metadata Settings
These settings provide information for the Integration Broker routings.
|
Field or Control |
Definition |
|---|---|
| Node Name |
Select the Integration Broker node to be used for this target. Because each node represents an end point, you will need one node per target. SAIP can share a node with other integration processes for the same target, however. At a minimum, SAIP needs to have the Description and Valid Default User ID fields populated, and the Node Type set to external. |
Enter the target's endpoint URL for each of the services required by SAIP.
The required services differ between Version 1.5 and Version 2.0 (2.0-2011 or 2.0-2012r1).
Version 1.5 target setup required services are:
BULKDATAEXCHANGEMGMTSERVICE
COURSEMGMTSERVICE
GROUPMANAGEMENTSERVICE
MEMBERSHIPMANAGEMENTSERVICE
PERSONMANAGEMENTSERVCE
OUTCOMESERVICE
Version 2.0 (2.0-2011 or 2.0-2012r1) target setup required services are:
BULKDATAEXCHANGEMGMTSERVICE
GROUPMANAGEMENTSERVICE
MEMBERSHIPMANAGEMENTSERVICE
PERSONMANAGEMENTSERVCE
OUTCOMESERVICE
COURSETEMPLATESERVICE
COURSEOFFERINGSERVICE
COURSESECTIONSERVICE
SECTIONASSOCIATIONSERVICE
Once the URLs have been entered, press Generate Routings to finish the target setup.