Creating and Updating Student or Exchange Visitor and Dependent Data
This section discusses how to:
Create and update biographical data.
Create and update addresses data.
Create and update electronic addresses.
Create and update visa and permit data.
Create and update port of entry information for F and M visas.
Create and update citizenship and passport data.
Maintain SEVIS ID information.
Create and update employment authorization information for F and M visas.
|
Page Name |
Definition Name |
Navigation |
Usage |
|---|---|---|---|
|
Biographical Details |
SCC_BIO_DEMO_PERS |
|
Enter or update basic biographical and demographic data for an individual. |
|
Addresses |
SCC_BIO_DEMO_ADDR |
|
Update an individual's address information. Note: This pages does not appear in the Add/Update a Person component when you add a new person. It appears only when you update an existing person. |
|
Addresses |
ADDRESSES_89 |
|
Enter or update an individual's address information. |
|
Electronic Addresses |
E_ADDR_PERS |
|
Enter or update an individual's email address data. |
|
Visa/Permit Data |
SCC_VISA_PERMIT |
|
Enter an individual's visa and permit information for SEVIS. |
|
Visa/Permit Data Detail |
VISA_PERMIT_DETAIL |
Click the Visa/Permit link on the Biographical Details page. |
Enter an individual's visa and permit information for SEVIS. |
|
Citizenship/Passport Data |
LS_CITIZEN_PASSPORT |
|
Enter or update an individual's citizenship and passport data. |
|
Citizenship Detail |
SA_CITIZENSHIP_DTL |
Click the Citizenship link on the Biographical Details page. |
Enter or update an individual's citizenship and passport data. |
|
SEVIS ID Maintenance |
SEV_ID_MAINT |
|
Enter or update an individual's SEVIS ID information. |
|
Port of Entry Data |
SEV_POE_DATA |
|
Track an individual's port of entry into the United States for F or M student visas. |
|
Employment Authorizations |
SEV_EMPL_AUTH |
|
Enter or update an individual's employment authorization information for F or M student visas. |
|
SEVIS Employer Address |
SEV_EMPL_ADDR |
Click the Employer Address link on the Employee Authorization page. |
Enter or update employer address information for F or M student visas. |
Access the Biographical Details page ().
Image: Biographical Details
This example illustrates the fields and controls on the Biographical Details. You can find definitions for the fields and controls later on this page.
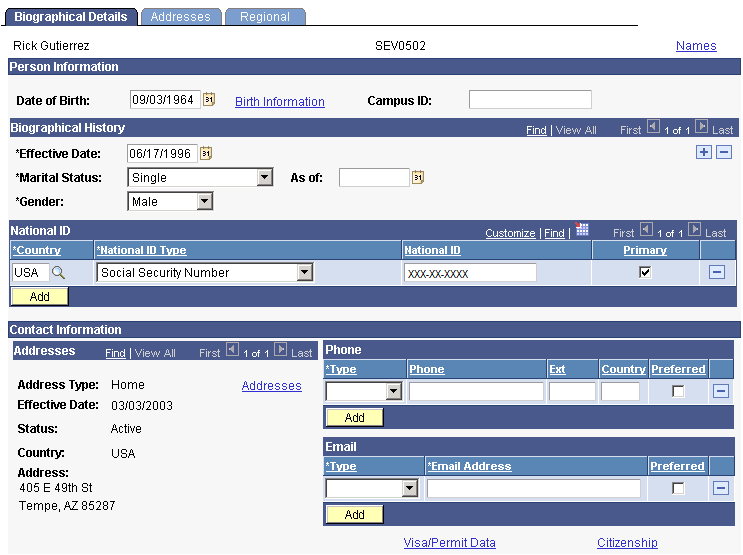
The Biographical Details page in the SEVIS Add/Update component is the same as the Biographical Details page in the Personal Information, Add/Update component.
See Adding or Updating Biographical Details Data.
SEVIS requires specific biographical data for each student and dependent. The SEVIS Export process pulls the required data from the Biographical Details page.
In addition to first and last names, the following fields must be completed for each student or exchange visitor and dependent:
Person Information
|
Field or Control |
Definition |
|---|---|
| Last Name |
Enter the individual's last name. |
| Date of Birth |
Enter the individual's date of birth. |
| Birth Information (link) |
SEVIS requires that you enter the name of the individual's birth city (J Visa only) and country. Click the Birth Information link next to the Date of Birth field to enter the individual's birth city and country. |
Biographical History
|
Field or Control |
Definition |
|---|---|
| Gender |
Specify the individual's gender. Options are Male, Female, or Unknown. |
(Links at Bottom)
|
Field or Control |
Definition |
|---|---|
| Visa/Permit Data |
SEVIS requires that you identify the type of visa issued to the individual. Click the Visa/Permit Data link to enter the visa type. |
| Citizenship |
SEVIS requires that you identify the individual's country of citizenship. Click the Citizenship link to the enter the country of citizenship. |
Access the Addresses page ().
Image: Addresses page
This example illustrates the fields and controls on the Addresses page. You can find definitions for the fields and controls later on this page.
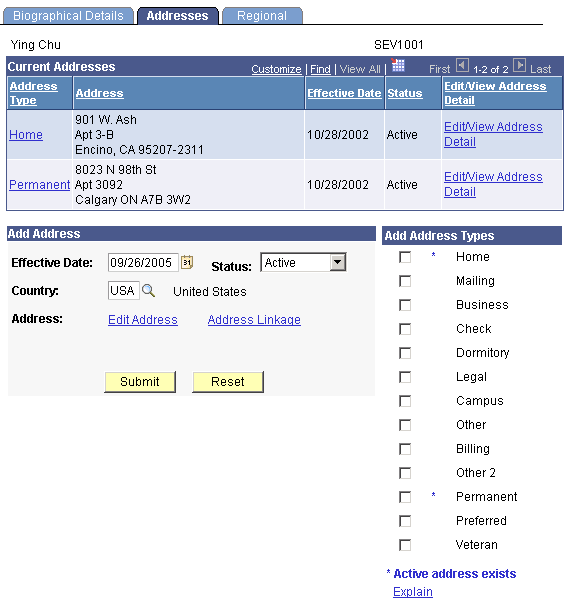
Note: The Addresses page does not appear in the Add/Update a Person component (shown here) when you add a new person. It appears only when you update an existing person.
Note: The PeopleSoft system stores up to the ninth digit of the U.S. postal code in the SEVIS Master component to enable you to store bulk mail codes on the Addresses page as part of the postal code without affecting SEVIS processing. The alerts process compares up to the ninth digit of the postal code on the addresses record against the postal code stored in the SEVIS Master component. If the postal code for a U.S. address is too short (1-4 digits or 6-8 digits) when you run the export and alerts processes, an error appears on the Alerts page saying that the postal code is invalid. If the postal code is too long (greater than 9 digits), the process ignores everything after the ninth digit.
For F and M student visas, SEVIS requires a foreign address for each student with a creation reason of Initial or Initial - Change of Status on the I-20 form.
For exchange visitor J visas, SEVIS requires that each exchange visitor have a U.S. address when reporting the Validate event.
The address types reported to SEVIS are based on the types defined in the US and Foreign fields on the SEVIS Setup page. You can view address data on the Biographical Details page, and edit the data on the Addresses page.
The following fields are required for the foreign address:
Country
Address 1
The following fields are required for the U.S. address:
Address 1
City
State
Postal
Access the Electronic Addresses page ().
Image: Electronic Addresses page
This example illustrates the fields and controls on the Electronic Addresses page . You can find definitions for the fields and controls later on this page.

Email Information
Enter the individual’s email address. The email address that you select as Preferred is reported to SEVIS as part of the Create Student, Personal Info, Dependent – Add and Dependent – Edit events for F and M visas, as well as the Create Exchange Visitor and Biographical events for J visas.
Email address is not required, but is reported when provided.
Note: The SEVIS Schema does not allow for sending a blank email address. If an alert is triggered due to an email address being removed, you will need to use SEVIS RTI to manually delete the email address.
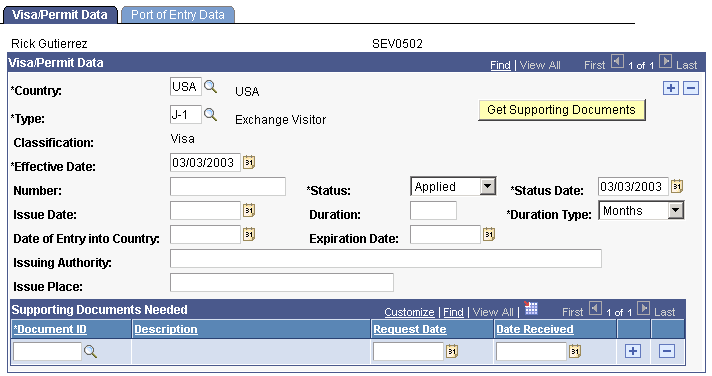
Access the Visa/Permit Data page ().
Image: Visa/Permit Data page
This example illustrates the fields and controls on the Visa/Permit Data page. You can find definitions for the fields and controls later on this page.
Visa/Permit Data
|
Field or Control |
Definition |
|---|---|
| Type |
Enter the type of visa issued to the individual. For the PeopleSoft system to send the individual's information to SEVIS, the visa type that you enter must correspond to a visa type defined on the Visa Mapping page, which includes only F, M, or J visa types. |
| Number, Issue Date, and Expiration Date |
Enter the visa number and appropriate dates. This information is not required or reported. |
Access the Port of Entry Data page ().
Image: Port of Entry Data page
This example illustrates the fields and controls on the Port of Entry Data page. You can find definitions for the fields and controls later on this page.
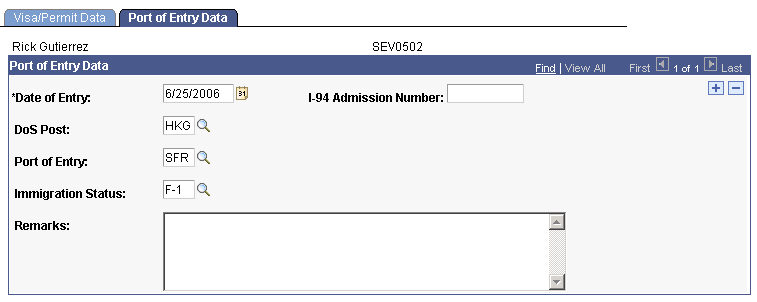
You can record data regarding a student's date and location of entry into the United States. The SEVIS system is the official record of this data, however, you might find it helpful to record this information in your PeopleSoft system.
Port of entry data is not required or reported.
Access the Citizenship/Passport page ().
Image: Citizenship/Passport page
This example illustrates the fields and controls on the Citizenship/Passport page. You can find definitions for the fields and controls later on this page.
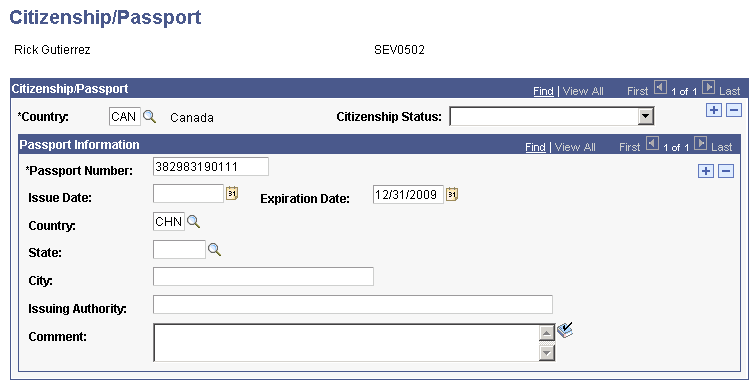
Citizenship/Passport
|
Field or Control |
Definition |
|---|---|
| Country |
Enter the country of citizenship to use on the I-20 form or the DS-2019 form. If you enter more than one non-U.S. country, you must indicate on the form which citizenship country to send to SEVIS. |
Passport Information
|
Field or Control |
Definition |
|---|---|
| Passport Number, Issue Date, Expiration Date, and Country |
Enter the passport number and associated information. This data is not required or reported. |
Access the SEVIS ID Maintenance page ().
Image: SEVIS ID Maintenance page
This example illustrates the fields and controls on the SEVIS ID Maintenance page. You can find definitions for the fields and controls later on this page.
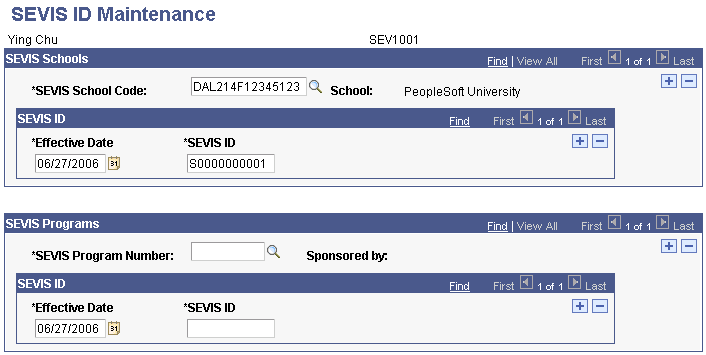
Note: When SEVIS processes the Create Student and Dependent - Add events for F/M visas or the Create EV and Dependent - Add events for J visas, it assigns SEVIS IDs to the new students or exchange visitors and dependents. You must manually enter the IDs assigned by SEVIS into your PeopleSoft system if you used the Send to Master option on the Alerts Header page to populate SEVIS Master for Create Student, Create EV or Dependent - Add events.
Use this page to store the SEVIS ID provided by the DHS for students or exchange visitors and their dependents. The SEVIS ID is an 11-character unique identifier that SEVIS uses for students and their dependents related to a specific school code and for exchange visitors and their dependents related to a specific program number. The system displays only the SEVIS IDs of the school codes or program numbers for which you have security clearance.
Running the SEVIS Import Results process for new students, exchange visitors, and dependents automatically populates the ID field. You may need to manually enter this value if you initially created the student or exchange visitor, or the dependent using the DHS SEVIS RTI.
SEVIS Schools for F and M Visas
|
Field or Control |
Definition |
|---|---|
| SEVIS School Code, Effective Date, and SEVIS ID |
Enter each school code for which the student has an I-20 form or is listed as a dependent on an I-20 form. Enter the effective date of the SEVIS ID. Enter the unique 11-digit identifier for the student or dependent for the SEVIS school code. |
SEVIS Programs for J visas
|
Field or Control |
Definition |
|---|---|
| SEVIS Program Number, Effective Date, and SEVIS ID |
Enter each program number for which the exchange visitor has a DS-2019 form or is listed as a dependent on a DS-2019 form. Enter the effective date of the SEVIS ID. Enter the unique 11-digit identifier for the exchange student or dependent for the SEVIS school code. |
Access the Employment Authorizations page ().
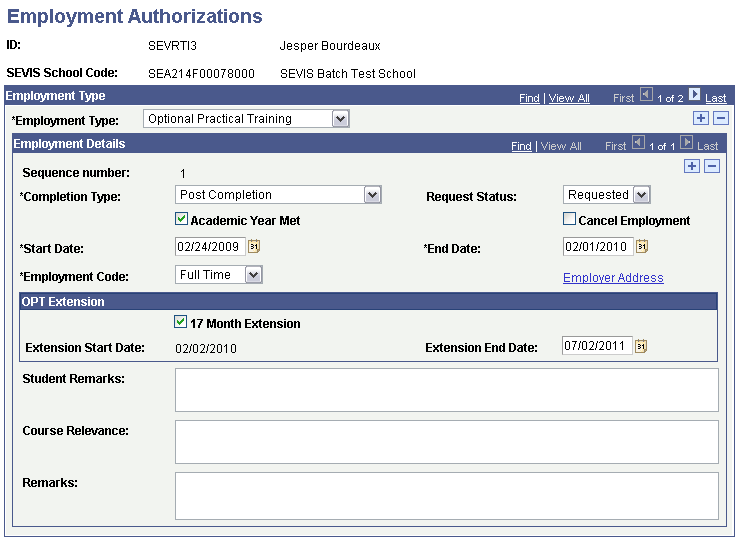
Image: Employment Authorizations page
This example illustrates the fields and controls on the Employment Authorizations page. You can find definitions for the fields and controls later on this page.
Employment Type
|
Field or Control |
Definition |
|---|---|
| Employment Type |
Select the employment type relevant to the authorization or endorsement for this student. Options are: Curricular Practical Training (CPT) Optional Practical Training (OPT) Off-Campus (to enter recommendation information for the student to obtain off-campus employment authorization) M-1 students are authorized for OPT only. The system does not enable you to enter CPT or off-campus employment for an M-1 student. F-1 students are eligible for all employment authorizations. |
Note: The fields in the Employment Details group box remain the same for CPT and OPT. The system displays different fields when you enter the Off-Campus employment type.
Employment Details (for CPT and OPT employment types)
|
Field or Control |
Definition |
|---|---|
| Sequence Number |
Displays the number that the system uses to track multiple rows. |
| Completion Type |
This field appears only for the Employment Type of Optional Practical Training for F-1 visas. Values are: Pre Completion Post Completion Note: For Pre Completion, the OPT end date must be on or before the program end date. For Post Completion, the OPT start date must be on or after the program end date. |
| Request Status |
This field appears for the Employment Types of Optional Practical Training (OPT) and Off-Campus Employment. For OPT, the Request Status field value is used in combination with other values on the Employment Authorizations page to trigger the OPT Employment – Extend and OPT Employment – Edit events. For example, if the 17 Month Extension check box is selected and the Request Status is Approved, the Extend event is triggered. Values are: Requested Pending Approved Canceled Denied Unknown Withdrawn The default value is Requested. Note: For rows existing prior to SEVIS 6.0, the Request Field value is set to Unknown in the system. You must change the value for all current OPT students to trigger the appropriate event. Note: Automatic status change updates are not sent as part of the SEVIS Batch process. You must manually update this field when the status changes. Warning! For OPT, SEVIS accepts changes to the Start Date, End Date, Employment Code, Completion Type or Academic Year Met fields only when the Request Status field is set to Requested or Pending. |
| Academic Year Met |
This check box appears for the Employment Type of Optional Practical Training (OPT). Select to indicate that the student has met the full academic year requirement for OPT. |
| Cancel Employment |
Select this check box to trigger the CPT Employment - Cancel or the OPT Employment - Cancel event. The start date must be later than the current system date for CPT Employment. Cancellation of OPT Employment may be performed only prior to determination of the OPT by the Service Center. |
| Start Date |
Enter the date when the employment is expected to begin. |
| End Date |
Enter the date when the employment is expected to end. Note: Review DHS regulations to ensure that you comply with the most recent duration rules for the employment type before entering the authorization start and end date. The Curricular Practical Training (CPT) employment type requires that the end date be not later than the end date for the student on the I-20 form. See the U.S. Immigration and Customs Enforcement website for regulations regarding employment duration. The authorization end date affects the Program – Complete event trigger. |
| Employment Code |
Select either Part-time or Full-time. |
| 17 Month Extension |
This check box appears only for the Employment Type of Optional Practical Training for F-1 visas. When selected, the employer's name and address are required. The 17 Month Extension field value is used in combination with the Request Status value to trigger the OPT Employment – Extend event. For example, if the 17 Month Extension check box is selected and the Request Status is Approved, the Extend event is triggered. Note: The SEVIS Batch process accepts only requests where Request Status is Approved and Completion Type is Post Completion. See the U.S. Immigration and Customs Enforcement website for regulations regarding eligibility for 17 month extensions: http://www.ice.gov/sevis/schools/existing_schools/index.htm |
| Extension Start Date |
This field appears only for the Employment Type of Optional Practical Training (OPT) when the 17 Month Extension check box is selected. The system automatically enters an Extension Start Date of OPT end date plus one day. You cannot edit this date. The SEVIS Batch process does not send the Extension Start Date value to SEVIS. |
| Extension End Date |
This field appears only for the Employment Typeof Optional Practical Training (OPT) when the 17 Month Extension is selected. The system automatically enters an extension end date of the OPT extension start date plus 17 months. You can edit this date, and might want to do so when a Cap-Gap extension is approved. The SEVIS Batch process does not send the Extension End Date value to SEVIS. |
| Course Relevance |
Enter remarks identifying the relevance of the employment to the student's course of study. Remarks are not required, but are submitted if provided. |
| Student Remarks |
This field appears only for the Employment Type of Optional Practical Training (OPT). Student remarks are optional, but are submitted to SEVIS when provided. |
| Remarks |
Remarks here are optional, but are submitted to SEVIS when provided. |
| Employer Address |
Click to access the SEVIS Employer Address page, where you can enter employer name and address information. If the employer is defined in the External Organization table, you can enter it on the SEVIS Employer Address page to populate the fields there (Employer Name, Address 1, Address 2, City, State, and Postal Code). You can also manually enter employer name and address information on the SEVIS Employer Address page without using an external organization ID. Note: SEVIS requires employer information for CPT authorizations, but it is optional for OPT endorsements. Note: The PeopleSoft system stores up to the ninth digit of the U.S. postal code in the SEVIS Master component to enable you to store bulk mail codes on the Addresses page as part of the postal code without affecting SEVIS processing. The alerts process compares up to the ninth digit of the postal code on the addresses record against the postal code stored in the SEVIS Master component. If the postal code for a U.S. address is too short (1-4 digits or 6-8 digits) when you run alerts process, an error appears on the Alerts page saying that the postal code is invalid. If the postal code is too long (greater than 9 digits), the processes ignores everything after the ninth digit. |
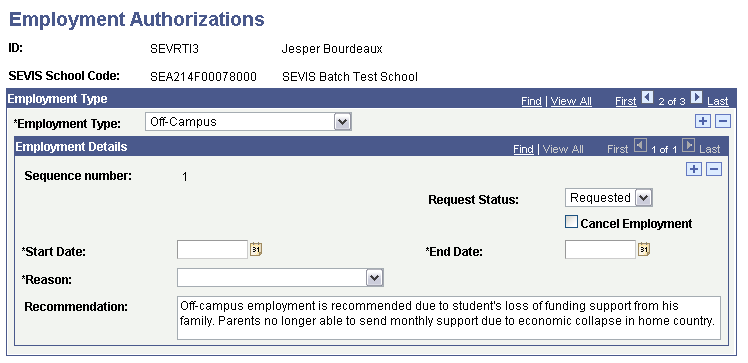
Employment Details (for Off-Campus Employment Type)
When you enter the employment type of Off Campus, the fields in the Employment Details group box change.
Image: Employment Authorizations (Off-Campus Employment Type) page
This example illustrates the fields and controls on the Employment Authorizations (Off-Campus Employment Type) page. You can find definitions for the fields and controls later on this page.
|
Field or Control |
Definition |
|---|---|
| Sequence Number |
Displays the number that the system uses to track multiple rows. |
| Cancel Employment |
Select to trigger the Off Campus Employment - Cancel event. |
| Start Date |
Enter the date when the employment is expected to begin. Note: To trigger the Off Campus Employment - Cancel event, the start date must be later than the current system date. |
| End Date |
Enter the date when the employment is expected to end. The date entered must be earlier than or equal to the I-20 Program To Date value. |
| Reason |
The available options are Economic Hardship, International Organization, and Special Student Relief. The DHS defines the reasons in the Student Off-Campus Employment Codes section of the Lookup Tables in the Application Program Interface on the U.S. Immigrations and Customs Enforcement (ICE) web site. |
| Request Status |
This field appears only for the Employment Types of Optional Practical Training (OPT) and Off Campus Employment. Values are: Requested Pending Approved Canceled Denied Unknown Withdrawn The default value is Requested. Note: Automatic status change updates are not sent as part of he SEVIS Batch process. You must manually update this field when the status changes. |
| Recommendation |
Enter general remarks regarding the student's off-campus employment. Remarks are not required, but are submitted if provided. |