Managing Addresses and Phone Data
This section provides an overview of managing addresses, lists prerequisites, and discusses how to:
Enter addresses for an individual.
Link addresses.
Enter electronic address data.
Enter seasonal addresses.
Process seasonal addresses.
Update linked addresses.
Search for addresses.
Enter phone data.
Some of your faculty or constituents might routinely relocate and work from a different address. For example, a student might go to his family's ski lodge every winter break or a staff member might volunteer out of state each summer. Using the Seasonal Addresses feature, you can track temporary addresses to stay in contact with individuals while they are away. You enter the individual's seasonal address data with the appropriate begin and end dates. Then you run the seasonal addresses process to apply or remove the address, based on the begin and end dates. You can run the process to apply the seasonal address for a specific individual or you can run it to apply or remove all seasonal addresses between certain start and end dates.
When you update an address for a campus location or organization, the campus location or organization address for individuals linked to that location or organization are not changed in your database until you run the Update Linked Addresses process. When you run the process, the system locates all the individuals with whom that campus location or organization is linked and updates the changed address there as well. For example, when you change an organization's address and run the Update Linked Addresses process, the system locates each of the individuals who are linked to that organization and changes the organization's address.
You can search for addresses for individuals. You can search on address usage, email type, or address type. For example, if you want to send an email message to an individual at his dorm, you can search on the email type of Dormitory. If you need to send a billing notice, you can search on the address type of Billing or search on the address usage of Billing. However, if no address type of Billing exists for the individual, you will get no results. If your institution has assigned address usages, use one of the address usage search orders (in this case, Billing, Mailing, Home, Permanent) to have the system search for and find the first appropriate address.
Note: The system searches only on active addresses.
You can view a list of all addresses in your system for an individual, which includes all address types that have been entered for the individual. It also includes the individual's current addresses, any previous addresses that are now inactive, and any addresses that are set to become active in the future.
Before managing seasonal or linked addresses or before searching for addresses in your system, enter addresses and address types for the individual.
|
Page Name |
Definition Name |
Navigation |
Usage |
|---|---|---|---|
|
Addresses |
SCC_BIO_DEMO_ADDR |
|
Enter or review an individual's address types and data. |
|
Address History |
SCC_ADDR_HIST_SEC |
Click the Edit/View Address Detail link for an address type in the Current Addresses area of the Addresses page. |
View the history of a specific address type for an individual. |
|
Edit Address |
EO_ADDR_XXX_SEC (where XXX = the country code) |
|
If you access the Edit Address page by clicking Edit Address, enter address data for the specified address type. If you access the Edit Address page by clicking Update Addresses, edit or update any address data associated with the individual. |
|
Electronic Addresses |
E_ADDR_PERS |
|
Enter or review an individual's email address and URL data. |
|
Seasonal Address |
CC_ADDR_SEASONAL |
|
Enter a seasonal address for an individual. |
|
Process Seasonal Addresses |
RUNCTL_SEASNL_ADDR |
|
Run the process to apply or remove the designation of Seasonal Address to specified addresses in the Current Addresses area of the Addresses and Address History pages. |
|
Address Linkage |
SCC_ADDRSA_LNK_SEC |
Click the Address Linkagelink in the Edit Address area of the Addresses page or the Address History page. |
Link an address type to the location of a campus or an organization. |
|
Update Linked Addresses |
RUNCTL_CCADDLINK |
|
Run the process to update linked addresses throughout your system. |
|
Address Search |
ADDRESS_SRCH |
|
Search for a specific address for an individual. |
|
Phone Numbers |
PHONE_PERS |
|
Enter or review an individual's telephone numbers. |
Access the Addresses page ().
Image: Addresses page
This example illustrates the fields and controls on the Addresses page. You can find definitions for the fields and controls later on this page.
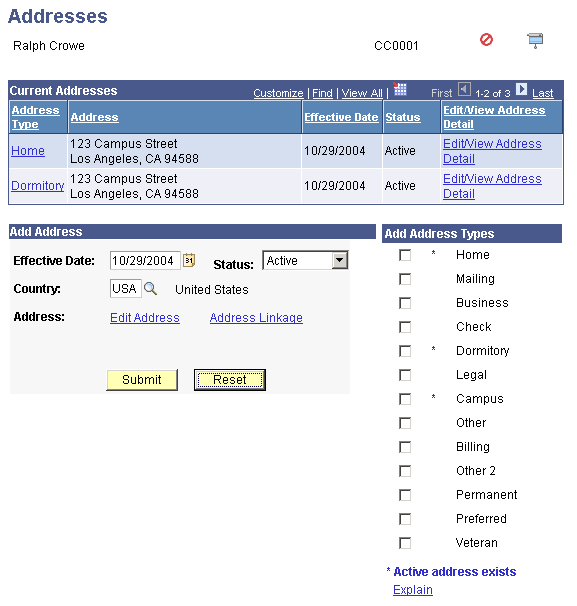
Information that you enter here is the same as the address data that you enter on the Biographical Details page when you create a personal record. When you save the data (either there or here), the system updates the address data in both places.
See Adding or Updating Biographical Details Data.
Current Addresses
If the individual has current addresses in the database, this area of the page shows the current address types and the associated data. If the individual does not have a current address, the text No current addresses exist appears instead.
|
Field or Control |
Definition |
|---|---|
| Address Type |
Displays the individual's current address types as links. Click the link to view or update data for the address type. The system displays values for the current address in the relevant fields. Displaying the address data enables you to copy it from one address type to another. |
| Edit/View Address Detail |
Click to access the Address History page, on which you can view the history of the address type. To update the current address type for the individual, click the Edit/View Address Detail link, add a new address row, specify the effective date and address format, and edit the related fields. |
Add Address
|
Field or Control |
Definition |
|---|---|
| Effective Date |
Enter the date on which the address is active. Enter addresses in the chronological order of their effective dates. Enter the earliest dated address first and the future-most dated address last. |
| Country |
Enter the country code for the address format to use for the individual. The system displays the fields required for that country as defined on the Country Table - Address Format page. |
| Edit Address |
Click to access the Edit Address page, on which you can enter new address data in the specified format. |
| Address Linkage |
Click to access the Address Linkage page, on which you can link an address type to a campus location or organization location. |
Add Address Types
A particular address often applies to more than one address type for an individual. For example, an individual's dormitory, campus, and billing addresses might be the same.
To copy the address, effective date, and status from one address type to other address types, select the address types to which to assign the data, click Submit, and then click Save.
|
Field or Control |
Definition |
|---|---|
| Address Type |
Click the current address type such as Dormitory, Campus or Billing, to copy. The system displays the associated address data beneath the Edit Address link in the Add Address area of the page. To make changes to the data, click Edit address and make the changes. A blue asterisk to the left of an address type indicates that the address type exists and that it has a current or future-dated address with a status of Active. Be sure that you want to add a new effective-dated row to the existing data before selecting the address type. |
| Explain |
Click to display an explanation of the marks that indicate the successful or unsuccessful creation of an address type. Note: A green check mark indicates the successful creation of an address type. A red X appears if you try to create an address type that causes effective dates to become out of sync for a specific address type. For example, a red X appears if the address type that you are adding already has an existing duplicate effective date, or when an earlier effective-dated address currently exists for the address type. |
| Submit |
To copy the address data to each of the selected address types, click Submit. A green check mark appears next to each address type to which the data is successfully copied and the new or updated addresses appear in the Current Address area of the page. The addresses are not written to the Addresses Table until you click Save. Note: When you create multiple address types from one source address, you can have a mixture of successful and unsuccessful outcomes (green check mark or red X respectively). The data only from successful outcomes appear in the Current Address area. |
| Edit/View Address Detail |
Click to access the Address History page, on which you can change the effective date and status for any newly submitted address and address type before you save it. You can also add a new effective-dated row for the selected address type. |
| Reset |
Click to clear address information in the Add Address and Add Address Type areas. Doing so enables you to enter different data, either manually or by clicking the Address Type link to copy address data from a current address. |
Access the Address Linkage page (click the Edit/View Address Detail link for an address type in the Current Addresses area of the Addresses page).
Image: Address Linkage page
This example illustrates the fields and controls on the Address Linkage page. You can find definitions for the fields and controls later on this page.
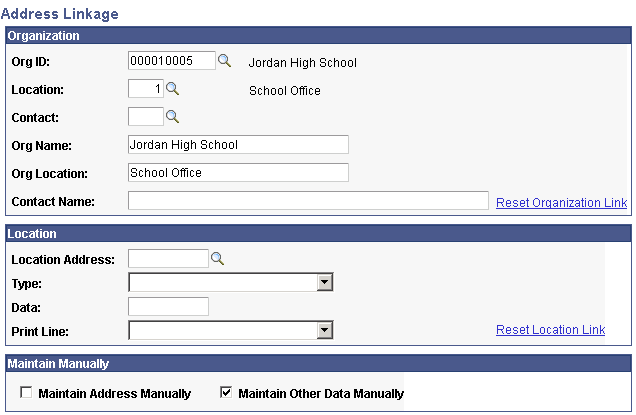
This page enables you to specify the addresses to link. It also enables you to set linked data to manual maintenance so that the Update Linked Addresses process (or any other automatic update process) will bypass the information.
Organization
Enter information to identify the organization address to which you want to link.
Location
Enter information to identify the location address to which you want to link.
|
Field or Control |
Definition |
|---|---|
| Location Address and Type |
Enter the location address and specify the address type to which to link. |
| Data and Print Line |
Enter address data to print for this location and specify on which address line to print it. |
Maintain Manually
|
Field or Control |
Definition |
|---|---|
| Maintain Address Manually |
Select to maintain the address manually and have the system bypass it in the update linked addresses process or other automatic update processes. |
| Maintain Other Data Manually |
Select to maintain other data (from Location or Organization page areas) manually and have the system bypass it in the update linked addresses process or other automatic update processes. |
Access the Electronic Addresses page ().
Image: Electronic Addresses page
This example illustrates the fields and controls on the Electronic Addresses page. You can find definitions for the fields and controls later on this page.
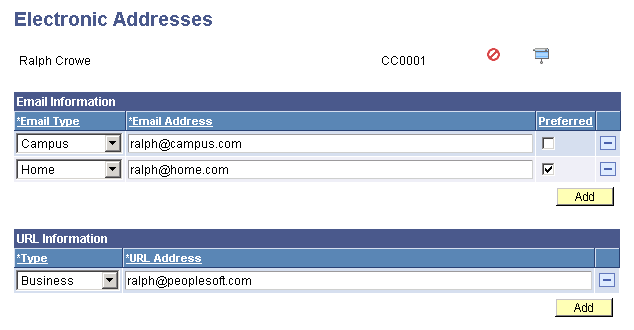
Note: Information that you enter here is the same as the email address data that you enter from the Biographical Details page when you create a personal record. When you save data here, the system updates the same email address data on the Biographical Details page.
See Adding an Individual to Your Database.
Email Information
|
Field or Control |
Definition |
|---|---|
| Email Type |
Select the type, such as Home, Business, or Mailing, that describes this email address. Values for this field are delivered with your system as translate values. You can modify these translate values. |
| Email Address |
Enter the individual's email address. |
| Preferred |
Select to indicate the individual's preferred email address, which is the one to use first when contacting this individual. You may select only one preferred email address for an individual. For information about preferred email for Notifications, see Managing Personal Attributes Information, “Entering Notification Preferences.” |
URL Information
|
Field or Control |
Definition |
|---|---|
| Type |
Select the type (such as Home, Business, or Mailing) that describes this electronic address or URL. |
| URL Address |
Enter the individual's URL or home page address. |
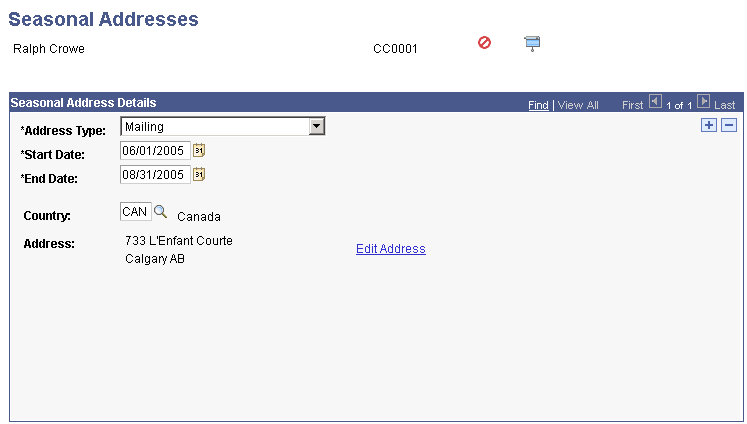
Access the Seasonal Addresses page ().
Image: Seasonal Addresses page
This example illustrates the fields and controls on the Seasonal Addresses page . You can find definitions for the fields and controls later on this page.
|
Field or Control |
Definition |
|---|---|
| Address Type |
Select the type of address that is seasonal for this individual. Only the address types for which the individual has data are available. Note: If the main address data for the address type of this seasonal address is removed, an error message is shown similar to "Business Seasonal Address is invalid - no Active Business Address on file. Seasonal Addresses may only be added for active address types." You can recreate the main address information for this address type, select a different address type for the seasonal address, or remove it. |
| Start Date |
Indicate the date when the seasonal address begins to apply. |
| End Date |
Indicate the date when the seasonal address ceases to apply. When the end date occurs, the system automatically increases the start and end dates by one year and resets the address for the next year. |
| Country |
Enter the country formatting to use for this address. When you exit the Country field, the address fields appear in the format for the selected country as defined on the country Address Format page. |
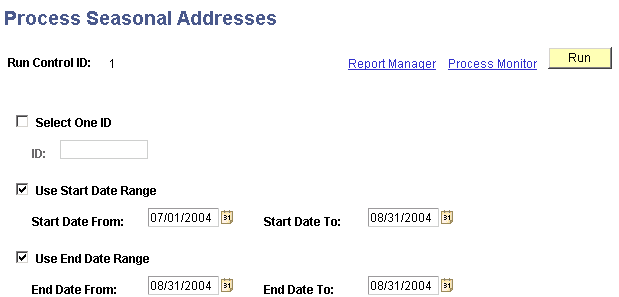
Access the Process Seasonal Addresses page ().
Image: Process Seasonal Addresses page
This example illustrates the fields and controls on the Process Seasonal Addresses page. You can find definitions for the fields and controls later on this page.
|
Field or Control |
Definition |
|---|---|
| Select One ID |
Select this check box to apply or remove seasonal addresses for one individual only. You must specify the individual's ID in the ID field. If you do not choose Select One ID, the system applies or removes seasonal addresses for all IDs for which seasonal address data exists. |
| Use Start Date Range |
Select this check box to indicate that all seasonal addresses beginning within the specified date range should be applied or removed. |
| Use End Date Range |
Select this check box to indicate that all seasonal addresses ending within the specified date range should be applied or removed. |
Note: You must enter either a start date range, an end date range, or both. If the individual has multiple seasonal addresses, consider specifying a date range long enough to include all of them in the search.
If you specify only one date in a range, the system limits the search to seasonal addresses that begin or end, respectively, on that specific date.
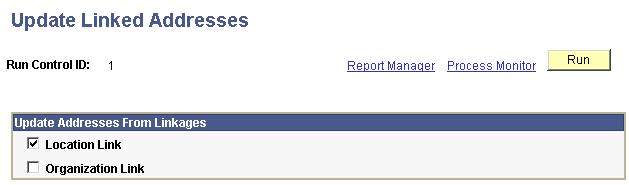
Access the Update Linked Addresses page ().
Image: Update Linked Addresses page
This example illustrates the fields and controls on the Update Linked Addresses page. You can find definitions for the fields and controls later on this page.
|
Field or Control |
Definition |
|---|---|
| Location Link |
Select this check box to indicate that the process should update all addresses linked to locations. |
| Organization Link |
Select this check box to indicate that the process should update all addresses linked to organizations. |
Access the Address Search page ().
Image: Address Search page
This example illustrates the fields and controls on the Address Search page. You can find definitions for the fields and controls later on this page.
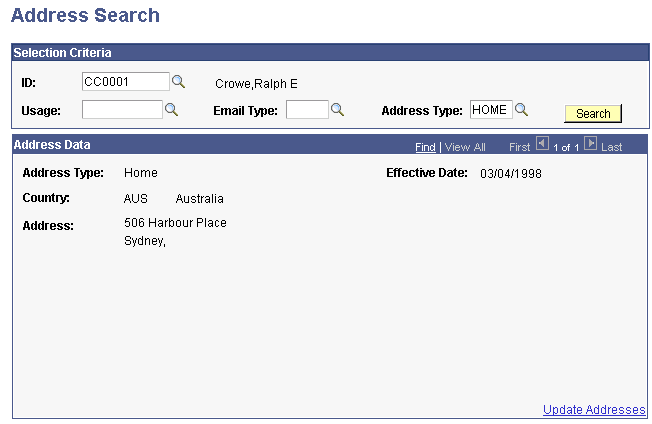
Selection Criteria
|
Field or Control |
Definition |
|---|---|
| ID |
Enter the ID of the individual whose address you want to find. |
| Usage |
Enter the type of address usage or search order for the system to use in the search. All address usages on the Address Usage page are available. |
| Email Type |
Enter the type of email address, if any, for which the system should search, such as Home, Dorm, or Business. Only the existing email types for this individual are available. If no email data exists for the individual, no email types are available. |
| Address Type |
Enter the type of street address for which the system should search, such as Home, Dorm, or Business. All address types are available. If no data of that type exists for the individual, no results are returned. |
| Search |
Click to launch the search. |
Address Data
The system displays the search results in this area.
|
Field or Control |
Definition |
|---|---|
| Update Addresses |
Click this link to access the Addresses page on which you can edit or update any address data associated with the individual. |
Access the Phone Numbers page ().
Image: Phone Numbers page
This example illustrates the fields and controls on the Phone Numbers page. You can find definitions for the fields and controls later on this page.
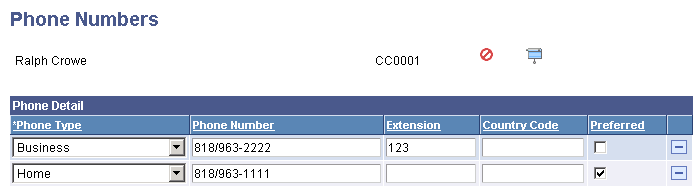
Note: Information that you enter here is the same as the phone number data you enter on the Phone Detail page. When you save data here, the system updates the same phone number data on the Phone Detail page.
|
Field or Control |
Definition |
|---|---|
| Phone Type |
Select the type, such as Home, Business, or Mailing) that describes this telephone number. Values for this field are delivered with your system as translate values. You can modify these translate values. |
| Phone Number |
Enter the telephone number, including area code, for this individual. |
| Extension |
Enter the individual's direct extension, if any. |
| Country Code |
Enter the country code, if required to complete the call. |
| Preferred |
Select to indicate that this is the individual's preferred phone number, and the one to use first when contacting this individual. You can select only one preferred phone number for an individual. For information about preferred phone for Notifications, see Managing Personal Attributes Information, “Entering Notification Preferences.” |