Managing Personal Attributes Information
This section provides an overview of the personal attribute deceased label, lists prerequisites, and discusses how to:
Enter ethnicity information.
Process ethnicity information updates.
Enter languages information.
Enter communication preferences.
Enter notification preferences.
Enter religious preferences.
Enter date of death and other decedent data.
(AUS) Enter student data.
When an individual dies, you should apply the deceased label to all pages about that individual. Then, when users encounter a page with the word DECEASED at the top, they can determine whether to continue or suspend their transactions for that individual.
You can apply the label using either of the following methods. In both methods, when you save the individual's page, the system displays the word DECEASED at the top of the pages.
To display the deceased label and not enter any other decedent data (for example, place of death and death certificate number), assign your institution's deceased service indicator to the decedent.
The service indicator sets the deceased label to display. You can use this method regardless of whether you know the individual's date of death.
If you know the individual's date of death, you can enter that date on the Decedent Data page along with other decedent data, and then save the page.
You can use this method to apply the deceased label only if you know the date of death.
For example, you might receive confirmation that Gloria is deceased. You want to apply the deceased label to all pages about her as soon as possible to alert users. However, you have not received a copy of the death certificate or official confirmation of her date of death. Because you do not know when she died, you could assign her your institution's deceased service indicator, which is the one that is set to display the deceased label.
You can verify that the label is applied by accessing any page about the decedent. The word DECEASED appears at the top right of the page.
All of the decedent's data remains in your database until your system administrator deletes the decedent's ID.
Before you can enter personal attributes data, you must define language codes, and religious preferences codes in your system. Before you can apply and manage FERPA privacy control, you must establish FERPA privacy control fields. Before you can allow students to identify publications for which they release FERPA privacy restrictions, you must set up your institution's publications.
|
Page Name |
Definition Name |
Navigation |
Usage |
|---|---|---|---|
|
Ethnicity |
ETHNICITY_DETAIL |
|
Enter or review an individual's ethnicity data. |
|
Ethnicity Detail Update |
SCC_ETH_UPDATE |
|
Process ethnicity-related updates to person records in batch. |
|
Languages |
SCC_LANGUAGES |
|
Enter and track an individual's language abilities. |
|
Communication Preferences |
SCC_COMM_PREF |
|
Enter an individual's preferred language and method for receiving communications (applies to communication generated by Comm Gen only). |
|
Notification Preferences |
SCC_NTF_PREF |
|
Enter an individual's notification preferences. |
|
Religious Preferences |
RELIGIOUS_PREF |
|
Enter data to identify an individual's religious preference. |
|
Decedent Data |
SA_DECEASED_DATA |
|
Enter the date of death and other data about the decedent. |
|
Student Data AUS |
SSR_STDN_DATA_DEST |
|
Enter DEST information regarding a student's prior programs, including values related to TAFE, secondary school, and postgraduate programs. |
Access the Ethnicity page ().
Image: Ethnicity page
This example illustrates the fields and controls on the Ethnicity page. You can find definitions for the fields and controls later on this page.
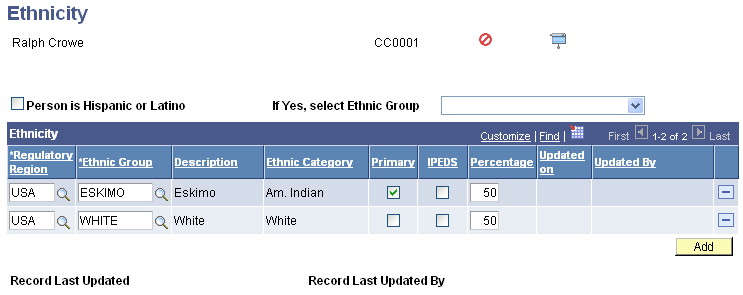
For institutions with USA as an installed country, the following fields appear for editing:
|
Field or Control |
Definition |
|---|---|
| Person is Hispanic or Latino |
Select this check box to indicate whether the person is of Hispanic or Latino origin. For further information on guidelines for defining if person is Hispanic or Latino, see http://nces.ed.gov/statprog/2002/std1_5.asp. Note: You must select this check box if a row exists in the grid that indicates Hispanic origin. |
| If yes, Select Ethnic Group |
If you selected the Person is Hispanic or Latino check box, then select an ethnic group code to further refine the person's ethnicity. When you select a value, row changes occur as follows:
|
| Primary |
Select this check box to indicate with which ethnic group the person most directly identifies. |
| IPEDS |
Select this check box to indicate that the data has been submitted by a reliable source, such as application data or self service, in response to the IPEDS questions. |
The following fields appear for all customers:
|
Field or Control |
Definition |
|---|---|
| Ethnic Group |
This field allows you to select multiple ethnic backgrounds. Click the Add button to add more than one ethnic group. |
| Ethnic Category |
The system populates this field based on the value in the EEO Ethnic Group field for U.S. regulatory region ethnic groups or the Ethnic Category for ethnic groups tracked for other regulatory regions. For any ethnic group codes with a regulatory region of USA, this field should always map to one of these five races:
For further information on guidelines for mapping ethnic group codes to the five races, see http://nces.ed.gov/statprog/2002/std1_5.asp. |
| Percentage |
Indicate the share of 100 of which this person derives his or her ethnicity. The system displays a warning if you enter an amount over 100. Note: Collecting this information is optional. |
| Last Updated, Updated By |
Indicates when the ethnicity data was last created or changed, and by whom. The system updates these fields when you save the page. The system stores the OPRID of the user and displays the name of the user. |
| Record Last Updated |
This field displays the date and time of the most recently added row in the grid. |
| Record Last Updated By |
This field displays the name of the last user to update any row of the grid. |
Access the Ethnicity Detail update page ().
Image: Ethnicity Detail Update page
This example illustrates the fields and controls on the Ethnicity Detail Update page. You can find definitions for the fields and controls later on this page.
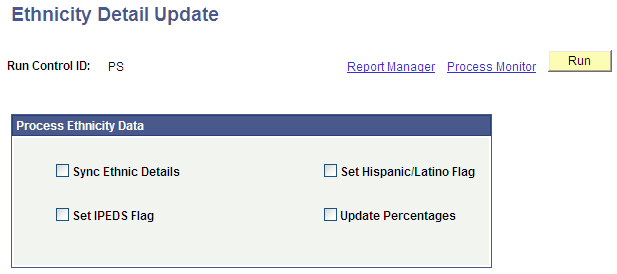
If your institution chooses not to resurvey your population, you can use the check boxes on this page to update ethnicity record attributes in batch. Select any combination of the four check boxes.
|
Field or Control |
Definition |
|---|---|
| Sync Ethnic Details |
Select this check box to instruct the system to search for all rows in the DIVERS_ETHNIC table without a corresponding row in ETHNICITY_DTL and add a row, if one does not exist. Select this check box to instruct the system to search for all rows in ETHNICITY_DTL without a corresponding row in DIVERS_ETHNIC and delete them. |
| Set IPEDS Flag |
Select this check box to instruct the system to set the ETHNICITY_DTL.ETH_VALIDATED flag on ethnicity records to "Y", meaning that your institution considers the records valid for IPEDS requirements. The system also updates corresponding audit fields on the record. |
| Set Hispanic/Latino Flag |
Select this check box to instruct the system to search for all DIVERS_ETHNIC rows with an EEO Ethnic Category = 3 'Hispanic' that are not set to "HISP_LATINO = Y", and set them to "Y." The system also updates corresponding audit fields on the record. |
| Update Percentages |
Select this check box to instruct the system to search ETHNICITY_DTL records for fractional ethnicity data (such as 2/5) and convert it to a percentage (such as 40%) or to convert zero percentages to a Numerator = 0 and a Denominator = 100. The system also updates corresponding audit fields on the record. |
Click the Run button to initiate the process. Review the results log within Process Scheduler that identifies which option was run and how many records were updated.
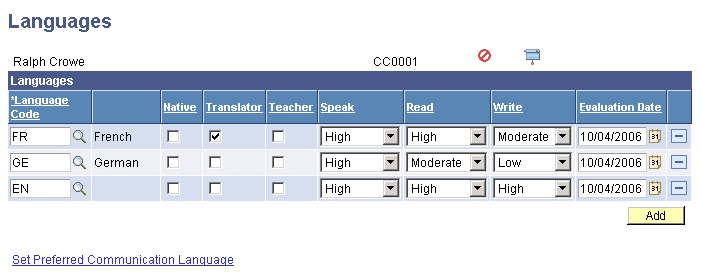
Access the Languages page ().
Image: Languages page
This example illustrates the fields and controls on the Languages page. You can find definitions for the fields and controls later on this page.
|
Field or Control |
Definition |
|---|---|
| Language Code |
Enter the language that this individual speaks, reads, or writes. |
| Native |
Select this check box to indicate that this is the individual's native or primary language. |
| Translator |
Select this check box to indicate that the individual can translate or interpret this language. |
| Teacher |
Select this check box to indicate that the individual can teach or has taught this language. |
| Speak |
Select the level of proficiency, such as high, medium, or low, with which the individual can speak this language. |
| Read |
Select the level of proficiency, such as high, medium, or low, with which the individual can read this language. |
| Write |
Select the level of proficiency, such as high, medium, or low, with which the individual can write this language. |
| Evaluation Date |
Enter the date on which the individual's levels of proficiency in this language were evaluated, reported, or entered. |
| Set Preferred Communication Language |
Appears only if the Support multiple languages check box is selected on the Installation Default - CC (installation default - Campus Community) page. Click to transfer to the Communication Preferences page where you can specify the language in which the student prefers to receive communications from you. See Reviewing or Defining Campus Community Installation Settings. |
Access the Communication Preferences page ().
Image: Communication Preferences page
This example illustrates the fields and controls on the Communication Preferences page. You can find definitions for the fields and controls later on this page.
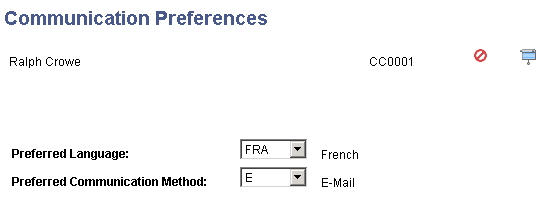
If your institution supports multiple languages and multiple methods, you can enter an individual's communication preferences so that the Communication Generation process will produce correspondences to that individual accordingly.
Note: Communication preferences apply to the Communication Generation process only. They do not apply to the Letter Generation process.
|
Field or Control |
Definition |
|---|---|
| Preferred Language |
Enter the language in which the individual prefers to receive communications from your institution. Only the languages that your institution supports and selects on the Installation Default - CC (installation default Campus Community) page are available. |
| Preferred Communication Method |
Enter the method by which the individual prefers to receive correspondence from your institution. Only the methods that your institution supports and selects on the Installation Default - CC (installation default Campus Community) page are available. Note: Currently, the Communication Generation process supports only the methods of Email and Letter. |
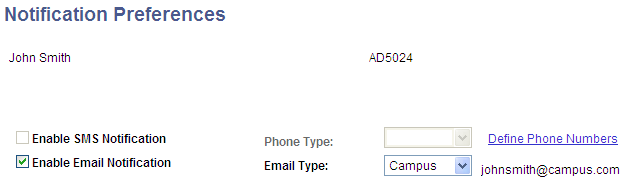
Access the Notification Preferences page ().
Image: Notification Preferences page
This example illustrates the fields and controls on the Notification Preferences page. You can find definitions for the fields and controls later on this page.
For information about the Notifications Framework, see Understanding the Notifications Framework.
|
Field or Control |
Definition |
|---|---|
| Enable SMS Notification and Enable Email Notification |
Enable notifications and then select the preferred phone/email type. Note: The specified phone number must be able to receive SMS or text messages. If phone or email details do not exist for the person, use the links to access the Phone Numbers page or Electronic Addresses page and add them. |
If the preferences on this page differ from those on the Phone Numbers and Electronic Addresses pages, the preferences selected here are always used for notifications (except when overridden on Notification setup).
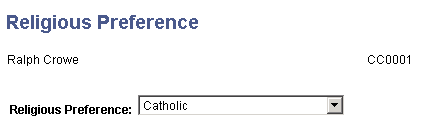
Access the Religious Preference page ().
Image: Religious Preference page
This example illustrates the fields and controls on the Religious Preference page. You can find definitions for the fields and controls later on this page.
|
Field or Control |
Definition |
|---|---|
| Religious Preference |
Select the individual's stated religious preference. |
Access the Decedent Data page ().
Image: Decedent Data page
This example illustrates the fields and controls on the Decedent Data page. You can find definitions for the fields and controls later on this page.
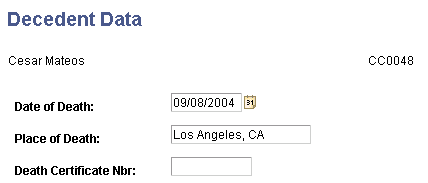
Note: Only the date of death is required to display the deceased label for the individual throughout your system.
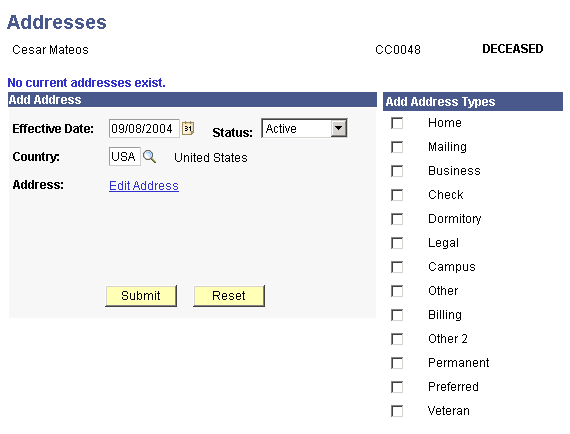
Image: Example of the Addresses page with the Deceased indicator displayed
This example illustrates the fields and controls on the Example of the Addresses page with the Deceased indicator displayed. You can find definitions for the fields and controls later on this page.
|
Field or Control |
Definition |
|---|---|
| Date of Death |
Enter the individual's date of death. You can enter either the official date of death or the date on which your institution was notified of the death, depending on your institution's requirements. When you enter a date and save the page, the system displays the word DECEASED at the top of pages about this individual throughout your system. If you do not enter a date, the deceased label does not appear. Note: If you do not know the date of death, use the Service Indicator page to assign your institution's deceased indicator to this individual. If, after you enter a date of death and save the Decedent Data page, you decide that you do not want the deceased label to appear on pages for this individual, return to the Decedent Data page, highlight and delete the date, and then save the page with an empty Date of Death field. The deceased label no longer appears. |
| Place of Death |
Enter the place (city, state, county, or country) where the individual died. |
| Death Certificate Number |
Enter the number from the official certificate of death. The death certificate number might be required for financial aid reconciliation if the individual is a student, for beneficiary pay out if the individual is an employee, or to receive funds if the individual donated a trust to your institution. Consult your institution's administration. |
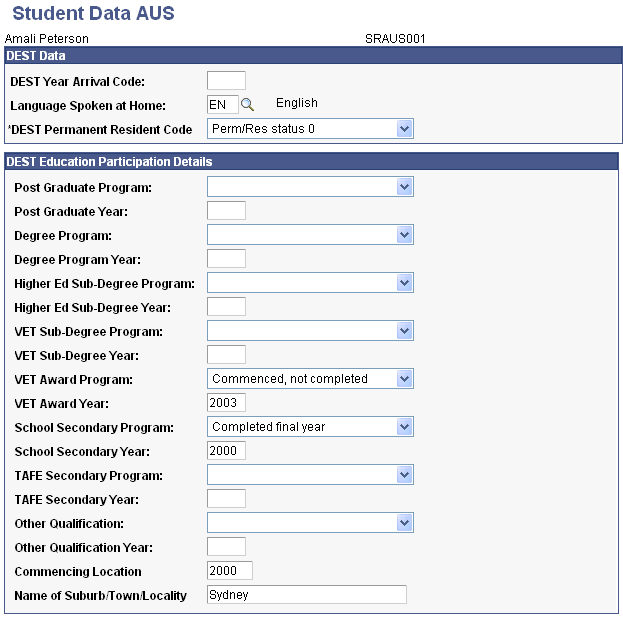
Access the Student Data AUS page ().
Image: Student Data AUS page
This example illustrates the fields and controls on the Student Data AUS page. You can find definitions for the fields and controls later on this page.
Department of Industry, Innovation, Science, Research and Tertiary Education (DIISRTE) was previously known as DEEWR and before that as DEST. DIISRTE reports require data on students and staff at an institution. The Staff File for DIISRTE is produced using PeopleSoft Human Resources Management System. It is important that the data elements used in the DIISRTE reports be set up and entered properly.
See:
DEST Data
|
Field or Control |
Definition |
|---|---|
| DEST Year Arrival Code |
Enter the year that a student, who was not born in Australia, entered Australia. This value is reported in element 347. |
| Language Spoken at Home |
Enter the appropriate code to indicate the use of a language other than English at the student's permanent home residence. The drop-down list includes any PeopleSoft-defined language codes. The DIISRTE Enrollment Extract process maps your selection to the numeric DIISRTE language code. This value is reported in element 346. |
| DEST Permanent Resident Code |
Select the value for reporting in element 390 – Permanent Resident Eligibility for HELP Assistance. Note: This element is reported as blank in files for the 2009 reporting year and later. It is required for pre-2009 reporting periods, including revisions to those reporting periods. |
Refer to DIISRTE's Higher Education Collection Documentation for explanation of the permanent resident codes.
DEST Education Participation Details
Record the status and the last year applicable to each level of education the student has participated in. This data is used to determine the value for elements 493 and 572 if the student is deemed to be a domestic commencing student.
Values for Post Graduate Program, Degree Program, Higher Ed Sub-Degree Program, VET Sub-Degree Program, and VET Award Program are:
Commenced, not completed
Completed all requirements
Never commenced
No information
Not a commencing student
Values for School Secondary Program are:
Completed final year
Did not do final year
No information
Not a commencing student
Values for TAFE Secondary Program are:
Completed such a course
Didn't begin/complete
No information
Not a commencing student
Values for Other Qualification are:
No information
No other qualifications/certs (certifications)
Not a commencing student
Other qualifications/certs (certifications)
|
Field or Control |
Definition |
|---|---|
| Commencing Location |
Enter the Australian postcode of a student's permanent home residence in their last year of secondary school. This value is reported in element 476 if the student is deemed to be a domestic school leaver commencing an undergraduate course. |
| Name of Suburb/Town/Locality |
Enter the name of the suburb, town, or locality applicable to the permanent residence of the student in their last year of secondary schooling. This value is reported in element 486 if the student is deemed to be a domestic school leaver commencing an undergraduate course. |
| Gender Parent/Guardian 1 |
Select the gender for the first parent or guardian. |
| Highest Education Parent/Guardian 1 |
Specify the highest level of education attained by the parent or guardian. The values presented in this prompt are restricted to those applicable to the gender specified for parent/guardian 1. |
| Gender Parent/Guardian 2 |
Select the gender for the second parent or guardian. |
| Highest Education Parent/Guardian 2 |
Specify the highest level of education attained by the parent or guardian. The values presented in this prompt are restricted to those applicable to the gender specified for parent/guardian 2. |