Setting Up the Rules Engine
This section discusses how to:
Set Up Rules Engine Install Options.
Define Rule Category Security.
Define Color Codes for Rules Engine Manager Elements.
Define Rules Engine Statements.
Define Rules Version Reason Codes.
Set up Rules Engine Variables.
Define Lists of Values for Rules Engine Variables.
|
Page Name |
Definition Name |
Navigation |
Usage |
|---|---|---|---|
|
Rules Engine Install Options |
SCC_INSTALL_RE |
|
Set up Rules Engine Install Options. |
|
Rule Category Definition |
SCC_RULE_CAT_SETUP |
|
Add and define Rule Categories to control the ability to create Rules by Rule Usage. Control Rule Category access to called Rules and Functions and assign a valid Entity Profile. |
|
Rule Category Rule Groups |
SCC_RULE_CAT_RLGRP |
|
Determine if Rule Groups are required for a Rule Category and assign valid Rule Groups. |
|
Rule Category Security |
SCC_RULE_CAT_SCRTY |
|
Assign valid roles and additional users that have access to a Rule Category. |
|
Rule Category Cross Reference |
SCC_RULE_CAT_XREF |
|
Displays Rules, Rule Groups, System Variables, and Triggers associated with the Rule Category. |
|
Define Colors |
SCC_COLORS |
|
Define colors to associate with Rules Engine user interface elements. |
|
Define Rules Engine Text Colors |
SCC_RULE_TXT_COLOR |
|
Associate colors with Rules Engine user interface elements. |
|
Define Rules Engine Statements |
SCC_RULE_STMT_TBL |
|
Define Statements to use in Rule evaluations and calculations. |
|
Define Version Reason Codes |
SCC_RULE_VRSN_TBL |
|
Define Rules Version Reason Codes to use when creating new versions of existing Rules. |
|
Define System Variables |
SCC_RULE_SYSVAR |
|
Define System Variables to use when creating Rules. |
|
System Variables Cross Reference |
SCC_RULE_SYSV_XREF |
|
Displays Rules and Rule Groups associated with the System Variable. |
|
Define Data Sets |
SCC_RULE_EDS |
|
Define Data Sets to use as a temporary storage when creating Rules. |
|
Data Set Property Details |
SCC_EDS_PROP_DTLS |
Click the Details link on the Define Data Sets page. |
Define Data Set property details. |
|
Data Set Cross Reference |
SCC_RULE_EDS_XREF |
|
Displays Rule and Rule Groups associated with the Data Set. |
|
Define List of Values |
SCC_RULE_LOV_DEFN |
|
Define lists of values to use for property prompting when creating Rules. |
|
List of Values Cross Reference |
SCC_RULE_LOV_XREF |
|
Displays Rule and Rule Groups associated with the List of Values. |
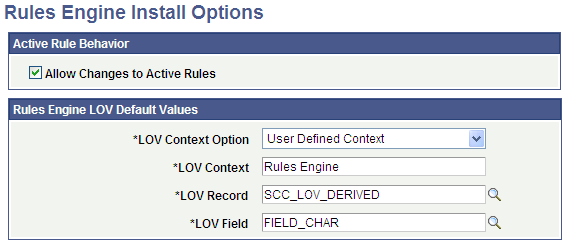
Access the Rules Engine Install Options page ().
Image: Rules Engine Install Options page
This example illustrates the fields and controls on the Rules Engine Install Options page. You can find definitions for the fields and controls later on this page.
|
Field or Control |
Definition |
|---|---|
| Allow Changes to Active Rules |
Select this check box to allow changes to active Rules or Functions. You can use this flag to override the feature that makes Rules features inaccessible when Rules or Functions are active. This option can be useful in non-production environments in cases where it should be possible to change active Rules. The check box is not selected by default. When Allow Changes to Active Rules is not selected only the following can be changed or accessed by the user when accessing the Rules Engine Manager Component:
When Allow Changes to Active Rules is not selected, the following Action Drop down options are not available:
When Allow Changes to Active Rules is not selected, Rule Groups that are selected to be Available In Dynamic Rules cannot be altered. |
| Rules Engine LOV Default Values |
Rules Engine List of Values (LOV) allows you to define Rules Engine prompting for variables created and used in the Rules Engine Manager. The system-delivered default values of the fields in this group box control LOV functionality in the Rules Engine Manager. Warning! Do not change the values delivered with the system. |
Rules Engine Categories provide a means of administering various Rules Engine settings by Role and/or User. Every Rule that is created must belong to one predefined Rule Category. The Rule Category is used to control the following:
The type of Rule that can be created as defined by Rule Usage: Rule, Function, and/or Trigger. Rule Usage determines how a Rule can be used in a business process.
Access to Rules in other Rule Categories. Multiple Rule Categories can be added to the Rule Category definition. When these Rule Categories are added, Rules or Functions belonging to the associated Rules Category can be called from the main Rule.
Access to Data through Entities. The Entity Profile attached to the Rule Category defines which Entities can be used as a Base Entity in the Rule created. The Base Entity is the starting point from which the logic in the Rule is built. Depending upon the Entity Profile setup, you may have access to one or more Base Entities and all or a defined set of Entity Properties.
Valid Rule Groups. Valid Rule Groups can be associated with a Rules Category. Restrictions may be applied so that you can only build Rules from a Rule Group. This can be beneficial in circumstances where you want to guide a group of users with Rule creation by making sure that they build their Rule according to the defaults provided by the Rule Group or Rule Groups associated with this Rule Category.
Note: For Rule Categories delivered with the system, only the Long Description on the Definition page and Rule Groups and Security pages can be modified. Rules Engine Categories delivered with the system are marked by the words “System Data” to the right of the Rule Category field.
Access the Rule Category Definition page ().
Image: Rule Category Definition page
This example illustrates the fields and controls on the Rule Category Definition page. You can find definitions for the fields and controls later on this page.
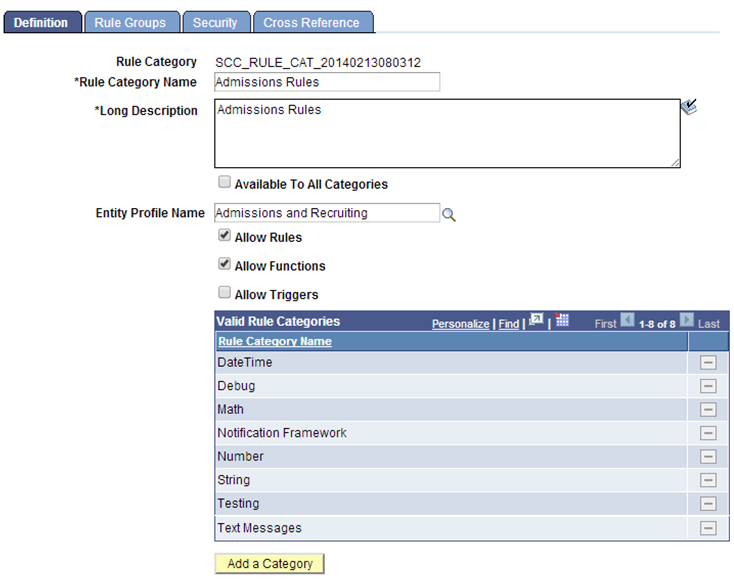
Using this category as an example, you cannot create Functions or Rules in category Math, but you can create Functions and Rules in category AIR Functions and CALL Functions in category Math.
|
Field or Control |
Definition |
|---|---|
| Rule Category |
Displays a unique ID generated by the system. When adding a new Rule Category, the default value is NOID. After saving the Rule Category, a unique ID is generated by the system and assigned to the Rule Category. The ID is created by combining prefix “SCC_RULE_CAT_” with the system date and time stamp in format YYYYMMDDHHMMSS. |
| Rule Category Name |
Enter a Rule Category Name. The Rule Category Name is used when searching for a Rule Category and for display. |
| Long Description |
Enter descriptive text explaining the function of the Rule Category. |
| Available to All Categories |
Select this check box to make this Category automatically available as a valid Category in other Categories. Categories that are defined as “Available to all Categories” cannot have any Valid Categories of its own. When this check box is deselected, the Category is no longer available in other Categories. Note: Security settings on the Rule Category affect all Rules, Functions and Triggers which have been called from or created in this Category. In the example below the Category Math has been made available to Category “Admissions Rules” as a Valid Rule Category. Every Function and Rule Created in Category Math can now be called from a Function or Rule created in Category “Admissions Rules”. Note: Deselecting “Available to All Categories” on category Math would remove the Category from Admissions Rules and invalidate the security on the Call statement of rules which have already been created. Although this would not break compiled Rules it would cause problems when users want to change those rules. |
| Entity Profile Name |
Enter the Entity Profile Name that you want to associate to this Rule Category. Rules, Functions and Triggers can be built using the Base Entities which have been setup in this Entity Profile. If the Entity Profiles uses Views, access to certain properties within an Entity may have been restricted. |
| Allow Rules |
Select this check box to allow the creation of Rules with this Rule Category. |
| Allow Functions |
Select this check box to allow the creation of Functions with this Rule Category. |
| Allow Triggers |
Select this check box to allow the creation of Triggers with this Rule Category. |
| Valid Rule Categories |
Select Rule Categories available to this Rule Category. The Rules, Functions, and Triggers of the selected categories can be called by Rules created in the main Category. Note: This is not an inheritance model. Adding a valid Rule Category here gives you access to the Rules, Functions, and Triggers native to that Rule Category but not to Rules, Functions, and Triggers of any Rule Categories associated with the selected Rule Category. |
Access the Rule Category Rule Groups page ().
Image: Rule Category Rule Groups page
This example illustrates the fields and controls on the Rule Category Rule Groups page. You can find definitions for the fields and controls later on this page.
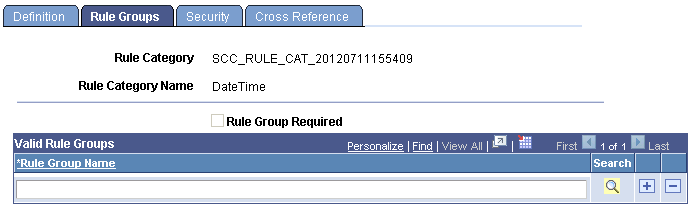
Use this page to add valid Rule Groups to this Rule Category or to restrict users to only being able to build Rules by using one of the associated Rule Groups.
|
Field or Control |
Definition |
|---|---|
| Rule Group Required |
Select to enforce Rule Group usage. When building Rules users must select one of the Valid Rule Groups before being able to build their Rules. |
| Valid Rule Groups |
Select Rule Groups. Note: Rule Groups are added to this setup page automatically when you add Rules to a Rule Group by using the Create Rule Group option from Rules Engine Manager or by using Create Rule Group from a Rule when on the Rules Engine Search option page. |
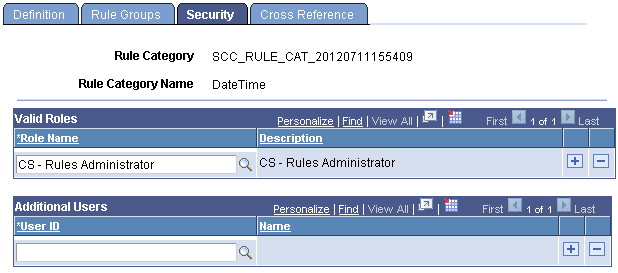
Access the Rule Category Security page ().
Image: Rule Category Security page
This example illustrates the fields and controls on the Rule Category Security page. You can find definitions for the fields and controls later on this page.
|
Field or Control |
Definition |
|---|---|
| Valid Roles |
Enter Valid Roles for which the Rules Category definition is valid. These are Roles that are set up using the standard PeopleTools Security function. |
| Additional Users |
Enter additional users for which the Category Definition is valid. The registration of Additional Users is supplemental to the Valid Roles. |
Access the Rule Category Cross Reference page ().
Image: Rule Category Cross Reference page
This example illustrates the fields and controls on the Rule Category Cross Reference page. You can find definitions for the fields and controls later on this page.
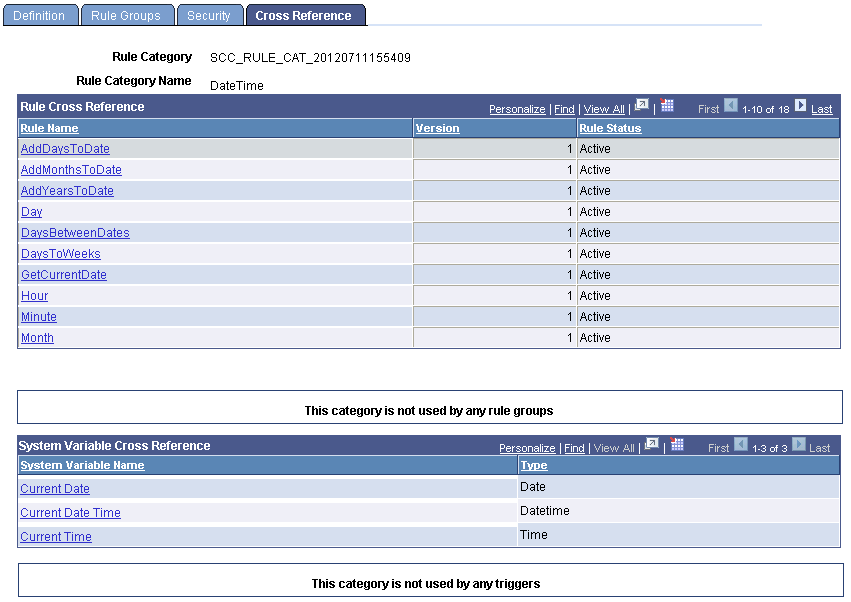
This page shows Rules, Rule Groups, System Variables, and Triggers which have been created as part of this Category.
|
Field or Control |
Definition |
|---|---|
| Rule Name, Rule Group Name, System Variable Name, and Trigger Name |
Displays to authorized users a link for any of these Rules Engine objects that have been created in this Rule Category. If a user is not authorized, the link is disabled. Click a link to transfer out of the component and to the referenced object. Warning! Make sure you have saved any data that you need to before confirming you want to transfer to the referenced object in a new component. If no objects are associated with the Rule Category, a notification is shown in place of the object details. for example, “This Category is not used by any triggers”. |
| Version |
Displays the Rule Version Number. |
| Rule Status and Rule Group Status |
Displays the status of the Rule Group or Rule Name (In Progress, Active, In-active). |
| Type |
Displays the Type of System Variable. |
Note: The assigning of different colors to different Rules Engine Manager Elements for purposes of displaying the Elements in different colors in user interfaces is optional and does not affect how a Rule is used in System processing. If no color setup is done, all Element text is displayed in black.
A set of predefined color codes for the Rules Engine Manager user interface are delivered. The different colors represent different types of elements of the Rule; for example, Rule Names, Statements, Variables, etc. You can customize the colors and the Rule elements with which they are associated. The following color codes are delivered:
|
Color |
Color Code ID |
|---|---|
|
Dark Purple |
380B61 |
|
Black |
000000 |
|
Blue |
0000ff |
|
Red |
ff0000 |
|
Green |
008000 |
|
Purple |
800080 |
|
Brown |
a52a2a |
|
Gray |
808080 |
|
Dark Blue |
0000a0 |
|
Yellow |
ffff00 |
|
Orange |
ffa500 |
|
Maroon |
800000 |
Note: Colors delivered with the system cannot be modified.
Access the Define Colors page ().
Image: Define Colors page
This example illustrates the fields and controls on the Define Colors page. You can find definitions for the fields and controls later on this page.
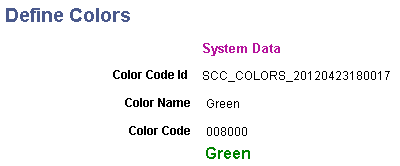
Although Oracle recommends using the pre-delivered color range, you can add new colors to the system for the Rules Engine Manager user interface elements. New colors can be added simply by adding a new entry, specifying a Color Name and a Color Code which conforms to the HTML color code standard.
|
Field or Control |
Definition |
|---|---|
| Color Code ID |
Displays a unique ID generated by the system. When adding a new value the default value is NOID. The unique ID is generated when the Color Code is saved. The Color Code ID is created by combining prefix SCC_COLORS_ with the system date and time stamp in format YYYYMMDDHHMMSS. |
| Color Name |
Enter the name of the color; for example, Sky Blue. |
| Color Code |
Enter an HTML standard color code. New color codes can be defined using HTML standards.
|
Access the Define Rules Engine Text Colors page ().
Image: Define Rules Engine Text Colors page
This example illustrates the fields and controls on the Define Rules Engine Text Colors page. You can find definitions for the fields and controls later on this page.
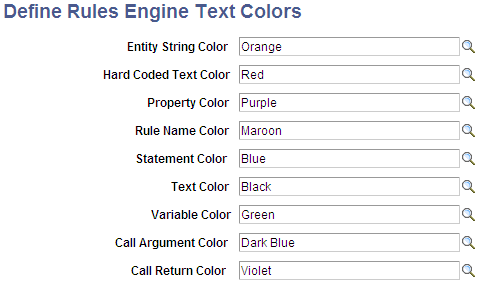
Use this page to assign colors to Rules Engine Manager elements. The following elements can be color coded:
Entity String
Hard Coded Text
Property
Rule Name
Statement
Text
Variable
Call Argument
Call Return
Rules Engine Statements help you create business rules in the Rules Engine Manager to perform specific processing Functions like assigning values to variables or creating Evaluative Statements. An extensive set of Statements is delivered with the system to facilitate the creation of a comprehensive set of Rules. The processing functionality for each statement is defined in Application Class PeopleCode and associated with a Rules Engine Manager secondary page through a predefined work record. This secondary page is used to display fields and logic associated with the Statement.
For more information, see Using Statements for Evaluation and Calculation in a Rule.
Note: For Statements delivered with the system, only the Long Description can be modified.
Note: Oracle may deliver additional Statements in the future. You are advised not to create your own Statements at this time.
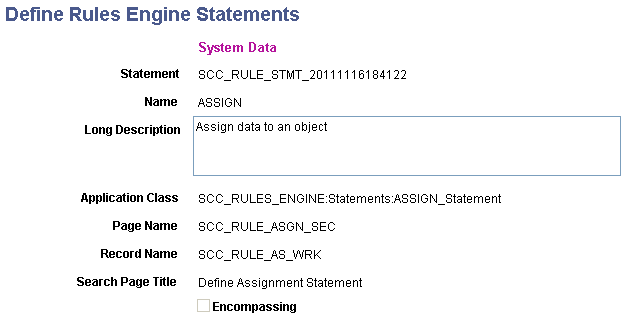
Access the Define Rules Engine Statements ().
Image: Define Rules Engine Statements page
This example illustrates the fields and controls on the Define Rules Engine Statements page. You can find definitions for the fields and controls later on this page.
|
Field or Control |
Definition |
|---|---|
| Statement |
Displays a unique system-generated Rules Engine Statement identifier. When adding a new value the default value is NOID. The unique ID is generated when the Rules Engine Statement is saved. The Rules Engine Statement ID is created by combining prefix SCC_RULE_STMT_ with the system date and time stamp in format YYYYMMDDHHMMSS. |
| Name |
Enter a Statement Name. The Statement Name is used when searching for a Statement and for display. |
| Long Description |
Enter descriptive text explaining the function of the Statement. |
| Application Class |
Enter the Application Class for this Rules Engine Statement. Logic for system–delivered Statement functionality uses the SCC_RULES_ENGINE:Statements Application Class. Warning! To ensure that delivered functionality works as intended, do not change delivered Application Classes. |
| Page Name |
Enter the Page Name for this Rules Engine Statement. Each Statement references a secondary page specifically created for this Statement. The secondary page is used to display Statement functionality to the end user. The Statement secondary pages are pre–delivered and are designed to render Statement logic in a specific way. Warning! To ensure that delivered functionality works as intended, do not change the Page Name for the Statement. |
| Record Name |
Enter the Record Name for this Rules Engine Statement. Each Statement has a unique work record reference. The associated work record is used to technically facilitate the information shown on the secondary pages. The Statement work records are pre–delivered and have been designed to render Statement logic in a specific way. Warning! To ensure that delivered functionality works as intended, do not change the Record Name for the Statement. |
| Search Page Title |
Enter the Page Title for the Rules Engine Statement. The Page Title is displayed at the top of the Statement grid once the Statement has been selected for use in the Rule. |
| Encompassing |
Select to indicate whether the Statement created is an encompassing statement. An Encompassing Statement is one which can enclose one or more other Statements in the Rule. The following delivered statements are encompassing:
For more information, see Using Statements for Evaluation and Calculation in a Rule. |
New versions of Rules can be created for each Rule, Trigger or Function. Rule Versions are managed on the Rules Engine Manager Rule Version Page. New versions of Rules can be created for reasons like needing to incorporate new Rule logic or correcting Rule mistakes. To facilitate Rule maintenance, use Rule Version reason codes to indicate why a new version was created. Define Rule Version Codes on the Rules Version Reason Code setup page.
Note: For Version Reason Codes delivered with the system, only the Description can be modified.
Note: The system-delivered Version Reason Code of New Version of the rule is used automatically whenever a new version of a rule is created. This Version Reason Code is delivered with the Initial Version Default check box selected. If the Initial Version Default check box is not selected, the Version Reason Code of New Version of the rule can be selected to be both the Initial Version Reason Code as well as the New Version Reason Code.
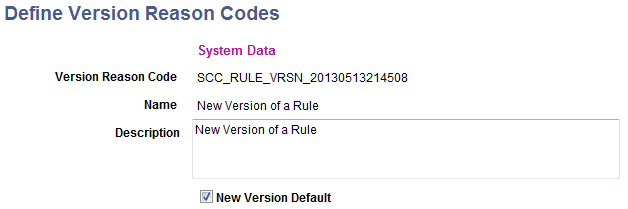
Access the Define Version Reason Codes page ().
Image: Define Version Reason Codes page
This example illustrates the fields and controls on the Define Version Reason Codes page. You can find definitions for the fields and controls later on this page.
|
Field or Control |
Definition |
|---|---|
| Version Reason Code |
Displays a unique ID generated by the system. When adding a new value the default value is NOID. The unique ID is generated when Version Reason Code is saved. The ID is created by combining prefix SCC_RULE_VRSN_ with the system date and time stamp in format YYYYMMDDHHMMSS. |
| Name |
Enter a Version Reason Name. The Version Reason Name is used when searching for a Version Reason and for display. |
| Description |
Enter descriptive text explaining the function of the Version Reason Code.. |
| Initial Version Default |
Select this check box to use this Version Reason code automatically when the rule is created. Comments can be added to the Version Reason code before the Version page is saved. The system-delivered Version Reason Code Initial Version of the Rule is delivered with this check box selected. |
| New Version Default |
Select this check box to use this Version Reason Code automatically whenever a new version of a rule is created. The system-delivered Version Reason Code New Version of the rule is delivered with this check box selected. If the Initial Version Default check box for the system-delivered Version Reason Code Initial Version of the Rule is not selected and the system-delivered Version Reason Code New Version of the rule is selected, the New Version Default reason is used for both. |
This section discusses setting up Rules Engine Variables.
Understanding Rules Engine Variables
Variables provide you with a flexible way to create a temporary placeholder or storage location which can be used in a Rule or passed from the current Rule to another. A Variable has a name and a certain type; for example, “Text” or “Number”. The Variable starts out as empty storage and can be assigned a value, cleared, and re-used.
For example, a Variable named “Total Units” is a variable of type “Number”. The Variable is used in a Function that calculates Total Units from Course Units that are found in a specific Course List. At the end of the Function, the Variable “Total Units” is displayed as the result or outcome of the Rule.
The following Variables can be created when working with the Rules Engine Manager:
Rules Engine Manager Variables
System Variables
Data Sets
Rules Engine Manager Variables are created in a specific Rule and act as a storage place to temporarily store a value in that particular Rule. The previously mentioned “Total Units” is an example. Such a variable can be passed from one Rule to another, but it cannot be referenced by another Rule without having been passed.
System Variables have been predefined in the Define System Variable component and have a specific predefined value. System Variables are available for all Rules in the system and are intended to provide values which are generic and are Variables that are appropriate in multiple situations. Their values do not need to change from one Rule to the next. An example is “Current Date” which always provides the user with value of the current system date. System Variables are typically created by Developers but, once created, can be used by Functional Expert Users in their Rules.
Data Sets allow you to define multiple Variables that can be referenced as a group. When building more complex Rules you may need more than one Variable as a temporary placeholder. There may be situations where you need multiple temporary placeholders that can be stored together as a logical set of Variables. For example, when calculating Total Units for multiple students in batch, you may need to not only store the “Total Units” but also the Student (in the example below we store Student ID as well as Student Name) and the Course List ID. In this case you may want to create three temporary Variables that can be referenced together as a group. This is a Data Set. The Data Set described above would allow you to store the following example data:
|
Student ID |
Student Name |
Course List ID |
Total Units |
|---|---|---|---|
|
0000012 |
Brad Wilkinson |
Math100 |
12 |
|
0000011 |
Brenda Benson |
Math100 |
22 |
|
0000010 |
Billy Mathews |
Math100 |
18 |
Defining Rules Engine Manager Variables
Rules Engine Manager Variables can be defined whenever you need to use a named temporary storage space of a specific type in which to store a value in the Rules Engine. You can pass that Variable to other Rules or use the Variable to store data retrieved from other Rules. Variables are always created within a Rule itself.
For more information, see Adding Variables to a Rule.
Defining Rules Engine System Variables
A System Variable is predefined in the system typically by a developer or programmer. Once created, the System Variable can be used in Rules built by functional experts. System Variables can be created to provide re-usable defaults for commonly used values such as system date, Operator ID, etc.
Note: Rules Engine System Variables delivered with the system cannot be modified.
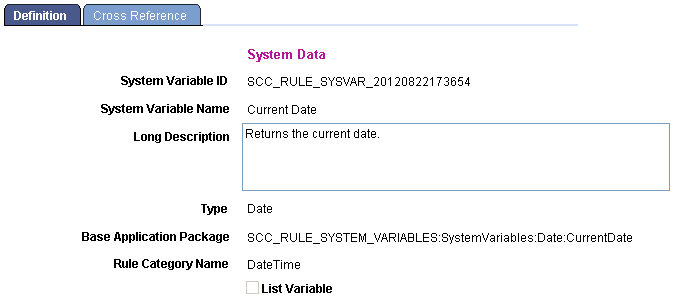
Access the Define System Variables page ().
Image: Define System Variables page
This example illustrates the fields and controls on the Define System Variables page. You can find definitions for the fields and controls later on this page.
|
Field or Control |
Definition |
|---|---|
| System Variable ID |
Displays a unique ID generated by the system. When adding a new value the default value is NOID. The unique ID is generated when the system variable is saved. The Statement ID is created by combining prefix SCC_RULE_SYSVAR_ with the system date and time stamp in format YYYYMMDDHHMMSS. |
| System Variable Name |
Enter a System Variable Name. The System Variable Name is used when searching for a System Variable and for display. |
| Long Description |
Enter descriptive text explaining the function of the System Variable. |
| Type |
Select the Type of Variable. Values are:
|
| Base Application Package |
Enter the Base Application Package for this System Variable. The Base Application Package contains the logic that returns the System Variable. System Variables can only be assigned using application package PeopleCode. Delivered system variables have been created in the reserved application package: SCC_RULE_SYSTEM_VARIABLES:SystemVariables. Note: Oracle expects to make new system variables available as needed. |
| Rule Category Name |
Enter the Rule Category Name for this System Variable. This restricts direct access to specific System Variables. |
| List Variable |
Select this check box if the System Variable needs to accommodate the return of multiple values. |
For a complete listing of System Variables delivered with the system for use in Rules and Functions by an Expert user, see Library of System-Delivered Rules Engine Objects
Access the Define System Variables Cross Reference page ().
Image: Define System Variables Cross Reference page
This example illustrates the fields and controls on the Define System Variables Cross Reference page. You can find definitions for the fields and controls later on this page.
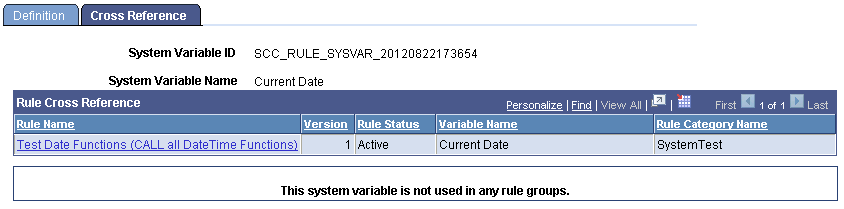
This page shows Rules and Rule Groups associated with this System Variable.
|
Field or Control |
Definition |
|---|---|
| Rule Name and Rule Group Name |
Displays to authorized users a link for any of these Rules Engine objects which use this System Variable. If a user is not authorized, the link is disabled. Click a link to transfer out of the component and to the referenced object. Warning! Make sure you have saved any data that you need to before confirming you want to transfer to the referenced object in a new component. If no objects use the System Variable, a notification is shown in place of the object details. for example, “This System Variable is not used by any Rule Groups”. |
| Version |
Displays the Rule Version Number. |
| Rule Status and Rule Group Status |
Displays the status of the Rule Group or Rule Name (In Progress, Active, In-active). |
| Variable Name |
Displays the name of the Variable associated with the System Variable. |
| Rule Category Name |
Displays the Rule Category Name in which the Rule or Rule Group has been created. |
Defining Rules Engine Data Sets
Data Sets can be used in Rules when you need to create placeholders or temporary storage for multiple Variables and reference those Variables together as a logical group. The Data Set can be used across any Rule in the system and is not specific for one Rule alone.
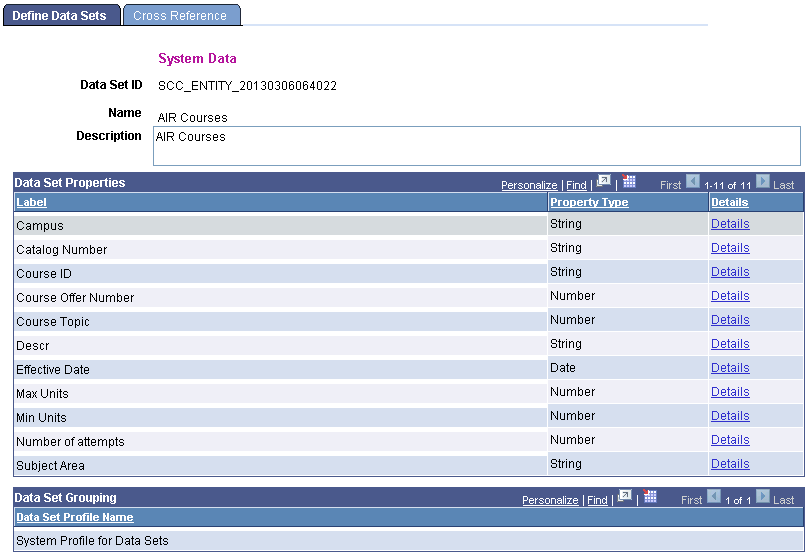
Access the Define Data Sets page ().
Image: Define Data Sets page
This example illustrates the fields and controls on the Define Data Sets page. You can find definitions for the fields and controls later on this page.
|
Field or Control |
Definition |
|---|---|
| Data Set ID |
Displays a unique ID generated by the system. When adding a new value the default value is NOID. The unique ID is generated when the Data Set is saved. The Statement ID is created by combining prefix SCC_ENTITY_ with the system date and time stamp in format YYYYMMDDHHMMSS. |
| Name |
Enter a Data Set Name. The Data Set Name is used when searching for a Data Set and for display. |
| Actions |
|
| Description |
Enter descriptive text explaining the function of the Data Set.. |
| Label |
Enter a Label for each of your Data Set properties. This Label is used in the Rules Engine Manager to display the Data Set Property. |
| Property Type |
Select the Property Type:
|
| Details |
Click on the Details link to access more information about each Data Set Property. |
Access the Data Sets Details page (click the Details link on the Define Data Sets page).
Image: Data Set Property Details page
This example illustrates the fields and controls on the Data Set Property Details page. You can find definitions for the fields and controls later on this page.
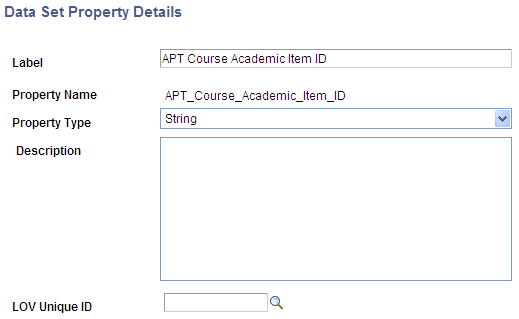
The Data Set Property details page allows you to add a long Description for a Property and List of Values (LOV) which can be used to enforce Prompt Edits.
For more information, see Defining Lists of Values for Rules Engine Variables.
|
Field or Control |
Definition |
|---|---|
| Data Set Profile Name |
Select Entity Profiles to associate multiple Data Sets to a group of Data Sets. The Category is used to search for Data Sets when associating Rules Engine Variables with created Data Sets. There is no security tied into this functionality. A created Data Set can be used by any Rule in the system. |
Access the Define Data Sets Cross Reference page ().
Image: Define Data Sets Cross Reference page
This example illustrates the fields and controls on the Define Data Sets Cross Reference page. You can find definitions for the fields and controls later on this page.
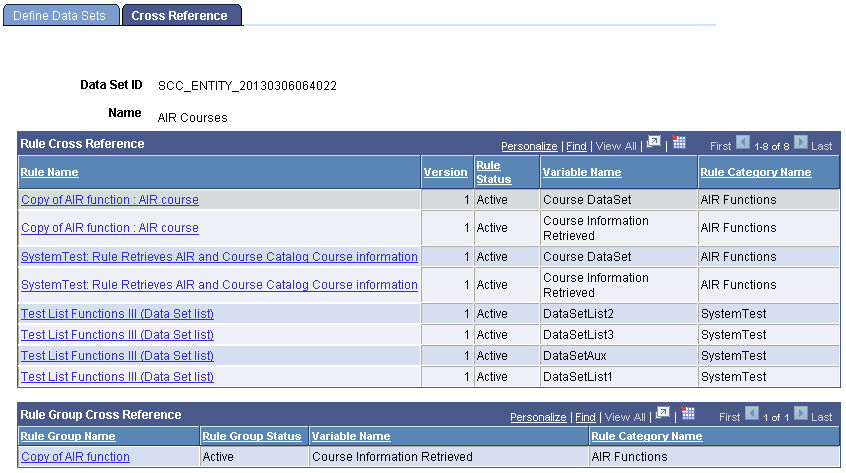
This page shows Rules and Rule Groups associated with this System Variable.
|
Field or Control |
Definition |
|---|---|
| Rule Name and Rule Group Name |
Displays to authorized users a link for either of these Rules Engine objects which use this Data Set. If a user is not authorized, the link is disabled. Click a link to transfer out of the component and to the referenced object. Warning! Make sure you have saved any data that you need to before confirming you want to transfer to the referenced object in a new component. If no objects use the Data Set, a notification is shown in place of the object details. for example, “This Data Set is not used by any Rule Groups”. |
| Version |
Displays the Rule Version Number. |
| Rule Status and Rule Group Status |
Displays the status of the Rule Group or Rule Name (In Progress, Active, In-active). |
| Variable Name |
Displays the name of the Variable associated with the System Variable. |
| Rule Category Name |
Displays the Rule Category Name in which the Rule or Rule Group has been created. |
This section discusses defining lists of values for use with Rules Engine Variables. There are cross references to information about adding lists of values to Entity Properties and Data Set Properties.
Understanding Lists of Values for Rules Engine Variables
List of Values (LOV) functionality allows you to add the functionality of prompting with edits against a defined List of Values where there were no edits defined before. In Rules Engine Manager, a LOV can be added to properties or variables of the following Types:
Rules Engine Variable
Entity Property
Data Set Property
For example, take a Variable created in Rules Engine named “Institution” . When defined as a Variable of type String and referenced in a Rules Engine Rule, any String value can be added to the Variable and no editing is enforced. However, you may want to enforce that users can only add values to this Variable that are valid according to the Institution Table defined in the system (Set up SACR, Foundation Tables, Academic Structure, Institution Table). In order to enforce that edit, you can define a LOV on the Institution Table. Once defined, the LOV can be tied to any Rules Engine Variable, Entity Property, or DataSet Property which has the same Type (for example, String) as the defined LOV.
LOV Prompts may already exist on an Entity Registry Property. The Entity Registry automatically adds a LOV prompt to a property for which the underlying record field contains a Prompt Table. Adding an LOV to a property which already has an automatic prompt table defined will overwrite that functionality.
For the Lists of Values are delivered with the system for the Rules Engine, see Library of System-Delivered Rules Engine Objects.
Note: Lists of Values delivered with the system cannot be modified, but the Test button can be used to test return of valid LOV values.
To understand more about how to add an LOV to an Entity Property, see Setting Up Entity Registry, “Setting Up Entity Property Details.”
To understand more about how to add an LOV to a Data Set Property, see Defining Rules Engine Data Sets.
To understand more about how LOV functionality can be used throughout the system, see Setting Up List of Values.
Defining Lists of Values – Ad Hoc Values
Access the Define List Of Values page ().
Image: Define List of Values – Ad Hoc Values page
This example illustrates the fields and controls on the Define List of Values – Ad Hoc Values page. You can find definitions for the fields and controls later on this page.
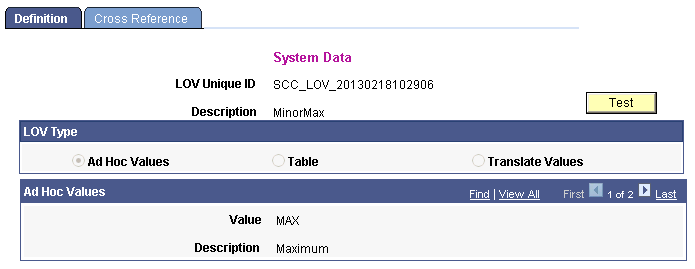
Select LOV Type Ad Hoc Values if you want to prompt on a user-defined Value or List of Values that is not related to a translate table or an existing prompt table.
|
Field or Control |
Definition |
|---|---|
| LOV Unique ID |
Displays a unique ID generated by the system. When adding a new value the default value is NOID. The unique ID is generated when the LOV is saved. The UID is created by combining prefix SCC_LOV_ with the system date and time stamp in format YYYYMMDDHHMMSS. |
| Description |
Enter a LOV Description. The LOV Description is used when searching for a LOV and for display. |
| LOV Type – Ad Hoc Values selected |
Create an LOV of Ad Hoc Values if you want to prompt on a user-defined value or List of Values that is not related to a translate table or an existing prompt table. |
| LOV Unique ID – Copy Ad Hoc Values From grid |
Select an LOV to copy by using the Search icon to find an existing LOV Unique ID. Then add custom values in the Ad Hoc Values grid. |
| Value – Copy Ad Hoc Values grid |
Enter an Ad Hoc Value from which you would like to copy existing Ad Hoc values. |
| Description – Copy Ad Hoc Values grid |
Enter a Description for the Ad Hoc Value. |
| Test |
Click the Test button to display a preview of the values that will be returned by the LOV when it is deployed as a prompt edit. |
Defining Lists of Values – Table
Access the Define List Of Values page ( and select the Table radio button.
Image: Define List of Values – Table
This example illustrates the fields and controls on the Define List of Values – Table. You can find definitions for the fields and controls later on this page.
Select an LOV Type of Table if you want to prompt on an existing Campus Solutions Prompt Table.
|
Field or Control |
Definition |
|---|---|
| LOV Unique ID |
Displays a unique ID generated by the system. When adding a new value the default value is NOID. The unique ID is generated when the LOV is saved. The UID is created by combining prefix SCC_LOV_ with the system date and time stamp in format YYYYMMDDHHMMSS. |
| Description |
Enter a LOV Description. The LOV Description is used when searching for a LOV and for display. |
| LOV Type – Table selected |
Create an LOV of type Table if you want to prompt on an existing Campus Solutions Prompt Table. |
| Record |
Enter the Record where the prompt is found. |
| Field |
Select a Field for the prompt. |
| Description Field |
Select the Field from which the description should be taken. |
| Prompt Table Filters |
Select Field Names to further specify the selection. For example in case of the Honors and Awards Table, the setup is defined by Institution. To specify that only values from institution PSUNV be retrieved, add the Field Name Institution and Field Value PSUNV. |
| Exclude Prompt Field Values |
|
| Test |
Click the Test button to display a preview of the values that will be returned by the LOV when it is deployed as a prompt edit. The Test functionality uses the Exclude Prompt Field Values and Prompt Table Filter settings. |
Defining Lists of Values – Translate Values
Access the Define List Of Values page ( and select the Translate Values radio button.
Create an LOV of type Translate Values if you want to prompt on an existing Campus Solutions Translate Value.
Image: Define List of Values – Translate Values
This example illustrates the fields and controls on the Define List of Values – Translate Values. You can find definitions for the fields and controls later on this page.
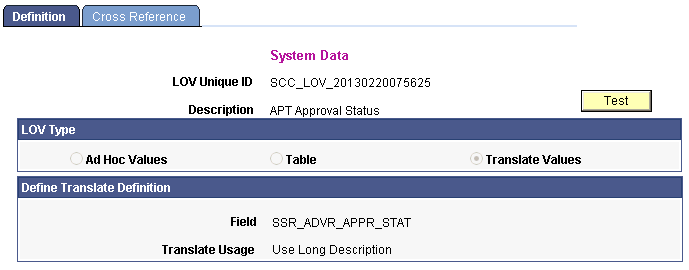
Select an LOV Type of Translate Values if you want to prompt on an existing Campus Solutions Translate Values.
|
Field or Control |
Definition |
|---|---|
| LOV Unique ID |
Displays a unique ID generated by the system. When adding a new value the default value is NOID. The unique ID is generated when the LOV is saved. The unique ID is created by combining prefix SCC_LOV_ with the system date and time stamp in format YYYYMMDDHHMMSS. |
| Description |
Enter a LOV Description. The LOV Description is used when searching for a LOV and for display. |
| Field |
Enter the Record where the prompt is found. |
| Translate Usage |
Select the Translate Usage to be returned:
|
| Exclude Prompt Field Values |
|
| Test |
Click the Test button to display a preview of the values that will be returned by the LOV when it is deployed as a prompt edit. The Test functionality uses the Exclude Prompt Field Values and Prompt Table Filter settings. |
Access the Define List of Values Cross Reference page ().
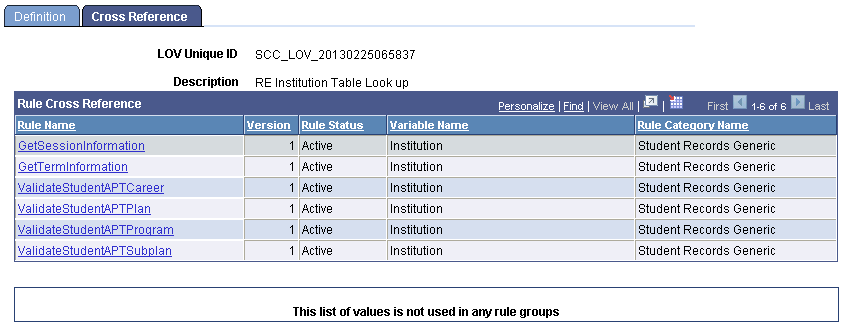
Image: Define List of Values Cross Reference
This example illustrates the fields and controls on the Define List of Values Cross Reference. You can find definitions for the fields and controls later on this page.
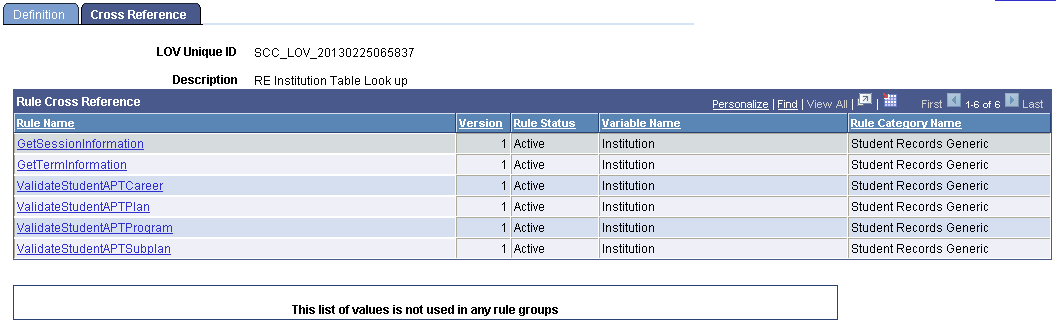
This page shows Rules and Rule Groups associated with this System Variable.
|
Field or Control |
Definition |
|---|---|
| Rule Name and Rule Group Name |
Displays to authorized users a link for either of these Rules Engine objects which uses a variable with this List of Values. If a user is not authorized, the link is disabled. Click a link to transfer out of the component and to the referenced object. Warning! Make sure you have saved any data that you need to before confirming you want to transfer to the referenced object in a new component. If no objects use the List of Values, a notification is shown in place of the object details. for example, “This List of Values is not used by any Rule Groups”. |
| Version |
Displays the Rule Version Number. |
| Rule Status and Rule Group Status |
Displays the status of the Rule Group or Rule Name (In Progress, Active, In-active). |
| Variable Name |
Displays the name of the Variable that uses this List of Values. |
| Rule Category Name |
Displays the Rule Category Name in which the Rule or Rule Group has been created. |
Example of an LOV Added to a Property from Record Field Prompts
The following is an example of an Entity Registry LOV which has been added to the Property due to the fact that the underlying Record field was defined with a prompt table value. In this Rule, the Entity Academic Program is used to retrieve applicants.
Image: Example of Define Rule Page Using a LOV from Field Record Prompts
This example illustrates the Define Rule page using a LOV from Field Record Prompts.
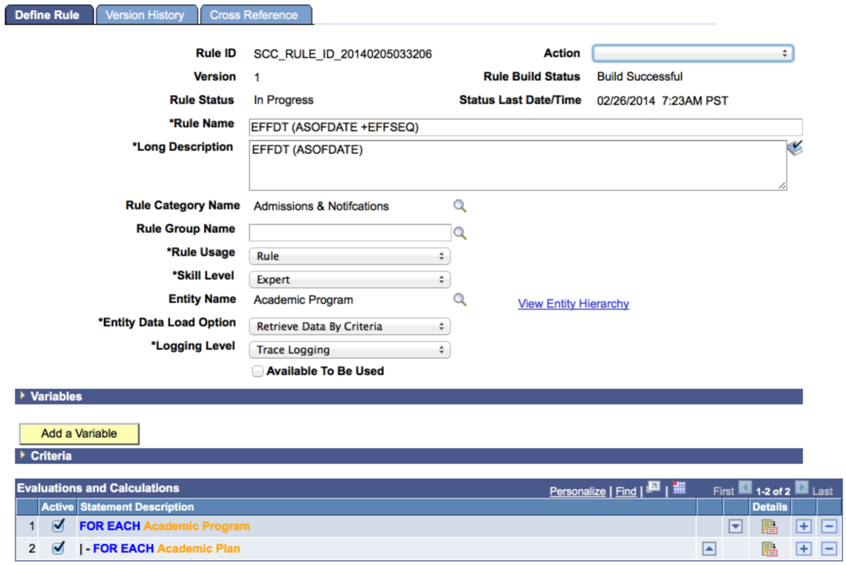
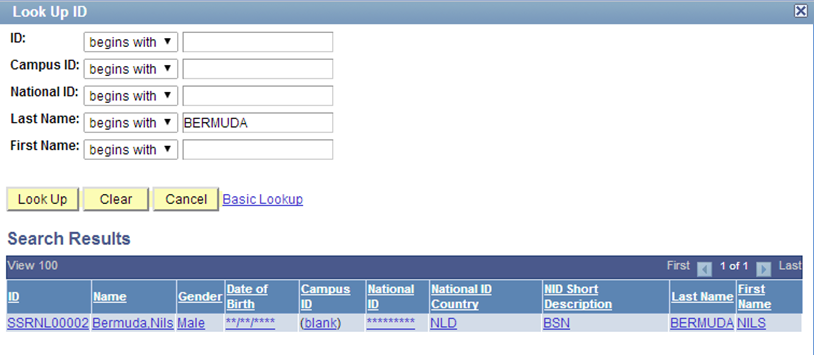
In this example in the Criteria grid, the Type of the Property with theLabel of EmplID is set to Text. Click the Search prompt button to the right of the Object (value) for Property EMPLID to open a Lookup table. This is the PEOPLE_SRCH Prompt for table. This functionality also works whenever a Property with a Lookup table is used in combination with the Assign or IF Evaluative statements. The same Search values are available and, if relevant, permission level security is enforced:
Image: Prompt Window for Example Of Define Rule Page Using A LOV From Field Record Prompts
This example illustrates the Prompt Window for Example Of Define Rule Page Using A LOV From Field Record Prompts.
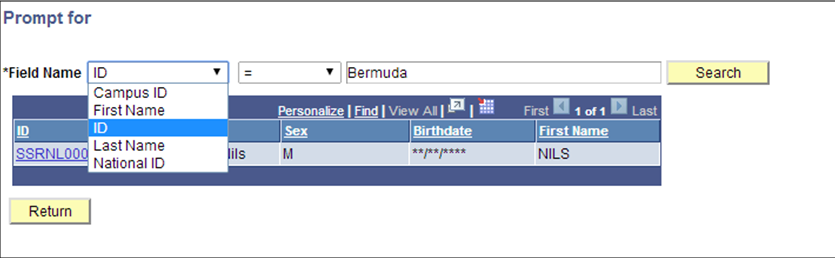
The Search function behaves the same as if prompted from a normal search record or component:
Image: Example of Prompt Options from Component Search Record (Student Admissions, Application Maintenance, Maintain Applications)
This example illustrates Prompt Options from Component Search Record (Student Admissions, Application Maintenance, Maintain Applications).
The Lookup functionality for EmplID Property is enabled by the Entity Registry. To view the Entity Prompts, access the Entity Registry page ().
Image: Entity Registry Window for Example of Define Rule Page Using a LOV from Field Record Prompts
This example illustrates the Entity Registry Window for Example of Define Rule Page Using a LOV from Field Record Prompts
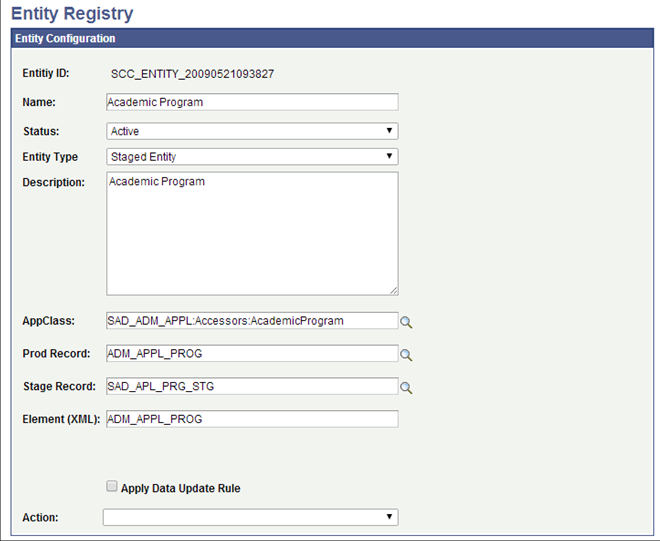
Select Edit Properties from the Action drop-down to view the Entity properties:
Image: Entity Properties Window for Example Of Define Rule Page Using a LOV from Field Record Prompts
This example illustrates Entity Properties Window for Example Of Define Rule Page Using a LOV from Field Record Prompts.
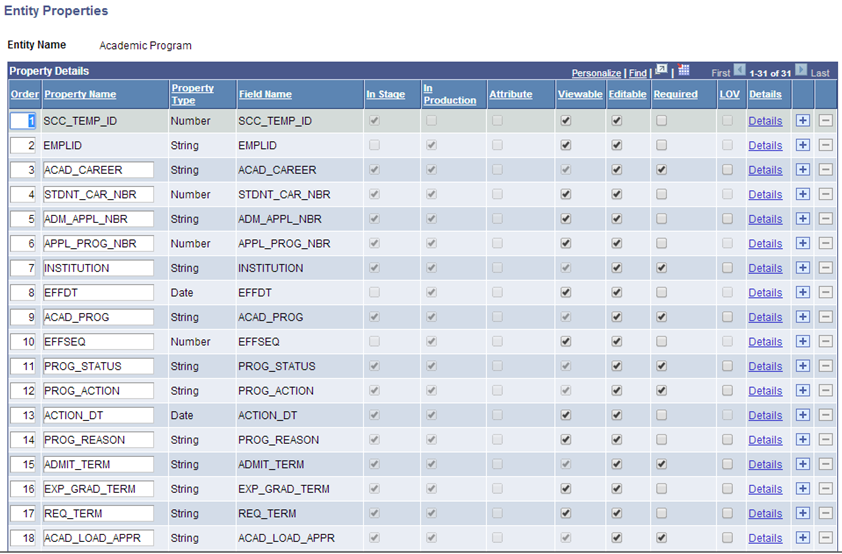
Prompt values present in a production record or staging record of an Entity are added to the Entity Registry automatically. Any Property which has inherited a Prompt from a production or staging record is displayed as view-only in the LOV column of the Entity Properties page. In this example the field EMPLID has inherited a prompt to the PEOPLE_SRCH table from the ADM_APPL_PROG production record:
Image: Property and Prompt Table for Example of Define Rule Page Using a LOV from Field Record Prompts
This illustrates the Property and Prompt Table for Example of Define Rule Page Using a LOV from Field Record Prompts

When the Academic Program Entity is used to build Rules in the Rules Engine Manager, the prompt to PEOPLE_SRCH becomes active. These prompts cannot be removed; however, they can be overridden by adding a new LOV Lookup Table value to the Property.
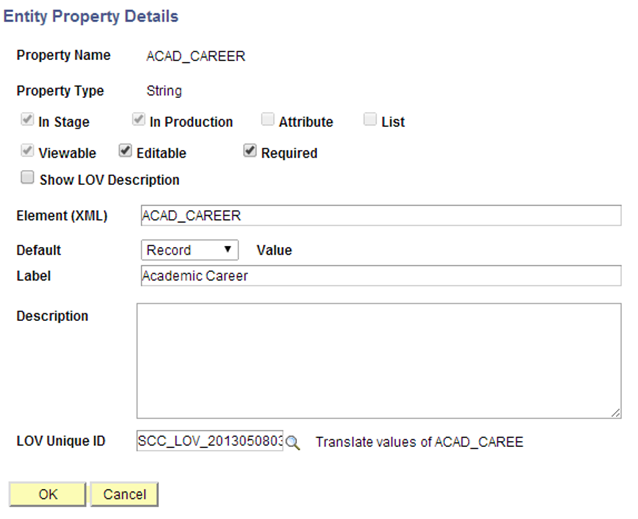
For an example of a LOV Look Up Table that is NOT present on the production or staging record and has been added to an Entity Property, select the Details link for property ACAD_CAREER in the Entity Properties page example. This opens the Entity Properties Detail page where an LOV Lookup Table can be added using the LOV Unique ID field for a relevant LOV:
Image: Entity Property Details Window for Example of Define Rule Page Using a LOV from Field Record Prompts
This illustrates the Entity Property Details Window for Example of Define Rule Page Using a LOV from Field Record Prompts.
Note: The Rules Engine automatically enforces the security used by security views by the OPRID or OPRCLASS of the user who built the rule to the security view.
Note: %EDITABLE prompts do not enable look-up functionality in the Rules Engine.
Note: Performance should be considered when using prompts in the Rules Engine. Do not use look-up tables in the Rules Engine user interface without providing at least one relevant field value.