Selecting Students and Creating a FAN Extract File
Important! Mass Change is a deprecated product. Support will be maintained for this product, but no new development will be produced for Mass Change. It is strongly recommended that you use Application Engine instead. For more information on PeopleSoft Application Engine, see PeopleTools: Application Engine.
This section provides an overview of FAN processing and discusses how to:
Assign FAN communications manually.
Assign FAN communications using mass change.
Review students selected for award notification.
Select students to include in the extract file.
Create the FAN extract file and produce the FAN letter.
After packaging students, use the FAN to notify students of their financial aid awards. The FAN includes the name of each award, the amount awarded to the student, and any messages that you designated for a particular financial aid item type. When you define financial aid item types, you select award messages to print on the FAN and specify whether the award should be classified as an award item, other resource, or a custom format when printed on the FAN.
To create a FAN:
Assign communications to students.
You can assign a FAN communication to an individual student manually, or you can use Mass Change to assign a FAN communication to a group of students.
Select a group of students for which to create an extract file.
Create the extract file.
Merge the extract file with your selected word processing software to create the actual FAN letter.
Some particulars for FAN processing:
Aid year is a merge field to enable printing a FAN for multiple aid years.
Financial aid item types that are designated to be printed as Other Resources are summed together and displayed on the FAN as one item in the Eligibility section of the letter. To provide a breakdown of the Other Resources total, each financial aid item type designated to print as Other Resources appears as a line item in the Financial Aid Offer section of the letter with term amounts and total award amount shown. The message code of OTHR identifies each financial aid item type designated to be printed as Other Resources. Awards with the OTHR message code are not included in the total financial aid offer amount displayed.
Adjustment reason codes are included in the data extract process so they appear when the FAN is printed. Adjustment reason codes appear only if there has been a change to an award.
|
Page Name |
Definition Name |
Navigation |
Usage |
|---|---|---|---|
|
Award Notification Selection |
FAN_SEL_LET_MC |
|
Review students selected to receive a financial aid notification letter during the FAN-Select Letter Mass Change process. |
|
Award Notification Selection (process) |
RUNCTL_FAN_SEL |
|
Select a student or group of students to include in extract file used to generate FAN letters. Choose the address and name to be used on the FAN letter. |
|
Award Letter Data Extract |
RUNCTL_FAN_EXTRACT |
|
Create a FAN extract file. |
|
Award Notification Summary |
STDNT_FAN_ATRBT |
|
Review award letters for a student. |
|
Summary of Data Printed on FAN |
STDNT_FAN_DATA |
|
View the information that was printed on the student's FAN letter. |
|
Budget Items |
STDNT_FAN_BDGT_SEC |
Click the Budget Detail link on the Summary of Data Printed on FAN page. |
View the budget categories and amounts that constitute the student's cost of attendance. |
|
Term Award Data |
STDNT_FAN_AWRD_SEC |
Click the Award Detail link on the Summary of Data Printed on FAN page. |
View the student's financial aid package by term. |
Click the Communication button to access the Communication Management page and assign a FAN communication for an individual student. This button is found on several pages including the:
Communication Summary page.
You can use this page to see if a FAN communication has already been assigned to this student.
Financial Aid Status page.
To assign communications using Mass Change:
Update the Mass Change Select Template in the Mass Change Definition component with the criteria that you want to use to select students.
Select FAN-Select Letter as the Mass Change Definition.
Select the Campus Solutions page, and enter or update the fields as necessary.
Select the Criteria and Defaults page and use the SQL Statement scroll arrows to find Execution Seq 2, which has a Description of Select Application Criteria.
Update the Field and Field Value entries that you want to use to select students, leaving blank those fields that you are not using.
Select the Generate SQL page, and click the Mass Change Clear Switch button.
Click the Mass Change Generate SQL Swch (mass change generate SQL switch) button.
Click the Count button to make sure that the count (number of students selected) is at least greater than zero.
Click the Save button, and click OK for any warning messages that appear.
Run the Mass Change using the Run Mass Change page.
Select the Execute Single Mass Change option in the Mass Change Run Type group box.
In the Mass Change Definition field, select FAN-Select Letter.
(Optional) Review and edit the selected students on the Award Notification Selection page.
Update the Mass Change Update Template in the Mass Change Definition component
Select FAN-Update Comm Table as the Mass Change Definition.
Select the Campus Solutions page, and enter or update the fields as necessary.
Select the Generate SQL page, and click the Mass Change Clear Switch button.
Click the Mass Change Generate SQL Swch (mass change generate SQL switch) button.
Click the Count button to make sure that the count (number of students selected) is at least greater than zero.
Click the Save button, and click OK for any warning messages that appear.
Run the 3C Engine
On the Trigger Table page, select the Mass Change option in the Process 3Cs group box.
Select the Mass Change page.
Enter FAN-Create-Communication in the Mass Change Group ID field.
Click the Run button.
Access the Award Notification Selection page ().
Image: Award Notification Selection page
This example illustrates the fields and controls on the Award Notification Selection page. You can find definitions for the fields and controls later on this page.
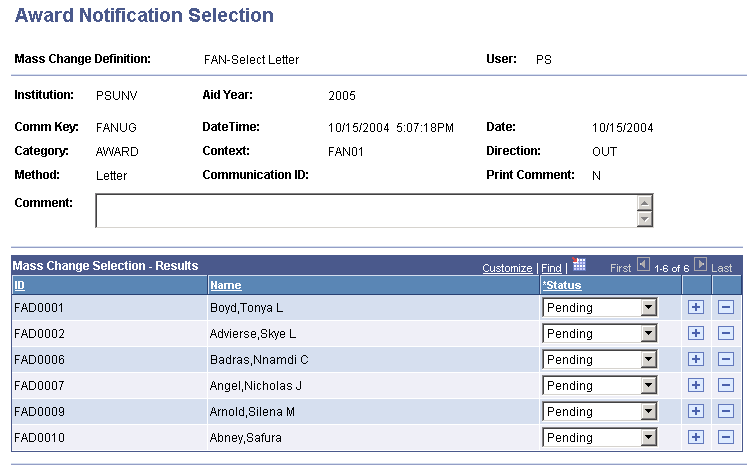
The Mass Change Selection - Results group box lists the students who are selected to receive a FAN by the mass change process.
|
Field or Control |
Definition |
|---|---|
| Status |
Specifies the current status of the student's FAN communication, and determines whether the student is selected for inclusion in the extract file. As long as the student does not have a status of Cancel, the student is selected for inclusion in the extract file. To prevent a student from receiving a FAN letter, you can either change the student's status to Cancel or you can delete the student's row. Cancel: Select this value to prevent the student from having a FAN communication assigned. Pending: The student has been selected to have a FAN communication assigned, but it has not yet been assigned (the 3C Engine still needs to be run). Successful: Indicates that a FAN communication has been successfully assigned to the student. |
Access the Award Notification Selection (process) page ().
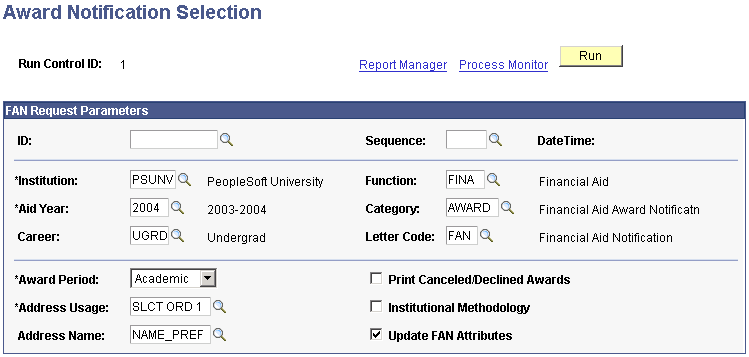
Image: Award Notification Selection (process) page
This example illustrates the fields and controls on the Award Notification Selection (process) page. You can find definitions for the fields and controls later on this page.
|
Field or Control |
Definition |
|---|---|
| ID |
To print a FAN letter for only one student, select the student's ID number in this field. Only students who have been assigned a communication with a function of FINA are available for selection. If you want to select a group of students, leave this field empty. |
| Sequence |
If you want to print a FAN letter for a group of students, leave this field blank. Select a specific communication for the student. If you leave this field blank, the most recent communication is used. When you select a sequence number, the system populates the Institution, Function, Aid Year, Category, and Letter Code fields. |
| Institution |
If you are selecting a group of students for which to run this process, select the institution that the students attend. When you complete this field, the system automatically populates the Function and Aid Year fields. If you selected an ID, this field is already populated. |
| Function |
The administrative function of the Communication. FINA is the default. |
| Category |
Select AWARD for the FAN letter. |
| Career |
If you select an ID and a sequence, you can select a career for the student. If you select a career, only awards for that career are printed on the FAN. If you do not select a career, then awards for all the student's careers are printed on the FAN. If the student is a multiple career student and you want awards for all careers printed on the FAN, do not select a career. When selecting a group of students, if you select a career, then only the awards for that career for each student are printed on the FAN. If you have multiple career students and you want awards for all their careers to be printed on the FAN, do not select a specific career. |
| Letter Code |
Select FAN for the FAN letter. |
| Award Period |
Select the award period for which you want the FAN letter created. The default value is Academic. Non Std (non standard) is also available for nonacademic terms. FA Term determines the default for these periods and uses the last effective-dated sequence or effective-dated status. For example, if the default is Academic and because different academic statuses are available in FA Term, such as fall 2006-2007, spring 2006-2007, and summer 2007-2008, the system uses the last effective-dated sequence or effective-dated status for that aid year. |
| Address Usage |
The address usage determines which address is printed on the FAN letter. Address usage is defined by your institution. |
| Address Name |
Select the address name that you want to use for this FAN letter. This determines what name is printed on the FAN letter. Address name is defined by your institution. |
| Print Canceled/Declined Awards |
Select if you want the FAN letter to print canceled and declined awards in addition to offered and accepted awards. |
| Institutional Methodology |
Select if you want institutional costs to be included as part of the FAN letter data. The institutional costs are summed into the Personal/Miscellaneous budget category. |
| Update FAN Attributes |
Select to update the information on the Award Notification Summary page and mark the communication record completed. Clear the check box to run the selection process in test mode. |
| Run |
Run the Select students who need a FAN process (FANSEL) when you are ready to select students for the extract file. |
Note: Be sure to run the FANSEL process in update mode at least once. If you never run the process in update mode the communication request is never marked as completed and it may always be selected for award notification. If you forget to Update FAN Attributes on this step, you can also update it during the Extract File Creation step.
Access the Award Letter Data Extract page ().
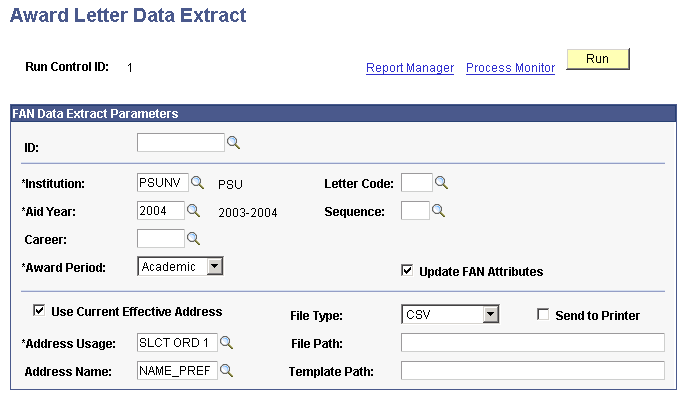
Image: Award Letter Data Extract page
This example illustrates the fields and controls on the Award Letter Data Extract page. You can find definitions for the fields and controls later on this page.
|
Field or Control |
Definition |
|---|---|
| ID |
Select the student that you are working with if you are creating a FAN letter for only one student. If no ID is selected, all students who have been selected to receive a FAN are included in the extract file. |
| Letter Code |
Select FAN. |
| Sequence |
This number distinguishes between versions of letters sent to a student. Each time a new communication and award notification letter (FAN) are requested, a sequential number is assigned to the award notification letter. This sequence is increased by one each time an additional award notification letter is requested. The sequence number allows you to select which version of the award notification letter that you want to use if an ID is entered. |
| Career |
If you select an ID and a sequence number you can select a career for the student. If you select a career, only awards for that career are printed on the FAN. If you do not select a career, then awards for all the student's careers are printed on the FAN. If the student is a multiple career student and you want awards for all careers printed on the FAN, do not select a career. When selecting a group of students for whom to run this process, if you select a career, then only the awards for that career for each student are printed on the FAN. If you have multiple career students and you want awards for all their careers to be printed on the FAN, do not select a career. |
| Award Period |
Select the award period for which you want the FAN letter created. The default value is Academic. Non Std (non standard) is also available for nonacademic terms. FA Term determines the default for these periods and now uses the last effective-dated sequence or effective-dated status. For example, if the default is Academic and because different academic statuses are available in FA Term, such as fall 2006-2007, spring 2006-2007, and summer 2007-2008, the system uses the last effective-dated sequence or effective-dated status for that aid year. |
| Update FAN Attributes |
Select to update the Print Status field on the Award Notification Summary page and update the communication record. Clear to run the process in test mode only. |
| Use Current Effective Address |
Select to have the Create Award Data Extract process (FANLTR) re-select the student's name and address information using the information that you enter in the Address Usage and Address Name fields on this page. Clear to have the extract file contain the name and address chosen during the FANSEL process. |
| Address Usage |
The address usage determines which address is printed on the FAN letter. Address usage is defined by your institution. The default value is the address usage from the student selection process. |
| Address Name |
Select the address name to use for this FAN letter. This determines what name is printed on the FAN letter. Address name is defined by your institution. The default value is the address name from the student selection process. |
| File Type |
Select the extract file type to be created. Values are: JetForm, CSV, and Other. JetForm is the default value. The value that you select in this field determines what other file-related fields appear on the page. If you select JetForm, the page displays the File Path and Override Flags fields. If you select CSV, the page displays the Send to Printer check box, the File Path field, and the Template Path field. If you select Other, the page displays the File Path field. |
| Send to Printer |
If you select CSV for the file type and you want the letter to go directly to the printer during the Microsoft Word merge process, select this check box. |
| File Path |
Enter the full path of where you want the extract file to reside after the FANLTR process is run. Include a / or \ at the end of the path, such as C:\TEMP\ or //user/tmp/. Make sure that the destination folder or directory is a valid share folder or directory on the network. |
| Template Path |
If you select CSV for the file type, you must indicate where your award letter master document (FANLTR.doc) and your template file (FANLTR.dot) reside. The Microsoft Word merge process uses this information. This location is usually \\PS_HOME\Winword. |
| Override Flags |
If you select JetForm for the file type, specify print options to use when producing the FAN, such as the number of copies to create. |
| Run |
Click to run this request. Process Scheduler runs the Create Award Data Extract process (FANLTR) at user-defined intervals. After the system runs the process successfully, you can retrieve the extract file from the file path you specified. You can then use the extract file in whatever software you use to create the actual FAN letter. |
Printing the Award Letter Using Microsoft Word
To perform a merge using Microsoft Word:
Use the Award Letter Data Extract page to create a FAN extract file, using CSV for the file type. The date file output has been changed from .LTR (MS-Word) to .CSV.
Specify the file path where you want the extract file and the parameter file to go in the File Path field. This can be a shared folder on your local machine or a shared folder on any valid network drive path. An example of a file path is C:\TEMP\.
Run the process from the Process Scheduler. When the process completes, the extract file for the FAN (FAN.CSV) and the Word Merge parameters file (FANPARMS.DAT) are located at the file path you specified in Step 2.
Move the FANPARMS.DAT file into the C:\TEMP\ folder if it is not already located there.
Create a shortcut for MS-Word on your desktop specifically to run the merge process for the FAN letter. You must create this shortcut.
Open Windows Explorer and find the Winword.exe file (usually in C:\Apps\Office\).
Drag the button onto your desktop to create a shortcut.
Right-click the shortcut and select Properties to edit the shortcut properties. Select the Shortcut tab.
Edit the Target field to include the following parameter path values for launching the Winword file, template, and macro. In this example, we are pointing to C:\PS\LS8\Winword\ to find the FANLTR.DOT file, but you must enter the valid directory where the template resides on your system. However, you must enter /mPRCSFANLTR for the name of the macro.
You must use a space to separate the path for launching the Winword file (which should already be in the Target field) from the path to the template and to separate the path to the template from the macro name. For example: C:\Apps\Office97\Office\WINWORD.EXE C:\PS\LS\Winword\FANLTR.DOT /mPRCSFANLTR
Click OK when you finish editing the Target field.
Rename the shortcut to indicate that the shortcut launches the merge process, such as FAN Winword.exe.
Double-click the Word desktop shortcut you created to launch the merge process. The merge process creates a file called SAFANLTR.DOC in the C:\TEMP\ folder.
Open the SAFANLTR.DOC file and print the FAN letters.
Note: If you select the Send to Printer check box on the Award Letter Data Extract page, the file prints automatically on your default printer.
Warning! If you are using Microsoft Office 2000, you must have applied service pack SR1 for the FAN to print. If you have not applied the service pack, the FAN does not print.