Setting Up Service Indicator Sets
To set up service indicator sets, use the Service Indicator Sets component (SERVICE_IND_SETUP).
This section provides an overview of service indicator sets and discusses:
Service indicator sets enable you to automatically attach service indicators to student accounts by running the Credit History process. When you define service indicator sets, you link a service indicator to an aging category and minimum amount combination. When you run the Credit History process, the system applies the linked service indicator to any student or external organization with an overdue balance that falls within the specified aging category and is over the minimum amount. In addition, if the linked service indicator is already applied to an account and the overdue balance is paid off, the next time you run the Credit History process, the system removes the service indicator.
|
Page Name |
Definition Name |
Navigation |
Usage |
|---|---|---|---|
|
Service Indicator |
SRVC_IND_SF_TBL |
|
Create service indicator sets and define descriptive information for them. |
|
Service Indicator - Details |
SRVC_IND_SF |
|
Define service indicator set details. |
|
Service Indicator - Career Setup |
SRVC_IND_SF_C |
|
Define eligible academic careers for service indicator sets. |
Access the Service Indicator - Details page ().
Image: Service Indicator - Details page
This example illustrates the fields and controls on the Service Indicator - Details page. You can find definitions for the fields and controls later on this page.

|
Field or Control |
Definition |
|---|---|
| Severity |
Enter the alphanumeric code established by your institution to indicate the severity of the service indicator. |
| Aging Set |
Select the aging set containing the aging category to which you are linking a service indicator. |
| Aging Category |
Select the aging category that triggers the application of the service indicator to student accounts. |
| Min Amt (minimum amount) |
Define the minimum amount that triggers the application of the service indicator to student accounts. |
| Service Indicator Cd (service indicator code) |
Select a service indicator code from your established list. This code is linked to a service impact that controls what actions the system takes related to the service indicator. |
| Service Ind Reason Cd (service indicator reason code) |
Select a service indicator reason code from your established list. This code explains why this service indicator is being applied. |
| Contact ID |
Select the ID number of a specific person with the department responsible for this service indicator set. |
| Department |
Select the department that is responsible for this service indicator set. This is the department that the student must contact to clear the associated service indicator. |
Academic Career Controls
The check boxes in this group box control where the system searches to confirm that the student is active in an academic career before applying a service indicator. At least one check box must be selected, but you can select all three. You must select the No Career check box for external organizations.
|
Field or Control |
Definition |
|---|---|
| Use Records |
Select if you want the system to verify that the student's academic career matches the one that you establish on the Service Indicator Career Setup page. |
| Use Admissions |
Select to have the system verify that the student's admissions career matches the one that you established on the Service Indicator Career Setup page. This verification takes place after the academic career verification. The system performs this verification only after it performs the verification in Student Records and cannot find a match. |
| No Career |
Select if you want the system to process the student only if no admissions career or academic career is associated with the student, regardless of whether you selected the Use Records check box or the Use Admissions check box. Selecting this check box indicates to the system that you want a service indicator placed even if the student is not activated in Student Records or PeopleSoft Student Admissions. This must be selected for external organizations. |
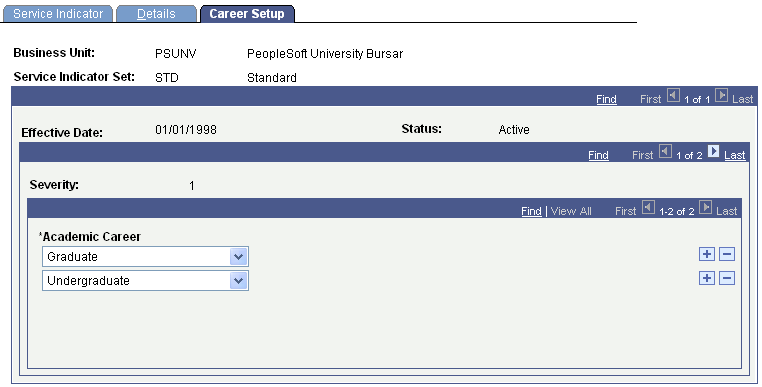
Access the Service Indicator - Career Setup page ().
Image: Service Indicator - Career Setup page
This example illustrates the fields and controls on the Service Indicator - Career Setup page. You can find definitions for the fields and controls later on this page.
|
Field or Control |
Definition |
|---|---|
| Academic Career |
Select the academic career to which the associated service indicator can be applied. Note: If you did not select the No Career check box on the Service Indicator - Details page, you must be sure to specify the career for all appropriate rows and severity levels. |