Purchasing Miscellaneous Items
Your institution may provide access to students and others to select and purchase miscellaneous items or services outside of the regular tuition and fees calculated by Tuition Calculation. After selecting and purchasing these items or services, you will be routed to Make a Payment pages, where the transaction will be completed.
This section discusses how to:
Purchase miscellaneous items.
Select items.
Confirm an order.
Make a payment.
Note: Whether payment profile functionality is available in the Purchase Miscellaneous Items component depends on your self-service setup and on whether you use hosted payment.
See Understanding Self-Service Payment Profiles.
See Setting Up Installation Parameters and Keywords.
Note: Using hosted payment does not impact how you select items for purchase. However, the payment process for purchasing miscellaneous items is different depending on whether you use hosted or non-hosted payment. Refer to the Making Self-Service Payments section.
|
Page Name |
Definition Name |
Navigation |
Usage |
|---|---|---|---|
|
Electronic Payments/Purchases - Purchase Items - Select Campus |
SSF_SS_BU_SELECT |
|
Select the campus from which to make a purchase. |
|
Electronic Payments/Purchases - Purchase Items - Select Items |
SSF_SS_MISC_PUR |
|
Enter the quantity of the purchased items. |
|
Electronic Payments/Purchases - Purchase Items - Confirm Order |
SSF_SS_PMT_ITMCONF |
|
Verify the amount and total of the items to be purchased. |
|
Electronic Payments/Purchases - Purchase Items- Select Payment Method |
SSF_SS_PMT_METHOD |
Click the Next button on the Purchase Items - Confirm Order page |
Depending on whether the institution supports both the eCheck and credit card payment methods, select the method by which to make a payment. |
|
Electronic Payments/Purchases - Purchase Items - Confirm Payment |
SSF_SS_PMT_MSG |
For hosted payment only: Click the Next button on the Purchase Items - Select Payment Method page. |
Advise students that their payments will be collected through a third party provider. When a student clicks the Continue to Make Payment button, the student is transferred to the third party site to input credit card or eCheck details. |
|
Electronic Payments/Purchases - Purchase Items - Specify Payment Details |
SSF_SS_PMT_CR_CARD |
For non-hosted payment only: Click the Next button on the Purchase Items - Select Payment Method page. |
Specify either the credit card or eCheck payment details for the current transaction. |
|
What is a Security Code |
SSF_CVV_ABOUT |
Click the What is a Security Code? link on the Purchase Items - Specify Payment Details page. |
Access information about the Security Code that is located on credit cards. |
|
Electronic Payments/Purchases - Purchase Items- Confirm Payment |
SSF_SS_PMT_SUBMIT |
For non-hosted payment, click the Next button on the Purchase Items - Specify Payment Details page. For hosted payment, click Continue from the third party site. |
Confirm payment details. This page appears differently for hosted and non-hosted payments. |
|
Electronic Payments/Purchases - Purchase Items - Payment Result |
SSF_SS_PMT_RESULT |
Click the Submit button on the Purchase Items - Confirm Payment page. |
View successful and declined payment results. |
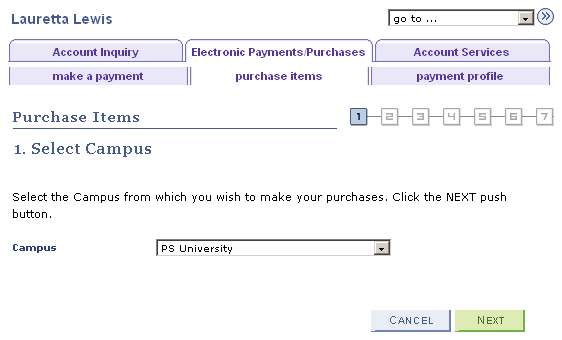
Access the Electronic Payments/Purchases - Purchase Items - Select Campus page ().
Image: Electronic Payments/Purchases - Purchase Items - Select Campus page
This example illustrates the fields and controls on the Electronic Payments/Purchases - Purchase Items - Select Campus page. You can find definitions for the fields and controls later on this page.
Access the Electronic Payments/Purchases - Purchase Items - Select Items page ( and click the Next button).
Image: Electronic Payments/Purchases - Purchase Items - Select Items page
This example illustrates the fields and controls on the Electronic Payments/Purchases - Purchase Items - Select Items page. You can find definitions for the fields and controls later on this page.
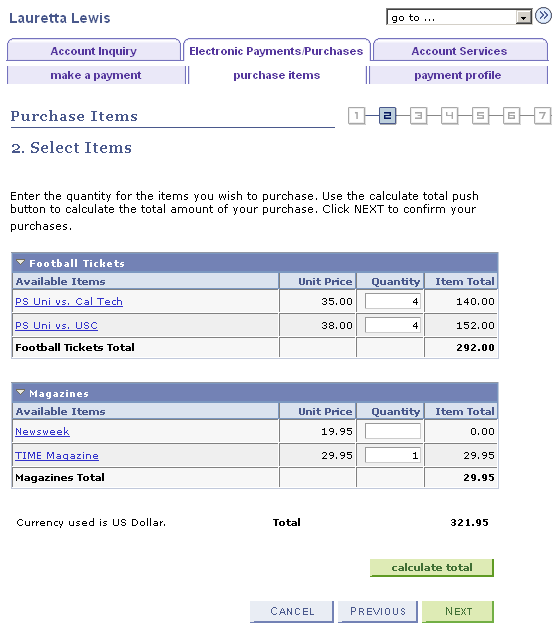
Students can make multiple transactions at one time. For term-based selections, current and future terms will appear in the grid. Expired terms (based on the term end date) or items that are not within the effective date and expiration date will not be available for selection.
If taxes (sales or GST) are included, a separate line item will appear after the Total line. A subtotal line appears after each grid for multiple entries in each category.
After selections are made, click the Calculate Total button.
If you click Cancel, the system exits the Miscellaneous Purchases page and accesses the Account Summary page.
Click Next to have the system display a purchase confirmation page.
Click Next again to begin the Make a Payment process.
Access the Electronic Payments/Purchases - Purchase Items - Confirm Order page ( and click the Next button).
Image: Electronic Payments/Purchases - Purchase Items - Confirm Order page
This example illustrates the fields and controls on the Electronic Payments/Purchases - Purchase Items - Confirm Order page. You can find definitions for the fields and controls later on this page.
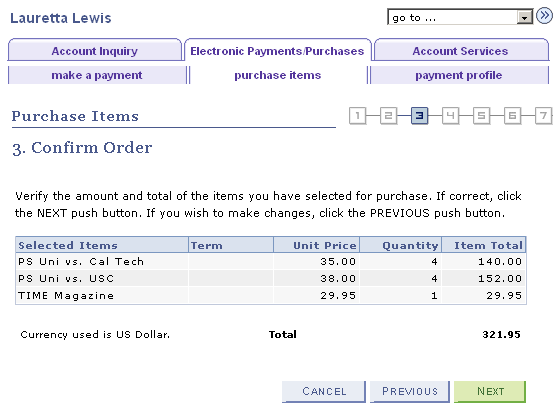
This page provides a consolidated list of selections and a total of all items before beginning the Make a Payment process.
Click Next to proceed through the Make a Payment process.
For information about making a payment for miscellaneous items, refer to the Making Self-Service Payments section.