A Advanced Topics
This appendix contains these topics:
-
Section A.9, "Working with Item Dimension and Warehouse Process Groups,"
-
Section A.15, "Comparing Inventory and Warehouse Item Balance,"
-
Section A.16, "Purging Closed Requests, Suggestions, and Tasks."
A.1 About Advanced Topics
The procedures in Advanced Topics are not required to operate your warehouse. However, they provide more flexibility in inventory movement, record keeping, and so on. You can:
-
Generate detailed movement records by confirming movement out of one location and into another in two separate steps
-
Segregate tax-paid inventory in special locations according to tax codes that you assign
-
Reduce putaway trips to a location by placing a hold on putaway until you deplete the inventory in the location
-
Track large units of measure of an item by assigning special tracking numbers
-
Reduce the number of picking trips by combining (or rolling up) small units of measure into larger units during picking
-
Protect your inventory by packing items in suitable storage containers during putaway
-
Reduce warehouse traffic congestion and the effects of pick equipment failure by setting the maximum quantity for an item in a zone
-
Change the effect of movement instructions by changing an item's warehouse process groups
-
Use warehouse space more efficiently by setting up rules to randomly select locations
-
Prevent errors in system records by updating the Warehouse Suggestions, Item Location, and Location Detail Information tables with identical information
-
Merge location detail records to minimize system and user resources when processing these records
-
Generate reports of location detail information (in unusual circumstances, such as system failure, where you need to reconstruct information)
-
Generate reports of discrepancies between Inventory Location Information (F41021) and Warehouse Location Detail Information (F4602)
-
Purge files of closed or canceled requests, suggestions, and tasks
A.2 Setting Up Two-Phase Movement Confirmation
From Advanced Warehouse Management (G46), enter 29
From Warehouse Management General Setup (G4641), choose Item Profile
You use one-phase confirmation to confirm inventory movement as one step, after you move the items out of the From location and into the To location. You use two-phase confirmation to confirm inventory movement:
-
When you move the items out of the From location and into a staging location
-
When you move the items out of the staging location and into the To location
You can use two-phase movement confirmation to generate reports for audit purposes that show the movement of items during each phase.
You can use either a physical (real) staging location, or a logical staging location that exists only in the system's database. You use a logical staging location to generate separate documents for movement out of the From location and into the To location without actually using a physical staging location.
If you use two-phase confirmation, you must set it up for each item and for each From location.
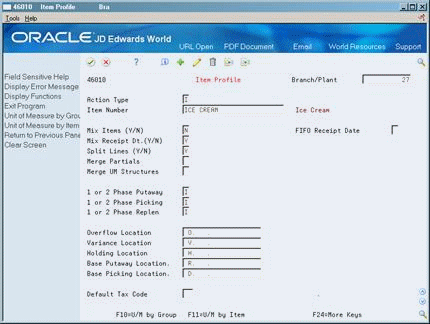
To set up two-phase confirmation
-
To use two-phase confirmation, complete the following fields for each item:
-
Branch/Plant
-
Item Number
-
1 or 2 Phase Putaway
-
1 or 2 Phase Picking
-
1 or 2 Phase Replenishment
-
-
Access Location Profile Detail.
Figure A-2 Location Profile Detail screen
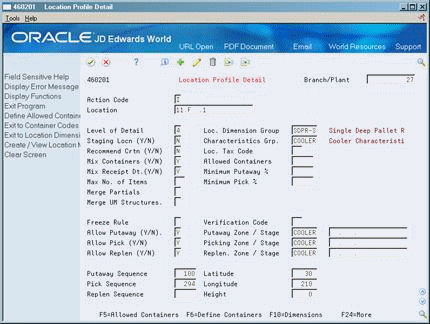
Description of "Figure A-2 Location Profile Detail screen"
-
On Location Profile Detail, complete the following fields for each location that requires two-phase confirmation:
-
Branch/Plant
-
Location
-
Putaway Stage
-
Picking Stage
-
Replenishment Stage
-
| Field | Explanation |
|---|---|
| 1 or 2 Phase Putaway | A code that indicates whether you use 1- or 2-phase confirmation during putaway.
If you use 2-phase confirmation, you can specify whether the confirmation is logical or physical.
Valid codes are: I – Use 1-phase confirmation L – Use logical 2-phase confirmation P – Use physical 2-phase confirmation |
| 1 or 2 Phase Picking | A code that indicates whether you use 1- or 2-phase confirmation during picking.
If you use 2-phase confirmation, you can specify whether the confirmation is logical or physical.
Valid codes are: I – Use 1-phase confirmation L – Use logical 2-phase confirmation P – Use physical 2-phase confirmation |
| 1 or 2 Phase Replenishment | A code that indicates whether you use 1- or 2-phase confirmation during replenishment.
If you use 2-phase confirmation, you can specify whether the confirmation is logical or physical.
Valid codes are: I – Use 1-phase confirmation L – Use logical 2-phase confirmation P – Use physical 2-phase confirmation |
| Staging Location - Putaway | A code that specifies a warehouse location where you hold items temporarily (either physically or logically) before moving them somewhere else. You use the putaway staging location when the system suggests movement from one location to another while using two-phase confirmation. In two-phase confirmation, you confirm the movement from the first location to the staging location, and then confirm the movement from the staging location to the final location. |
| Staging Location - Picking | A code that specifies a warehouse location where you hold items temporarily (either physically or logically) before moving them somewhere else. You use the picking staging location when the system suggests movement from one location to another while using two-phase confirmation. In two-phase confirmation, you confirm the movement from the first location to the staging location, and then confirm the movement from the staging location to the final location. |
| Staging Location - Replenishment | A code that specifies a warehouse location where you hold items temporarily (either physically or logically) before moving them somewhere else. You use the replenishment staging location when the system suggests movement from one location to another while using two-phase confirmation. In two-phase confirmation, you confirm the movement from the first location to the staging location, and then confirm the movement from the staging location to the final location. |
A.3 Assigning Tax Codes
You assign a tax code to a location to allow only items with the same tax code to be stored in that location. For example, if you have an item on which you have already paid tax, you can assign the same tax code to the item and to specific locations so that the system uses only those locations for putaway. You can use tax codes for import or export items.
On Item Profile
-
To assign a tax code to an item, complete the following fields:
-
Branch/Plant
-
Item Number
-
Default Tax Code
-
-
Access Location Profile Detail.
-
On Location Profile Detail, complete the following field for each location to which you want to assign a tax code:
-
Location Tax Code
-
| Field | Explanation |
|---|---|
| Code - Location Tax Status | A code (system 46/type LT) that indicates whether the location contains tax-paid inventory (in-bond vs. duty paid). If an item has an assigned tax code, the system puts the item away only in locations with the same tax code.
You assign tax codes to items through Item Profile (P46010). |
A.4 Setting Up Freeze Rules
From Advanced Warehouse Management (G46), enter 29
From Warehouse Management General Setup (G4641), choose Location Profile Detail
You use a freeze rule to determine how the system refills a pick location after picking. You can use a freeze rule to reduce the number of putaway trips that warehouse employees make to the location.
You must set up the freeze rule for each location for which you want to restrict putaway after picking.
On Location Profile Detail
Figure A-3 Location Profile Detail (Freeze Rules) screen
Description of "Figure A-3 Location Profile Detail (Freeze Rules) screen"
Complete the following fields:
-
Branch/Plant
-
Location
-
Freeze Rule
| Field | Explanation |
|---|---|
| Freeze Rule | A code that indicates what putaway restrictions you want to place on a location during the pick process.
Valid codes are: Blank – No freeze. The system does not perform any automatic restrictions. 1 – Freeze when empty. Do not put away to this location after you pick the location empty. 2 – Freeze when picked (auto reset). Do not put away to this location after picking. When you pick the location empty, the system automatically resets the putaway flag to allow putaway to this location. 3 – Freeze when picked (manual reset). Do not put away to this location after picking. When you pick the location empty, you must manually reset the putaway flag to allow putaway to this location. |
A.5 Setting Up Tracking Numbers
From Advanced Warehouse Management (G46), enter 29
From Warehouse Management General Setup (G4641), choose Unit of Measure Definition by Item or Group
You can track large units of measure, such as a pallet, by assigning a tracking number when you create a movement request. For example, you can assign a "license plate" tracking number to a pallet of expensive stereo equipment to locate it easily.
If you use license plate tracking for a particular item/unit of measure combination, the system generates one tracking number for each unit of measure of that item.
On U/M Definition by Item or Group
Figure A-4 U/M Definition by Item or Group screen
Description of "Figure A-4 U/M Definition by Item or Group screen"
Complete the following fields:
-
Branch/Plant
-
Item Number or Item Dimension Group
-
Unit of Measure
-
License Plate
| Field | Explanation |
|---|---|
| License Plate (Y/N) | A code that indicates whether you want the system to assign a tracking number to the specified item in this unit of measure when the system creates a request. This tracking number follows the item through the warehouse. License plate tracking is optional, and you should use it only for the level 1 (largest) unit of measure.
Valid codes are: Y – Yes, assign a tracking number to the item N – No, do not assign a tracking number to the item |
A.6 Setting Up Rollup
You can convert large units of measure into smaller units of measure during putaway. You can also convert small units of measure into larger units of measure during picking. For example, if 24 cases of compact discs equal a pallet, you can pick a pallet instead of the requested 24 cases. This improves warehouse efficiency by using the most appropriate unit of measure for picking.
You set up the unit of measure definition for an item or a group to use rollup. You also must set up your pick instructions to use rollup.
On U/M Definition by Item or Group
Figure A-5 U/M Definition by Item or Group (Rollup) screen

Description of "Figure A-5 U/M Definition by Item or Group (Rollup) screen"
A.7 Setting Up Repack
You use repack to specify whether you want to pack items in new containers before you send them to storage. For example, if your inventory items arrive in containers that are not suitable for storage, you would repack the items during putaway.
On Unit of Measure Definition by Item or Group
Complete the following fields:
-
Branch/Plant
-
Item Number or Item Dimension Group
-
Unit of Measure
-
Repack
| Field | Explanation |
|---|---|
| Repack (Y/N) | A code that determines whether the specified item in this unit of measure should be repacked before putaway. Valid codes are:
Y – Yes, repack the item N – No, do not repack the item You must also specify a packing method by entering a code in the Default Pack Code field. |
A.8 Defining Maximum Quantity by Zone
From Advanced Warehouse Management (G46), enter 27
From Warehouse Advanced and Technical Operations (G4631), choose Warehouse Movement Rules
From Warehousing Movement Rules (G46311), choose Maximum Quantity by Zone
You can define a maximum quantity of items to store in a zone to prevent the zone from being dominated by one particular item. For example, if you are concerned about the risk of fire for a certain item, you would specify a maximum quantity of the item to minimize losses in the event of a fire. Or, to minimize warehouse traffic for a zone that stores a popular item, you would limit the quantity of the popular item that you store in the zone.
To define maximum quantity by zone
Figure A-6 Maximum Quantity by Zone screen
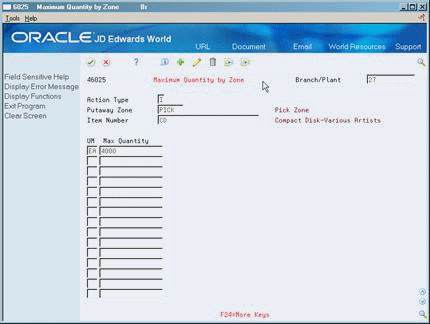
Description of "Figure A-6 Maximum Quantity by Zone screen"
Complete the following fields:
-
Branch/Plant
-
Putaway Zone
-
Item Number
-
Unit of Measure
-
Maximum Putaway Quantity
| Field | Explanation |
|---|---|
| Max Quantity | This indicates the maximum quantity to be putaway in a particular putaway zone. This quantity can be defined by putaway zone and unit of measure or putaway zone, item and unit of measure. For example, you may want to limit the quantity in a zone so if your picking devices fail in that zone you can then pick it from another zone. |
A.9 Working with Item Dimension and Warehouse Process Groups
From Advanced Warehouse Management (G46), enter 29
From Warehouse Management General Setup (G4641), choose Speed Group Maintenance
You can quickly review or change an item's dimension group or warehouse process group. By changing the process groups for an item, you can change which movement instruction table you choose. This can change the putaway, picking, or replenishment location you use during inventory movement.
To work with item dimension and warehouse process groups
Figure A-7 Speed Group Maintenance screen
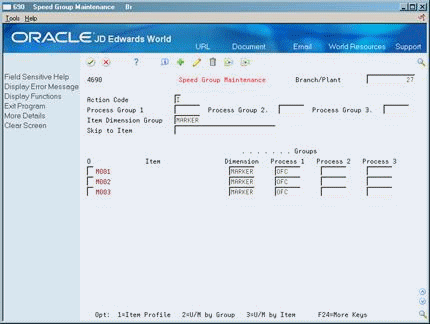
Description of "Figure A-7 Speed Group Maintenance screen"
-
To limit the information that displays, complete the following fields in the upper part of the form:
-
Process Group 1
-
Process Group 2
-
Process Group 3
-
Item Dimension Group
-
Skip to Item
-
-
To change groups for a particular item, complete the following fields in the lower part of the form:
-
Item Dimension Group
-
Process Group 1
-
Process Group 2
-
Process Group 3
-
| Field | Explanation |
|---|---|
| Item Dimension Group | A code (system 41/type 01) that identifies a group of items that share the same size specifications, such as height and width. An item dimension group defines the size specifications for all items that belong to the group. After you set up an item dimension group, you can assign items to the group through Classification Codes. |
| Process Group 1 | A code (system 41/type 02) that identifies a group of items that you want to move the same way. An item's process group determines the movement instructions the system uses to put away, pick, and replenish the item. You assign items to process groups using Classification Codes. |
| Process Group 2 | A code (system 41/type 02) that identifies a group of items that you want to move the same way. An item's process group determines the movement instructions the system uses to put away, pick, and replenish the item. You assign items to process groups using Classification Codes (P41011). |
| Process Group 3 | A code (system 41/type 02) that identifies a group of items that you want to move the same way. An item's process group determines the movement instructions the system uses to put away, pick, and replenish the item. You assign items to process groups using Classification Codes (P41011). |
A.10 Setting Up Random Rules
From Advanced Warehouse Management (G46), enter 27
From Warehouse Advanced and Technical Operations (G4631), choose Warehouse Movement Rules
From Warehousing Movement Rules (G46311), choose Random Requirements
You use random rules to make location selection more efficient by randomly distributing items throughout the warehouse instead of using fixed locations for putaway, picking, and replenishment. You create a random rule using random requirements that are based on location characteristics.
After you set up a random rule, you can specify that random rule in a putaway, picking, or replenishment instruction table.
On Random Requirements
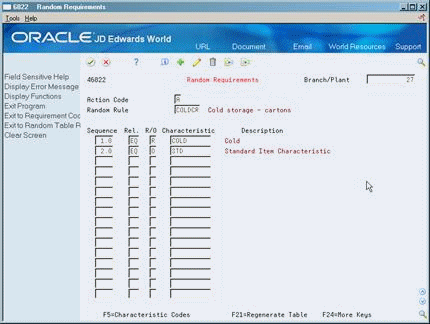
Complete the following fields:
-
Branch/Plant
-
Random Rule
-
Sequence
-
Relationship
-
Required/Optional
-
Characteristic
| Field | Explanation |
|---|---|
| Branch/Plant | An alphanumeric field that identifies a separate entity within a business for which you want to track costs. For example, a business unit might be a warehouse location, job, project, work center, or branch/plant.
You can assign a business unit to a voucher, invoice, fixed asset, and so on, for purposes of responsibility reporting. For example, the system provides reports of open accounts payable and accounts receivable by business units to track equipment by responsible department. Security for this field can prevent you from locating business units for which you have no authority. Note: The system uses this value for Journal Entries if you do not enter a value in the AAI table. |
| Random Rule | A code (system 46/type SR) that identifies a random requirements table. If you use Random, Empty or Existing locations for the movement method, you must enter a random rule code to consider only locations whose characteristics match the random rule. |
| Random Sequence | A number that ranks optional characteristics in a random rule. During random putaway, picking, and replenishment, the system selects locations with characteristics that match the random rule's characteristics, according to the random characteristic sequence. If a characteristic is required, the system does not use the random sequence. |
| Relationship | A code that indicates what location characteristics should be included or excluded when choosing locations with a random rule. Each characteristic specified on a random rule must have a relationship code. You assign relationships on Random Tables (P46822).
Valid values are: EQ – Search for locations with characteristics that equal the random rule characteristics NE – Search for locations with characteristics that do not equal the random rule characteristics |
| Required/Optional | A code that indicates whether a location characteristic is required or optional for a random rule to select the location. The random rule selects locations that have characteristics matching the random rule's required characteristics. The random rule does not necessarily select locations matching the random rule's optional characteristics.
Valid codes are: R – Use only locations that have this required characteristic O – Use locations that have this optional characteristic, if possible |
| Characteristic | A code (system 46/type DF) defines a characteristic for a location or location group. You can define unlimited characteristics (such as Cold, Dark, Dry, Heavy, and Secure) for any location or location group. |
A.10.1 What You Should Know About
| Topic | Description |
|---|---|
| Rebuilding the Random Location table | After you add or change a random rule or a location characteristic, you must rebuild the Random Location table using the Build Random Location Table program (P46821). This updates the table with the changes you made.
Run the Build Random Location Table program in batch mode from the Warehouse Advanced and Technical Operations menu, instead of running it interactively from Random Requirements. This ensures that your terminal remains free for other processing. |
| Automatically rebuilding the Random Location table during putaway | If you do not run the Build Random Location Table program, the next putaway request that uses the random rule will cause the system to automatically rebuild the Random Location table. This might result in slower processing of the movement request. |
A.11 Creating the Random Location Table
From Advanced Warehouse Management (G46), enter 27
From Warehouse Advanced and Technical Operations (G4631), choose Build Random Location Table
The Random Locations table contains a list of all the random locations and their characteristics. You run the Build Random Location Table after you change your random rule requirements or after you change the characteristics of random locations.
When you run the Build Random Location Table program, the system matches location characteristics with random rule characteristics and updates the Random Locations table (F46821).
Build Random Location Table is a DREAM Writer program.
A.12 Reposting Open Location Suggestions
From Advanced Warehouse Management (G46), enter 27
From Warehouse Advanced and Technical Operations (G4631), choose Repost Open Suggestions
An open suggestion selects a location for an item based on the total quantity, volume, or weight of the item. The system creates open suggestions for items you have posted putaway, picking, or replenishment suggestions, but for which you have not confirmed the movement. You repost open location suggestions in the event that the location suggestion information in the Item Location, Location Detail Information, and Warehouse Suggestions tables does not match.
When you run the Repost Open Suggestions program, the system:
-
Examines the suggestions in Warehouse Suggestions (F4611)
-
Updates the suggestion information in Item Location (F41021)
-
Updates the inbound quantity, outbound quantity, reserved cubes, and reserved weight in Location Detail Information (F4602)
Repost Open Suggestions is a DREAM Writer program.
A.13 Merging Location Detail Records
During daily operations, the system creates location detail records for each item as it is stored in each location in the warehouse. Among other information, the location detail record lists the following:
-
Item number
-
Location
-
Unit of measure structure
-
Used space
-
On-hand quantity
-
Volume
-
Weight of the item
In some cases, the system creates multiple records for each combination of item and location. These records can accumulate quickly and slow down the process of selecting locations for items. To limit the number of location detail records, the system can merge all compatible records. This action is effective when it results in only one location detail record for an item in a location.
For records to be compatible, the information in all of the following fields must be identical:
-
Unit of measure (UM) code
-
Quantity per UM (in the primary unit of measure)
-
Container code
-
UM dimensions and weight
-
Container dimensions
-
Quantity required to fill the next greatest UM in the structure
-
UM group
-
UM usage
In a standard merge, the system does not merge records with the following attributes:
-
Different FIFO receipt dates
-
Items with partial quantities in both the FROM and TO locations. A partial quantity is a quantity in any UM in a structure that is less than one. (For example, an item with a case-each structure, where case = 10 each, would have a partial quantity if there were 5 each of the item.)
-
Items with different UM structures. (For example, the system does not merge a case-each structure with a pallet-case-each structure.)
The system provides the following fields that you can set to override the above rules:
-
FIFO Receipt Date
-
Merge Partials
-
Merge UM Structures
You can merge records by any or all of these categories.
A.13.1 What You Should Know About
A.14 Managing Location Detail Information
From Advanced Warehouse Management (G46), enter 27
From Warehouse Advanced and Technical Operations (G4631), choose Location Detail Maintenance
You can review and change information in the Location Detail Information table. You might do this after a system failure and you need to reconstruct information about locations.
|
Caution: JD Edwards World recommends that you limit the use of this program. If you change information in the Location Detail Information table, you must also update the Warehouse Requests and Warehouse Suggestions tables to avoid mismatched information and unpredictable inventory movements. |
To manage location detail information
On Location Detail Maintenance
Figure A-9 Location Detail Maintenance (Branch) screen
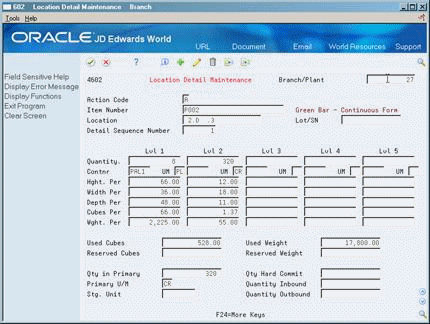
Description of "Figure A-9 Location Detail Maintenance (Branch) screen"
-
Complete the following fields:
-
Branch/Plant
-
Item Number
-
Location
-
Lot Serial Number
-
Detail Sequence Number
-
-
Complete the following fields for item unit of measure level (1 through 5):
-
Quantity
-
Container
-
Unit of Measure
-
Height Per Unit of Measure
-
Width Per Unit of Measure
-
Depth Per Unit of Measure
-
Cubes Per Unit of Measure
-
Weight Per Unit of Measure
-
-
Complete the following fields:
-
Used Cubes
-
Reserved Cubes
-
Used Weight
-
Reserved Weight
-
Quantity in Primary
-
Primary Unit of Measure
-
Storage Unit Number
-
Quantity Hard Committed
-
Quantity Inbound
-
Quantity Outbound
-
| Field | Explanation |
|---|---|
| Lot/SN | A number that identifies a lot or a serial number. A lot is a group of items with similar characteristics. |
| Detail Sequence Number | The sequence number that identifies a record in the Location Detail table (F4602). The system uses this number to distinguish between the different pallets, cases, and so forth, for the same item in the same location. |
| Quantity - Total Level 1 | The total quantity of the item in the item's level 1 unit of measure. You use Unit of Measure Conversion Information (P41002) to define unit of measure levels. When you define a unit of measure structure, define your largest unit of measure as level 1, and your smallest, or primary, unit of measure as the last level. The system supplies an item's unit of measure structure to a location's detail information (F4602) during inventory movement, but you can override the structure, if necessary. |
| Height per - Level 1 | The height of the item as defined in the item/unit of measure profile for level 1 of your unit of measure structure, or the height of the container. If you set the U/M Usage field in the item/unit of measure profile to 2 for box type, the system uses that height when it assigns a storage container. If you set the U/M Usage field to 1 for pallet type, the system adds the height of the container and the height of the item. |
| Width per - Level 1 | The width of the item as defined in the item/unit of measure profile for level 1 of your unit of measure structure, or the width of the container. If you set the U/M Usage field in the item/unit of measure profile to 2 for box type, the system uses this width when it assigns a storage container. If you set the U/M Usage field to 1 for pallet type, the system uses the width of the container or the width of the item, whichever is greater. |
| Depth per - Level 1 | The depth of the item as defined in the item/unit of measure profile for level 1 of your unit of measure structure, or the depth of the container. If you set the U/M Usage field in the item/unit of measure profile to 2 for box type, the system uses that depth when it assigns a storage container. If you set the U/M Usage field to 1 for a pallet type, the system uses the depth of the container or the depth of the carton, whichever is greater. |
| Cubic Dimensions per - Level 1 | The gross cubic dimensions of one item/unit of measure, or the cubic dimensions of the container for the item's level 1 unit of measure. If you set the U/M Usage field in the item's unit of measure profile to 2 for a box type container, the system uses only the gross cubic dimensions of that container. If you set the U/M Usage field to 2 for a pallet type container, the system adds the gross cubic dimensions of the item and the container. |
| Weight per - Level 1 | The weight of one item per unit of measure, or the weight of the item and container in the level 1 unit of measure. You define weights for an item through Unit of Measure Definition by Item (P46011) and for the container through Container Codes (P46091). |
| Quantity - Total Level 2 | The total quantity of the item in the item's level 2 unit of measure. You use Unit of Measure Conversion Information (P41002) to define unit of measure levels. When you define a unit of measure structure, define your largest unit of measure as level 1, and your smallest, or primary, unit of measure as the last level. The system supplies an item's unit of measure structure to a location's detail information (F4602) during inventory movement, but you can override the structure, if necessary. |
| Height per - Level 2 | The height of the item as defined in the item/unit of measure profile for level 2 of your unit of measure structure, or the height of the container. If you set the U/M Usage field in the item/unit of measure profile to 2 for box type, the system uses that height when it assigns a storage container. If you set the U/M Usage field to 1 for pallet type, the system adds the height of the container and the height of the item. |
| Width per - Level 2 | The width of the item as defined in the item/unit of measure profile for level 2 of your unit of measure structure, or the width of the container. If you set the U/M Usage field in the item/unit of measure profile to 2 for box type, the system uses this width when it assigns a storage container. If you set the U/M Usage field to 1 for pallet type, the system uses the width of the container or the width of the item, whichever is greater. |
| Depth per - Level 2 | The depth of the item as defined in the item/unit of measure profile for level 2 of your unit of measure structure, or the depth of the container. If you set the U/M Usage field in the item/unit of measure profile to 2 for box type, the system uses that depth when it assigns a storage container. If you set the U/M Usage field to 1 for a pallet type, the system uses the depth of the container or the depth of the carton, whichever is greater. |
| Cubic Dimensions per - Level 2 | The gross cubic dimensions of one item/unit of measure, or the cubic dimensions of the container for the item's level 2 unit of measure. If you set the U/M Usage field in the item's unit of measure profile to 2 for a box type container, the system uses only the gross cubic dimensions of that container. If you set the U/M Usage field to 2 for a pallet type container, the system adds the gross cubic dimensions of the item and the container. |
| Weight per - Level 2 | The weight of one item per unit of measure, or the weight of the item and container in the level 2 unit of measure. You define weights for an item through Unit of Measure Definition by Item (P46011) and for the container through Container Codes (P46091). |
| Quantity - Total Level 3 | The total quantity of the item in the item's level 3 unit of measure. You use Unit of Measure Conversion Information (P41002) to define unit of measure levels. When you define a unit of measure structure, define your largest unit of measure as level 1, and your smallest, or primary, unit of measure as the last level. The system supplies an item's unit of measure structure to a location's detail information (F4602) during inventory movement, but you can override the structure, if necessary. |
| Height per - Level 3 | The height of the item as defined in the item/unit of measure profile for level 3 of your unit of measure structure, or the height of the container. If you set the U/M Usage field in the item/unit of measure profile to 2 for box type, the system uses that height when it assigns a storage container. If you set the U/M Usage field to 1 for pallet type, the system adds the height of the container and the height of the item. |
| Width per - Level 3 | The width of the item as defined in the item/unit of measure profile for level 3 of your unit of measure structure, or the width of the container. If you set the U/M Usage field in the item/unit of measure profile to 2 for box type, the system uses this width when it assigns a storage container. If you set the U/M Usage field to 1 for pallet type, the system uses the width of the container or the width of the item, whichever is greater. |
| Depth per - Level 3 | The depth of the item as defined in the item/unit of measure profile for level 3 of your unit of measure structure, or the depth of the container. If you set the U/M Usage field in the item/unit of measure profile to 2 for box type, the system uses that depth when it assigns a storage container. If you set the U/M Usage field to 1 for a pallet type, the system uses the depth of the container or the depth of the carton, whichever is greater. |
| Cubic Dimensions per - Level 3 | The gross cubic dimensions of 1 item/unit of measure, or the cubic dimensions of the container for the item's level 3 unit of measure. If you set the U/M Usage field in the item's unit of measure profile to 2 for a box type container, the system uses only the gross cubic dimensions of that container. If you set the U/M Usage field to 2 for a pallet type container, the system adds the gross cubic dimensions of the item and the container. |
| Weight per - Level 3 | The weight of one item per unit of measure, or the weight of the item and container in the level 3 unit of measure. You define weights for an item through Unit of Measure Definition by Item (P46011) and for the container through Container Codes (P46091). |
| Quantity - Total Level 4 | The total quantity of the item in the item's level 4 unit of measure. You use Unit of Measure Conversion Information (P41002) to define unit of measure levels. When you define a unit of measure structure, define your largest unit of measure as level 1, and your smallest, or primary, unit of measure as the last level. The system supplies an item's unit of measure structure to a location's detail information (F4602) during inventory movement, but you can override the structure, if necessary. |
| Height per - Level 4 | The height of the item as defined in the item/unit of measure profile for level 4 of your unit of measure structure, or the height of the container. If you set the U/M Usage field in the item/unit of measure profile to 2 for box type, the system uses that height when it assigns a storage container. If you set the U/M Usage field to 1 for pallet type, the system adds the height of the container and the height of the item. |
| Width per - Level 4 | The width of the item as defined in the item/unit of measure profile for level 4 of your unit of measure structure, or the width of the container. If you set the U/M Usage field in the item/unit of measure profile to 2 for box type, the system uses this width when it assigns a storage container. If you set the U/M Usage field to 1 for pallet type, the system uses the width of the container or the width of the item, whichever is greater. |
| Depth per - Level 4 | The depth of the item as defined in the item/unit of measure profile for level 4 of your unit of measure structure, or the depth of the container. If you set the U/M Usage field in the item/unit of measure profile to 2 for box type, the system uses that depth when it assigns a storage container. If you set the U/M Usage field to 1 for a pallet type, the system uses the depth of the container or the depth of the carton, whichever is greater. |
| Cubic Dimensions per - Level 4 | The gross cubic dimensions of 1 item/unit of measure, or the cubic dimensions of the container for the item's level 4 unit of measure. If you set the U/M Usage field in the item's unit of measure profile to 2 for a box type container, the system uses only the gross cubic dimensions of that container. If you set the U/M Usage field to 2 for a pallet type container, the system adds the gross cubic dimensions of the item and the container. |
| Weight per - Level 4 | The weight of one item per unit of measure, or the weight of the item and container in the level 4 unit of measure. You define weights for an item through Unit of Measure Definition by Item (P46011) and for the container through Container Codes (P46091). |
| Quantity - Total Level 5 | The total quantity of the item in the item's level 5 unit of measure. You use Unit of Measure Conversion Information (P41002) to define unit of measure levels. When you define a unit of measure structure, define your largest unit of measure as level 1, and your smallest, or primary, unit of measure as the last level. The system supplies an item's unit of measure structure to a location's detail information (F4602) during inventory movement, but you can override the structure, if necessary. |
| Height per - Level 5 | The height of the item as defined in the item/unit of measure profile for level 5 of your unit of measure structure, or the height of the container. If you set the U/M Usage field in the item/unit of measure profile to 2 for box type, the system uses that height when it assigns a storage container. If you set the U/M Usage field to 1 for pallet type, the system adds the height of the container and the height of the item. |
| Width per - Level 5 | The width of the item as defined in the item/unit of measure profile for level 5 of your unit of measure structure, or the width of the container. If you set the U/M Usage field in the item/unit of measure profile to 2 for box type, the system uses this width when it assigns a storage container. If you set the U/M Usage field to 1 for pallet type, the system uses the width of the container or the width of the item, whichever is greater. |
| Depth per - Level 5 | The depth of the item as defined in the item/unit of measure profile for level 5 of your unit of measure structure, or the depth of the container. If you set the U/M Usage field in the item/unit of measure profile to 2 for box type, the system uses that depth when it assigns a storage container. If you set the U/M Usage field to 1 for a pallet type, the system uses the depth of the container or the depth of the carton, whichever is greater. |
| Cubic Dimensions per - Level 5 | The gross cubic dimensions of 1 item/unit of measure, or the cubic dimensions of the container for the item's level 5 unit of measure. If you set the U/M Usage field in the item's unit of measure profile to 2 for a box type container, the system uses only the gross cubic dimensions of that container. If you set the U/M Usage field to 2 for a pallet type container, the system adds the gross cubic dimensions of the item and the container. |
| Weight per - Level 5 | The weight of one item per unit of measure, or the weight of the item and container in the level 5 unit of measure. You define weights for an item through Unit of Measure Definition by Item (P46011) and for the container through Container Codes (P46091). |
| Reserved Cubes | The cubic space (volume) that has been reserved for items. You use the Reservations program (P46130) to create reservations. The system suggests reserved locations when you create suggestions. The amount comes from the item/unit of measure profile and the cubic dimensions of the storage container if the level 1 unit of measure in the location detail has a container. |
| Reserved Weight | The weight that has been reserved for items in this location. The system creates reserved weight when you use the Reservations program (P46130) to reserve space in the warehouse for items you expect to receive. The amount comes from the item/unit of measure profile and the weight for the storage container if the level 1 unit of measure in the location detail has a container. |
| Qty in Primary | The total quantity of an item to be reworked or scrapped as the result of a disposition on an ECO. |
| Storage Unit Number | A number that uniquely identifies goods in specific location detail information. Location detail contains a storage unit number if you turn on license plate tracking in the Item/UOM Profile (P46011) for the item's level 1 unit of measure.
The system assigns a storage unit number to a storage unit when it creates a request or suggestion. |
| Qty Hard Commit | The number of units committed to a specific location and lot.
Form-specific information When the system creates a suggestion for picking from a specific location, it also updates the committed quantity for that location. When you confirm the suggestion, the system removes the committed quantity from the location you picked from and adds the quantity to the quantity in the destination location, which is usually your shipping location. |
| Quantity Inbound | A quantity in the primary unit of measure that you expect to add to the location detail after you confirm a putaway or replenishment suggestion. |
| Quantity Outbound | A quantity in the primary unit of measure that you expect to remove from the location after you confirm a picking or replenishment suggestion. |
A.15 Comparing Inventory and Warehouse Item Balance
From Advanced Warehouse Management (G46), choose Inquiries and Reports
From Inquiries and Reports (G4614), choose Warehouse Location Integrity
When you perform a cycle or tag count of items in selected locations in your inventory, the system records the variance between the expected on-hand quantity and the quantity determined from a physical count of the inventory. The system uses this information to update Inventory Item Branch records (F41021) and Warehouse Location Detail records (F4602). If you record a negative variance (missing inventory), the system subtracts this variance from existing records and can make both sets of records negative. In the cycle or tag process, the system can also create discrepancies between these records.
Warehouse Location Integrity generates a report that compares the warehouse and inventory records for all locations and items, and displays imbalances between the records. You can set processing options to specify the type of imbalance you want to display.
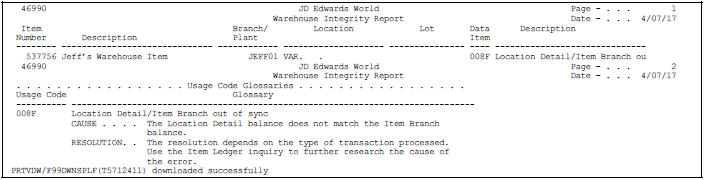
A.15.1 Processing Options
See Section 28.1, "Warehouse Location Integrity (P46990)."
|
See Also:
|
A.16 Purging Closed Requests, Suggestions, and Tasks
From Advanced Warehouse Management (G46), enter 27
From Warehouse Advanced and Technical Operations (G4631), choose Purge Movement Information
When you create requests, suggestions, and tasks, the system stores this information in files that take up storage space and increase processing time for any job that references them. To solve this problem, you can use the Purge Movement Information program to purge unnecessary records. The purge program searches through requested files, finds the related suggestions and tasks, and purges those in which all associated processing has been completed. A request and its associated suggestions and tasks must meet all of the following criteria before you can purge them:
-
You must close or cancel the request
-
You must confirm or cancel the associated suggestions
-
You must complete or cancel the warehouse processing of all associated tasks
-
You cannot purge any request, associated suggestion, or associated task until all are eligible for purge
In cases where a task is shared by several work orders (such as Work Order Completions Putaway requests) or sale order lines (such as Sales Order Pick requests), you specify the work or sales order line status at which you can purge the task. You can purge the task when all of the following criteria are met:
-
All requests and suggestions associated with the task are either closed, complete, or cancelled
-
Any single work order or sales order line associated with the task meets the status requirement
The Purge Movement Information program allows you to select the requests to purge. The program generates a report that lists all requests, suggestions, and tasks that are not eligible for purge and the cause of ineligibility. The report also lists the total number of requests, suggestions, and tasks that are eligible and ineligible for purging.
Figure A-11 Request Purge Eligibility Report
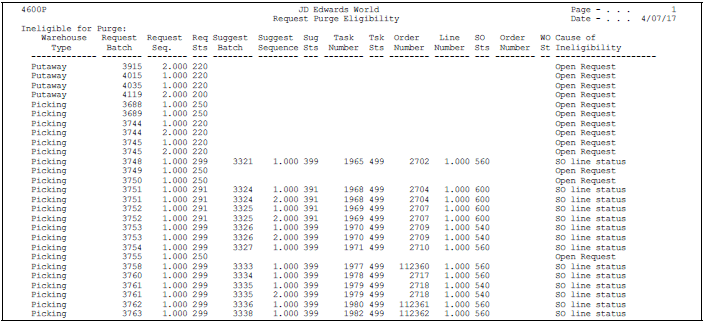
Description of "Figure A-11 Request Purge Eligibility Report"