25 Set Up Multi-Level Master Schedules
This chapter contains these topics:
25.1 Setting Up Multi-Level Master Schedules
You must set up planning data for a multi-level master schedule to:
-
Develop rules and procedures for ordering
-
Classify the types of items that you stock
-
Identify the features that you expect to sell
The system uses the planning data to generate and maintain a multi-level master schedule for the hypothetical parent item. It explodes the parent item to the component level.
Setting up multi-level master scheduling consists of the following tasks:
-
Setting Up Order Policy Rules
-
Setting Up Stocking Types
-
Setting Up Feature Planned Percents
25.1.1 Before You Begin
-
Verify that DRP, MPS, or RCCP has been set up
-
Understand the concepts and terms described in Single Level Master Scheduling.
|
See Also:
|
25.2 Setting Up Order Policy Rules
From Inventory Management (G41), choose Inventory Master/Transactions
From Inventory Master/Transactions (G4111), choose Item Branch/Plant Information
You must set up order policy rules to control how multi-level master scheduling calculates dates and quantities. The order policy rules that you set up are:
-
Planning code - Include the item in the DRP, MRP, or MPS planning runs.
-
Order policy code - Designate several different rules for reordering inventories, including fixed order quantity, lot for lot, or number of days supplied. For example, purchasing a 90-day supply of V-8 engines.
-
Leadtime level for phantom items - Indicate the transfer or purchase leadtime for an item to ensure that you have it in stock on time.
25.2.1 What You Should Know About
On Item/Branch Plant Information
-
To locate the item for which you want to plan orders, complete the following fields:
-
Branch/Plant
-
Item Number
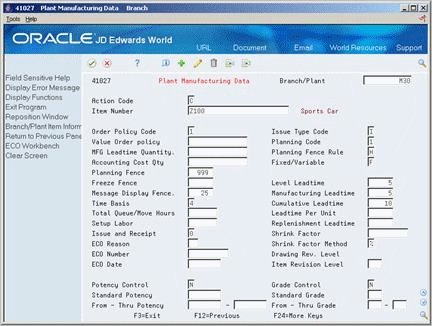
Figure 25-1 Plant Manufacturing Data screen

Description of ''Figure 25-1 Plant Manufacturing Data screen''
-
-
To control how multi-level master scheduling calculates dates and quantities, complete the following fields:
-
Order Policy Code
-
Planning Code
-
Level Leadtime
-
| Field | Explanation |
|---|---|
| Order Policy Code | A code that designates the rules for inventory reordering in the MPS/MRP/DRP systems. Valid codes are:
0 – Reorder point (not planned by MPS/MRP/DRP) 1 – Lot-for-lot or as required 2 – Fixed order quantity 3 – Economic order quantity (EOQ) 4 – Periods of supply 5 – Rate scheduled item The codes above are hard-coded. |
| Planning Code | A code that indicates how Master Production Schedule (MPS), Material Requirements Planning (MRP), or Distribution Requirements Planning (DRP) processes this item. Valid codes are:
0 – Not Planned by MPS, MRP, or DRP 1 – Planned by MPS or DRP 2 – Planned by MRP 3 – Planned by MRP with additional independent forecast 4 – Planned by MPS, Parent in Planning Bill 5 – Planned by MPS, Component in Planning Bill These codes are hard-coded. |
| Level Leadtime | A value that represents the lead time for an item at its assigned level in the production process, as defined on Plant Manufacturing Data. The system uses this value to calculate the start dates for work orders using fixed lead times. Level lead time is different for purchased and manufactured items:
You can enter level lead time manually on Manufacturing Values Entry, or you can use the Leadtime Rollup program calculate it. To calculate level lead time using the Leadtime Rollup program, you must first enter a quantity in the Manufacturing Leadtime Quantity field in the Item Branch table (F4102). |
25.3 Setting Up Stocking Types
From Inventory Management (G41), choose Inventory Master/Transactions
From Inventory Master/Transactions (G4111), choose Item Master Information
Set up a stocking type to identify how you stock an item (for example, as finished goods or raw materials).
On Item Master Information
Figure 25-2 Item Master Information screen

Description of ''Figure 25-2 Item Master Information screen''
-
To locate the item for which you want to plan orders, complete the following field:
-
Item Number
-
-
To indicate how you stock the item for which you want to plan orders, complete the following field:
-
Stocking Type
-
| Field | Explanation |
|---|---|
| Stocking Type | A user-defined code (41/I) that indicates how you stock an item (for example, as finished goods, or as raw materials). The following stocking types are hard-coded and you should not change them:
B – Bulk floor stock C – Configured item F – Feature K – Kit parent item N – Non-stock |
25.4 Setting Up Feature Planned Percents
From Product Data Management (G30), choose Daily PDM Discrete
From Daily PDM Discrete (G3011), choose Enter/Change Bill
Set up a feature planned percent to define the percentage of demand for a specified feature based on projected sales.
When you set up a feature planned percent, you can change the percentages on which the hypothetical parent item is based. This allows you to account for any planning variations on which you might base planned orders.
To set up a feature planned percent
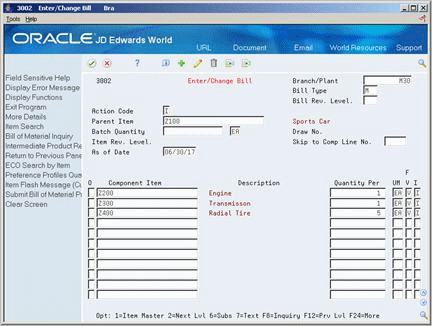
Figure 25-3 Enter/Change Bill (Feature Planned Percent) screen

Description of ''Figure 25-3 Enter/Change Bill (Feature Planned Percent) screen''
-
To locate the item for which you want to plan orders, complete the following fields:
-
Branch/Plant
-
Parent Item
-
-
Access the detail area (F4).
Figure 25-4 Enter/Change Bill (Feature Planned Percent, Detail) screen

Description of ''Figure 25-4 Enter/Change Bill (Feature Planned Percent, Detail) screen''
-
Complete the following field:
-
Feature Planned Percent
-
| Field | Explanation |
|---|---|
| Parent Item | A number that the system assigns to an item. It can be in short, long, or 3rd item number format.
Form-specific information Header - The Parent field contains the item number of the parent item. Detail - The Component Item field contains the item number of the component item. |
| Feature Planned % | The percentage of demand for a specified feature based on projected sales. For example, a company might sell 35% of their computers with a standard keyboard and 65% of them with an extended keyboard, based on customer demand.
The Material Planning system uses this percentage to accurately plan for a feature's component items. Enter percents as whole numbers: 5% as 5.0. The default value is 100%. |