3 Enter Item Master Information
This chapter contains these topics:
This chapter is an overview of item master information from the Inventory Management system. For information about item master information not included in this chapter, see the JD Edwards World Inventory Management Guide.
3.1 Entering Item Master Information
From Inventory Management (G41), choose Inventory Master/Transactions
From Inventory Master/Transactions (G4111), choose Item Master Information
You must enter general information for all stock and non-stock items. The system uses this information to identify and process each item in the distribution and manufacturing systems.
When you enter a new item, the system creates an item master record in the Item Master Information table (F4101).
Figure 3-1 Item Master Information screen
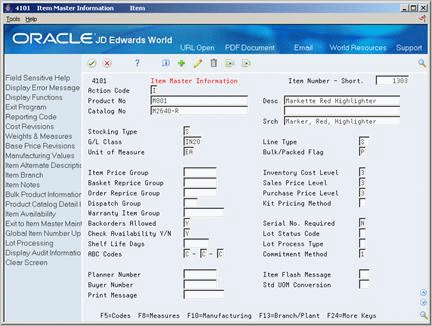
Description of "Figure 3-1 Item Master Information screen"
3.1.1 What You Should Know About
|
See Also:
|
3.2 Entering Basic Item Information
To enter basic item information, complete the following tasks:
-
Enter item identifiers
-
Enter item descriptions and search text
-
Enter item processing information
Each item can have up to three identifiers. You use the identifiers to locate the item. These identifiers can represent universal product codes (UPCs), bar codes, supplier numbers, or a user defined value.
In Branch/Plant Constants, you must specify a primary item identifier. You must also enter an item description and the text on which a user is most likely to search when trying to locate the item. You can also translate item descriptions and search text into multiple languages to accommodate those users who must locate items using alternate languages.
Item processing information consists of values that control how the system processes the item. These values pertain to stocking, packaging, accounting transactions, system interfaces, and so on.
3.2.1 What You Should Know About
| Topic | Description |
|---|---|
| Locating other identifiers | To locate an item using an identifier other than the primary identifier, you can perform a wildcard search by typing a special symbol, such as an asterisk (*), before the identifier. This only applies for forms that contain the Item Number field. |
|
See Also:
|
Complete the following fields:
-
Item Number - Short
-
Product No (Product Number)
-
Catalog No (Catalog Number)
|
See Also:
|
To enter item descriptions and search text
-
To enter descriptions and search text in your native language, complete the following fields:
-
Desc (Description)
-
Srch (Search)
-
-
To enter descriptions and search text in alternate languages, access Item Alternative Description.
Figure 3-2 Item Alternative Description window
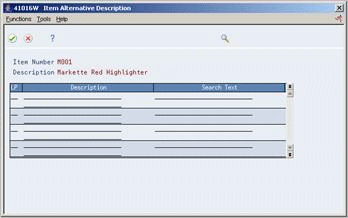
Description of "Figure 3-2 Item Alternative Description window"
-
On Item Alternative Description, complete the following fields:
-
LP (Language Preference)
-
Description
-
Search Text
-
To enter item processing information
Complete the following fields:
-
Stocking Type (R denotes a process)
-
G/L Class
-
Line Type
-
Bulk/Packed Flag
-
Backorders Allowed
-
Unit of Measure
-
Check Availability Y/N
-
ABC Codes
| Field | Explanation |
|---|---|
| Item Number - Short | An inventory item number. The system provides three separate item numbers plus an extensive cross reference capability to alternate item numbers (see data item XRT) to accommodate substitute item numbers, replacements, bar codes, customer numbers, supplier numbers, and so forth. The item numbers are:
1. Item Number (short) - An eight-digit, computer-assigned item number. 2. 2nd Item Number - The 25-digit, free-form, user-defined alphanumeric item number. 3. 3rd Item Number - Another 25-digit, free-form, user-defined alphanumeric item number. Form-specific information The first of three identifiers you can assign to an item. The system assigns this number if you activate the Next Number program. This field is numeric only. If you leave the other two item identifier fields blank, the system copies this number to those fields. |
| Product No | The 2nd Item Number (see number 2, above).
Form-specific information The second of three identifiers that you can assign to an item. This field is alphanumeric. If you leave the third identifier field blank, the system copies this number to that field. |
| Catalog No | The 3rd Item Number (see number 3, above).
Form-specific information The third of three identifiers you can assign to an item. This field is alphanumeric. If you leave the second identifier field blank, the system copies that number to this field. |
| Description: | A brief description of an item, a remark, or an explanation. |
| Srch: | A field that specifies how the system searches for an item. Your entry should be specific and descriptive of the item. Type the words in the order in which you are likely to enter them.
In single-byte environments, where computer storage space can contain only Latin-based language character sets, the system inserts the first 30 characters from the item's description if you do not enter search text. In double-byte environments where computer storage space can contain more complex language character sets (in languages such as Japanese, Chinese, and Korean), you must complete this field. This is a single-byte field that you complete with single-byte characters to phonetically represent the item description (which can be single-byte, double-byte, or both). |
| Stocking Type | A user defined code (41/I) that indicates how you stock an item (for example, as finished goods, or as raw materials). The following stocking types are hard-coded and you should not change them:
B – Bulk floor stock C – Configured item F – Feature K – Kit parent item N – Non-stock |
| G/L Class | A user defined code that identifies the G/L offset to use when the system is searching for the account to which it will post the transaction. If you do not want to specify a class code, you can enter **** (four asterisks) in this field.
The table of Automatic Accounting Instructions (AAIs) allows you to predefine classes of automatic offset accounts for the Inventory, Procurement, and Sales Order Management systems. G/L categories might be assigned as follows: IN20 – Direct Ship Orders IN60 – Transfer Orders IN80 – Stock Sales The system can generate accounting entries based upon a single transaction. As an example, a single sale of a stock item can trigger the generation of accounting entries similar to these: Sales-Stock (Debit) xxxxx.xx A/R Stock Sales (Credit) xxxxx.xx Posting Category: IN80 Stock Inventory (Debit) xxxxx.xx Stock COGS (Credit) xxxxx.xx |
| Line Type | A code that controls how the system processes lines on a transaction. It controls the systems with which the transaction interfaces (General Ledger, Job Cost, Accounts Payable, Accounts Receivable, and Inventory Management). It also specifies the conditions under which a line prints on reports and is included in calculations. Codes include:
S – Stock item J – Job cost N – Non-stock item F – Freight T – Text information M – Miscellaneous charges and credits W – Work order |
| Unit of Measure | A user defined code (system 00, type UM) that identifies the unit of measure that the system uses to express the quantity of an item, for example, EA (each) or KG (kilogram).
Form-specific information The default for this field is the primary unit of measure you specify in processing options. |
| Bulk/Packed Flag | A code that indicates if the item is a bulk liquid product. If it is a bulk product, you must perform temperature and density/gravity conversions. To record the movement of bulk products, you must use forms designed specifically for bulk products. If you try to record movement using standard inventory forms, the system prevents the movement. Valid values are:
P – Packaged B – Bulk liquid If you leave this field blank, the system uses P. |
| Backorders Allowed | A code that indicates whether you allow backorders for this item. You can allow backorders by item (through Item Master or Item Branch/Plant), or by customer (through Billing Instructions).
Y – Yes, allow backorders for this item. N – No, do not allow backorders for this item, regardless of the backorders code assigned to the customer. Note: The system does not use this information if you have set the option on Branch/Plant Constants to indicate that you do not allow backorders in your operating environment. |
| Check Availability Y/N | This field controls whether availability checking is performed throughout the Sales Order Management system. You might want to check availability for some items. For other items, you can assume that an adequate supply is available. Valid values are:
Y – Check availability N – Do not check availability |
| ABC Codes | A code that specifies this item's ABC ranking by sales amount.
Valid values are: A – Assign this item to the first (largest) amount ranking. B – Assign this item to the second (intermediate) amount ranking. C – Assign this item to the third (smallest) amount ranking. D – Do not include this item when you run ABC Analysis. There are three types of ABC analysis, which include sales, margin, and on-hand value. Within each type of analysis, you can have three groups, including A, B, and C. The ABC Code fields contain a percentage that defines the A, B, and C groups for categorizing items during ABC analysis. Each group measures a total within the type of analysis. For all groups, the system compares the appropriate sales, margin, or on-hand value totals of a single item to the appropriate total for all items and calculates the value of each item. An item's value is its percentage of the appropriate total. The system arranges the values of all items from highest to lowest value and accumulates the percentages. Then, depending on the group, the system processes the information as follows: A – If an item's value causes the accumulated total to exceed the A accumulated percentage, the system assigns the item to the B group. B – When the accumulated total reaches the percentage you entered for items in the A group, it continues to add values until it reaches the percentage you entered for items in the B group. The system assigns all items whose value falls between the A and B percentages to the B group. C: – The C group consists of items whose accumulated value exceeds the B percentage. The percentage that you usually enter for the C group is .999. |
3.3 Entering Item Text
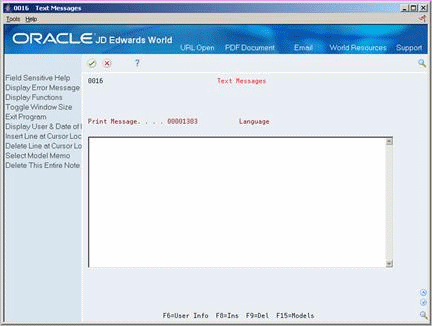
You might want to enter text about an item that others can view or print when working with the item. When you enter item master information, you can use one of two methods to enter item text:
-
Attach messages to an item
-
Enter notes for an item
Item messages are predefined, so you can attach the same message to multiple items.
Unlike item messages, item notes are not predefined. If notes already exist for an item, the words See Memo appear as highlighted text at the top of Item Master Information.
3.3.1 Before You Begin
-
Before you can attach a predefined message to an item, you must create text for the message. Where you create this text depends on the message type.
On Item Master Information
Complete the following fields:
-
Print Message
-
Item Flash Message
-
Access Item Notes.
-
On Text Messages, enter the appropriate text.
| Field | Explanation |
|---|---|
| Print Message | A code that you assign to each print message. Examples of text messages are engineering specifications, hours of operation during holiday periods, and special delivery instructions. |
| Item Flash Message | User defined code system 40, type FL, which is used to flash a warning message about a particular item. |
3.4 Assigning Item Responsibility
When you enter master information for an item, you can specify those persons or businesses that are responsible for the item, including the buyer, planner, and preferred carriers.
Before you can assign a responsible person or business to an item, each must have an address book number in the Address Book system.
On Item Master Information
-
Complete the following fields:
-
Planner Number
-
Buyer Number
-
-
Access Reporting Code (F5) from Item Master Information.
-
On Classification Codes, complete the following fields:
-
Sales: Preferred Carrier
-
Purchasing: Preferred Carrier
-

| Field | Explanation |
|---|---|
| Planner Number | The address number of the material planner for this item. |
| Buyer Number | The address number of the person responsible for setting up and maintaining the correct stocking levels for the item. |
| Sales: Preferred Carrier | The address number for the preferred carrier of the item. The customer or your organization might prefer a certain carrier due to route or special handling requirements. |
| Preferred Carrier | The address number for the preferred carrier of the item. The supplier or your organization might prefer a certain carrier because of route or special handling requirements. |
|
See Also:
|
3.5 Entering Item Classification Codes
You might want to group items with similar characteristics so that you can work with the entire group at the same time. For example, for sales analysis, you can group items together for reporting purposes.
To group items, you assign classification codes to them. You can assign classification codes to items when you enter item master information or when you enter item branch/plant information.
There are several categories of classification codes. Each category represents a different item classification or property type, such as shipping conditions. From the shipping conditions category, you can select a code that indicates the condition under which you ship an item, such as fragile.
You can assign one of four groups of classification codes. Each group relates to one of the following JD Edwards World systems:
-
Sales Order Management
-
Procurement
-
Inventory Management
-
Advanced Warehouse Management
Complete the following optional tasks:
-
Enter sales classification codes
-
Enter purchasing classification codes
-
Enter inventory classification codes
-
Enter warehouse classification codes
To enter sales classification codes
-
Access Reporting Code (F5).
-
On Classification Codes, complete the following fields:
-
Sales Catalog Section
-
Sub Section
-
Sales Category Code 3
-
Sales Category Code 4
-
Sales Category Code 5
-
Preferred Carrier
-
Category Code 6
-
Category Code 7
-
Category Code 8
-
Category Code 9
-
Category Code 10
-
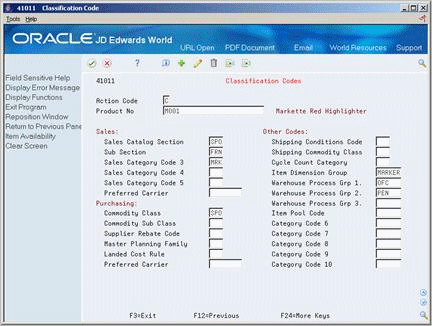
To enter purchasing classification codes
-
Access Classification Codes.
-
On Classification Codes, enter a classification code for each of the following fields:
-
Commodity Class
-
Commodity Sub Class
-
Supplier Rebate Code
-
Master Planning Family
-
Landed Cost Rule
-
To enter inventory classification codes
On Item Master Information
-
Access Classification Codes.
-
On Classification Codes, enter a classification code for each of the following fields:
-
Shipping Conditions Code
-
Shipping Commodity Class
-
Cycle Count Category
-
To enter warehouse classification codes
-
Access Classification Codes.
-
On Classification Codes, enter a classification code for each of the following fields:
-
Item Dimension Group
-
Warehouse Process Group 1
-
Warehouse Process Group 2
-
Warehouse Process Group 3
-
| Field | Explanation |
|---|---|
| Sales Catalog Section | One of ten category codes for sales coding purposes. These codes can represent such things as color, material content, or use. |
| Sub Section | One of ten category codes for sales coding purposes. These codes can represent such things as color, material content, or use.
This field represents one of ten property type categories available for sales purposes. |
| Sales Category Code 3 | One of ten category codes for sales coding purposes. These codes can represent such things as color, material content, or use. |
| Category Code 7 | One of ten category codes to be used for sales coding purposes. These can represent such things as color, material content, or use. |
| Commodity Class | A code (table 41/P1) that represents an item property type or classification, such as commodity type, planning family, or so forth. The system uses this code to sort and process like items.
This field is one of six classification categories available primarily for purchasing purposes. |
| Commodity Sub Class | A code (table 41/P2) that represents an item property type or classification, such as commodity type, planning family, or so forth. The system uses this code to sort and process like items.
This field is one of six classification categories available primarily for purchasing purposes. |
| Supplier Rebate Code | A code (UDC table 41/P3) that represents an item property type or classification, such as commodity type, planning family, or so forth. The system uses this code to sort and process like items.
This field is one of six classification categories available primarily for purchasing purposes. |
| Master Planning Family | A code (table 41/P4) that represents an item property type or classification, such as commodity type, planning family, or so forth. The system uses this code to sort and process like items.
This field is one of six classification categories available primarily for purchasing purposes. |
| Landed Cost Rule | A user defined code (41/P5) that indicates the landed cost rule for an item. The landed cost rule determines purchasing costs that exceed the actual price of an item, such as broker fees, commissions, and so forth. You set up landed cost rules on Landed Cost Revisions.
Form-specific information When you enter a purchase order for the item, this is the default landed cost rule. If you enter a landed cost rule for the entire purchase order, it overrides the landed cost rule for the item. This is the only purchasing classification category that is hard coded. You can use it for landed cost rules only. This field corresponds to purchasing reporting code 5. |
| Shipping Conditions Code | A code (table 41/C) that represents an item property type or classification, such as special shipping conditions. The system uses this code to sort and process like items.
This field is one of three classification categories available primarily for inventory and shipping purposes. |
| Shipping Commodity Class | A user defined code (system 41/type E) that represents an item property type or classification, such as international shipment handling. The system uses this code to sort and process like items.
This field is one of three classification categories available primarily for inventory and shipping purposes. |
| Cycle Count Category | A code (table 41/8) that represents the family or cycle in which an item is counted. Cycle counting means that you count different inventory items at different times. Cycle codes commonly represent item values, item locations, time frames, or product groups.
Form-specific information This inventory classification category is hard coded. You can use it for cycle count codes only. |
| Item Dimension Group | A code (system 41/type 01) that identifies a group of items that share the same size specifications, such as height and width. An item dimension group defines the size specifications for all items that belong to the group. After you set up an item dimension group, you can assign items to the group through Classification Codes. |
3.6 Entering Item Unit of Measure Information
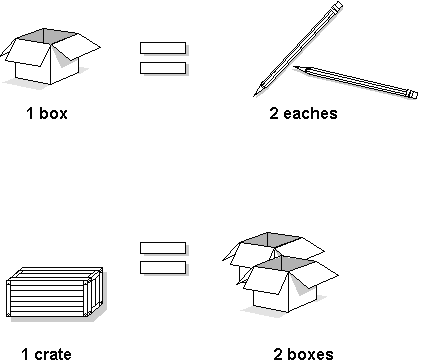
You must provide the system with the item units of measure that are most common to each of your distribution processes, such as sales, purchasing, and so on. For example, you might purchase an item in pallets, stock it in boxes, and ship it in individual containers.
If you work with an item in multiple units of measure, you must specify how to convert one unit of measure to another. For example, if you stock items in boxes and crates, you must specify the number of individual items in a box and the number of boxes in a crate.
Figure 3-6 Specifying Item Unit Measurements
Description of "Figure 3-6 Specifying Item Unit Measurements"
In some instances, the system must work with an item in its smallest (primary) unit of measure. The item conversions you specify must enable the system to trace all units of measure back to the primary unit of measure.
You can set up unit of measure conversions that are specific to an item or to an item and branch/plant combination. You specify whether item conversions are specific to a branch/plant in System Constants. You can also set up units of measure that are standard for all items.
You must set up all units of measure for an item in the Unit of Measure Conversion table (F41002) or the Standard Unit of Measure Conversion table (F41003). The system verifies the item unit of measure conversions before using standard unit of measure conversions.
Complete the following tasks:
-
Enter default units of measure for items
-
Define item unit of measure conversions
To enter default units of measure for items
-
Access Weights & Measures.
Figure 3-7 Default Units of Measure screen
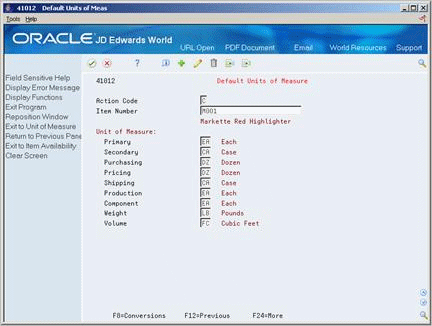
Description of "Figure 3-7 Default Units of Measure screen"
-
On Default Units of Measure, complete the following field to locate the item:
-
Item Number
-
-
Complete the following fields:
-
Primary
-
Secondary
-
Purchasing
-
Pricing
-
Shipping
-
Production
-
Component
-
Weight
-
Volume
-
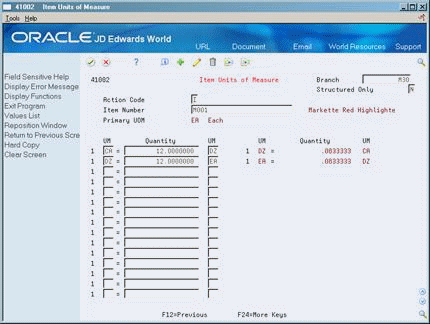
To define item unit of measure conversions
-
Access Weights & Measures.
-
On Default Units of Measure, access Exit to Unit of Measure.
-
On Item Units of Measure, complete the following fields:
-
Branch
-
Structured Only
-
Item Number
-
Primary UOM
The Branch field displays only if item unit of measure conversions are specific to branch/plants.
-
-
For each unit of measure that the system must convert for the item, complete the following fields:
-
UM (Unit of Measure To)
-
Quantity
-
UM (Unit of Measure From)
-
| Field | Explanation |
|---|---|
| Primary | A user defined code (system 00, type UM) that identifies the unit of measure that the system uses to express the quantity of an item, for example, EA (each) or KG (kilogram).
Form-specific information This is the primary stock accounting unit of measure that the system uses to store all inventory. If you change the primary unit of measure, the conversion factors in the item-level conversion table will no longer be valid. The default for this field is the unit of measure that you specify for the item on Item Master Information. |
| Secondary | A code that indicates an alternate unit of measure for the item. See the User Defined Code table for system 00, record type UM.
Form-specific information The default for this field is the primary unit of measure that you specify in processing options for Item Master Information. |
| Purchasing | A user defined code (00/UM) that identifies the unit of measure in which you usually purchase the item.
Form-specific information The default for this field is the primary unit of measure that you specify in processing options for Item Master Information. |
| Pricing | A code (system 00/type UM) that indicates the unit of measure in which you usually price the item.
Form-specific information The default for this field is the primary unit of measure that you specify in processing options for Item Master Information. |
| Shipping | A code (table 00/UM) that indicates the unit of measure in which you usually ship the item.
Form-specific information The default for this field is the primary unit of measure that you specify in processing options for Item Master Information. |
| Production | A code (table 00/UM) that indicates the unit of measure in which you produce the item.
Form-specific information The default for this field is the primary unit of measure that you specify in processing options for Item Master Information. This code serves as the default for:
|
| Component | A code (table 00/UM) that indicates the unit of measure for an item when it serves as a component.
Form-specific information The default for this field is the primary unit of measure that you specify in the processing options for Item Master Information. This code serves as the default value for:
|
| Weight | A user defined code (system 00/type UM) that identifies the unit of measure that the system uses to display weight for this item. You can specify ounces, grams, kilograms, and so on, as weight standards. The system uses this unit of measure for the item or overrides it for an individual item or container.
Form-specific information The default for this field is the weight unit of measure you specify in processing options for Item Master Information. |
| Volume | A code (system 00/table UM) that indicates the unit of measure by metric conversion for ambient volume. For example, the unit of measure code for a gallon might be GL, or for a liter might be LT. |
| Structured Only | A code that determines whether the system displays all units of measure for an item and branch/plant or only the structured units of measure that have been set up for the Advanced Warehouse Management system.
Form-specific information If you use the Advanced Warehouse Management system, you must structure conversions from large to small. For example:
You assign structure code 1 to the largest unit of measure and codes 2, 3, and so on, to the smaller units of measure. Note: You do not have to define the primary unit of measure within a structure. This value is always the default for the lowest level. |
| UM | A code (UDC table 00/UM) that indicates a secondary unit of measure.
Form-specific information The unit of measure from which you are converting. This unit of measure, in conjunction with the quantity, equals the unit of measure to which you are converting. |
| Quantity | The factor that the system uses to convert one unit of measure to another unit of measure.
Form-specific information The quantity and the unit of measure from which you are converting must equal the unit of measure to which you are converting. |
3.7 Entering Item Manufacturing Information
You can define manufacturing information about an item when you enter item master information. This information includes:
-
Enter requirements planning information
-
Enter lead time information
-
Enter engineering information
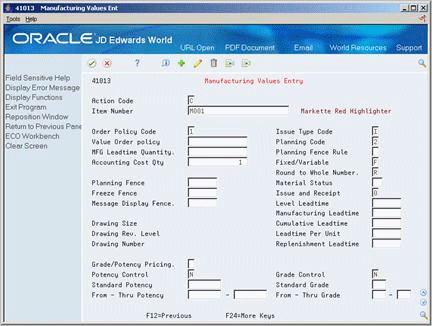
Figure 3-9 Manufacturing Values Entry screen
Description of "Figure 3-9 Manufacturing Values Entry screen"
To enter requirements planning information
On Item Master Information
-
Access Manufacturing Values Entry.
-
On Manufacturing Values Entry, complete the following fields:
-
Value Order Policy
-
Planning Code
-
Planning Fence Rule
-
Accounting Cost Qty
-
Round to Whole Number
-
Planning Fence
-
Freeze Fence
-
Message Display Fence
-
To enter lead time information
On Item Master Information
-
Access Manufacturing Values Entry.
-
On Manufacturing Values Entry, complete the following fields:
-
MFG Leadtime Quantity
-
Fixed/Variable
-
Leadtime Level
-
Leadtime Manufacturing
-
Leadtime Cumulative
-
Leadtime Per Unit
-
Issue Type Code
-
To enter engineering information
On Item Master Information
-
Access Manufacturing Values Entry.
-
On Manufacturing Values Entry, complete the following fields:
-
Drawing Size
-
Last Revision No
-
Drawing Number
-
3.8 Entering Item Grade and Potency Information
After you enter item master information or item branch/plant information, you specify whether grade or potency applies to an item. Grades enable you to classify items (for example, grade A eggs and grade B eggs). Potency allows you to specify the active ingredient in a product (for example, the percentage of alcohol in liquor).
When you activate grade or potency control for an item, you can enter a standard grade or potency for the item and a range of acceptable values. If you receive or issue items that are not within the range, the system provides a warning message. You cannot perform sales on items that are not within the range.
Item grade and potency are applicable only to items that are produced in lots. You cannot use both grade control and potency control for the same item.
|
See Also:
|
To enter item grade and potency information
On Item Master Information
-
Access Manufacturing Values Entry.
-
On Manufacturing Values Entry, complete the following fields:
-
Grade/Potency Pricing
-
Potency Control
-
Standard Potency
-
From Potency
-
Thru Potency
-
Grade Control
-
Standard Grade
-
From Grade
-
Thru Grade
-
| Field | Explanation |
|---|---|
| Grade/Potency Pricing | A code that indicates whether you price the item by grade or potency range. You must control the item by grade to price it by grade, just as you must control the item by potency to price it by potency. Valid values are:
Blank – No potency or grade pricing 1 – Potency pricing 2 – Grade pricing |
| Potency Control | A code that indicates whether you control the item by potency. |
| Standard Potency | The percentage of active ingredients normally found in an item. |
| From Potency | A number that indicates the minimum potency, or percentage of active ingredients, acceptable for an item.
The system displays a warning message if you try to purchase or issue items that do not meet the minimum acceptable potency. The system does not allow you to sell items that do not meet the minimum acceptable potency. |
| Thru Potency | A number that indicates the maximum potency, or percentage of active ingredients, that is acceptable for an item.
The system displays a warning message if you try to purchase or issue items that have a potency that exceeds the maximum potency acceptable. The system does not allow you to sell items that have a potency that exceeds the maximum potency acceptable. |
| Grade Control | A code that indicates whether you control the item by grade. |
| Standard Grade | A code (table 40/LG) that represents the normal grade for an item. |
| From Grade | A code (system 40, type LG) that indicates the minimum grade that is acceptable for an item.
The system displays a warning message if you try to purchase or issue items with grades that do not meet the minimum grade acceptable. The system does not allow you to sell items with grades that do not meet the minimum acceptable level. |
| Thru Grade | A code (system 40, type LG) that indicates the maximum grade that is acceptable for an item.
The system displays a warning message if you try to purchase or issue items with grades that exceed the maximum grade acceptable. The system does not allow you to sell items with grades that exceed the maximum grade acceptable. |
3.8.1 What You Should Know About
| Topic | Description |
|---|---|
| Lots | You can specify the grade or potency of all items in a specific lot on Lot Master Revisions. If you do not specify a grade or potency, the system uses the standard grade or potency from Item Master or Item Branch Information. |
| Grade and potency ranges for sales purposes | You can specify an acceptable grade or potency range for each of your customers using preference profiles.
For more information, see Setting Up Preference Types in the JD Edwards World Sales Order Management Guide |
|
See Also:
|