46 Enter Records of Employment
The Canadian government uses Records of Employment (ROEs) to calculate Employment Insurance (EI) benefits. You enter and issue ROEs for any employees whose employment status has changed and results in lower earnings. This can occur for a variety of reasons, such as:
-
Leave of absence
-
Strike
-
Termination
-
Work sharing
You can enter a single ROE when an employee submits a resignation or takes a leave of absence.
You might want to create multiple ROEs if there is a mass layoff or a strike.
You can change an ROE before you update the history and print an ROE. You might need to do this to correct employee information that you enter in error or that changes.
From either the Create Single or Create Multiple ROEs programs, you can access the Holiday Table program (P06915) to select holiday dates by choosing Holiday Table Revisions (F8).
When you issue a paper ROE, the system automatically assigns an ROE serial number based on the starting value you enter in the Process ROE's/Update History program (P070671).
When you create electronic ROEs, the system assigns a serial number of XMLS because the Canadian government assigns the serial numbers. You cannot extract the serial numbers the Canadian government assigns into the ROE Summary History file (F0717). You can manually enter these numbers when you receive them from the Canadian government. See Section 48.4, "Correcting a Serial Number for an ROE" for more information.
Validating Values in Fields and Insurable Earnings
The Canadian government requires that you validate the values in certain fields based on the values of other fields. For example, if you enter 2 (Paid because no longer working) in the Vacation Code field, you must leave the Start and Stop Date fields blank, enter a value in the Pay Amount field, and the program enters the amount in block 15C, Pay period 1.
Pay period 1 of block 15C must be greater than the total of all insurable earnings in block 17. This includes some vacation pay, all holiday pay, and some other monies.
The system validates the values in fields and inclusion of the payments in block 15C, Pay Period 1 by the values in the Special Handling Code field of the following UDCs:
-
77/OM - Other Monies
-
77/SP - Special Payments
-
77/VC - Vacation Codes
The values in Special Handling Code of the UDCs are as follows:
-
B - Must be blank
-
M - Mandatory
-
O - Optional
-
Y/N - Yes/No (whether to include in block 15C, pay period 1)
The position for each UDC is as follows:
-
Position 1 - Start Date
-
Position 2 - End Date
-
Position 3 - Amount
-
Position 4 - Include in block 15C, pay period 1
See Section 45.1, "Working with User Defined Codes (UDCs) for ROEs" for more information.
JD Edwards World recommends that you terminate the employee before entering an ROE. The system assigns the value in the Date Terminated field on the Employee Master to the Last Day for Which Paid field on the ROE.
This chapter contains these topics:
46.1 Entering a Single ROE
Depending on how you set the processing option, you use the Create Single ROE - Paper program (P070631) or the Create Single ROE - ROE Web program (P0717) to enter a single ROE when an employee:
-
Takes a leave of absence
-
Submits a resignation
-
Terminates for any reason
For statutory holidays, you can enter up to three for paper ROEs and up to 10 for an electronic ROE.
For special payments you can enter only one for paper ROEs and up to three for electronic ROEs.
You can access the Employment Insurance History Revisions program (P06176) to review EI history by choosing Employment Insurance History (F18).
Set the processing option for Paper or Web ROE for the Record Of Employment Entry program (J070631).
From Canadian Payroll Master (G77), choose Governmental Reports
From Governmental Reports (G7724), choose Record of Employment Menu
From Record of Employment Insurance (G77241), choose Create Single ROE Request
The following task uses the Create Single ROE - ROE Web program P0717 as an example because it requires more data than a paper ROE, however, it includes the steps for both paper and web.
-
On Create Single ROE Request, complete the Employee Number field.
-
Perform one of the following:
-
For a paper ROE, complete the Reason for Issuing ROE field.
-
For an electronic ROE, complete the Separation Code field.
The system supplies the following dates:
-
First Day Worked
-
Last Day Worked
-
Last Day For Which Paid
-
Final Pay Period Ending Date
Figure 46-1 Create Single ROE Request screen
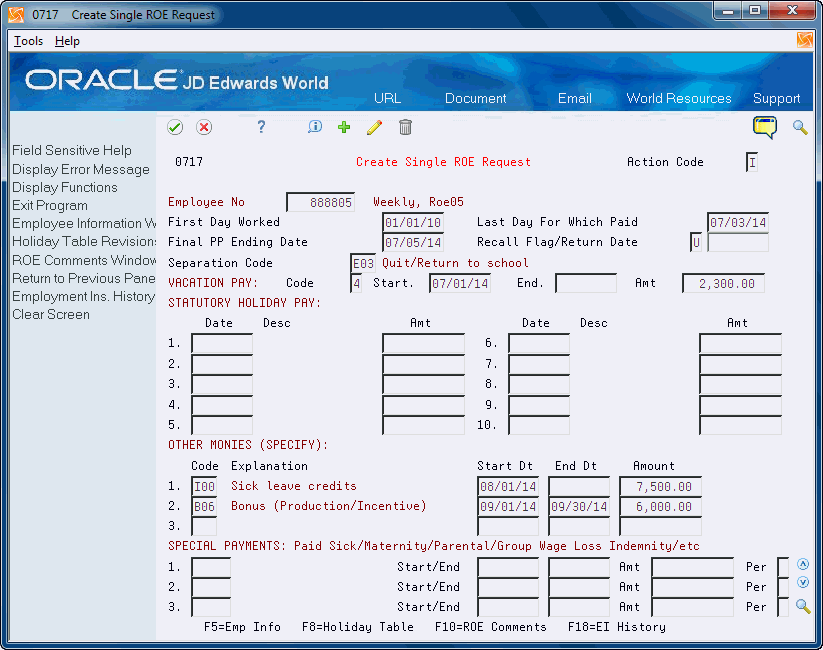
Description of "Figure 46-1 Create Single ROE Request screen"
The balance of the fields on the screen are optional. You use many to record pay items other than regular pay.
-
-
Perform one of the following:
-
For a paper ROE, complete the Expected Recall Date and Recall Flag fields.
-
For an electronic ROE, complete the Recall Flag and Return Date fields.
-
-
Perform one of the following to record vacation pay:
-
For a paper ROE:
-
Complete the Vacation Pay Amount field.
-
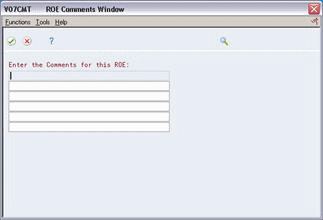
Choose ROE Comments Window (F10) and enter the vacation dates for Block 18 of the ROE.
-
-
For an electronic ROE, complete the following fields:
-
Vacation Code
-
Vacation Start
-
Vacation End
-
-
-
To record statutory holiday pay, complete the following fields:
-
Holiday Date
-
Amount
-
-
To record ”Other” types of money paid, perform one of the following:
-
For paper ROEs, complete the Explanation field.
-
For an electronic ROE, complete the following fields:
-
Other Monies Code
The system enters a value in the Other Monies Explanation field.
-
Other Monies Start Date
-
Other Monies End Date
-
-
-
Complete the Other Monies Amount field.
-
To record special payments, which include pay for sick, maternity or paternity leave, or for wage loss indemnity payments, complete the following fields:
-
Start Date
-
Amount
-
-
Perform one of the following:
-
For Paper ROEs, complete the Number of Weeks field.
-
For electronic ROEs, complete the following fields:
-
Payment Type
-
End Date
-
Payment Period
-
-
-
To attach comments to an ROE, choose the ROE Comments function (F10).
-
On ROE Comments Window, enter any comments and choose the Update the ROE Comments file and Exit.
-
Click Add.
| Field | Explanation |
|---|---|
| First Day Worked | The actual day the employee started to work.
If you do not know the actual first day worked and the employee has worked for you more than two years, enter the date exactly two years before the interruption of earnings. If the employee has worked for you on several occasions, the date to be entered is the start of the most recent period in which the worker returned to work (since you last issued an ROE to this person). Form-specific information If you leave this field blank, the system enters a value of one day after the pay period end date on the last ROE that you issue or the start date from the employee master, whichever date is greater. |
| Last Day For Which Paid/Last Day Worked | The actual last date for which the employee was paid.
If employee has reached 65 and continues to work enter the date of the last day worked in the month in which the 65th birthday occurred. Form-specific information If you leave this field blank, the system enters the value from the Date Terminated field on the Employee Master. |
| Final Pay Period Ending Date | The date that corresponds to the end of a processing period (pay period, month, quarter or year).
Form-specific information This date usually corresponds to the pay period ending date of the last record in the Employment Insurance History table (F06176). |
| Separation Code/Reason for Issuing ROE | The separation code that identifies the reason for issuing the ROE.
If you use one of the following separation codes, you must choose the ROE Comments function and attach comments: K00 – Other K15 - Canadian Forces - Queen's Regulations/Orders Form-specific information Enter a value for UDC 77/SC. |
| Recall Flag | ROE recall flag.
Y - Yes, employee is expected to be recalled. N - No, employee is not expected to be recalled. U - It is unknown whether employee will be recalled. |
| Return Date/Expected Recall Date | The date on which the employee will be recalled for employment, if known. |
| Vacation Pay Code | A code that identifies how vacation pay was paid to the employee because of the separation and whether or not you need to report it in Block 17A on the ROE.
Form-specific information Enter a value for UDC 77/VC. When you enter Vacation Pay Code 2 – Paid because no longer working, ensure you include the vacation pay amount in block 15C pay period 1 on the paper ROE. When you enter Vacation Pay Code 4 - Anniversary (paid on a specific date each year), include the amount in the pay period in which the date falls or, if the date is after the last day for which paid, include the amount in block 15C pay period 1 on the paper ROE. |
| Vacation Pay Start Date | The start date for any vacation pay the employer has paid or will pay to the employee for a specific period of leave after the date entered in Block 11 on the ROE, when the employee plans to take vacation leave during the interruption of earnings and the employer granted the leave.
-OR- The specific date for any vacation pay that is paid as a result of an anniversary date. |
| Vacation Pay End Date | The end date for any vacation pay the employer has paid or will pay to the employee for a specific period of leave after the date entered in Block 11 on the ROE, when the employee plans to take vacation leave during the interruption of earnings and the employer granted the leave. |
| Vacation Pay Amount | The amount of vacation pay that has been paid or is owed to the employee at the time of the interruption of earnings. The system automatically updates this amount, based on the Vacation Pay Table indicated in the processing options for ROE Workbench, Box 17/19. The Vacation Pay Table is established on Workers Compensation Insurance Basis Tables (P079071). |
| Holiday Date | Statutory holiday date on which pay is paid or payable after the later of 1) Last day worked or 2) the day EI/UI premiums are payable up to.
Form-specific information For paper ROEs you can enter up to three statutory holidays, for an electronic ROE, you can enter up to 10 statutory holidays. |
| Holiday Amount | Statutory Holiday pay that is paid after the Last Day for Which Paid. The system will automatically populate this amount if there is a value in the Amount column for the holiday code in the Holiday Table. Otherwise the user will need to enter this amount. |
| Other Monies Code | A code that identifies the type of other payment or benefit, other than vacation pay or statutory holiday pay, that the employer has paid or will pay to the employee because of the separation, whether or not the amount is considered as insurable earnings.
If utilizing ROE Web, a code must be entered from the values in UDC 77/OM. If printing paper ROE forms, a code is not required, but an explanation of the other pay is. Form-specific information If you complete this field when you enter an electronic ROE, the Start Date for:
|
| Other Monies Explanation | A short description of one of the following payments which are paid or payable in contemplation of, on, or after a separation from employment:
Form-specific information If you are submitting electronic ROEs via ROE Web, the system enters a value in this field based on the value that you enter in the Other Monies Code field. If you are printing paper ROE forms, you must enter one of the above descriptions in this field. |
| Other Monies Start Date | The start date for the first other monies code on the ROE. |
| Other Monies End Date | The end date for the first other monies code on the ROE. |
| Other Monies Amount | The amount of the payments that are owed to the employee following an interruption of earnings. |
| Special Payments Type | A code to identify the type of special payment being made.
Form-specific information Enter a value from UDC 77/SP. |
| Special Payments Start Date | The date payments start for any insurable sick leave, maternity leave, parental leave, compassionate care leave, parents of critically ill children leave or group wage-loss insurance payments from the employer, or if the employee is receiving any group wage-loss indemnity plan payments from a third party. |
| Special Payments End Date | The date payments end for any insurable sick leave, maternity leave, parental leave, compassionate care leave, parents of critically ill children leave or group wage-loss insurance payments from the employer, or if the employee is receiving any group wage-loss indemnity plan payments from a third party. |
| Special Payments Amount | The payment amount for any insurable sick leave, maternity leave, parental leave, compassionate care leave, parents of critically ill children leave or group wage-loss insurance payments from the employer, or if the employee is receiving any group wage-loss indemnity plan payments from a third party. |
| Special Payments Period | A code to indicate the period of time covered by the special payment amount
D = Per Day W = Week |
| Special Payments For Days/Weeks | The number of weeks or days for which the employee will receive paid sick, maternity, or parental leave, or group wage loss indemnity payments.
Form-specific information This field displays for only paper ROEs. |
46.2 Entering Multiple ROEs
When you need to process many ROEs at one time, it is more convenient to use Create Multiple ROE Request (P070620) to create multiple ROEs. You might need to do this if you have a mass layoff or at the end of a seasonal employment period.
-
To limit the employees or select specific groups of employees, set the processing options or the data selection values for the DREAM Writer version that runs for P070620.
-
Set the processing option for Paper or Web ROE for the Create Multiple ROE Requests program (J070620).
From Canadian Payroll Master (G77), choose Governmental Reports
From Governmental Reports (G7724), choose Record of Employment Menu
From Record of Employment Insurance (G77241), choose Create Multiple ROE Requests
To enter multiple records of employment
If you set the processing option for paper ROEs, the Create Multiple ROEs - Paper program (P070620P) displays. For electronic ROEs, the Create Multiple ROEs - ROE Web program (P0717M) displays. The following task uses the Web ROEs entry program P0717M.
-
On Create Multiple ROE Requests, enter a version in the Version of Create Multiple ROEs field or choose Field Sensitive Help to locate a version.
Figure 46-3 Create Multiple ROE Requests screen
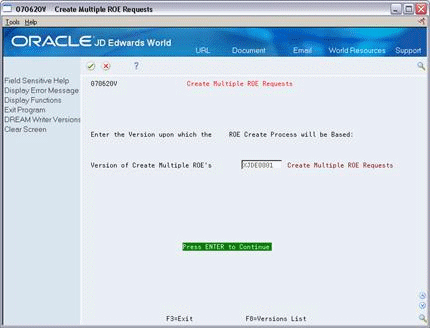
Description of "Figure 46-3 Create Multiple ROE Requests screen"
-
On Create Multiple ROE Requests, click Enter twice.
-
On the second Create Multiple ROE Requests, complete the steps for entering a single ROE and click Enter twice.
Figure 46-4 Create Multiple ROE Requests screen
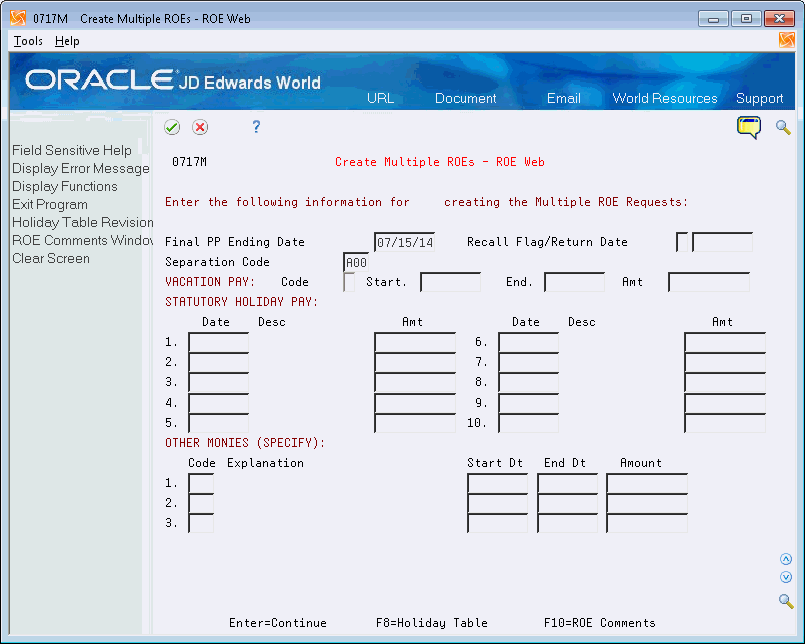
Description of "Figure 46-4 Create Multiple ROE Requests screen"
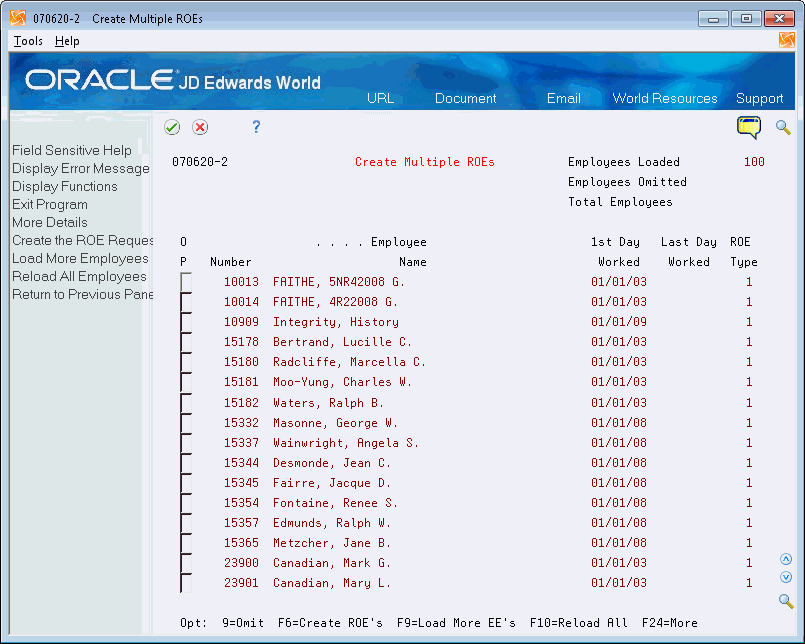
The system lists all employees that meet your selection criteria.
Figure 46-5 Create Multiple ROE Requests screen
Description of "Figure 46-5 Create Multiple ROE Requests screen"
-
Review the third Create Multiple ROE Requests screen.
-
Choose the Omit option for each employee that you do not want issue an ROE.
-
Choose the Create ROEs function (F6).
-
Verify your creation request.
46.2.1 What You Should Know About
46.3 Changing Employee Information on an ROE
From Canadian Payroll Master (G77), choose Governmental Reports
From Governmental Reports (G7724), choose Record of Employment Menu
From Record of Employment Insurance (G77241), choose Create Single ROE Request
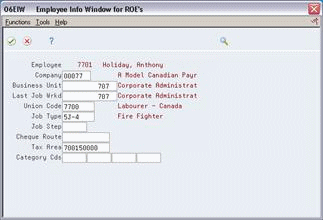
You can change some employee information on an ROE. This is particularly useful if the employee has worked for more than one company or in more than one job type during the year, but the ROE must reflect only one of the employee's positions. These changes do not update the Employee Master table (F060116) and the system stores them in the ROE Summary History table (F0717).
To change employee information on an ROE
-
On Create Single ROE Requests, choose the Employee Information function (F5).
Figure 46-6 Employee Information Window for ROEs
Description of "Figure 46-6 Employee Information Window for ROEs"
-
On Employee Information Window for ROE's, complete any of the following fields:
-
Company
-
Business Unit
-
Last Job Worked
-
Union Code
-
Job Type
-
Job Step
-
Cheque Route
-
Tax Area
-
Category Codes
-
-
Choose the Update ROE file (F0717) with EE Info function.
