41 Define the Print Subsystem
This chapter contains the topic:
Section 41.1, "Defining the Print Subsystem."
41.1 Defining the Print Subsystem
From Sales Order Management (G42), enter 27
From Sales Order Advanced & Technical Operations (G4231), choose Define Subsystem
You define the print subsystem to print delivery documents that are produced during load confirmation and do not require print control. That is, you cannot use the print subsystem to print prenumbered forms. If you do not set up a print subsystem, the system's load confirm processing will be slowed down because it must print the documents interactively.
To define a print subsystem, you must define the data queue name and the production library.
-
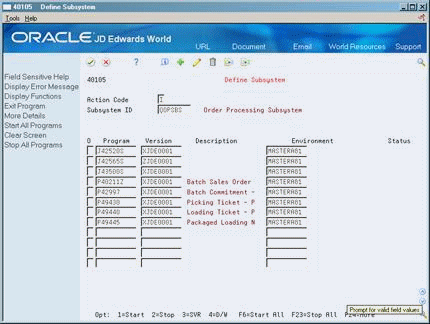
Complete the following required fields:
-
Subsystem ID
-
Program
-
Version
-
Environment
-
-
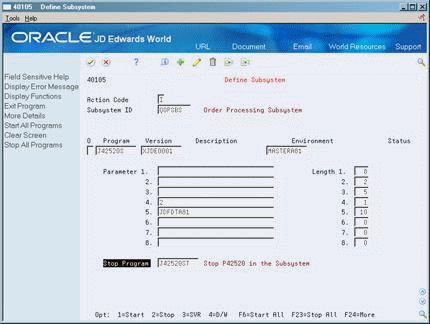
Access the detail area (F4).
Figure 41-2 Define Subsystem screen (Detail area)

Description of "Figure 41-2 Define Subsystem screen (Detail area)"
-
Complete the following required fields:
-
Parameter
-
Length
-
Stop Program
-
| Field | Explanation |
|---|---|
| Subsystem ID | A user defined code (system 40/type SB) that identifies an existing subsystem. If you have set up the processing options to do so, the system automatically fills in this field.
Form-specific information Normally, you use the name of the subsystem that JD Edwards World has predefined for the print or gantry subsystems. It is best to change the values associated with this subsystem to tailor it for your environment, rather than create a new one. For Print Subsystem: The identifier supplied by the Define Print Subsystem program (QOPSBSxx). If you chose to have more than one active set of open order tables (F4x01/F4x11/F4x19), you need to have one Print Subsystem per set of active files. The program automatically increments the subsystem ID so that the second one carries an identifier of QOPSBS01, the third is identified as QOPSBS02, and so forth. For Gantry Subsystem: The identifier for the gantry subsystem is GNTSBS. |
| Object | The name of a program you want to define within the subsystem.
Form-specific information For Print Subsystem: A code identifying the print control program. For Gantry Subsystem: A code identifying the gantry download control program. |
| Version | Identifies a group of items that the system can process together, such as reports, business units, or subledgers.
Form-specific information The DREAM Writer version of the print control or gantry program identified in the program field. |
| Environment | The name associated with a specific list of libraries. The J98INITA initial program uses these library list names to control environments that a user can sign on to. These configurations of library lists are maintained in the Library List Master table (F0094). |
| Parameter 1 | A generalized 10 character parameter value passed to a called program.
Form-specific information For Gantry Subsystem: You must enter the name of the library where the Download Data Queue (DTAQGD) exists. For example, *LIBL. |
| Length 1 | The length of the parameter which the called program is expecting.
Form-specific information For Gantry Subsystem: You must enter a value of 10. |
| Member ID | A program that the system uses to stop a print control or gantry program when you use option 2 (stop) on this form or you use the Stop Subsystem menu selection.
Form-specific information For Gantry Subsystem: The default name of this program is J49571ST. |
41.1.1 Example: Creating a Print Subsystem for Document Print Control
This example shows you how to create a print subsystem entry for document print control. Accessing the Define Subsystem form through the navigation provided at the beginning of this chapter ensures that the system populates the Subsystem ID field with the value QOPSBS (JD Edwards World standard subsystem name).
On Define Subsystem
-
Use the Change action.
-
Enter the number of the Document Print Control program (P49550) in the first blank Program field.
-
Enter the program version (ZJDE0004 or equivalent) in the Version field associated with the Program field you completed in the previous step.
This identifies the version of the program you want to run on the subsystem.
-
Enter the name of your standard production data environment in the Environment field.
-
To save your entry and clear the form, press Enter.
41.1.2 Example: Setting Parameters for Document Print Control
This example shows you how to set document print control parameters for a previously created print subsystem, Accessing the Define Subsystem form through the navigation provided at the beginning of this chapter ensures that the system populates the Subsystem ID field with the value QOPSBS (JD Edwards World standard subsystem name).
On Define Subsystem
-
Use the Change action.
-
Access the detail area.
-
Scroll through the selection until you locate the program and version you defined in the previous example.
-
Enter 2 in the first Parameter field.
-
Enter 1 in the Length field associated with the Parameter field above.
-
Enter the name of the library where your data queue exists in the second Parameter field.
-
Enter 10 in the Length field associated with the Parameter field above.
-
Enter the name of the data queue in the third Parameter field.
JD Edwards World recommends that you use the name CDTAQDD for the data queue name. If you define a name other than DTAQDD, it must agree with the data queue name defined in the processing option of the Documentation Selection program (P49545).
-
Enter 63 in the Length field associated with the Parameter field above.
This sizes the file so it can receive data (with the length of 63) from the data queue.
-
Enter J49550ST in the Stop Program field.
This instructs the system to stop the print subsystem function when processing is complete.
-
To save your entry and clear the form, press Enter.
-
Close the detail area.
