17 Working with Software License Manager
This chapter contains these topics:
The Software License Manager (SLM) provides a way to manage the license agreements based on the number of users rather than the size of your machine's central processing unit. It enables you to make decisions about adjusting your license agreement based on your company's growth and changing software usage.
17.1 About SLM
JD Edwards World issues licenses for machines that run JD Edwards World software. If you choose to pay license fees based on the number of concurrent users, the license agreement indicates the number of users who can access the software at any particular time on that machine. SLM records the number of users at any particular time.
Specifically, the SLM does the following:
-
Tracks the number of users who concurrently access JD Edwards World software on one machine over a period of time, which helps you determine your licensing needs.
-
Keeps a log of the number of concurrent users who access JD Edwards World software for each day in a given month. You can print a report of this information.
You do not need to activate the SLM in order to run JD Edwards World World software. You do not need software protection codes and the SLM does not function in an enforcement mode. Audit mode is available for recording usage activity to aid licensing requirements.
17.2 Monitoring the Licensed Users
When the SLM runs in audit mode, it monitors the number of concurrent users. JD Edwards World licenses the software for an individual machine. The SLM includes in the total count all users who access various environments on that machine regardless of the environment they use. The SLM counts users who access JD Edwards World software on multiple machines, but only on the machine on which they are running. SLM identifies and tracks concurrent users by profile name, device (location), and job.
The SLM counts users as follows:
-
Counts a user who accesses a JD Edwards World program through a menu selection, fast path, or hidden selection
-
Counts a user until the user signs off of JD Edwards World software or enters hidden selection 30 to return to the Library List Selection screen
-
Counts a user once if the user signs on multiple times on a single device
-
Counts a user twice if a user is signed on to two devices
-
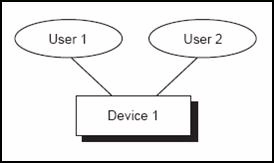
Counts two users who are signed on to the same device as two users
For Multi-session terminals, counts a user once if the user is signed on to each device at the same time.
|
Note: Multi- session terminal devices are either dual or quad session. The multi-session terminals types that the SLM supports are: 3153, 3197, 3476, 3477, 3486, 3487, 3488, 3489, 5291, and 8292. For PCs, the manner the SLM counts users is dependent on the configuration you use. System Network Architecture (SNA) with Advanced Peer to Peer Connection (APPC) devices counts users similar to the method that the SLM counts dumb terminal workstations. Additionally, the SLM identifies PCs on Transmission Control Protocol/Internet Protocol (TCP/IP) configurations by the virtual device and IP address, providing more accurate license counts. Note that as of IBM release V5R1, Client Access supports only TCP/IP configurations. |
The SLM counts group jobs as one user, and it counts a user who starts alternate sessions as one user. It only counts a user who is signed on to JD Edwards World software and who is executing a menu selection that runs a JD Edwards World program.
|
Note: The SLM does not count users who access an environment where SLM is not installed or not active (running a model-based SPC). |
17.2.1 Examples
The examples below assume dumb terminal workstation devices, or PCs that you configure under SNA support. Client Access Express dropped support for SDLC configurations and run native TCP/IP. PCs configured with TCP/IP are tracked by the IP address.
A user signs on to the same device twice with the same signon, and SLM counts one user.
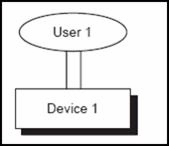
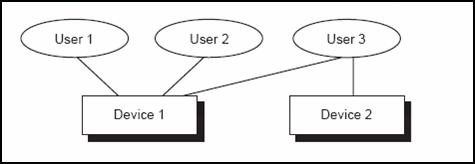
The same user signs on to another device, and SLM counts the user twice. The user signs on to the second device again, and SLM continues to count the user twice.
Two users sign on to the same device with different signons, and the SLM counts two separate users.
A third user signs on to a second device and the SLM counts three users.
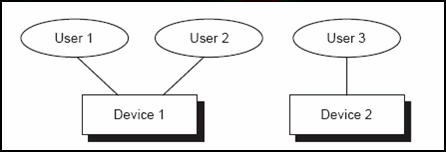
The third user signs on to the first device also and the SLM counts four users.
17.3 Implementing SLM
This section contains the following:
-
Setting up SLM to run in audit mode
-
Initializing or reinitializing SLM
-
Setting up SLM to automatically reinitialize
-
Setting up job control authority
|
Caution: If a prior release of JD Edwards World software, for example A7.3, resides on your system and SLM is in use with licensed users, do not set up SLM to run in audit mode. If you do so, you will be unable to execute menu options in the prior release. |
17.3.1 Setting up the SLM to Run in Audit Mode
In order to run the SLM in audit mode you must set up your system values.
From Master Directory (G), choose Hidden Selection 27
From Advanced & Technical Operations (G9), choose Security & System Admin
From Security and System Administration (G94), choose System Administration
From Security Administration (G944), choose JDE System Values
You must be signed on to the production environment of your system.
To set up SLM to run in audit mode
-
Press F6 to bypass the menu message.
-
On the JD Edwards World System Values, verify that your object library is in the following field and press Enter:
-
QJDF Library Name
If your object library is not in this field, enter the object library name in the field and press Enter.
-
-
On the JD Edwards World System Values, enter 1 in the following field:
-
UBP Audit Flag
-
17.3.2 Initializing or Reinitializing SLM
You must initialize the SLM in order for the software to monitor your license usage count.
You can initialize or reinitialize SLM while batch jobs are running, but not while users are active on the system.
-
Ensure that all users are signed off of the JD Edwards World software.
-
Ensure the QSECOFR user profile does not access JD Edwards World software directly.
-
Sign on as QSECOFR.
-
Ensure that QTEMP, your JD Edwards World, and QGPL libraries are in your library list. Additionally, ensure that QTEMP is at the beginning of the library list, followed by your JD Edwards World object, common, production, and security libraries (in any order), and then the QGPL library. See Section 18.1, "Creating Libraries" for more information about adding libraries.
-
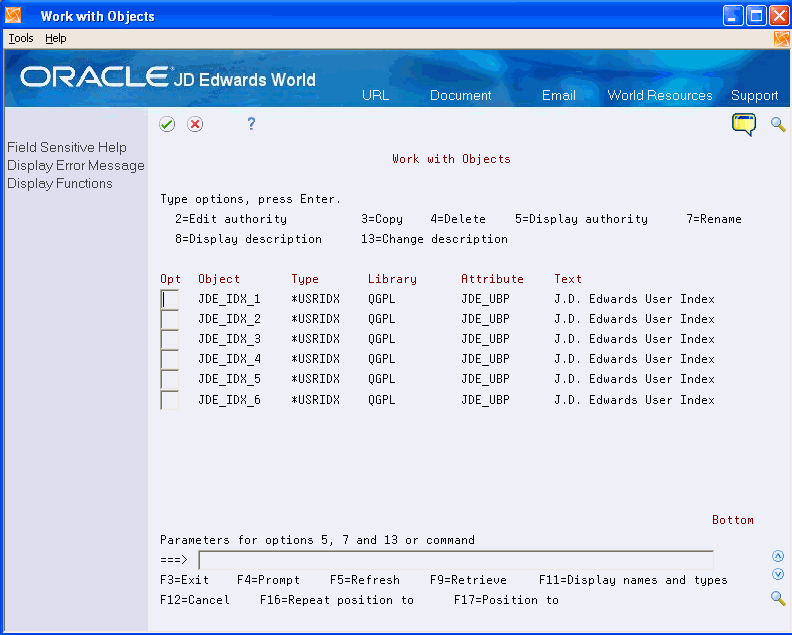
On the Command Line, enter WRKOBJLCK OBJ(QGPL/JD Edwards World_IDX_1) OBJTYPE(*USRIDX).
If locks exist, instruct users locking the indexes to sign off. Alternatively, you may terminate their jobs.
-
On the Command Line, enter WRKOBJ QGPL/JDE_IDX_*
-
On Work with Objects, enter 4 in the following field to delete indexes JD Edwards World_IDX_1 through JD Edwards World_IDX_4:
-
Option
Do not delete indexes 5 and 6 as they contain history information.
-
-
On the Command Line, enter WRKOBJ QGPL/JDEDT*.
Figure 17-8 Work with Objects (Delete Indexes) screen
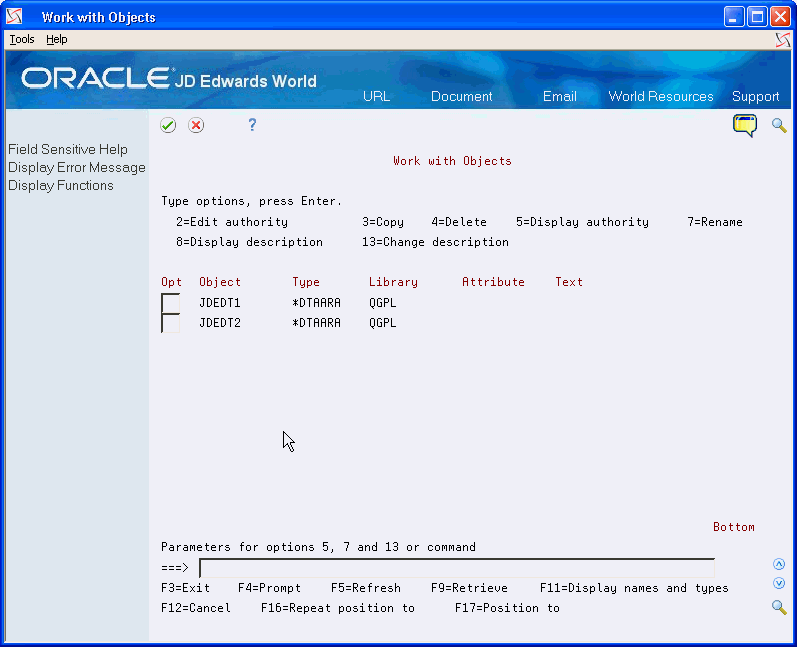
Description of "Figure 17-8 Work with Objects (Delete Indexes) screen"
-
On Work with Objects, enter 4 in the following field to delete the data areas JDEDT1 and JDEDT2:
-
Option
-
Continue to reinitialize SLM by completing the steps to initialize the SLM.
-
On the Command Line, enter SBMJOB CMD(CALL J98802JQ).
The User Based Pricing program (J98802JQ) creates and initializes the SLM objects.
-
On the Command Line, enter WRKSBMJOB *JOB
The User Based Pricing program (J98802JQ) should run without critical errors, and you should not receive a joblog. If an issue arises, refer to the joblog to troubleshoot the issue.
-
Sign off the system.
-
Sign on to the production environment in the system.
-
Access several different programs on different menus.
The ability to access different programs signifies that the SLM initialization was successful. The SLM runs in audit mode.
17.3.3 Set Up SLM to Automatically Reinitialize
To ensure continual, accurate counting of users who access JD Edwards World software, you must set up the User Based Pricing program (J98802JQ) to run as an autostart job during an Initial Program Load (IPL). This ensures that the SLM will reinitialize properly. After completing this task, JD Edwards World recommends that you also run this program as a batch job at night or when users are not signed on to JD Edwards World software.
You can either set up the program to run as a sleeper job or in the IBM job scheduler. See Chapter 59, "Set Up Sleeper" to set up the job as a sleeper.
-
Ensure the QSECOFR user profile does not access JD Edwards World software directly.
-
Select a subsystem that automatically starts during an IPL, such as QBATCH. You do not need to end this subsystem to make the following changes.
To set up SLM to automatically reinitialize
-
Sign on as QSECOFR.
-
On the Command Line, enter CRTJOBD JOBD(QGPL/JD Edwards World_SLM) JOBQ(subsystem) OUTQ(outq) USER(jdeuser) RQSDTA('CALL objlib/J98802JQ') INLLIBL(QTEMP seclib comlib prodlib objlib QGPL)
Change the command as follows:
-
Subsystem is the name of the subsystem that automatically starts during an IPL
-
Outq is the name of your output queue
-
Jdeuser is the name of your user profile with security officer authority
-
Seclib is the name of your security library, if you have one
-
Comlib is the name of your common library
-
Prodlib is the name of your production data library
-
Objlib is the name of your JD Edwards World object library
This creates a job description for J98802JQ.
-
-
On the Command Line, enter ADDAJE SBSD(subsystem) JOB(JD Edwards World_SLM) JOBD(JD Edwards World_SLM)
Change the subsystem in the command to the name of the subsystem that automatically starts during an IPL.
17.4 Set Up Job Control Authority
The SLM contains a server program, User Based Pricing (X98UBP), which verifies jobs and adjusts user counts automatically. This program requires job control authority.
|
Note: SLM verifies all active jobs, re-adjusts license counts in intervals of no less than five minutes, and this also occurs when a user requests a license. Job control authority verifies other user's jobs. If users, or the User Based Pricing program, do not have job control authority, then the SLM does not verify active jobs and does not release licenses of abnormally terminated jobs. This adversely affects the accuracy of the SLM license count, thus making SLM re-initialization an important, necessary, and more frequent task. |
To set up job control authority, you can either set up users with job control authority or change the ownership of X98UBP and use adopted authority. This enables the server program to verify jobs and release or activate user licenses.
17.4.1 Set Up Users with Job Control Authority
To set up each user with job control authority, you must set the special authority parameter in their IBM user profile to *JOBCTL.
17.4.2 Change Ownership of X98UBP
If your security implementation requires that individual users cannot have job control authority, you can change the ownership of the server program to an IBM profile that has job control authority. The user profile for the server program (X98UBP) is set to *OWNER, which allows you to assign an owner which has job control authority.
-
On the Command Line, enter CHGOBJOWN jdfobj/X98UBP *PGM owner
Change jdfobj to the name of your JD Edwards World object library, and owner to the name of an IBM profile that has job control authority (*JOBCTL).
-
On the Command Line, enter CHGPGM jdfobj/X98UBP USEADPAUT(*YES)
This command ensures that X98UBP is set to use adopted authority. JD Edwards World programs are normally compiled to use the adopted authority of the owner.
Note:
You must change all X98UBP programs in all your environments.
17.4.3 Mirroring From One System i Machine to Another
When mirroring from one System i to another, you must exclude the following JD Edwards World objects from the mirroring process:
-
Data Areas:
-
JDEDT1
-
JDEDT2
-
QJDF
-
-
User Indexes:
-
JD Edwards World_IDX_1
-
JD Edwards World_IDX_2
-
JD Edwards World_IDX_3
-
JD Edwards World_IDX_4
-
JD Edwards World_IDX_5
-
JD Edwards World_IDX_6
-
-
Programs:
-
X98UBP
-
X0001M
-
If you mirror from one System i to another and are unable to sign on to the JD Edwards World software environment on the second System i, it might be due to a Software Protection Environment error. The indexes and data areas from the first machine might be locked by the mirroring program and the system cannot reinitialize the J98802JQ in an autostart job after the machine performs an IPL. This usually occurs after in IPL, or similar event, of the second machine.
To resolve the Software Protection Environment error
-
Turn off mirroring.
-
On the Command Line, enter WRKOBJ QGPL/JD Edwards World_IDX_*
-
On Work with Objects, enter 4 in the following field to delete JD Edwards World_IDX_1 through JD Edwards World_IDX_6:
-
Option
These indexes reside in the QGPL library.
-
-
On the Command Line, enter WRKOBJ QGPL/JDEDT*.
-
On Work with Objects, enter 4 in the following field to delete the data areas JDEDT1 and JDEDT2:
-
Option
These data areas reside in the QGPL library.
Note:
The indexes and data areas should not exist in any library other than QGPL. -
-
Reinitialize SLM. See "To reinitialize SLM" for more information.
17.5 Inquiries and Reports
You can locate information and produce reports from the SLM.
This section contains the following:
-
Verifying usage
-
Locating audit and error messages
17.5.1 Verifying Usage
The SLM automatically monitors the use of JD Edwards World software and checks for compliance with your license agreement when the UBP Audit Flag field is set to 1 on the JD Edwards World System Values screen and you initialize SLM.
You also can verify this information by:
-
Locating interactive usage
-
Creating the License Usage Report
You can display a list of users that the SLM counts when it checks for compliance. You also can refresh this information.
From Master Directory (G), choose Hidden Selection 27
From Advanced & Technical Operations (G9), choose Security and System Admin
From Security and System Administration (G94), choose Software License Manager
From Software License Manager (G943), choose Job Information
-
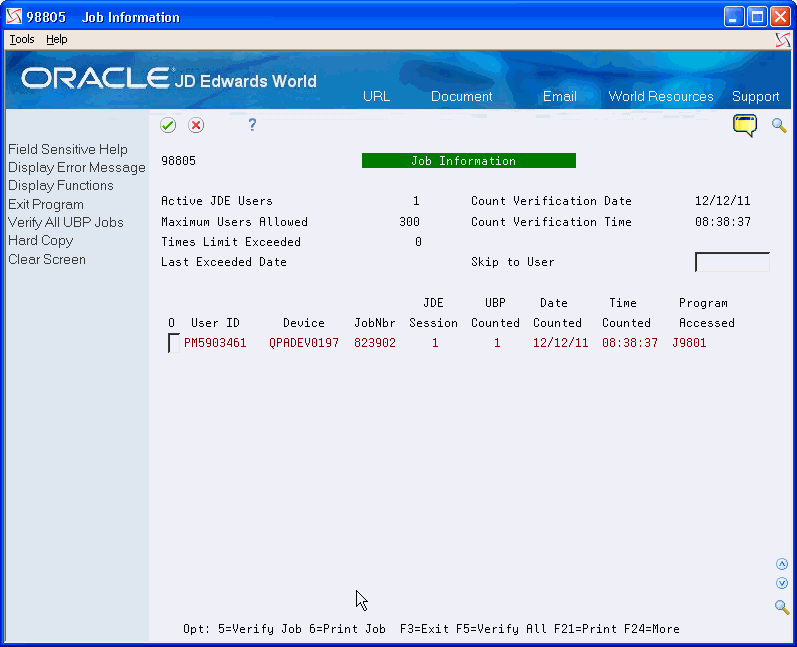
On Job Information, choose Verify All UPB Jobs (F5) to refresh all the information on this screen.
-
Enter 5 (Verify Job) in the O (Option field) next to the User ID to refresh the information for a specific user.
To create the license usage report
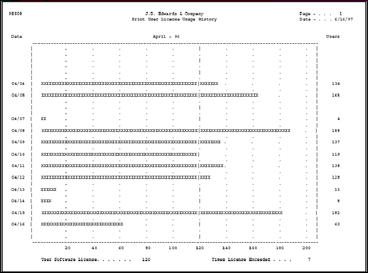
The License Usage Report (R98808) provides usage information for the time period you specify in the processing options with the DREAM Writer version. You also can set up your own versions. For example, set up versions for separate months.
From Master Directory (G), choose Hidden Selection 27
From Advanced & Technical Operations (G9), choose Security and System Admin
From Security and System Administration (G94), choose Software License Manager
From Software License Manager (G943), choose License Usage Report
-
On License Usage Report, a DREAM Writer versions list displays.
-
Enter 1 in the Option field next to version ZJDE0001.
-
On Processing Options Revisions, enter the starting and ending dates (MM/DD/YY format) for which you want to run the report.
Figure 17-10 Processing Options Revisions screen
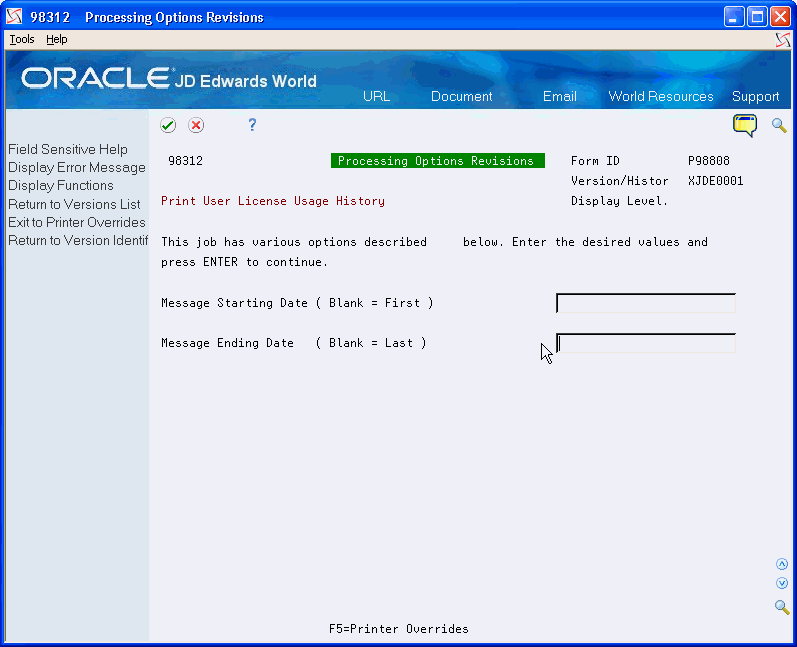
Description of "Figure 17-10 Processing Options Revisions screen"
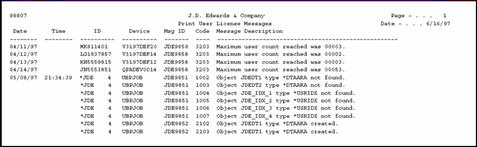
An example of the report follows:
17.5.2 Locating Audit and Error Messages
The SLM enables you to locate information about license non-compliances (number of users who exceed the license agreement) and error messages you receive from the SLM.
You can retrieve this information by:
-
Locating job information interactively
-
Locating audit error messages interactively
-
Creating the Audit/Error Message Report
To locate job information interactively
You use the Job Information program (P98805), to display detailed job information for a specific user.
From Master Directory (G), choose Hidden Selection 27
From Advanced & Technical Operations (G9), choose Security and System Admin
From Security and System Administration (G94), choose Software License Manager
From Software License Manager (G943), choose Job Information
On Job Information, complete the following field:
-
Skip to User
Figure 17-12 Job Information (Skip to User) screen
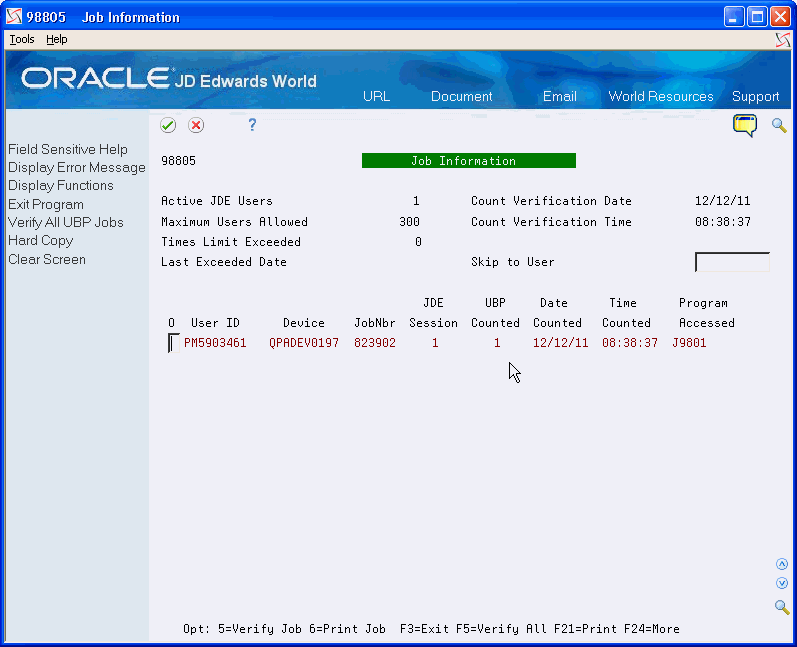
Description of "Figure 17-12 Job Information (Skip to User) screen"
To locate audit error messages interactively
You use the Audit/Error Message Inquiry program (P98806), to display the following information:
-
Maximum number of users for which you have a license.
-
Number of times users exceed the license count.
-
Last date users exceeded the license count.
-
Dates and times of error messages.
-
Error message IDs and descriptions.
In this program, you can also reduce the range of information the system displays. Additionally, you can print the information (F21) on the screen.
From Master Directory (G), choose Hidden Selection 27
From Advanced & Technical Operations (G9), choose Security and System Admin
From Security and System Administration (G94), choose Software License Manager
From Software License Manager (G943), choose Audit/Error Message Inquiry
On Audit/Error Message Inquiry, complete any of the fields.
Figure 17-13 Audit/Error Message Inquiry screen
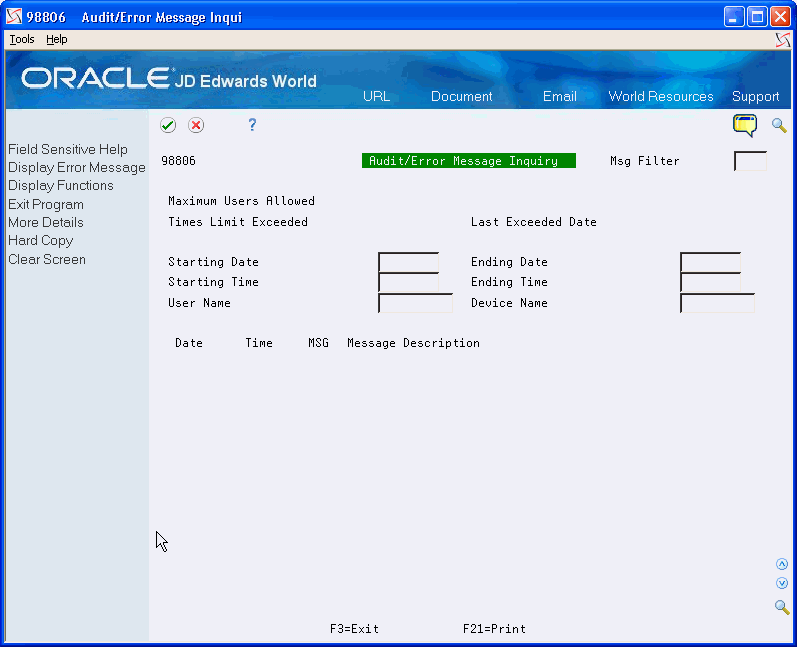
Description of "Figure 17-13 Audit/Error Message Inquiry screen"
To create the audit/error message report
The Audit/Error Message Report (R98807) provides you with audit and error message information that the license management server gathers. It provides slightly more detail than the Audit/Error Message Inquiry program (P98806).
You also can set up your own versions. For example, set up versions for separate months.
From Master Directory (G), choose Hidden Selection 27
From Advanced & Technical Operations (G9), choose Security and System Admin
From Security and System Administration (G94), choose Software License Manager
From Software License Manager (G943), choose Audit/Error Message Report
-
On Audit/Error Message Report, a DREAM Writer versions list displays.
-
Enter 1 in the Option field next to version XJDE0001.
-
On Processing Options Revisions, enter the starting and ending dates (MM/DD/YY format) for which you want to run the report.
If you leave the processing options blank, the report prints all records.
An example of the report follows: