3 Installing JD Edwards EnterpriseOne
Install Oracle's JD Edwards EnterpriseOne 9.2 with all the path codes and environments you require. The Pristine pathcode and data must be installed for the migration process.
Caution:
The process assumes that the target data source only has production data in it. The Platform Pack install for Pristine and Development environments loads demo data into the target data sources. Therefore, this process must be run against Production or Prototype environments.This means that JD Edwards EnterpriseOne 9.2 standard data is in control tables but other transaction data comes from the application and technical conversion programs you run in conjunction with the JD Edwards World Software Update.
EnterpriseOne Application Release 9.2 Installation Guide (for the platform and database you will be using for the EnterpriseOne installation)
EnterpriseOne Application Release 9.2 Upgrade Guide (for the platform and database you will be using for the EnterpriseOne installation)
Note:
-
From the JD Edwards Update Center, you must download and then apply the most current Planner Update for JD Edwards EnterpriseOne 9.2.
-
You need to download and apply the current Migration TC ESU from the JD Edwards Update Center located on My Oracle Support.
In the Update Center, your search for this ESU should include the following criteria.
Type = Electronic Software Updates
Release = 9.2
Description = *World Migration to E1*
Once you have completed the search, download the ESU from the Search which has a full description of World Migration to E1 9.2 TC ESU.

3.1 Working with the JD Edwards World Test Environment
It is recommended that you set up an alternate (test) JD Edwards World environment to apply the JD Edwards World Software Update against. One method to accomplish this is to restore the production libraries from a full tape backup to a new set of libraries. You need to set up a signon to access this new set of libraries. Also, you need to change the QJDF data area in the new object library to point to the correct libraries.
3.2 Dropping SQL Packages
When migrating data with IBM i data sources, the SQL packages must be dropped before running the TC workbench. The IBM i caches the table layout in the SQL package and does not look at what the current table layout is. If the SQL packages are not dropped, errors might occur in tables with changed formats.
3.2.1 To drop SQL packages
-
Ensure that JD Edwards EnterpriseOne is shut down.
-
On the IBM i, enter this command:
-
WRKOBJ OBJ(*ALLUSR/*ALL) OBJTYPE (*SQLPKG)
-
Select the business data and control table libraries from the list.
-
Enter 4 next to each of the packages, and then click Enter.
Note:
SQL packages beginning with ”Q” are IBM packages. Do not delete.3.3 Modifying the Enterprise Server JDE.INI
Before running the Table Conversion Workbench, make sure this entry in the JDE.INI on the server is active.
3.3.1 To modify the Enterprise Server JDE.INI file
-
From a regular IBM i screen, signed on as JDE, enter WRKLNK and press Enter.
-
Drill down to the INI directory by using option 5 on each directory:
-
E920SYS\ini
-
Then select option 2 for JDE.INI.
-
Enter SQL Package Library and press F16.
-
If there is a semicolon in front of this line, remove it:
SQL Package Library=2
-
-
Save and close the JDE.INI file.
Note:
When the TC workbench is completed, enter a semicolon at the beginning of this JDE.INI line. This ”comments out” the setting in JDE.INI file:; SQL Package Library=2
3.4 Testing Long File Names on the IBM i
3.4.1 To test long file names
-
Log on to the IBM i as QSECOFR.
-
On the command line, enter STRSQL.
This command starts a SQL session on the IBM i.
-
Enter this SQL statement:
CREATE TABLE QGPL/ <LONGFILENAME> (FIELD CHAR (10))Where <LONGFILENAME> is the name of the file. The system is ready if the file is created in the QGPL library. You can ignore the journal setting.
-
Enter this SQL statement to remove the file that you just created in the QGPL library,
DROP TABLE QGPL/<LONGFILENAME>Note:
The remaining steps in this procedure, Steps 5 through 8 below, are only required if Step 3 above fails. -
Stop all subsystem jobs from console, (ensure no users are on the system when stopping subsystem jobs).
-
After the jobs have successfully stopped, run this command:
RCLSTG SELECT(*DBXREF)Note that this command might run for several hours.
-
Restart all subsystem jobs by IPL or by starting each subsystem.
-
Verify that the cross-reference tables are built by entering these SQL commands:
SELECT * FROM SYSTABLESSELECT * FROM SYSCOLUMNS
3.5 Creating a Job Queue in JD Edwards EnterpriseOne
Installer or system administrator
Sign onto JDEPLAN
None
None
3.5.1 To create the job queue
Note:
The Job Queue name must match an existing IBM i JOBQ.-
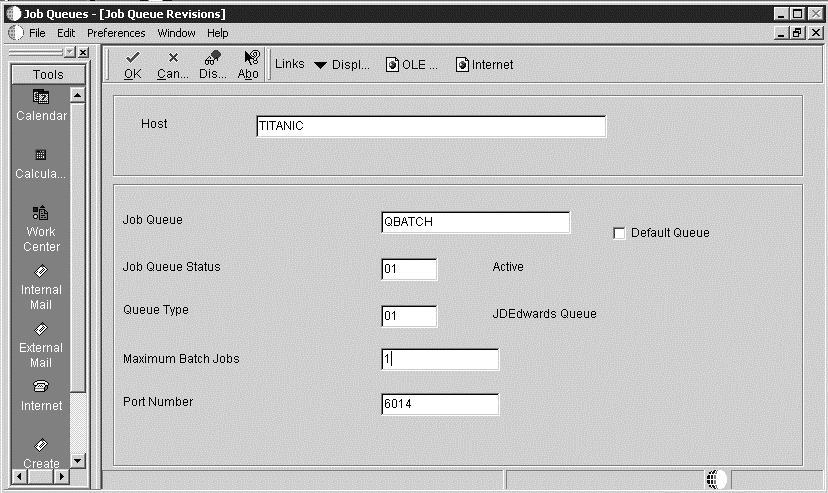
Go to menu GH9013 and start the Job Queues application (P986130).
-
On Job Queue Revisions, complete these fields as described below, and then click OK.
-
Host = Enter the Enterprise Server name.
Job Queue = Enter the Job Queue name. (Ensure that the Queue name matches the batch queue name on the IBM i. All IBM i can use the batch queue QBATCH as their default.)
Default Queue = Select this option.
Job Queue Status = Enter 01.
Queue Type = Enter 02.
Maximum Batch Jobs = This number must match the TC throttle for the plan. It must less than or equal to the MAXACT on the IBM i JOBQ entry in QBATCH.
Port Number = For release 9.1 the Port Number is 6017. Ignore the ”Network Failed” error if it occurs.
-
-
Add another queue called I-ACTIVE.

Set the maximum number of jobs equal to the maximum number of jobs the queue runs (set the queue for IBM i). Batch processes calling other batch processes use this queue; so define it as type JDEdwards, regardless of the platform.
3.6 Creating Temporary Tables for Data Migration
System Administrator
On the Deployment Server, logged on as user JDE in the JDEPLAN environment
Release 9.2 fully installed.
None
3.6.1 To create temporary tables for data migration
-
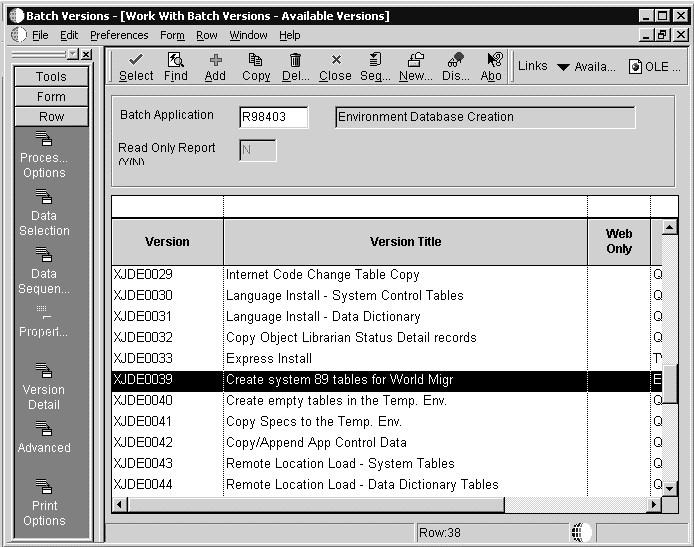
From menu GH9011, select Report Management, Batch Versions.
-
On the Work With Batch Versions form, enter R98403 as the Batch Application, and click Find.
-
Highlight version XJDE0039 (”Create system 89 tables for World Migr”), and then click Copy.
-
On the Batch Version - [Version Copy] form, enter CRTTEMPTBL for the New Version field and Create Temporary Migration Tables for the Version Title field.
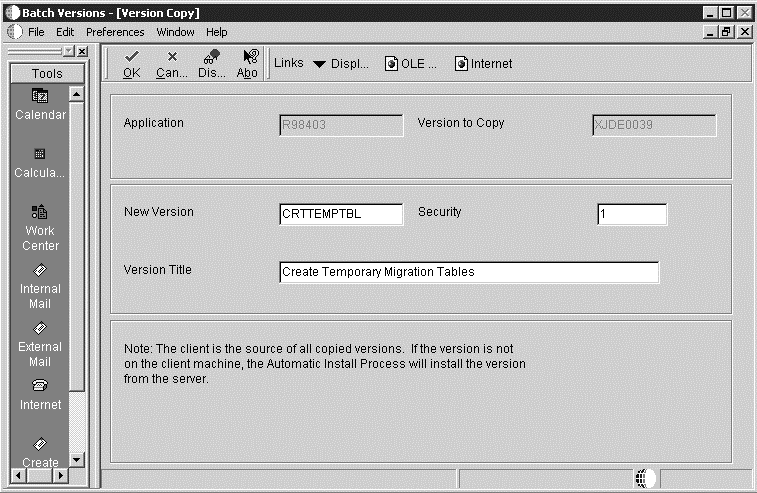
Change the Security field to 1 (Medium security), and then click OK.
-
On the General tab of the Batch Versions - [Batch Version Design] form, select Processing Options.

-
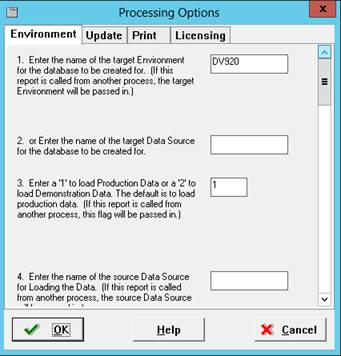
Set processing options 1-12 as follows:
-
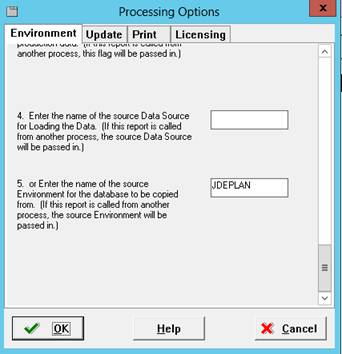
For the name of the Target Environment, enter DV920.
-
Leave blank.
-
Enter 1 to load production data.
-
Leave blank.
-
Enter JDEPLAN for the name of the source environment for the database to be copied from.
-
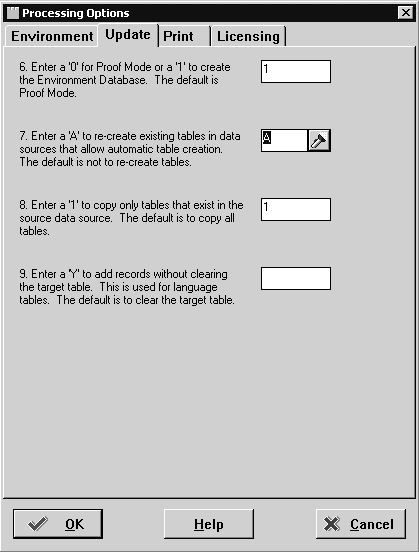
Enter 1 to create the environment database.
-
Enter A to re-create existing tables in data sources that allow automatic table creation.
-
Enter 1 to copy only tables that exist in the source data source.
-
Leave blank.
-
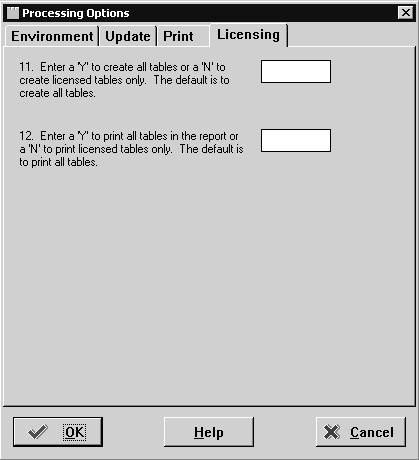
Leave blank (Print tab).
-
Leave blank.
-
Leave blank.
-
-
Click OK to exit the Processing Options window.
-
On the General tab of the Batch Versions - [Batch Version Design] form, click Run to submit the version.
-
Select Advanced from the Form Exit.
In the Batch Versions - [Advanced Version Prompting] form, select the Override Location.
-
Click OK to return the Batch Versions - [Version Prompting] form.
-
Select Submit from the Form Exit.
From the Batch Versions - [JD Edwards Data Sources] select the LOCAL data source.
-
When the Processing Options window reappears, review options 1-12 and ensure that they are correct.
-
Click OK to exit the Processing Options window.
-
Select desired Report Destination option and click OK.
-
Review the PDF carefully to ensure all tables copied over successfully.
If errors are encountered, review the JDE.LOG. Contact the Global Support Center for further assistance.