11.2 Managing Tabular Forms
A tabular form enables users to update multiple rows in a table at once from a single page. When created using a wizard, a tabular forms enables you to perform update, insert, and delete operations on multiple rows in a database table. This form includes a built-in multiple row update process that performs optimistic locking behind the scenes to maintain the data integrity.
11.2.1 About Creating Tabular Forms
There are two primary methods for creating tabular forms:
-
Create Application Wizard
-
Create Page Wizard
Tabular forms created using these wizards include automatic DML processes. These wizards create a form that performs update, insert, and delete operations on multiple rows in a database table. Alternatively, you can build a tabular form manually either by creating a updatable report region or standard report region with updatable columns with custom PL/SQL page processes to process the tabular form data.
Best Practices When Creating Tabular Forms
Oracle recommends the following best practices when creating tabular forms:
-
Do not modify of the select list of a SQL statement of a tabular form after it has been generated using a wizard. If you do modify the query, make sure the values of the updatable columns are not altered after being queried from the database by the Application Express engine.
-
Do not add custom JavaScript to display types that use display type specific JavaScript logic (for example, radio groups, simple check boxes, and popup key LOVs).
11.2.2 About Running a Tabular Form
When running a tabular form, data is rendered as a report having updatable columns shown using various form elements (including text fields, text areas, date pickers, select lists, radio groups, and so on).
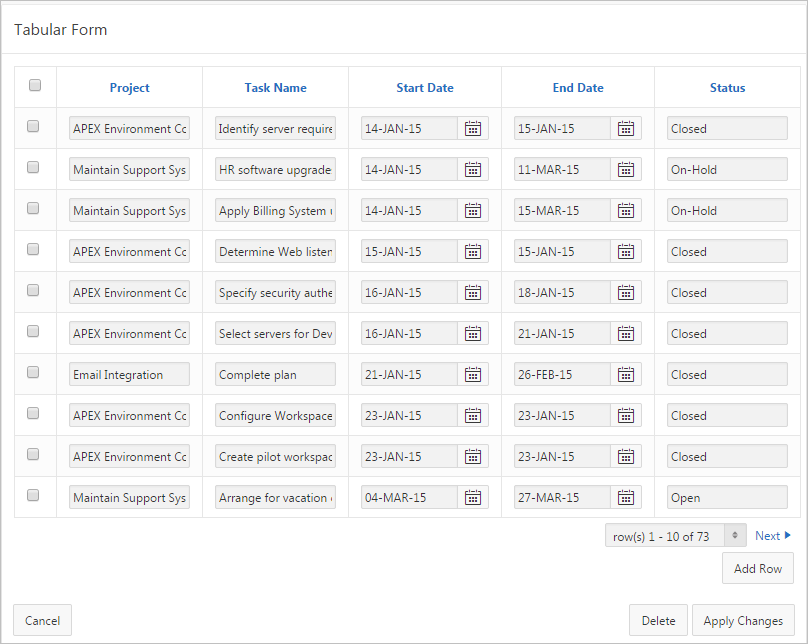
Description of the illustration ''rpt_tabular_form.png''
By default, date columns are created using the Date Picker item type. If user interface defaults are defined, other columns can be automatically created as select lists based on lists of values, or numeric fields and large text areas.
See Also:
"Managing User Interface Defaults" in Oracle Application Express SQL Workshop GuideFor numeric and date fields, you can also pre-define date and number format masks, or apply those format masks after generating the initial form.
Each report also includes a check box column (called a row selector). Users use this row selector to select one or more columns and update or delete data. To add a row, users click Add Row.
Tip:
You can control the appearance of a specific column by editing column attributes.11.2.3 How Tabular Forms Work
Tabular forms are based on a SQL query in which the query columns are tied to the underlying table columns. Unlike a single record from, tabular forms do not store data in session state. When a tabular form page is submitted, the tabular form data is processed using built-in data manipulation language (DML), or a custom PL/SQL page processes.
A tabular form with automatic DML has two processes for multi-row operations:
-
A Multi Row Update (MRU) process performs create and update operations.
-
Multi Row Delete (MRD) process deletes requests on one or more rows.
MRU and MRD processes reference the underlying table name and the primary key columns. The primary key columns must be part of the tabular form SQL query, and the report columns must be either hidden or display-only (save state) in order for the DML processes to be able to identify the correct records. For new records, the primary key values must be NULL to be identified as new records. Delete operations are performed by referencing row number of the row to be deleted. Users can check one or more rows on the current page and when they click the Delete button, the row numbers identify the corresponding primary key value(s) and the matching rows are deleted.
Wizard generated tabular forms built-in DMLinclude a checksum column to prevent lost updates. Using a method called optimistic locking, a checksum is computed for each row when rendering a tabular form. This checksum is stored in an extra hidden tabular form column. Upon submission of the form for update, an additional set of checksums is computed on the then current data stored in the database. The new checksums are compared to those built when the tabular form was first rendered, and if there are any mismatches, the update is rejected, because the data in the database was either modified by another user or anther process in the time between the tabular form was rendered and the time the data was submitted.
Wizard generated tabular forms also automatically create validations for some columns. Validations are created for columns that are set to NOT NULL in the underlying table and columns of type NUMBER, DATE or TIMESTAMP. Note that validations are not created for columns if the column is set to read-only, either based on the user's selection, or defined user interface defaults.
11.2.4 Creating a Tabular Form Using the Create Application Wizard
The Create Application Wizard is designed to quickly create a basic Oracle Application Express application consisting of multiple pages and components. For that reason, this wizard uses general best practices to generate the application and does not include several advanced options included in the Create Page Wizard.
Tip:
When creating a tabular form, Oracle recommends using a generic column template and avoiding column report templates. See "Report Templates."To create a tabular form using the Create Application Wizard:
-
On the Workspace home page, click the Application Builder icon.
-
Click the Create button.
-
For the application type, select Desktop and click Next.
-
For Name:
-
Schema - Each application obtains its privileges by parsing all SQL as a specific database schema. Identify the database schema owner.
-
Name - Enter the name used to identify the application to developers.
-
Application - Specify an integer value that identifies the application. The application ID must be unique within your Application Express instance. Application IDs between 3000 to 9000 are reserved for internal use by Oracle Application Express.
-
Theme - Select a theme. Themes are collections of templates used to define the layout and style of an entire application. See "Using Themes."
-
Theme Style - Select a theme style. Theme styles are only available for newer applications such as theme 42 and 51. See "Using Theme Styles."
-
Click Next.
Tip:
To create an instant application consisting that includes just a login page and blank page, click the Create Application button.Next, add pages to your application.
-
-
For Pages, click Add Page.
In the Create Application - Add Page dialog:
-
Select Page Type - Select Tabular Form.
-
Parent Page - If applicable, select a subordinate page. To learn more about an attribute, see field-level Help.
-
Table Name - Select a table.
-
Click Add Page.
The new page appears at the top of the page.
-
Click Next.
-
-
For Shared Components, indicate whether to copy shared components from another application. Select Yes or No. If you select Yes, select where to copy them from and which components to import. See "Managing Shared Components."
-
For Attributes, configure as appropriate and click Next.
Tip:
To learn more about an attribute, see field-level Help. See "Viewing Field-Level Help." -
Confirm your selections and click Create.
See Also:
"Managing User Interface Defaults" in Oracle Application Express SQL Workshop Guide11.2.5 Creating a Tabular Form Using the Create Page Wizard
Use the Create Page Wizard to add a tabular form to an existing application. Once you provide a table name on which to build the tabular form, the wizard reads the table columns from the database data dictionary.
Tabular forms perform insert, update and delete operations on table rows. Unlike with the Create Application Wizard, when you create a tabular form using the Create page Wizard you determine how rows are identified. You can either specify a primary key defined on the table, or a ROWID pseudo column, which uniquely identifies a row in a table. If you choose to select a primary key, you can choose between three different primary key source types: trigger, PL/SQL function, and sequence.
Tip:
When creating a tabular form, Oracle recommends using a generic column template and avoiding column report templates. See "Report Templates."To create a tabular form using the Create Page Wizard:
-
On the Workspace home page, click the Application Builder icon.
-
Select an application.
-
Click Create Page.
-
For Create a Page:
-
User Interface - Select a user interface for the page.
-
Select a page type - Select Form.
-
Click Next.
-
-
Select Tabular Form.
The Create Tabular Form Wizard appears.
-
For Table and Columns:
-
Table/View Owner - Select the table or view owner on which to base the tabular form.
-
Table/View Name - Select the table or view which contains the columns to be included in the tabular form region.
-
Select Columns - Select one or more columns to be included in the tabular form. In the pages that follow you define which columns should be updatable.
-
Allowed Operations - Select the operations to be performed on the table (for example, Update, Insert and Delete).
-
Use User Interface Defaults - Select whether to use user interface defaults. See field-level Help for more information and "Managing User Interface Defaults" in Oracle Application Express SQL Workshop Guide.
-
Click Next.
Next, define a primary key. Tabular forms perform insert, update and delete operations on table rows in the database. You identify the rows by using either a primary key defined on the table, or the ROWID pseudo column, which uniquely identifies a row in a table.
-
-
For Primary Key, select one of the following:
-
Managed by Database (ROWID) - The tabular form uses the ROWID pseudo column to identify rows to update and delete.
-
Select Primary Key Column(s) - The tabular form uses the source table's primary key column(s).
-
-
If you select Managed by Database (ROWID), click Next to continue.
-
If you select Select Primary Key Column(s):
-
Primary Key Column 1 - Select the first column of the primary key.
-
Primary Key Column 2 - If you have a compound primary key, specify the second primary key column in this attribute. This attribute is optional.
-
Click Next.
-
For Source Type, select the method by which the primary key is populated:
-
Existing trigger - Select this option if a before-insert trigger populates the primary key. You can also select this option if you plan on specifying the primary key column source later after completing the form.
-
Custom PL/SQL function - Select this option to provide a PL/SQL function to generate returning key value.
-
Existing sequence - Select this option to pick the sequence from a list of sequences available in the selected schema.
-
-
Click Next.
-
-
For Updatable Columns:
-
Updatable Columns - Select the updatable columns to include in the form.
You can modify the column order or your SQL query after you create the page.
-
Click Next.
-
-
For Page and Region Attributes:
Tip:
To learn more about an attribute, see field-level Help. See "Viewing Field-Level Help."-
Page - Select a page to contain the new updatable report, or enter a new page number.
-
Page Name - If you are creating a new page, enter a name.
-
Page Mode - Select a page mode.
-
Region Title - Enter a name for the region in which the updatable report appears.
-
Region Template - Select a region template for the updatable report region.
-
Report Template - Select a report template.
-
Breadcrumb - Select whether you want to use a breadcrumb navigation control on your page, and which breadcrumb navigation control you want to use.
-
Click Next.
-
-
For Navigation Menu, specify the type of navigation to include on this page and click Next. The navigation options (for example, navigation menu or tabs) depends upon the current application theme.
-
For Buttons and Branching:
-
Cancel Button Label - Enter text to display on the Cancel button.
-
Branch to Page - Specify the page number to branch to when the user clicks Cancel.
-
Apply Changes Button Label - Enter text to display on the Apply Changes button.
-
Branch to Page - Specify the page number to branch to when the user clicks Submit.
-
Delete Button Label - Enter text to display on the Delete button.
-
Add Row Button Label - Enter text to display on the Add Row button label.
-
Click Next.
-
-
Click Create.
A success message appears.
11.2.6 Synchronizing Tabular Form Column Order with Region Source
To synchronize a classic report's column order with the column order defined in the region source query:
-
On the Workspace home page, click the Application Builder icon.
-
Select the application.
-
Select a page containing the tabular form.
-
View the page in Component View. See "Viewing a Page in Component View."
-
To access the Report Attributes page, click the Report link next to the Tabular Form region.
-
From Tasks, select Synchronize Column Order with Region Source.
-
Click Synchronize.