11.3 Managing Master Detail Forms
This section describes how to create a master detail form.
11.3.1 About Master Detail Forms
A master detail form reflects a one-to-many relationship between two tables in a database. Typically, a master detail form displays a master row and multiple detail rows within a single HTML form. With this form, users can insert, update, and delete values from two tables or views.
When running a master detail form, data is rendered as a report using various form elements (including text fields, text areas, date pickers, select lists, radio groups, and so on). By default, date columns are created using the Date Picker item type. If user interface defaults are defined, other columns can be automatically created as select lists based on lists of values, or numeric fields and large text areas.
Description of the illustration ''rprt_master_detail1.png''
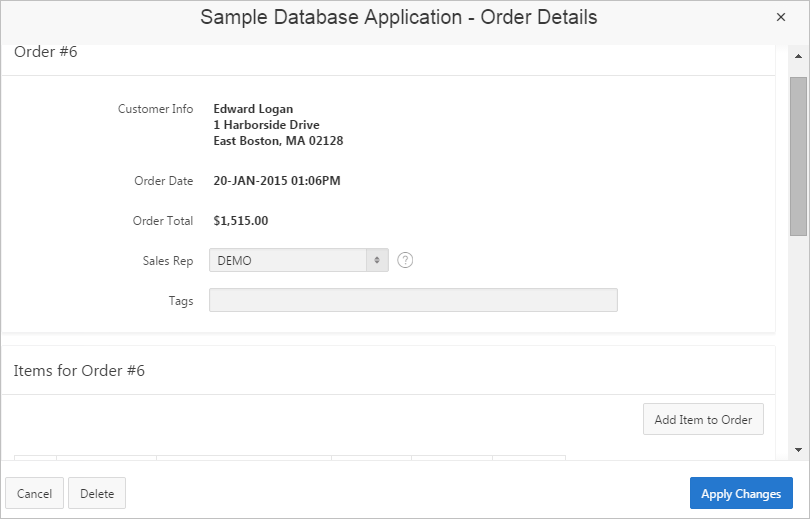
On the Master Detail, the master record displays as a standard form and the detail records display in a tabular form at the bottom of the page. In this example, users click Add Item to Order to add a new row.

Description of the illustration ''rprt_master_detail2.png''
See Also:
"Managing User Interface Defaults" in Oracle Application Express SQL Workshop GuideFor numeric and date fields, you can also pre-define date and number format masks, or apply those format masks after generating the initial form. Wizard generated master detail forms also automatically create validations for some columns. Validations are created for columns that are set to NOT NULL in the underlying table and columns of type NUMBER, DATE or TIMESTAMP. Note that validations are not created for columns if the column is set to read-only, either based on the user's selection, or defined user interface defaults.
Tip:
You can control the appearance of a specific column by editing column attributes.11.3.2 Creating a Master Detail Form Using the Create Application Wizard
The Create Application Wizard is designed to quickly create a basic Oracle Application Express application consisting of multiple pages and components. This wizard uses general best practices to generate the application and does not include several advanced options included in the Create Page Wizard.
To create a master detail form using the Create Application Wizard:
-
On the Workspace home page, click the Application Builder icon.
-
Click the Create button.
-
For the application type, select Desktop and click Next.
-
For Name:
-
Schema - Each application obtains its privileges by parsing all SQL as a specific database schema. Identify the database schema owner.
-
Name - Enter the name used to identify the application to developers.
-
Application - Specify an integer value that identifies the application. The application ID must be unique within your Application Express instance. Application IDs between 3000 to 9000 are reserved for internal use by Oracle Application Express.
-
Theme - Select a theme. Themes are collections of templates used to define the layout and style of an entire application. See "Using Themes."
-
Theme Style - Select a theme style. Theme styles are only available for newer applications such as theme 42 and 51. See "Using Theme Styles."
-
Click Next.
Tip:
To create an instant application consisting that includes just a login page and blank page, click the Create Application button.Next, add pages to your application.
-
-
Click the Add Page button.
On Add Page:
-
Select Page Type - Select Master Detail.
-
Parent Page - If applicable, select a subordinate page. To learn more about an attribute, see field-level Help.
-
Master Table Name - Select the table or view to be used as your master table. This table is used to create a report page and a master form on the master detail page.
-
Detail Table Name - Select the table or view to be used as your detail table.
Only tables and views that are associated to your selected Master Table using a foreign key are displayed.
-
Page Mode - Select a page mode.
-
Click Add Page.
The new pages appear at the top of the page.
-
Click Next.
-
-
For Shared Components, indicate whether to copy shared components from another application. Select Yes or No. If you select Yes, select where to copy them from and which components to import. See "Managing Shared Components."
-
For Attributes, configure as appropriate and click Next.
Tip:
To learn more about an attribute, see field-level Help. See "Viewing Field-Level Help." -
Confirm your selections and click Create Application.
11.3.3 Creating a Master Detail Form Using the Create Page Wizard
The Create Page Wizard provides support for creating a master detail from two tables that do not have foreign key relationship defined in the database. Although Oracle recommends the use of foreign keys and properly defined relationships in the underlying database, developers do not always have the ability to modify their database model.
When created using a wizard, the master form on a master detail form page includes buttons that enable the user to move forward and backward within the master result set. While running the wizard, you choose which columns determine the navigation order. You also have the option to choose whether to create a two-page or three-page master detail form, with the detail records shown in a report with single-record editing on a separate page.
To create a master detail form using the Create Page Wizard:
-
On the Workspace home page, click the Application Builder icon.
-
Select an application.
-
Click Create Page.
-
For Create a Page:
-
User Interface - Select a user interface for the page.
-
Select a page type - Select Form.
-
Click Next.
-
-
Select Master Detail Form and click Next.
The Master Detail Wizard appears.
-
On Master Table and Columns:
-
Table/View Owner - Select the schema that owns the master table.
-
Table/View Name - Select the table or view which contains the columns to be included in the master page.
The columns in that object display.
-
Select Columns - Select the columns to display in your master page. You may add additional columns later.
-
Use User Interface Defaults - Select whether to use user interface defaults. See field-level Help for more information and "Managing User Interface Defaults" in Oracle Application Express SQL Workshop Guide.
-
Click Next.
-
-
On Detail Table and Columns:
-
Show Only Related Tables - Specify whether to restrict the list of detail tables to only those tables related to the master table. Select Yes or No.
-
Table/View Owner - Select the table or view owner. The default selected owner for the table or view is the same owner as for your application. If the owner of your application has select privileges on tables or views in other schemas, you may select another schema.
-
Table/View Name - Select the table or view which contains the columns to be included in the detail page.
The columns in that object appear.
-
Select Columns - Select the columns to display in your detail page. You may add columns later.
-
Click Next.
Next, define a primary key. Forms perform insert, update and delete operations on table rows in the database. You identify the rows by using either a primary key defined on the table, or the ROWID pseudo column, which uniquely identifies a row in a table.
-
-
For Define Primary Key, select one for each table:
-
Managed by Database (ROWID) - Use the ROWID pseudo column to identify rows to update and delete.
-
Select Primary Key Column(s) - Use the source table's primary key column(s).
-
-
If you select Managed by Database (ROWID):
-
Click Next.
-
For Master Options, define the relationship between the Master and Detail tables. You may type in the column names (fully qualified with table names), or choose them from the list. Click Next.
-
Click Next.
-
-
If you select Select Primary Key Column(s):
-
On Define Primary Key, select the following for each table:
-
Primary Key Column 1 - Select the first column of the primary key.
-
Primary Key Column 2 - If you have a compound primary key, specify the second primary key column in this attribute. This attribute is optional
-
Click Next.
-
-
For Primary Key Source, select the method by which the primary key is populated and click Next.
-
Existing trigger - Select this option if a before-insert trigger populates the primary key. You can also select this option if you plan on specifying the primary key column source later after completing the form.
-
Custom PL/SQL function - Select this option to provide a PL/SQL function to generate returning key value.
-
Existing sequence - Select this option to pick the sequence from a list of sequences available in the selected schema.
-
-
For Master Options, specify whether to include master row navigation and click Next.
If you include master row navigation, define navigation order columns. If a navigation order column is not defined, the master update form navigates by the primary key column.
-
Click Next.
-
-
On Master Options:
-
Include master row navigation - Master row navigation enables users to navigate the master update form. Select Yes to include master row navigation.
-
Master row navigation order - Select the navigation order column. If no column is selected, navigation is ordered by primary key of the master table.
-
Secondary navigation order - Select the secondary navigation order column.
-
Include master report - You can choose to not create a master report page if you have a report page already. Select Yes to include a master report page.
-
Click Next.
-
-
On Build Master Detail, select the layout of master detail pages and click Next. Options include
-
Edit detail as tabular form on same page - Creates a two page master detail.
-
Edit detail on separate page - Creates a three page master detail.
-
-
On Page Attributes:
Tip:
To learn more about an attribute, see field-level Help. See "Viewing Field-Level Help."-
Page Attributes - Review and edit the master page and detail page information.
-
Detail Page Detail Region Title - Enter a title for the Detail page.
-
Page Group - Identify the name of the page group you would like to associate with this page.
-
Breadcrumb - Select whether you want to use a breadcrumb navigation control on your page, and which breadcrumb navigation control you want to use. To create breadcrumbs entries:
-
Parent Entry - Select a parent entry for this breadcrumb entry.
-
Entry Name (Master Report) - Specify the name of the breadcrumb entry for the master report page.
-
Entry Name (Master Detail Page) - Specify the name of the breadcrumb entry for the master detail page.
-
Parent Entry - This item displays if you have chosen a parent entry.
-
-
Click Next.
-
-
For Navigation Preference, specify the type of navigation to include on this page and click Next. The navigation options (for example, navigation menu or tabs) depends upon the current application theme.
-
Click Create.