2 Managing Database Objects with Object Browser
Object Browser enables developers to browse, create, and edit objects in a database. Oracle Application Express has many views defined to help you work with the underlying table structures. The views combine multiple base tables and use meaningful column names to minimize complexity and to be more intuitive to use. See Oracle Application Express API Reference for details of the views defined.
See Also:
Oracle Database SQL Language Reference2.1 Accessing Object Browser
To access Object Browser:
-
On the Workspace home page, click SQL Workshop.
-
Click Object Browser.
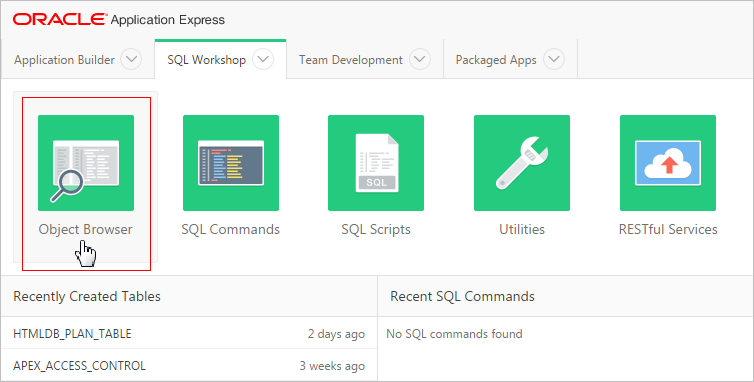
Description of the illustration obj_browser.png
Note:
If the instance administrator has disabled RESTful Services for this Application Express instance, RESTful Services are not available for this instance and the RESTful Services icon does not display. See "Configuring SQL Workshop" in Oracle Application Express Administration Guide.
2.2 Object Browser
The Object Browser page is divided into two panes:
-
Object Selection pane displays on the left side of the Object Browser page and lists database objects of a selected type within the current schema. You can further narrow the results by filtering on the object name.
-
Detail pane displays to the right of the page and displays detailed information about the selected object. To view object details, select an object in the Object Selection pane. Click the tabs at the top of the Detail pane to view additional details about the current object. To edit an object, click the appropriate button.
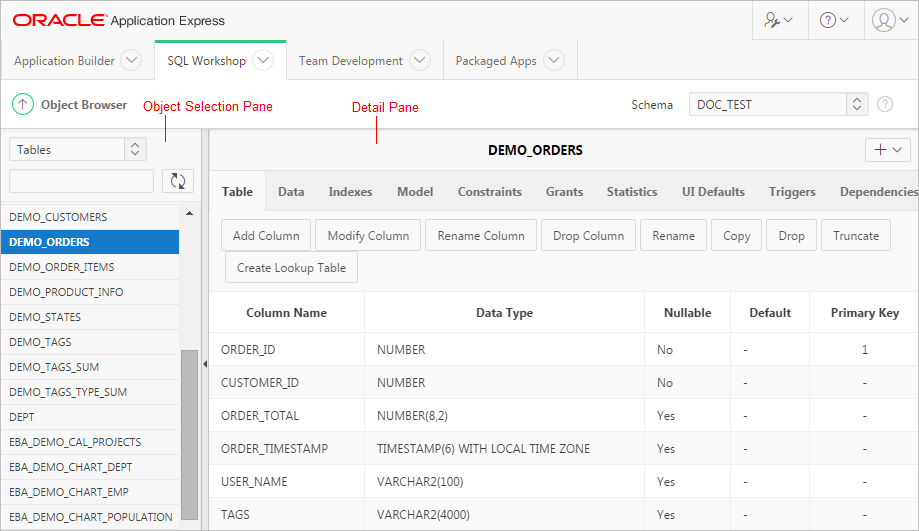
Description of the illustration obj_b_pane.png
2.3 Searching for and Browsing Database Objects
The Object Selection pane displays on the left side of the Object Browser page and lists database objects by type with the current schema. You can filter the view by selecting an object type or entering a case insensitive search term.
2.4 Searching For and Selecting Database Objects
To search for a database object in the Object Selection pane:
-
On the Workspace home page, click SQL Workshop and then Object Browser.
Object Browser appears.
-
Select an object type from the Object list.
The list of objects that appears depends upon the available objects in the current schema. Note that any object having a red bar adjacent to it is invalid.
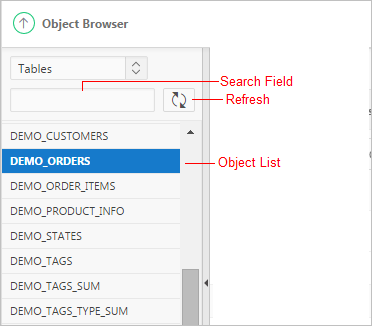
Description of the illustration obj_b_srch.png
-
To search for an object name, enter a case insensitive search term in the Search field.
-
To view all objects, leave the search field blank.
Once you locate the database object you want to view, simply select it. The selected object displays in the Detail pane. If no object is selected, the Detail pane is blank.
2.5 Hiding the Object Selection Pane
You can hide the Object Selection pane by selecting Collapse. The Collapse control displays on the right side of the Object Selection pane. If the Object Selection pane appears, selecting this control hides it. Similarly, if the Object Selection pane is hidden, selecting this control causes the pane to reappear.
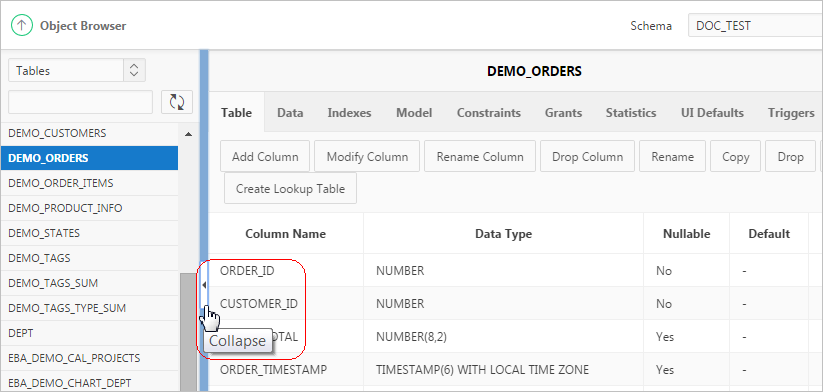
Description of the illustration obj_b_hide.png
2.6 Creating Database Objects
You can create database objects using the Create Database Object Wizard. Once you select an object, a set of tabs and buttons appears at the top of the Detail pane. Use the tabs to view different aspects of the current items (for example, the indexes of the table). Use the buttons to modify the current object.
To create an object:
-
On the Workspace home page, click SQL Workshop and then Object Browser.
Object Browser appears.
-
Click Create, located in the upper right corner of the Detail pane.
-
From the list of object types, select the type of object you want to create.
-
Follow the on-screen instructions.
2.7 Managing Tables
A table is a unit of data storage in an Oracle database, containing rows and columns. When you view a table in Object Browser, a table description appears that describes each column in the table.
See Also:
-
Oracle Database Administrator's Guide for information on managing tables.
-
Oracle Database Concepts for conceptual information on tables types.
-
Oracle Database SQL Language Reference for the syntax required to create and alter tables.
2.7.1 Creating a Table
To create a table:
-
On the Workspace home page, click SQL Workshop and then Object Browser.
Object Browser appears.
-
Click Create.
-
From the list of object types, select Table.
-
Enter a table name.
Table names must conform to Oracle naming conventions.
-
To have the final table name match the case entered in the Table Name field, click Preserve Case.
-
Enter column details:
-
Column Name - Enter the column name.
-
Type - Select the column type.
-
Precision - The precision is the number of digits before the decimal point. Not all column types have this setting. Precision must be a positive integer. Only
NUMBER,FLOAT,INTERVALYEARTOMONTH, andINTERVALDAYTOSECONDhave this setting. For example, if a column of typeNUMBERhas precision of 4, the column value can be 0 through 9999. -
Scale - The function of the scale setting depends on the column type. For
NUMBERtypes, scale is the number of digits after the decimal point. ForVARCHAR2andCHARtypes, scale is the number of stored characters. ForTIMESTAMPtypes, scale is the fractional seconds precision and must be a number between 0 and 9. Scale must be a positive number. For example, if a column typeTIMESTAMPhas a scale of 3, seconds are between .000 seconds and .999 seconds. -
Not Null - To specify a column must always have a value, select the Not Null check box.
-
If running Oracle Database 12c - Select an identity option for NUMBER and FLOAT columns. Options include:
-
Always - The Oracle Database always uses the sequence generator to assign a value to the column. If you attempt to explicitly assign a value to the column using INSERT or UPDATE, then an error is returned.
-
Default - The Oracle Database uses the sequence generator to assign a value to the column by default, but you can also explicitly assign a specified value to the column.
-
Default on Null - The Oracle Database uses the sequence generator to assign a value to the column when a subsequent INSERT statement attempts to assign a value that evaluates to NULL.
-
-
Move - Click the Up and Down arrows in the Move column to change the order of previously entered columns.
-
Add Column - Click Add Column to add additional columns.
-
Click Next.
Next, define the primary key for this table (optional). A primary key is a single field or combination of fields that uniquely identifies a record.
-
-
For Primary Key, select the appropriate option and click Next:
-
Select an option:
-
No Primary Key - No primary key is created.
-
Populate from a new sequence - Creates a primary key and creates a trigger and a sequence. The sequence is used in the trigger to populate the selected primary key column. The primary key can only be a single column.
-
Populated from an existing sequence - Creates a primary key and creates a trigger. The selected sequence is used in the trigger to populate the selected primary key column. The primary key can only be a single column.
-
Not populated - Defines a primary key but does not have the value automatically populated with a sequence within a trigger. You can also select this option to define a composite primary key (that is, a primary key made up of multiple columns).
-
If running Oracle Database 12c - Populate By Identity Column - Creates a primary key and a sequence. The sequence is used to populate the selected primary key column.
-
-
Click Next.
Next, add foreign keys (optional). A foreign key establishes a relationship between a column (or columns) in one table and a primary or unique key in another table.
-
-
Add Foreign Key:
-
Name - Enter a name of the foreign key constraint that you are defining.
-
Select the appropriate option:
-
Disallow Delete - Blocks the delete of rows from the referenced table when there are dependent rows in this table.
-
Cascade Delete - Deletes the dependent rows from this table when the corresponding parent table row is deleted.
-
Set to Null on Delete - Sets the foreign key column values in this table to null when the corresponding parent table row is deleted.
-
-
Select Key Column(s) - Select the columns that are part of the foreign key, then click the Add icon to move them to Key Column(s).
-
References Table - Select the table which is referenced by this foreign key. Then, select the columns referenced by this foreign key. Once selected, click the Add icon to move the selected columns to Referenced Column(s).
-
Click Add.
-
Click Next.
Next, add a constraint (optional). You can create multiple constraints, but you must add each constraint separately.
-
-
To add a constraint:
-
Specify the type of constraint (Check or Unique).
A check constraint is a validation check on one or more columns within the table. No records can be inserted or updated in a table which violates an enabled check constraint. A unique constraint designates a column or a combination of columns as a unique key. To satisfy a unique constraint, no two rows in the table can have the same values for the specified columns.
-
Enter the constraint in the field provided. For unique constraints, select the column(s) that are to be unique. For check constraints, enter the expression that should be checked such as
flag in ('Y','N'). -
Click Add.
-
-
Click Next.
A confirmation page appears.
-
Click Create.
See Also:
"Using the Table Finder" in Oracle Application Express Application Builder User's Guide and "Overview of Tables" in Oracle Database Concepts for information about tables.2.7.2 Browsing a Table
When you view a table in Object Browser, the table description appears. While viewing this description, you can add a column, modify a column, rename a column, drop a column, rename the table, copy the table, drop the table, truncate the table, or create a lookup table based upon a column in the current table. Additionally, you have access to other reports that offer related information including the table data, indexes, data model, constraints, grants, statistics, user interface defaults, triggers, dependencies, and SQL to create the selected table.
To view a table description:
-
On the Workspace home page, click SQL Workshop and then Object Browser.
Object Browser appears.
-
From the Object list, ensure Tables is selected.
-
From the Object Selection pane, select a table.
The table description appears.
-
Click the tabs at the top of the page to view different reports about the table.
See Also:
"Reports Available for Tables"2.7.3 Reports Available for Tables
Table 2-1 describes all available reports for tables.
Table 2-1 Available Reports for Tables
| View | Description |
|---|---|
|
Table |
Displays details of the first 57 columns including the column name, data type, nullable status, default value, and primary key. While viewing table details you can add, modify, delete, or rename a column. Additionally, you can drop, rename, copy, or truncate the table only if the referencing table has no records and create a lookup table. To export the data as a comma-delimited file (.csv) file, click the Download link. To print the data in a portable document format (.pdf) file, click the Print link. Please note, this option must have a Report Server configured at the instance level. See "Configuring Report Printing" in Oracle Application Express Administration Guide. See Also: "Editing a Table" |
|
Data |
Displays a report of the data in the current table. Actions you can perform include:
|
|
Indexes |
Displays indexes associated with this table. Actions you can perform include Create and Drop. See Also: "Managing Indexes" |
|
Model |
Displays a graphical representation of the selected table along with all related tables. Related tables are those that reference the current table in a foreign key and those tables referenced by foreign keys within the current table. You can position the cursor over an underlined table name to view the relationship between that table and the current table. Click an underlined table name to view the model of the related table. |
|
Constraints |
Displays a list of constraints for the current table. Actions you can perform include Create, Drop, Enable, and Disable. |
|
Grants |
Displays a list of grants on the current table, including the grantee, the privilege, and grant options. Actions you can perform in this view include Grant and Revoke. |
|
Statistics |
Displays collected statistics about the current table, including the number of rows and blocks, the average row length, sample size, when the data was last analyzed, and the compression status (enabled or disabled). Click Analyze to access the Analyze Table Wizard. |
|
UI Defaults |
Displays user interface defaults for forms and reports. User interface defaults enable developers to assign default user interface properties to a table, column, or view within a specified schema. Click Edit to edit defined user interface defaults. Click Create Defaults to initialize user interface defaults for tables that do not currently have user interface defaults defined. See Also: "Managing User Interface Defaults" |
|
Triggers |
Displays a list of triggers associated with the current table. Actions you can perform include Create, Drop, Enable, and Disable. To view trigger details, click the trigger name. See Also: "Managing Triggers" |
|
Dependencies |
Displays report showing objects referenced by this table, objects this table references, and synonyms for this table. |
|
SQL |
Displays the SQL necessary to re-create this table, including keys, indexes, triggers and table definition. |
2.7.4 Editing a Table
While viewing a table description, you can edit it by clicking the buttons above the table description.
To edit a table:
-
On the Workspace home page, click SQL Workshop and then Object Browser.
Object Browser appears.
-
From the Object list, ensure Tables is selected.
-
From the Object Selection pane, select a table.
The table description appears.
-
Click the appropriate button described in Table 2-2.
Button Description Adds a column to the table. Enter a column name and select a type. Depending upon the column type, specify whether the column requires a value, the column length, precision, and scale.
Modifies the selected column. For Oracle Database 11g Release 2 (11.2.0.4) and later, a Data Redaction region may be shown if the current schema selected has been granted execute on
DBMS_REDACT.Renames the selected column.
Drops the selected column.
Renames the selected table.
Copies the selected table.
Drop
Drops the selected table.
See Also: "Using the Recycle Bin"
Removes all rows from the selected table. Truncating a table can be more efficient than dropping and re-creating a table. Dropping and re-creating a table may invalidate dependent objects, requiring you to regrant object privileges or re-create indexes, integrity constraints, and triggers.
Creates a lookup table based on the column you select. That column becomes a foreign key to the lookup table.
2.7.5 Dropping a Table
To drop a table:
-
On the Workspace home page, click SQL Workshop and then Object Browser.
Object Browser appears.
-
From the Object list, ensure Tables is selected.
-
From the Object Selection pane, select a table.
The table description appears.
-
Click Drop.
-
To confirm, click Finish.
See Also:
"Using the Recycle Bin"2.8 Managing Views
A view is a logical representation of another table or combination of tables. A view does not contain or store data but derives its data from the views or tables on which it is based. These tables are called base tables. All operations performed on a view affect the base table of the view. In order to be updatable, a view cannot contain any of the following constructs: SET or DISTINCT, operators, aggregate or analytic functions, GROUP BY, ORDER BY, CONNECT BY, START WITH clause, subquery, or collection expression in a SELECT list.
For an example where using a view might be preferable to a table, consider the HR.EMPLOYEES table which has several columns and numerous rows. To allow users to see only five of these columns or only specific rows, a view is created as follows:
CREATE VIEW staff AS
SELECT employee_id, last_name, job_id, manager_id, department_id
FROM employees
See Also:
Oracle Database Administrator's Guide2.8.1 Creating a View
To create a view:
-
On the Workspace home page, click SQL Workshop and then Object Browser.
Object Browser appears.
-
Click Create.
-
From the list of object types, select View.
-
Define the view:
-
View Name - Enter a name for the View.
-
Query - Enter a query to define the view.
Tip:
To access Query Builder or SQL Commands, click the appropriate button at the bottom of the page. The selected tool displays in a pop-up window. Once you create the appropriate SQL, click Return to automatically close the popup window and return to the wizard with the SQL. -
-
Click Next.
A confirmation page appears, which displays the SQL used to create the view.
-
Click Create View.
2.8.2 Browsing a View
When you access a view in Object Browser, the Detail pane displays a report listing the columns in that view.
To browse a view:
-
On the Workspace home page, click SQL Workshop and then Object Browser.
Object Browser appears.
-
From the Object list, select Views.
-
From the Object Selection pane, select a view.
The view definition appears displaying the appropriate columns.
-
Click the tabs at the top of the page to view different reports about the view.
See Also:
"Reports for Views"2.8.3 Reports for Views
Table 2-3 describes all available reports for views.
Table 2-3 Available Reports for Views
| View | Description |
|---|---|
|
View |
(Default) Displays the columns in the current view. Actions you can perform include:
See Also: "Editing a View Manually," "Compiling a View," and "Dropping a View" |
|
Code |
Displays the code editor. See Also: "Editing a View Manually" |
|
Data |
Displays a report of the data in the columns in the view. Actions you can perform include:
|
|
Grants |
Displays a list of grants associated with the columns in the view. Grant details include grantee, privilege, and grant options. Actions you can perform include Grant and Revoke. |
|
UI Defaults |
Displays user interface defaults for forms and reports. User interface defaults enable developers to assign default user interface properties to a table, column, or view within a specified schema. Click Edit to edit existing user interface defaults. Click Create Defaults to initialize user interface defaults for views that do not currently have user interface defaults defined. See Also: "Managing User Interface Defaults" |
|
Dependencies |
Displays a report showing objects referenced by this view, objects this view references, and synonyms for this view. |
|
SQL |
Displays the SQL necessary to re-create this view. |
2.8.4 Editing a View Manually
When you edit a view you can edit the code manually, perform a search and replace, and compile the view. Additionally, you can save the view as a file or drop it.
To edit a view manually:
-
On the Workspace home page, click SQL Workshop and then Object Browser.
Object Browser appears.
-
From the Object list, select Views.
-
From the Object Selection pane, select a view.
-
Select the Code tab.
The code editor appears.
If you edit and make changes to a view, you must compile. See "Compiling a View."
2.8.5 Using Find and Replace
To use Find and Replace:
-
On the Workspace home page, click SQL Workshop and then Object Browser.
Object Browser appears.
-
From the Object list, select Views.
-
From the Object Selection pane, select a view.
-
To perform a basic search, click the Find icon (which resembles a magnifying glass).
-
To replace existing code, click the Replace icon (which resembles a two-sided arrow).
2.8.6 Downloading a View
To save the current view as a file:
-
On the Workspace home page, click SQL Workshop and then Object Browser.
Object Browser appears.
-
From the Object list, select Views.
-
From the Object Selection pane, select a view.
-
Select the Code tab.
The code editor appears.
-
Click Download Source.
2.8.7 Compiling a View
If you edit and make changes to a view, you must compile to save your changes. Note that there is no save function since this is just a view of the object within the database.
To re-create the current view:
-
On the Workspace home page, click SQL Workshop and then Object Browser.
Object Browser appears.
-
From the Object list, select Views.
-
From the Object Selection pane, select a view.
-
Select the Code tab.
The code editor appears.
-
Click Save & Compile.
2.9 Managing Indexes
An index is an optional structure associated with tables and clusters. You can create indexes on one or more columns of a table to speed access to data on those columns.
When you view an index in Object Browser, the Detail pane displays a report containing the index name, index type, table owner, table type, uniqueness, compression, prefix length, tablespace name, status, last analyzed and a listing of the indexed columns.
2.9.1 Creating an Index
To create an index:
-
On the Workspace home page, click SQL Workshop and then Object Browser.
Object Browser appears.
-
Click Create.
-
From the list of object types, select Index.
-
Select a table and select the type of index you want to create. Available index types include:
-
Normal - Indexes one or more scalar typed object attributes of a table
-
Text - Creates a text index (Oracle Text)
-
-
Click Next.
-
Create the index definition. Specify an index name, select one or more columns to be indexed, and click Next.
A confirmation page appears, which displays the SQL used to create the index.
-
To confirm, click Create Index.
2.9.2 Browsing an Index
To browse an index:
-
On the Workspace home page, click SQL Workshop and then Object Browser.
Object Browser appears.
-
From the Object list, select Indexes.
-
From the Object Selection pane, select an index.
The index appears displaying the index name, type, table owner, table type and a listing of indexed columns.
-
Click the tabs at the top of the page to view different reports about the index.
2.9.3 Reports for Indexes
Table 2-4 describes all available reports for indexes.
Table 2-4 Available Reports for Indexes
2.10 Managing Sequences
A sequence generates a serial list of unique numbers for numeric columns of a database table. Database sequences are generally used to populate table primary keys.
2.10.1 Creating a Sequence
To create a sequence:
-
On the Workspace home page, click SQL Workshop and then Object Browser.
Object Browser appears.
-
Click Create.
-
From the list of object types, select Sequence.
-
For Define:
-
Sequence Name - Enter the name of the sequence.
-
Preserve Case - To have the final sequence name match the case entered in the Sequence Name field, click Preserve Case.
-
Start With - Enter the number of the first sequence. The first reference to
sequence_name.nextvalreturns this number. -
Minimum Value - Enter the minimum value this sequence can return.
-
Maximum Value - Enter the maximum value this sequence can return.
-
Increment By - Each call to
sequence_name.nextvalreturns a value greater than the last, until the maximum value is reached. Enter the value used to increment to the next sequence number. -
Cycle - Select this option to restart the sequence number to the minimum value when the maximum value is reached. This is not recommended if using the sequence for primary key creation.
-
Number to Cache - For faster access, specify how many sequence values are stored in memory.
-
Order - Specify ORDER to guarantee that sequence numbers are generated in order of request. This option is necessary if using Real Application Clusters (Oracle RAC).
-
-
Click Next.
A confirmation page appears, which displays the SQL used to create the sequence.
-
Click Create Sequence.
2.10.2 Browsing a Sequence
To browse a sequence:
-
On the Workspace home page, click SQL Workshop and then Object Browser.
Object Browser appears.
-
From the Object list, select Sequences.
-
From the Object Selection pane, select a sequence.
The Object Details view appears.
-
Click the tabs at the top of the page to view different reports about the sequence.
2.10.3 Reports for Sequences
Table 2-5 describes all available reports for sequences.
Table 2-5 Available Reports for Sequences
2.10.4 Dropping a Sequence
To drop a sequence:
-
On the Workspace home page, click SQL Workshop and then Object Browser.
Object Browser appears.
-
From the Object list, select Sequences.
-
From the Object Selection pane, select a sequence.
The Object Details view appears.
-
Click Drop.
-
To confirm, click Finish.
2.11 Managing Types
A type is a user-specified object or collection definition. Oracle Application Express currently only supports collection definitions. There are two categories of Oracle collections (SQL collections):
-
Variable-length arrays (
VARRAYtypes) -
Nested tables (
TABLEtypes)
VARRAY types are used for one-dimensional arrays, while nested table types are used for single-column tables within an outer table.
See Also:
Oracle Database Concepts and Oracle Database PL/SQL Language Reference for information about collection types2.11.1 Creating a Type
To create a collection type:
-
On the Workspace home page, click SQL Workshop and then Object Browser.
Object Browser appears.
-
Click Create.
-
For Name:
-
Type Name - Enter the name of the type to be created.
-
Preserve Case - To have the type name match the case entered in the Type Name field, click Preserve Case.
-
Type to Create - Specify the kind of type to create.
-
Click Next
-
-
Follow the on-screen instructions.
A confirmation page appears, which displays the SQL used to create the type.
-
Click Create Type.
2.11.2 Browsing a Type
To browse a collection type:
-
On the Workspace home page, click SQL Workshop and then Object Browser.
Object Browser appears.
-
From the Object list, select Types.
-
From the Object Selection pane, select a type.
The Object Details view appears.
-
Click the tabs at the top of the page to view different reports for the type.
2.11.3 Reports for Types
Table 2-6 describes all available reports for types.
Table 2-6 Available Reports for Types
2.12 Managing Packages
A package is a database object that groups logically related PL/SQL types, items, functions and procedures. Packages usually have two parts, a specification and a body. The specification is the interface to your application. The body implements the specification.
See Also:
-
"Using PL/SQL Packages" in Oracle Database PL/SQL Language Reference for additional information on PL/SQL packages.
-
"Using PL/SQL Subprograms" in Oracle Database PL/SQL Language Reference for information on PL/SQL subprograms
2.12.1 Creating a Package
To create a package:
-
On the Workspace home page, click SQL Workshop and then Object Browser.
Object Browser appears.
-
Click Create.
-
From the list of object types, select Package.
-
For Create Package, select the type of package you want to create:
-
Specification
-
Body
-
Package with methods on database table(s)
A package is a database object that groups logically related PL/SQL types, items, functions and procedures. Packages usually have two parts: Specification and Body.
-
-
Click Next.
-
If you select Specification:
-
Package Name - Enter a package name. To preserve the case of the name you enter, click Preserve Case.
-
Click Next.
The wizard creates a dummy package specification and displays it for editing.
-
Edit the specification and click Create Package Specification.
-
-
If you select Body:
-
Package - Select the package you want to create the body for and click Next
The wizard creates a package body with stubbed out calls identified in the specification and displays it for editing.
-
Edit the package body and click Create Package Body.
-
-
If you select Package with methods on database tables:
-
Package Name - Enter a package name. To preserve the case of the name you enter, click Preserve Case.
-
Select up to ten tables and click Next.
The wizard creates a specification and body with insert, update, delete, and GET APIs for the selected tables. Note that you have the option to show or download the specification or body.
-
To confirm, click Create Package.
-
2.12.2 Viewing a Package
When you access a package in Object Browser the specification appears.
To view a specification:
-
On the Workspace home page, click SQL Workshop and then Object Browser.
Object Browser appears.
-
From the Object list, select Packages.
-
From the Object Selection pane, select a package.
The Specification appears. You can also edit the code in this view.
-
Click the tabs at the top of the page to view different reports about the package.
2.12.3 Reports for Packages
Table 2-7 describes all available reports for packages.
Table 2-7 Available Reports for Packages
2.12.4 Editing a Package Manually
When you edit a package, you can edit the code manually, perform a search and replace, and compile the package.
-
On the Workspace home page, click SQL Workshop and then Object Browser.
Object Browser appears.
-
From the Object list, select Packages.
-
From the Object Selection pane, select a package.
The Specification appears. You can edit the code in this view.
-
To perform a basic search, click the Find icon (which resembles a magnifying glass).
-
To replace existing code, click the Replace icon (which resembles a two-sided arrow).
2.12.5 Compiling a Package
If you edit and make changes to a package, you must compile to save your changes. There is no save function because this is just a view of the object within the database.
To compile a package:
-
On the Workspace home page, click SQL Workshop and then Object Browser.
Object Browser appears.
-
From the Object list, select Packages.
-
From the Object Selection pane, select a package.
The Specification appears.
-
Click Save & Compile to compile the current package.
Compiling re-creates the object in the database. If the compilation fails, an error message displays above the code.
2.12.6 Downloading a Package
To download a package:
-
On the Workspace home page, click SQL Workshop and then Object Browser.
Object Browser appears.
-
From the Object list, select Packages.
-
From the Object Selection pane, select a package.
The Specification appears.
-
Click Download Source to save the current package as a file.
2.12.7 Dropping a Package While Viewing Specification
To drop a package while viewing the Specification:
-
On the Workspace home page, click SQL Workshop and then Object Browser.
Object Browser appears.
-
From the Object list, select Packages.
-
From the Object Selection pane, select a package.
The Specification appears.
-
Click Drop.
-
To confirm, click Finish.
2.12.8 Dropping a Package While Viewing the Body
To drop a package while viewing the Body:
-
On the Workspace home page, click SQL Workshop and then Object Browser.
Object Browser appears.
-
From the Object list, select Packages.
-
From the Object Selection pane, select a package.
The Specification appears.
-
Click the Body tab.
-
Click Drop.
-
To confirm, click Finish.
2.13 Managing Procedures
A procedure is a subprogram that performs a specific action. You can use Object Browser to view, create, edit, download, and drop procedures.
2.13.1 Creating a Procedure
To create a procedure:
-
On the Workspace home page, click SQL Workshop and then Object Browser.
Object Browser appears.
-
Click Create.
-
From the list of object types, select Procedure.
-
For Name:
-
Procedure Name - Enter the name of the procedure. Object names must conform to Oracle naming conventions and cannot contain spaces, or start with a number or underscore.
-
Specify whether to Include Arguments or Preserve Case.
-
Click Next.
-
-
For Arguments, define the arguments by specifying the following information (optional):
-
Argument Name
-
In/Out (the parameter mode)
-
Argument Type (datatype)
-
Default (value)
-
Move
To add additional arguments, click Add Argument.
-
-
Click Next.
-
For Define, enter PL/SQL block you want to use as the procedure body and click Next.
A confirmation page appears.
-
Click Create Procedure.
2.13.2 Browsing a Procedure
To browse a procedure:
-
On the Workspace home page, click SQL Workshop and then Object Browser.
Object Browser appears.
-
From the Object list, select Procedures.
-
From the Object Selection pane, select a procedure.
The Code view appears, displaying the source code for the procedure. You can edit the code in this view.
-
Click the tabs at the top of the page to view different reports about the procedure.
2.13.3 Reports for Procedures
Table 2-8 describes all available reports for procedures.
Table 2-8 Available Views for Procedures
| View | Description |
|---|---|
|
Code |
(Default) Displays the source code for the procedure. You can edit the code in this view. Actions you can perform in this view include: See Also: "Editing a Procedure," "Compiling a Procedure," "Downloading a Procedure," and "Dropping a Procedure" |
|
Dependencies |
Displays objects that use (or depend) on the current procedure and objects the procedure depends on. |
|
Errors |
Lists errors related to the current procedure. |
|
Grants |
Lists details of grants for the current procedure, including privilege, grantee, grantable, grantor, and object name. |
2.13.4 Editing a Procedure
When you edit a procedure you can edit the code manually or perform a search and replace.
2.13.4.1 Editing a Procedure Manually
To edit a procedure manually:
-
On the Workspace home page, click SQL Workshop and then Object Browser.
Object Browser appears.
-
From the Object list, select Procedures.
-
From the Object Selection pane, select a procedure.
The Code view appears. You can edit the code in this view.
-
To perform a basic search, click the Find icon (which resembles a magnifying glass).
-
To replace existing code, click the Replace icon (which resembles a two-sided arrow).
2.13.5 Compiling a Procedure
If you edit and make changes to a procedure, you must compile to save your changes. There is no save function because this is just a view of the object within the database.
To compile a procedure:
-
On the Workspace home page, click SQL Workshop and then Object Browser.
Object Browser appears.
-
From the Object list, select Procedures.
-
From the Object Selection pane, select a procedure.
-
Click Save & Compile to compile the current procedure.
Compiling re-creates the object in the database. If the compilation fails, an error message displays above the code.
2.13.6 Downloading a Procedure
To download a procedure:
-
On the Workspace home page, click SQL Workshop and then Object Browser.
Object Browser appears.
-
From the Object list, select Procedures.
-
From the Object Selection pane, select a procedure.
-
Click Download Source to save the current procedure as a file.
2.14 Managing Functions
A function is a subprogram that can take parameters and return a single value.
See Also:
Oracle Database SQL Language Reference for information about PL/SQL functions and Oracle Database PL/SQL Language Reference2.14.1 Creating a Function
To create a function:
-
On the Workspace home page, click SQL Workshop and then Object Browser.
Object Browser appears.
-
Click Create.
-
From the list of object types, select Function.
-
For Name:
-
Function Name - Enter the name of the function. Object names must conform to Oracle naming conventions and cannot contain spaces, or start with a number or underscore.
-
Return Data Type - Select a data type.
-
Specify whether to Include Arguments or Preserve Case.
-
Click Next.
-
-
For Arguments, define the arguments by specifying the following information (optional):
-
Argument Name
-
Argument Type (datatype)
-
Default (value)
-
Move
To add additional arguments, click Add Argument.
-
-
Click Next.
-
For Function Body, enter PL/SQL block you want to use and click Next.
A confirmation page appears.
-
Click Create Function.
2.14.2 Browsing a Function
To view a function in Object Browser:
-
On the Workspace home page, click SQL Workshop and then Object Browser.
Object Browser appears.
-
From the Object list, select Functions.
-
From the Object Selection pane, select a function.
The Code view appears. You can edit the code in this view.
-
Click the tabs at the top of the page to view different reports about the function.
See Also:
"Reports for Functions"2.14.3 Reports for Functions
Table 2-9 describes all available reports for functions.
Table 2-9 Available Reports for Functions
| View | Description |
|---|---|
|
Code |
(Default) Displays the source code for the function. You can edit the code in this view. Actions you can perform in this view include:
See Also: "Editing a Function Manually," "Compiling a Function," "Downloading a Function," and "Dropping a Function" |
|
Dependencies |
Displays objects that use (or depend) on the current function and objects the function depends on. |
|
Errors |
Displays errors related to the current function. |
|
Grants |
Lists details of grants for the current function, including privilege, grantee, grantable, grantor, and object name. |
2.14.4 Editing a Function Manually
When you edit a function you can edit the code manually, perform a search and replace, and compile the function.
-
On the Workspace home page, click SQL Workshop and then Object Browser.
Object Browser appears.
-
From the Object list, select Functions.
-
From the Object Selection pane, select a function.
The Code view appears. You can edit the code in this view.
-
Click Edit to activate manual edit mode.
-
To perform a basic search, click the Find icon (which resembles a magnifying glass).
-
To replace existing code, click the Replace icon (which resembles a two-sided arrow).
2.14.5 Compiling a Function
If you edit and make changes to a function, you must compile to save your changes. There is no save function because this is just a view of the object within the database.
To compile a function in Object Browser:
-
On the Workspace home page, click SQL Workshop and then Object Browser.
Object Browser appears.
-
From the Object list, select Functions.
-
From the Object Selection pane, select a function.
The Code view appears.
-
Click Save & Compile to compile the current function.
Compiling re-creates the object in the database. If the compilation fails, an error message displays above the code.
2.14.6 Downloading a Function
To save a function to a file in Object Browser:
-
On the Workspace home page, click SQL Workshop and then Object Browser.
Object Browser appears.
-
From the Object list, select Functions.
-
From the Object Selection pane, select a function.
The Code view appears.
-
Click Download Source to save the current function as a file.
2.14.7 Dropping a Function
To drop a function in Object Browser:
-
On the Workspace home page, click SQL Workshop and then Object Browser.
Object Browser appears.
-
From the Object list, select Functions.
-
From the Object Selection pane, select a function.
The Code view appears.
-
Click Drop.
-
To confirm, click Finish.
2.15 Managing Triggers
A database trigger is a stored subprogram associated with a database table, view, or event. The trigger can be called once, for example when an event occurs, or many times, for example for each row affected by an INSERT, UPDATE, or DELETE statement.
2.15.1 Creating Triggers
To create a trigger in Object Browser:
-
On the Workspace home page, click SQL Workshop and then Object Browser.
Object Browser appears.
-
Click Create.
-
From the list of object types, select Trigger.
-
Select a table name and click Next.
-
Select the appropriate trigger attributes, enter the trigger body, and click Next.
A confirmation page appears, which displays the SQL used to create the trigger.
-
Click Create Trigger.
2.15.2 Browsing a Trigger
To browse a trigger in Object Browser:
-
On the Workspace home page, click SQL Workshop and then Object Browser.
Object Browser appears.
-
From the Object list, select Triggers.
-
From the Object Selection pane, select a trigger.
The Object Details view appears.
-
Click the tabs at the top of the page to view different reports about the trigger.
See Also:
"Reports for Triggers"2.15.3 Reports for Triggers
Table 2-10 describes all available reports for triggers.
Table 2-10 Available Reports for Triggers
| View | Description |
|---|---|
|
Object Details |
(Default) Lists of the details about the current trigger. Actions you can perform include:
|
|
Code |
Displays the source code for the trigger. You can edit the code in this view. Actions you can perform in this view include:
See Also: "Editing a Trigger Manually," "Compiling a Trigger," "Downloading a Trigger," and "Dropping a Trigger" |
|
Errors |
Displays errors related to the current trigger. |
|
SQL |
Displays the SQL necessary to re-create the trigger. |
2.15.4 Editing a Trigger Manually
-
On the Workspace home page, click SQL Workshop and then Object Browser.
Object Browser appears.
-
From the Object list, select Triggers.
-
From the Object Selection pane, select a trigger.
The Code view appears.
-
You can edit the code in this view. Other edit controls include:
-
Find
-
Replace
-
Auto Complete
-
When you edit a trigger you can edit the code manually, perform a search and replace, and compile the trigger.
2.15.5 Compiling a Trigger
If you edit and make changes to a function, you must compile to save your changes. There is no save function because this is just a view of the object within the database. Compiling re-creates the object in the database.
To compile a trigger in Object Browser:
-
On the Workspace home page, click SQL Workshop and then Object Browser.
Object Browser appears.
-
From the Object list, select Triggers.
-
From the Object Selection pane, select a trigger.
The Details view appears.
-
To compile the current trigger:
-
Under Object Details, click Compile.
-
Under Code, click Save & Compile.
If the compilation fails, an error message displays above the code.
-
2.15.6 Downloading a Trigger
To save the current trigger as a file:
-
On the Workspace home page, click SQL Workshop and then Object Browser.
Object Browser appears.
-
From the Object list, select Triggers.
-
From the Object Selection pane, select a trigger.
The Details view appears.
-
Click Download Source to save the current trigger as a file.
-
To download the current tripper:
-
Under Object Details, click Download.
-
Under Code, click Download Source.
If the compilation fails, an error message displays above the code.
-
2.15.7 Dropping a Trigger
To save drop a trigger in Object Browser:
-
On the Workspace home page, click SQL Workshop and then Object Browser.
Object Browser appears.
-
From the Object list, select Triggers.
-
From the Object Selection pane, select a trigger.
The Details view appears.
-
Click Drop.
-
To confirm, click Finish.
2.16 Managing Database Links
A database link is a schema object in one database that enables you to access objects in another database. Once you create a database link, you can access the remote objects by appending @dblink to the table or view name, where dblink is the name of the database link.
2.16.1 Creating a Database Link
To create a database link:
-
On the Workspace home page, click SQL Workshop and then Object Browser.
Object Browser appears.
-
Click Create.
-
From the list of object types, select Database Link.
-
For Define
-
Database Link Name - Enter the name of the database link. Database link names must conform to Oracle naming conventions and cannot contain spaces, or start with a number or underscore.
-
Connect To Schema- Enter the name of the database schema on the remote system to access.
-
Password - Enter the password for the remote database schema.
-
Remote Hostname or IP - Enter the hostname or IP address of the database server you wish to access.
-
Remote Host Port - Enter the network port number on which the Oracle Net Listener is accepting requests. This is typically 1521.
-
Identified by - Select Service Name or SID.
If you select SID (Oracle System Identifier), enter the SID name if the remote database is identified by a SID. If you select Service Name, enter the service name if the remote database is identified by a service name.
-
-
Click Next.
-
Click Create Database Link.
2.16.2 Browsing a Database Link
To browse a database link:
-
On the Workspace home page, click SQL Workshop and then Object Browser.
Object Browser appears.
-
From the Object list, select Database Links.
-
From the Object Selection pane, select a database link.
The Object Details view appears.
-
Click the tabs at the top of the page to view different reports about the database link.
2.16.3 Reports for Database Links
Table 2-11 describes all available reports for database links.
Table 2-11 Available Reports for Database Links
| View | Description |
|---|---|
|
Object Details |
(Default) Displays details about the database link. Actions you can perform include: |
|
Dependencies |
Displays a list of objects that use (or depend) upon this database link. |
|
SQL |
Displays the SQL necessary to re-create this database link. |
2.16.4 Dropping a Database Link
To drop a database link in Object Browser:
-
On the Workspace home page, click SQL Workshop and then Object Browser.
Object Browser appears.
-
From the Object list, select Database Links.
-
From the Object Selection pane, select a database link.
The Object Details View appears.
-
Click Drop.
-
To confirm, click Finish.
2.17 Managing Materialized Views
A materialized view provides indirect access to table data by storing the results of a query in a separate schema object. Unlike an ordinary view, which does not take up any storage space or contain any data, a materialized view contains the rows resulting from a query against one or more base tables or views. A materialized view can be stored in the same database as its base tables or in a different database.
Materialized views are often used to improve performance, especially when storing data locally that is sourced from tables or views using a database link. Similarly, materialized views are often used instead of views when there are extensive calculations or summarizations, especially on particularly large data sets. Materialized views are refreshed at specified intervals which means the data is not always up-to-date but queries against them are significantly faster for the examples given above.
See Also:
Oracle Database Concepts for information about materialized views2.17.1 Creating a Materialized View
To create a materialized view:
-
On the Workspace home page, click SQL Workshop and then Object Browser.
Object Browser appears.
-
Click Create.
-
From the list of object types, select Materialized View.
-
For Define:
-
Materialized View Name - Enter the name of the view. View names must conform to Oracle naming conventions and cannot contain spaces, or start with a number or underscore.
To preserve the case of the name you enter, click Preserve Case.
-
Query - Specify a query to define the view.
Tip:
To access Query Builder or SQL Commands, click the appropriate button at the bottom of the page. The selected tool displays in a pop-up window. Once you create the appropriate SQL, click Return to automatically close the popup window and return to the wizard with the SQL. -
Click Next.
A confirmation page appears, which displays the SQL used to create the materialized view.
-
-
Click Create Materialized View.
2.17.2 Browsing a Materialized View
To view a materialized view:
-
On the Workspace home page, click SQL Workshop and then Object Browser.
Object Browser appears.
-
From the Object list, select Materialized Views.
-
From the Object Selection pane, select a view.
The Materialized View appears.
-
Click the tabs at the top of the page to view different reports about the materialized view.
2.17.3 Reports for Materialized Views
Table 2-12 describes all available reports for materialized views.
Table 2-12 Available Reports for Materialized Views
2.17.4 Dropping a Materialized View
To drop a materialized view in Object Browser:
-
On the Workspace home page, click SQL Workshop and then Object Browser.
Object Browser appears.
-
From the Object list, select Materialized Views.
-
From the Object Selection pane, select a view.
The Materialized View appears.
-
Click Drop.
-
To confirm, click Finish.
2.18 Managing Synonyms
A synonym is an alias for a schema object. Synonyms can provide a level of security by masking the name and owner of an object and by providing location transparency for remote objects of a distributed database. Also, they are convenient to use and reduce the complexity of SQL statements for database users.
See Also:
Oracle Database Administrator's Guide for information about synonyms2.18.1 Creating Synonyms
To create a synonym:
-
On the Workspace home page, click SQL Workshop and then Object Browser.
Object Browser appears.
-
Click Create.
-
From the list of object types, select Synonym.
-
For Define:
-
Synonym Name - Enter a name.
-
Public or Private - Specify whether the synonym should be public or private.
-
Schema - Select the database schema (or user name) which owns the object upon which you want to create your synonym.
-
Object - Enter the name of the object upon which you want to create a synonym.
-
Database Link - Enter the name of the database link to use if the synonym is to be created on a remote object.
-
Click Next.
A confirmation page appears, which displays the SQL used to create the synonym.
-
-
Click Create Synonym.
2.18.2 Viewing a Synonym
To view a synonym:
-
On the Workspace home page, click SQL Workshop and then Object Browser.
Object Browser appears.
-
From the Object list, select Synonyms.
-
From the Object Selection pane, select a synonym.
The Object Details view appears displaying the following:
-
Synonym Owner
-
Synonym Name
-
Object Owner
-
Object Name
-
Object Type
-
Status
-