3 Using SQL Commands
This section provides information on how to use SQL Commands to create, edit, view, run, and delete SQL commands.
See Also:
-
Oracle Database SQL Language Reference for detailed information about SQL statements and other parts of SQL, such as operators, functions, and format models
-
Oracle Database Concepts for conceptual information about SQL
-
SQL*Plus User's Guide and Reference for information about SQL*Plus, Oracle's version of SQL
-
Oracle Database Sample Schemas for information about the
HRsample schema that is used for examples in this chapter
3.1 What is SQL Commands?
You can use SQL Commands to create, edit, view, run, and delete database objects. A SQL command can contain SQL statements or PL/SQL blocks.
When using SQL Commands, remember the following:
-
SQL commands created in the Query Builder can be accessed from SQL Commands.
-
Saved SQL commands must have unique names within a given workspace.
-
There is no interaction between SQL Commands and SQL Scripts.
-
You can cut and paste an SQL command from SQL Commands to run in the SQL Script Editor.
3.2 Accessing SQL Commands
To access SQL Commands:
-
On the Workspace home page, click SQL Workshop.
-
Click SQL Commands.
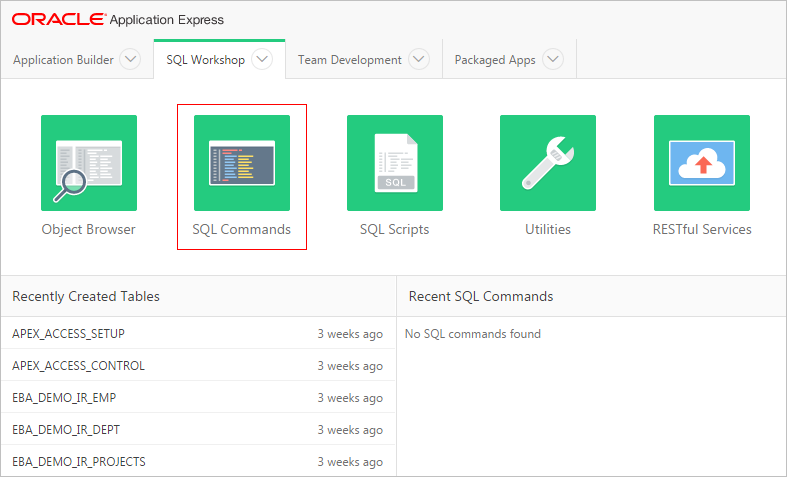
Description of the illustration sql_c.png
The SQL Commands home page appears.
Note:
If the instance administrator has disabled RESTful Services for this Application Express instance, RESTful Services are not available for this instance and the RESTful Services icon does not display. See "Configuring SQL Workshop" in Oracle Application Express Administration Guide.
3.3 About the SQL Commands Home Page
The SQL Commands home page is divided into two sections: a command editor and a display pane. You use the command editor to execute SQL commands and the display pane to view output, saved command lists, and history lists.
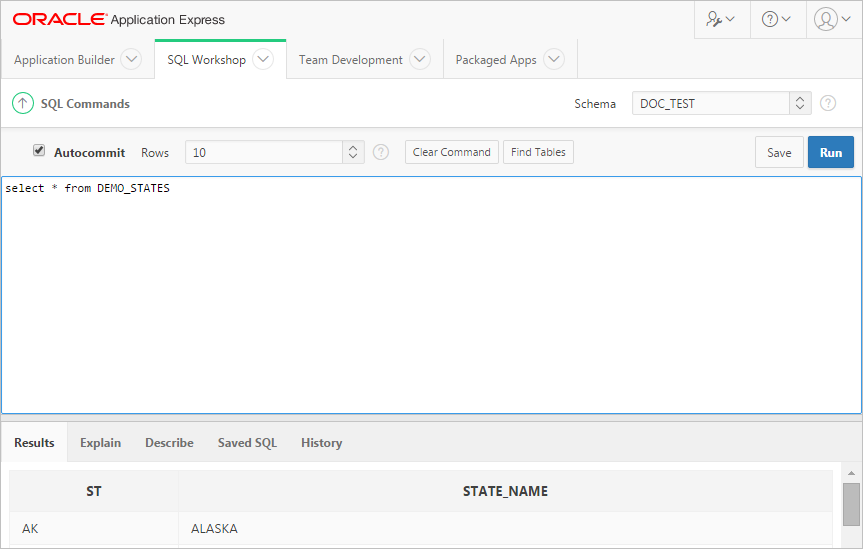
Description of the illustration sql_c_top.png
The top of the SQL Commands home page features a command editor and the following controls:
-
Autocommit. If available, click the Autocommit check box to enable autocommit and disable transactional commands. See "About Transactions in SQL Commands."
-
Rows. Select the number of rows of output to display simultaneously up to a maximum of 100,000. All rows of DBMS Output are displayed regardless of the Display list setting.
-
Clear Command. Use the Clear Command button to clear the text in the command editor.
-
Find Tables. Use the Find Tables button to view tables within the currently selected schema. See "Using the Find Tables Button."
-
Save. Click the Save button to save the contents of the command editor, or the currently highlighted content to a file. You are prompted to enter a name and an optional description. The command appears in the Saved SQL list. See "Saving an SQL Command."
-
Run. Click the Run button (Ctrl+Enter) to run the command in the command editor, or the currently highlighted command in the command editor. See "Running a SQL Command."
See Also:
"Using the Command Editor"The display pane is at the bottom of the SQL Commands home page and features the following five tabs:
-
Results. Click the Results tab to see the results from the last successfully executed SQL command. Click DBMS Output at the bottom of the displayed results to display lines of DBMS output. This control only appears when there is DBMS output to display. Click Download to export results to a comma-delimited file on your local file system. See "Viewing Results."
-
Explain. Click the Explain tab to examine the execution plan used by the optimizer for statements that make changes to the database. Objects in the output are linked to the Object Browser. Click the linked object to view its properties in the Object Browser. See "Using Explain Plan."
-
Describe. Enter Describe object_name and click Run to display column definitions for a table or view, or specifications for a function or procedure in the Describe tab. Select links in the Describe results to write that information into the command editor. For example, click a table name to add owner.table, click a column name to add the column name, click a procedure or function name to add the object call with parameters, or click a package name to add the package call.
-
Saved SQL. Click the Saved SQL tab to display a list of all SQL commands saved in the current workspace. Click the command title to load it into the command editor. See "Using Saved Commands."
-
History. Click the History tab to list your recently executed commands. Your last 200 executed commands are saved. See "Using SQL Command History."
See Also:
"Selecting a Schema"3.4 Using the Command Editor
You use the command editor in SQL Commands to execute SQL commands within Oracle Application Express.
See Also:
"About the SQL Commands Home Page"3.4.1 Running a SQL Command
To execute a SQL Command:
-
On the Workspace home page, click SQL Workshop and then SQL Commands.
The SQL Commands page appears.
-
Enter the SQL command you want to run in the command editor.
-
Click Run (Ctrl+Enter) to execute the command.
Tip:
To execute a specific statement, select the statement you want to run and click Run.The results appear in the Results pane.
-
To export the resulting report as a comma-delimited file (.csv), click the Download link.
3.4.2 About Transactions in SQL Commands
Transactional mode is a stateful transaction mode where you can, for example, perform an update, select data for review, and COMMIT or ROLLBACK changes. It is implemented using DBMS_JOBS.
Consider the following behavior in transactional mode:
-
Actions are not committed to the database until you enter an explicit
COMMITcommand. -
Exiting SQL Commands terminates and rolls back the current transaction.
-
A session timeout terminates and rolls back the current transaction.
Note that the Environment Setting,
SQL Commands Maximum Inactivity in minutes, sets the time before an inactive session times out. The default timeout is 60 minutes. See "Configuring SQL Workshop" in Oracle Application Express Administration Guide. -
The CSV Export option is not available.
3.4.3 Disabling Transactional SQL Commands
To disable transactional SQL commands in SQL Commands, check the Autocommit check box. Attempting to use any transactional SQL commands such as COMMIT or ROLLBACK when transactional mode is disabled returns an error message.
3.4.4 Enabling Transactional SQL Commands
To enable transactional SQL commands, clear the Autocommit check box. Oracle Application Express verifies that the necessary system resources are available before entering the transactional mode. If resources are unavailable, an error message is displayed.
3.4.5 About Unsupported SQL*Plus Commands
SQL Commands does not support SQL*Plus commands. If you attempt to enter an SQL Command Line command such as SET ECHO or DEFINE in SQL Commands, an error message displays.
3.4.6 Terminating a Command
You can terminate a command in SQL Commands using a semicolon (;), a slash (/), or with nothing. Consider the following valid alternatives:
SELECT * from emp;
SELECT * from emp
/
SELECT * from emp
The first example demonstrates the use of a semicolon (;), the second example demonstrates using a slash (/), and the final example demonstrates a command with no termination.
3.4.7 Using Bind Variables
Bind variables are supported. You are prompted to enter values for bind variables during command execution. Bind variables are prefixed with a colon.
For example
SELECT * FROM emp WHERE deptno = :dept
3.4.8 Using the Find Tables Button
Use the Find Tables button to view tables within the currently selected schema.
To view tables within the current schema:
-
Navigate to SQL Commands.
-
From the Schema list, select a schema (optional).
-
Click Find Tables.
The Table Finder appears. A search bar displaying the selected schema displays at the top of the page and contains the following controls:
-
Search. Search for a table name. Enter case insensitive keywords in the Search field and click Go. To view all tables, leave the Search field blank and click Go.
-
Views. Select the Views check box and click Go to include views in the resulting report.
-
Rows. Determine how many rows display in the resulting report. To change the number of rows that display, make a selection from the list and click Go.
The Table Finder report appears displaying the table name, the number of rows, last analyzed date, and the object type.
-
-
Select a table name.
The Table Finder report appears.
This report displays the column names, data type, length, precision, scale and the SQL necessary to re-create the table that appears at the bottom of the page.
-
Click Append to append SQL from the page to the existing command in the command editor.
-
Click Replace to replace existing command in the command editor with the SQL from the page.
3.5 Saving an SQL Command
You can save commands you enter in SQL Commands.
To save an SQL command:
-
On the Workspace home page, click SQL Workshop and then SQL Commands.
The SQL Commands page appears.
-
Enter the command in the command editor.
-
Click Save to save the command.
You are prompted to enter a name and description for the command.
-
Click Save, or click Cancel to return to the command editor without saving.
The saved command is listed in the display area.
3.6 Copying a Command
To copy a SQL command:
-
On the Workspace home page, click SQL Workshop and then SQL Commands.
The SQL Commands page appears.
-
Click Saved SQL.
The Saved SQL list of commands appears in the display pane.
-
Click the name of the command to load it into the command editor
-
Click Save to save the command.
-
Enter a name for the command in the Name field and click Save.
The command is copied to the new name.
3.7 Viewing Results
When you execute a SQL command, the results display in the display pane at the bottom of the SQL Commands home page. The results of the last executed command are available until you execute another SQL command, or leave SQL Commands.
3.7.1 Accessing the Results Pane
To display SQL command results:
-
On the Workspace home page, click SQL Workshop and then SQL Commands.
The SQL Commands page appears.
-
Click the Results tab.
The HTML formatted results appear in the display pane.
-
Click DBMS Output to display plain text DBMS output results.
The DBMS Output control only appears if there are DBMS output results.
3.7.2 About the Results Pane
The Results pane displays SQL command results as HTML formatted table. The number of rows returned appears after the output, and the time taken. DBMS output appears as plain text after the HTML formatted results.
On the Results pane you can:
-
Display DBMS output. Automatically displays HTML output or DBMS output depending on type of SQL command entered, SQL or PL/SQL block with DBMS output.
-
Download results. Click Download to export results to a comma-delimited file on your local file system. You are prompted to enter a name and directory for the file. Only available for HTML output.
See Also:
"Accessing the Results Pane"3.8 Using Explain Plan
You can view the explain plan the Oracle Optimizer uses to run your SQL command. It is not necessary to execute the command to view the explain plan.
3.8.1 Viewing an Explain Plan
To view the Explain Plan:
-
On the Workspace home page, click SQL Workshop and then SQL Commands.
The SQL Commands page appears.
-
Enter or load the command whose plan you want to view.
-
Click the Explain tab.
The explain plan used by the optimizer appears in the display pane.
The Explain Plan pane shows the plan used by the Oracle Optimizer to run your SQL command. It typically displays the Query Plan, Index Columns and Table Columns used.
On the Explain Plan pane you can:
-
View object definitions. Click the object name in Query Plan to display the object definition in the Object Browser.
-
View index definitions. Click the index name in Table Columns to display the index definition in the Object Browser.
-
3.9 Using Saved Commands
You can access the commands you save and commands saved by other users in the same workspace. You can also access SQL commands you and other users of the same workspace saved from the Query Builder.
3.9.1 Accessing Saved Commands
To access saved SQL commands:
-
On the Workspace home page, click SQL Workshop and then SQL Commands.
The SQL Commands page appears.
-
Click the Saved SQL tab.
The Saved SQL list of commands appears in the display pane.
-
Click the title of the command to load it into the command editor.
The command appears in the editor.
-
Click Run to execute the command.
See Also:
"About the Saved SQL Pane"3.9.2 About the Saved SQL Pane
The Saved SQL pane displays a list of all commands saved under the current workspace. The list displays commands saved from SQL Commands and SQL commands saved from Query Builder. Saved SQL commands must have unique names in the current workspace. The same name cannot be used in the Query Builder and SQL Commands.
Each command entry shows the owner name, the command name, a description if it exists, the first characters of the SQL command, who last updated the command and when.
On the Saved SQL pane you can:
-
Show commands by owner. Make a selection from the Owner list to specify the user whose commands you want to display. To view all scripts select -All Users-.
-
Search for a command. Enter a command name or partial name, or enter a code snippet in the Find field and click Go. To view all scripts, leave the Find field blank and click Go. You control how many rows display by making a selection from the Rows list.
-
Set the Number of Output Rows. Make a selection from the Display list to specify the number of Saved SQL commands to display simultaneously.
-
Delete a command. Click the check box associated with a command and click Delete Checked.
3.10 Using SQL Command History
Commands you have executed are stored in the command history regardless of whether you explicitly save them. You use SQL Command History to access commands you have executed in SQL Commands.
3.10.1 Accessing a Command from Command History
To access history commands:
-
On the Workspace home page, click SQL Workshop and then SQL Commands.
The SQL Commands page appears.
-
Click the History tab.
The list of commands in History appears in the display pane.
-
Click the partial command displayed in the SQL column.
The command appears in the editor.
3.10.2 About the History Pane
The History pane displays a list of commands you have executed. Each history entry shows the time the command was last executed, the first characters of the command, and the schema in which it was executed.
On the History pane you can:
-
Load a command. Click the partial command displayed in the SQL column to load the command into the command editor. When the command loads, it also sets the schema in which it was last executed.