Oracle® Enterprise Manager Ops Center
Discover an Oracle ZFS Storage Appliance and Configure Storage Libraries
12c Release 3
E60007-03
June 2016
This guide provides an end-to-end example of how to configure and discover an Oracle ZFS Storage Appliance with Oracle Enterprise Manager Ops Center and to create a dynamic storage library.
Introduction
A virtualization host such as a global zone or a control domain relies on a storage library to store all the metadata for the virtualization hosts' virtual hosts, as well as the data that is the output of their operations. A storage library can use block storage or file system storage. Block storage is backed by Fibre Channel disks or iSCSI disks in the form of Logical Units or LUNs. The Oracle ZFS Storage Appliance family of products is unified storage, that is, it is capable of both file system storage and block storage. See Related Articles and Resources for links to information and articles about other types of storage libraries.
In this document, a standalone ZFS storage appliance which uses both block storage backed by iSCSI LUNs and NFS storage (optional) is discovered. In the storage appliance’s UI, configure the iSCSI targets and optionally configure a dedicated user (a dedicated user needs to be defined only if the root user of the appliance cannot be used). In the Oracle Enterprise Manager Ops Center’s UI, specify the discovery profile to discover the iSCSI objects, which results in a dynamic storage library. When you complete these procedures, the dynamic storage library is ready to be associated with a server pool. You can then use Oracle Enterprise Manager Ops Center to create, resize, delete, and clone LUNs.
What You Will Need
Requirements for completing the discovery and configuration procedures in Oracle Enterprise Manager Ops Center.
You will need the following to set up and use a dynamic block storage library:
-
On the Proxy Controller, Port 215 must be open for the SSH protocol.
-
The IP address of the storage appliance
-
The role of Storage Admin
-
The role of Security Admin to create a new account or the
rootuser account. This account is used to discover the storage appliance and to manage it after discovery. -
An unmanaged Oracle ZFS Storage Appliance connected to a managed network and with the latest patch level installed.
Tasks for Setting Up a Storage Library on an Oracle ZFS Storage Appliance
Lists the procedures that must be completed to use the storage provided by Oracle ZFS storage appliances in Oracle Enterprise Manager Ops Center.
The tasks for setting up a dynamic storage library on an Oracle ZFS Storage Appliance are done on both the storage appliance itself and in Oracle Enterprise Manager Ops Center.
From the Oracle ZFS Storage Appliance's User Interface
From Oracle Enterprise Manager Ops Center
Discovering a Clustered ZFS Storage Appliance
Description on how to discover a clustered ZFS Storage Appliance
When the ZFS Storage appliance is in a cluster configuration, the same procedure described for a standalone appliance (that will be detailed in the next chapter) will be executed for each active head.
Note:
The Oracle ZFS storage appliances are available in a cluster configuration, in which two storage controllers, or heads, use storage and network resources to provide services. In an active-active cluster, both heads are active. In an active-passive cluster, one head is active. In both cases, if a head fails, the other head takes control of all known resources and provides the services associated with those resources. Starting in Release 12.3.1.0, Oracle Enterprise Manager Ops Center supports an active-active configuration. Previous releases support an active-passive configuration.
-
In an active-passive configuration
-
Define an iSCSI target group for the active head.
-
Execute the same discovery as for a standalone appliance against the active head (specifying the iSCSI target).
-
Execute a new discovery for the passive head. For the passive head discovery the iSCSI and NFS targets will be unchecked since the head is passive and does not provide iSCSI and NFS services at the discovery time.
-
The two heads that were discovered will automatically detect that they are part of the same active-passive cluster.
-
-
In an active-active configuration
-
Define one iSCSI target group for each of the active heads (performed on the appliance)
-
Execute the same discovery as for a standalone appliance against each of the active heads (specifying the corresponding iSCSI target for each head). So this is like discovering two standalone ZFS storage appliances.
-
The two heads that were discovered will automatically detect that they are part of the same active-active cluster
-
Configure the Oracle ZFS Storage Appliance
Description of Oracle ZFS Storage Appliance user interface.
These procedures specify access to LUNs using the iSCSI protocol to create iSCSI targets and target groups. The procedures are performed on the Oracle ZFS Storage Appliance through its user interface. See the Oracle ZFS Storage Appliance's on-line help for current and specific configuration procedures.
Note:
The user interface of the Oracle Sun 7-series storage appliance is different from the user interface of the Oracle ZS3-series or ZS4–series storage appliance but the attributes and values have not changed. This document shows the UI of the Oracle ZS3-4 storage appliance.
Configure iSCSI Targets
Procedure for setting up storage according to iSCSI protocol in the Oracle ZFS Storage Appliance.
These instructions expose iSCSI LUNs as iSCSI targets of the storage appliance.
-
Log into the Oracle ZFS Storage Appliance.
-
Select the Configuration tab to display the default subtab, Services.
-
In the Data Services section, verify that the iSCSI service is online.
-
Click iSCSI to display the service's details. Verify that the iSNS and Radius services are disabled. Click Back to Services.
-
In the System Settings section, verify that the Phone Home service is online. If it is not, this service might require registration or restart or both.
-
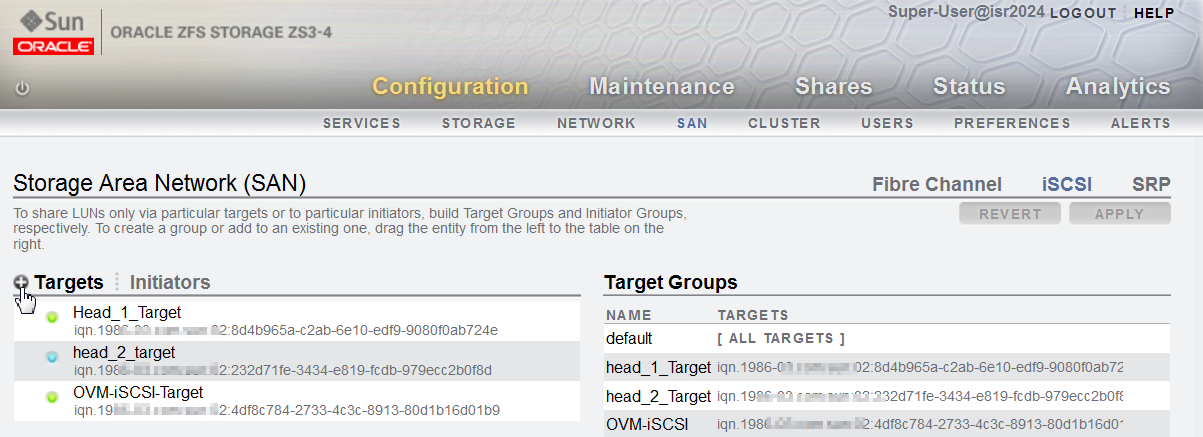
Click SAN and then the iSCSI subtab.
-
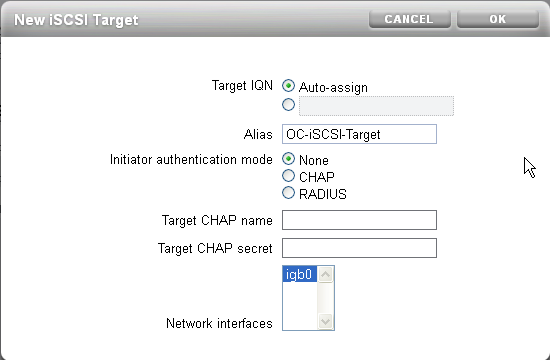
Click the Add icon, shown in the figure, to create a target with the following attributes:
-
Target IQN: Auto-assign
-
Alias: a name for the target. Throughout this document, the alias is
OC-iSCSI-Target. -
Initiator authentication mode: None
-
You can use CHAP credentials. If you add this option, include these credentials when you create the discovery profile.
-
Network interfaces: Select a network interface from the list of available interfaces.
Note:
To configure a new network interface, select Configuration and then Network. Click the Add icon in the Interfaces section to specify a new network interface.
-
-
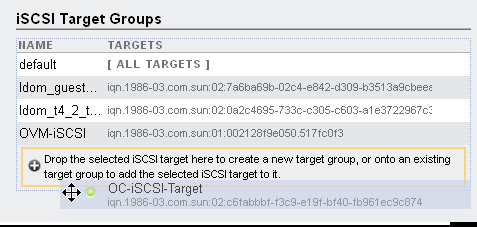
To create the new target group, highlight the new target, in this case
OC-iSCSI-Target, to show the Move icon, drag it to the Target Group table, and drop it in the area at the (+) icon. -
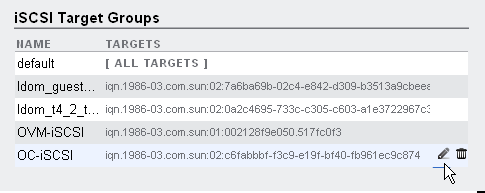
Click the Edit icon, shown in the figure, and rename the new group. This example renames the group to
OC-iSCSI.
You must provide the names of the target group and target in the discovery procedure.
Verify an Account for Oracle Enterprise Manager Ops Center
Procedure for setting up an account on the Oracle ZFS Storage Appliance.
When you create the discovery profile, you provide Storage Administration credentials. This username and password are used to log into the storage appliance during discovery and, after discovery, to monitor the storage appliance. It is recommended to use the storage appliance's root account. If this is not possible, you can use a different account.
If you choose to use an account that is not the root account, verify the account's access and privilege as described in this section. If you choose to use the root account, you can skip this procedure.
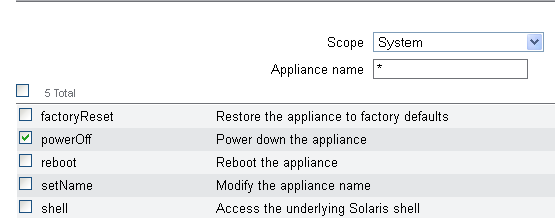
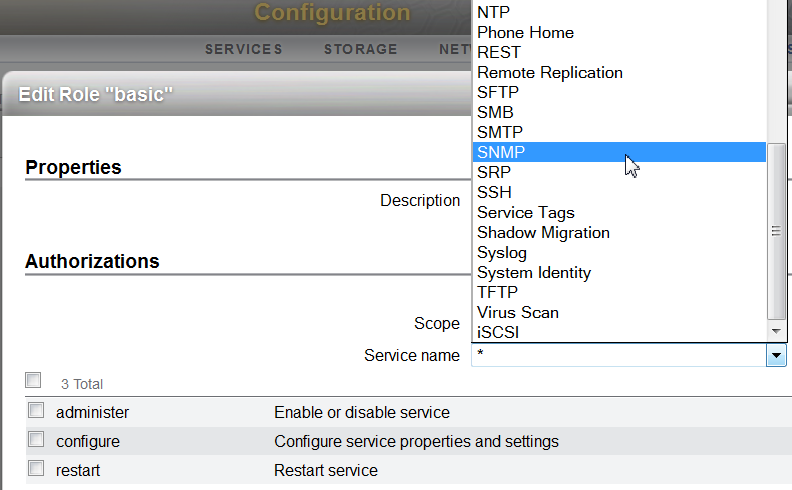
Verify that the user account used for discovery and management has the following characteristics:
Manage the Oracle ZFS Storage Appliance
Lists the procedures used to discover an Oracle ZFS storage appliance.
Now that the Oracle ZFS Storage Appliance has been configured, use Oracle Enterprise Manager Ops Center to discover and manage it. You will provide the head's management address and port and information the iSCSI storage that is available from this head: the iSCSI target group.
Create a Discovery Profile
Procedure for creating a profile that discovers an Oracle ZFS Storage Appliance.
Use this procedure to create a discovery profile. You can also create a discovery profile by selecting the Add Assets action.
-
Expand Plan Management in the Navigation pane.
-
In the Profiles and Policies section, click Discovery.
-
Click Create Profile in the Actions pane.
-
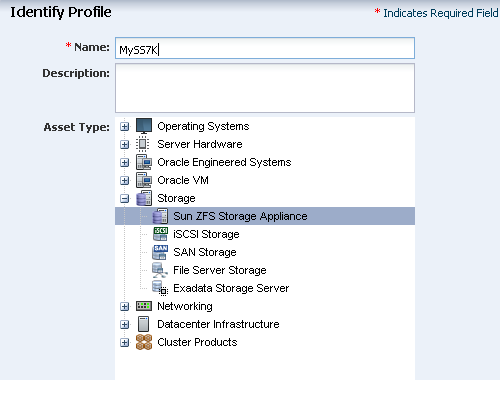
Enter a name for the discovery profile.
-
For Asset Type, expand the Storage section and select Sun ZFS Storage Appliance. Click Next.
-
(Optional) The Tags step of the wizard provides a way to add information for semantic tags. All assets discovered by this profile have the same tags. Click Next.
-
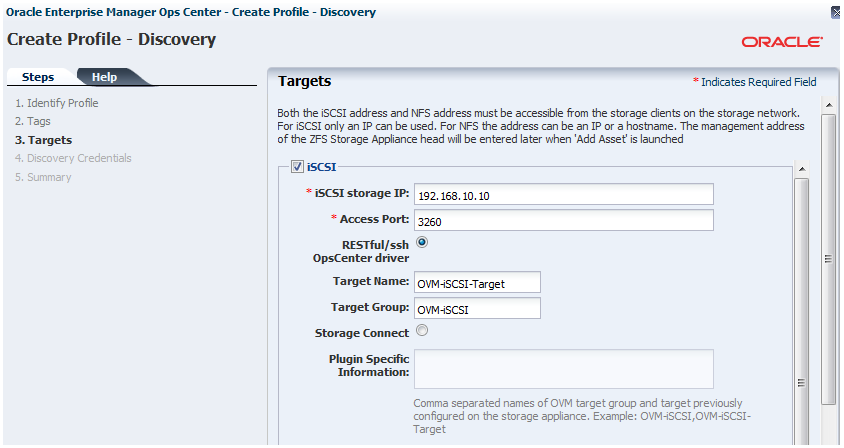
In the Targets step, select the iSCSI option. In the iSCSI storage IP field, enter the IP address of the storage appliance. You can accept the default ports.
-
To use the REST driver, select the RESTful/SSH Ops Center driver option to enable the Target Name and Target Group fields. Enter the names that you configured on the Oracle ZFS Storage Appliance in Configure iSCSI Targets:
-
Enter the name of the target, in this case
OC-ISCSI-Target, in the Target Name field. -
Enter the name of the target group, in this case
OC-iSCSI, in the Target Group field.
-
-
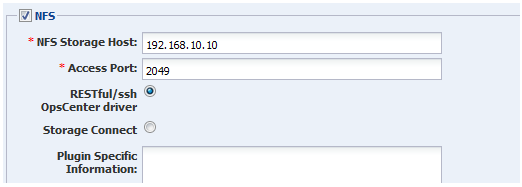
(Optional) To include the storage appliance's exported NFS shares in the discovery, select NFS and provide the IP address and port.
Note:
Note that the driver is set separately for iSCSI and NFS. If you select to work with the RESTful driver, which is the recommended option, make sure to select this option in the NFS part as well
-
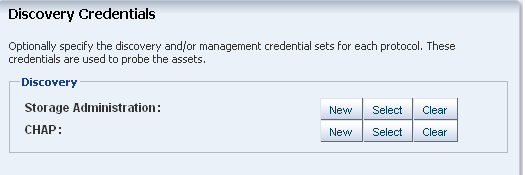
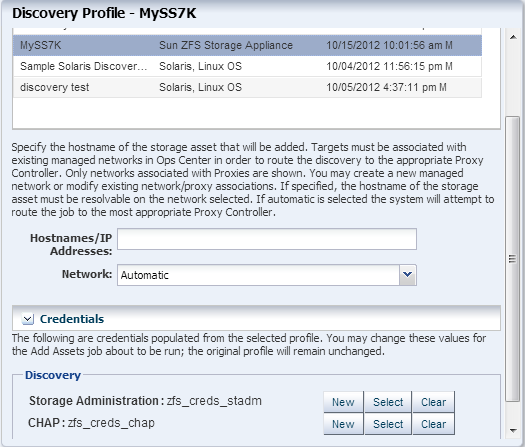
Oracle Enterprise Manager Ops Center gets access to the storage appliance using the Storage Administration credentials. In addition, you have the option to use CHAP credentials. In this example, we are creating a new discovery profile so create new credentials for the user account you reviewed in Verify an Account for Oracle Enterprise Manager Ops Center. The following example configures credentials for both Storage Administration and CHAP.
-
-
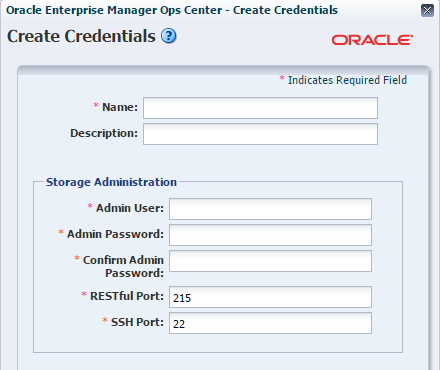
For Storage Administration credentials, click New.
-
For Name and Description, enter text to describe the purpose of these credentials.
-
For Admin User, enter the storage appliance’s root username, or the user account that was verified in “Verify an Account for Oracle Enterprise Manager Ops Center”.
-
For Admin Password, enter the password of the account you verified or the root password.
-
For Confirm Admin Password, enter the password again.
-
Click Create to complete the new credentials. These credentials will be available when you use this profile in a deployment plan.
-
-
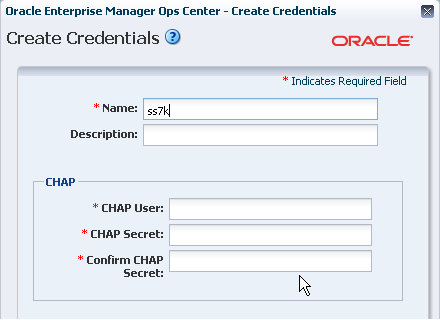
(Optional) To create challenge-handshake authentication protocol (CHAP) credentials, choose CHAP as the protocol and then click New.
This is only required if CHAP authentication was configured on the storage appliance.
-
For Name and Description, enter text to describe the purpose of these credentials.
-
For CHAP User, enter the CHAP username that you configured on the storage appliance.
-
For CHAP Secret, enter the CHAP password.
-
For Confirm CHAP Secret, enter the password again.
-
Click Create to complete the new credentials. These credentials will be available when you use this profile in a deployment plan.
-
-
Review the summary and click Finish to create the discovery profile.
Discover the Oracle ZFS Storage Appliance
Procedure for discovering an Oracle ZFS storage appliance using a discovery profile in Oracle Enterprise Manager Ops Center.
The discovery profile locates the Oracle ZFS Storage Appliance on the network, retrieves its configuration information, and makes it a managed asset.
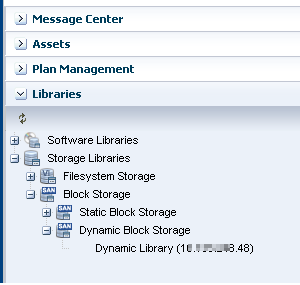
When the discovery job is completed, Enterprise Manager Ops Center displays the Oracle ZFS Storage Appliance in the Storage section of the Assets tree. The LUNs allocated to the iSCSI target in the storage appliance are now available for a new storage library. Because you discovered the storage appliance's iSCSI targets, a dynamic block storage library is created automatically.
What's Next
Description of the status of storage in Oracle Enterprise Manager Ops Center when the procedures are completed.
The new storage library is not associated with any server pool or virtualization host. Select a server pool or virtualization host and then use the Associate Libraries action.
Related Articles and Resources
See the following for more information:
-
Manage AssetsandConfigure Storagein Oracle Enterprise Manager Configuration Reference for information about discovery procedures for different types of servers. -
Hardwarein Oracle Enterprise Manager Operation Reference Guide for information about managing and monitoring hardware assets.
See the Deploy Storage Workflow in the Deploy How To library at http://docs.oracle.com/cd/E59957_01/nav/deploy.htm for storage examples.
To view the storage appliance's Administration Guide, log in to the Unified Storage System software interface and click Help in the top right corner of any screen. You can also access this guide at the host name or IP address of the storage system:
-
https://hostname:215/wiki -
https://ipaddress:215/wiki
See the Oracle ZFS Storage Appliance Software product information page at http://www.oracle.com/technetwork/documentation/oracle-unified-ss-193371.html?ssSourceSiteId=ocomen for links to more information.
Oracle® Enterprise Manager Ops Center Discover an Oracle ZFS Storage Appliance and Configure Storage Libraries, 12c Release 3
E60007-03
Copyright © 2007, 2016, Oracle and/or its affiliates. All rights reserved.
This software and related documentation are provided under a license agreement containing restrictions on use and disclosure and are protected by intellectual property laws. Except as expressly permitted in your license agreement or allowed by law, you may not use, copy, reproduce, translate, broadcast, modify, license, transmit, distribute, exhibit, perform, publish, or display any part, in any form, or by any means. Reverse engineering, disassembly, or decompilation of this software, unless required by law for interoperability, is prohibited.
The information contained herein is subject to change without notice and is not warranted to be error-free. If you find any errors, please report them to us in writing.
If this is software or related documentation that is delivered to the U.S. Government or anyone licensing it on behalf of the U.S. Government, then the following notice is applicable:
U.S. GOVERNMENT END USERS: Oracle programs, including any operating system, integrated software, any programs installed on the hardware, and/or documentation, delivered to U.S. Government end users are "commercial computer software" pursuant to the applicable Federal Acquisition Regulation and agency-specific supplemental regulations. As such, use, duplication, disclosure, modification, and adaptation of the programs, including any operating system, integrated software, any programs installed on the hardware, and/or documentation, shall be subject to license terms and license restrictions applicable to the programs. No other rights are granted to the U.S. Government.
This software or hardware is developed for general use in a variety of information management applications. It is not developed or intended for use in any inherently dangerous applications, including applications that may create a risk of personal injury. If you use this software or hardware in dangerous applications, then you shall be responsible to take all appropriate fail-safe, backup, redundancy, and other measures to ensure its safe use. Oracle Corporation and its affiliates disclaim any liability for any damages caused by use of this software or hardware in dangerous applications.
Oracle and Java are registered trademarks of Oracle and/or its affiliates. Other names may be trademarks of their respective owners.
Intel and Intel Xeon are trademarks or registered trademarks of Intel Corporation. All SPARC trademarks are used under license and are trademarks or registered trademarks of SPARC International, Inc. AMD, Opteron, the AMD logo, and the AMD Opteron logo are trademarks or registered trademarks of Advanced Micro Devices. UNIX is a registered trademark of The Open Group.
This software or hardware and documentation may provide access to or information about content, products, and services from third parties. Oracle Corporation and its affiliates are not responsible for and expressly disclaim all warranties of any kind with respect to third-party content, products, and services unless otherwise set forth in an applicable agreement between you and Oracle. Oracle Corporation and its affiliates will not be responsible for any loss, costs, or damages incurred due to your access to or use of third-party content, products, or services, except as set forth in an applicable agreement between you and Oracle.
