 Add. The Data Mapping
window is displayed.
Add. The Data Mapping
window is displayed.This option facilitates you to extract data from data sources and load to a table. The data source and target can be RDBMS table, HDFS-HIVE table or Flat File. It can also be a WebLog source and HDFS-Hive target. You can Load data incrementally from any data source to a table based on certain criteria.
NOTE |
If DB2 is selected as the source database, map data from Table to File (T2F) and then File to Table (F2T). Processing on Datatypes TIMESTAMP WITH TIME ZONE and TIMESTAMP WITH LOCAL TIME ZONE is not supported, even though source model generation is supported for those datatypes. |
Defining Data Mapping involves the following steps:
§ Specifying Data Mapping Details
§ Selecting Model
§ Defining Data Mapping to Table or File
§ Defining Mapping Properties
Additional Functionalities:
§ Associating DQ rules to the Data Mapping Definition
§ Replacing Source or Target of Data Mapping Definition During Execution
§ Handling Partitioned Target Tables
1. From the Data Mappings window, click Add. The Data Mapping
window is displayed.
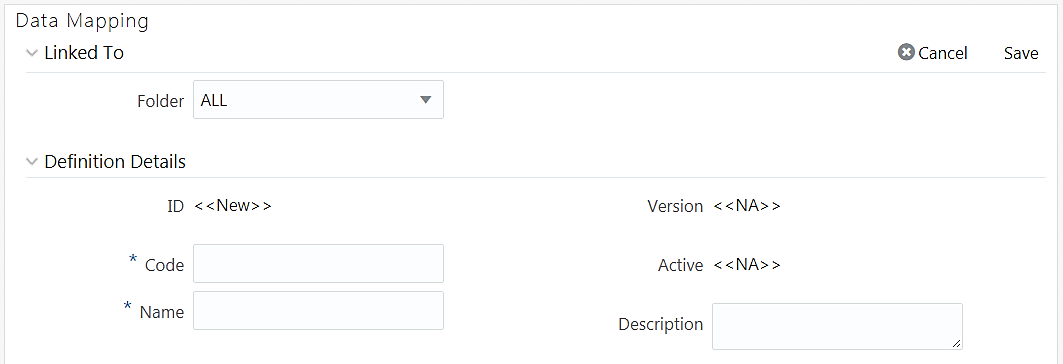
TheID will be automatically generated once you create a data mapping definition. The Folder field is not enabled.
2. Enter a distinct Code to identify the Data Mapping definition. Ensure that the code is alphanumeric with a maximum of 50 characters in length and there are no special characters except underscore “_”.
3. Enter the Name of the Data Mapping definition.
4. Enter a Description for the Data Mapping definition.

1. Select the Source as External Source or Infodom. By default, Infodom is selected.
2. If External Source is selected as Source, select the Data Source from the External drop-down list. All the Data Sources you have defined in the current infodom will be displayed in the drop-down list.
3. If Infodom is selected as Source:
§ Select the Information Domain from the Infodom drop-down list.
§ Turn on the Filter By Dataset toggle button if you want to filter the infodom by dataset. Select the Dataset from the drop-down list. The Dataset drop-down is enable only if the Filter By Dataset toggle button is turned on.
In case of F2T or F2H, the source data file should be located at /ftpshare/<INFODOM>/dmt/source/<SOURCE_NAME>/data/<MIS_DATE>. In case of multi-tier setup, if the dmt/source/<SOURCE_NAME>/data/<MIS_DATE>/ folder structure is not present in /ftpshare/<INFODOM> location, you need to manually create the folder structure.
For local L2H executions, you should create the execution file path explicitly in the app layer. Since the source folders get created in web local path, the execution will search for data file in ftpshare/<infodom>/dmt/<sourcename>/data/<datefolder>/ folder in the app layer.
NOTE
|
Data source based on File present in HDFS system cannot be loaded into RDBMS target Infodom. |
1. Select Load to Table option as Load Type.
2. Click the Map button. The DI Mapping window is displayed.
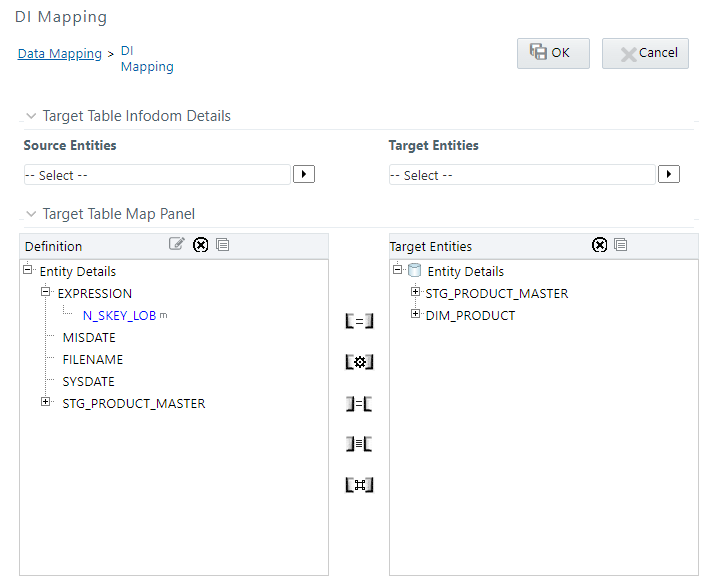
3. Click  and select the required table from the Source
Entities drop-down list. The list displays all the tables that
are part of the source model.
and select the required table from the Source
Entities drop-down list. The list displays all the tables that
are part of the source model.
The selected source entity attributes are displayed in the Definition pane of Target Table Map Panel.
4. Click and select the target table from the Target
Entities drop-down list. The selected entities are displayed in
the Target Entities pane of Target Table Map Panel.
If the Target column is a partitioned column, it is indicated using a superscript P and if it has a static value, mouse over the column displays the partition value.
You can select an entity and click  button
to view the Entity details. You can remove a selected Entity from the
Definition pane or Target Entities pane by clicking
button
to view the Entity details. You can remove a selected Entity from the
Definition pane or Target Entities pane by clicking  Remove Table button. You cannot remove an entity
if any of its attribute is mapped. The mapped attribute is indicated using
a superscript m.
Remove Table button. You cannot remove an entity
if any of its attribute is mapped. The mapped attribute is indicated using
a superscript m.
NOTE |
You can create a new table by clicking |
5. To map source to target, do one of the following:
§ Select
the required attribute from the Definition pane and select an attribute
from the Target Entities pane and click  button.
§ Click  button to automatically map between source attribute
and target attribute. Automapping happens if both source and target attributes
have the same name.
button to automatically map between source attribute
and target attribute. Automapping happens if both source and target attributes
have the same name.
§ Select
EXPRESSION from the Definition pane and select an attribute from the Target
Entities pane and click  Transformed Map button. The Specify
Expression window is displayed. Define expression to transform the
column.
Transformed Map button. The Specify
Expression window is displayed. Define expression to transform the
column.
§ To modify
an expression, select the expression name and click  from
the Definition toolbar. Modify the expression
from the Specify Expression window.
from
the Definition toolbar. Modify the expression
from the Specify Expression window.
You can remove a mapping by selecting the target column
and clicking  button or remove all
mappings by clicking
button or remove all
mappings by clicking  button.
NOTE |
For a single DI Mapping, you can use different target tables. That is, after mapping a source column to a column in a Target Entity, you can select another Target Entity and start mapping source columns to that target table columns. Also the same source column can be mapped to different target columns of different target entities. |
6. For F2T definition, you can map Row Level Transformation (RLT) functions, that is, SysDate() and Constant values to a target column:
§ Click SysDate() from the Definition pane and required
target column from the Target Entities pane and click  button.
The target column should be a Date column.
button.
The target column should be a Date column.
§ Click Constant Value from the Definition pane and required
target column from the Target Entities pane and click button.
Select the required constant value type from the drop-down list. The supported
constant values are #DEFINITIONNAME, #SOURCENAME, #MISDATE, and #FILENAME.
Ensure the Data Type of the target column is matching with the constant
value Data Type.
The options for Constants are:
1 #DEFINITIONNAME- The name of the Data File Mapping Definition will be transformed at Row level and loaded into mapped target column.
2 #SOURCENAME- The name of the Source on which Data File Mapping is defined will be transformed at Row level & loaded into mapped target column.
3 #MISDATE- Execution date of the Data File Mapping will be transformed at Row Level and loaded into mapped target column.
NOTE |
Columns mapped to #MISDATE will use the NLS
format of DB for loading. For loading successfully, the DB_DATE_FORMAT
given in AAI_DB_PROPERTY table should be the NLS date format of
the corresponding atomic schema. To know the NLS date format of
the DB , you can fire the following query: |
4 #FILENAME- The name of the file used for loading will be transformed at Row Level and loaded into mapped target column.
NOTE |
Row Level Transformation is supported only for F2T. In case of date based columns in F2T, when you map the same source date column to multiple target columns, an expression value is added for all mapped target columns, except the first column mapped. The expression will be in this format: TO_DATE(<<first record>>,'mm-dd-yyyy'). |
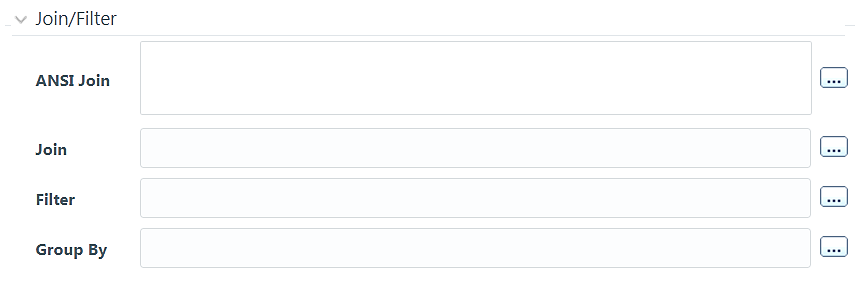
If you are mapping from multiple Source Tables, you need to define an expression to join the column data corresponding to each table. You can pass Runtime Parameters through Expressions, Joins and Filter conditions. For more information, see Passing Runtime Parameters in Data Mapping section.
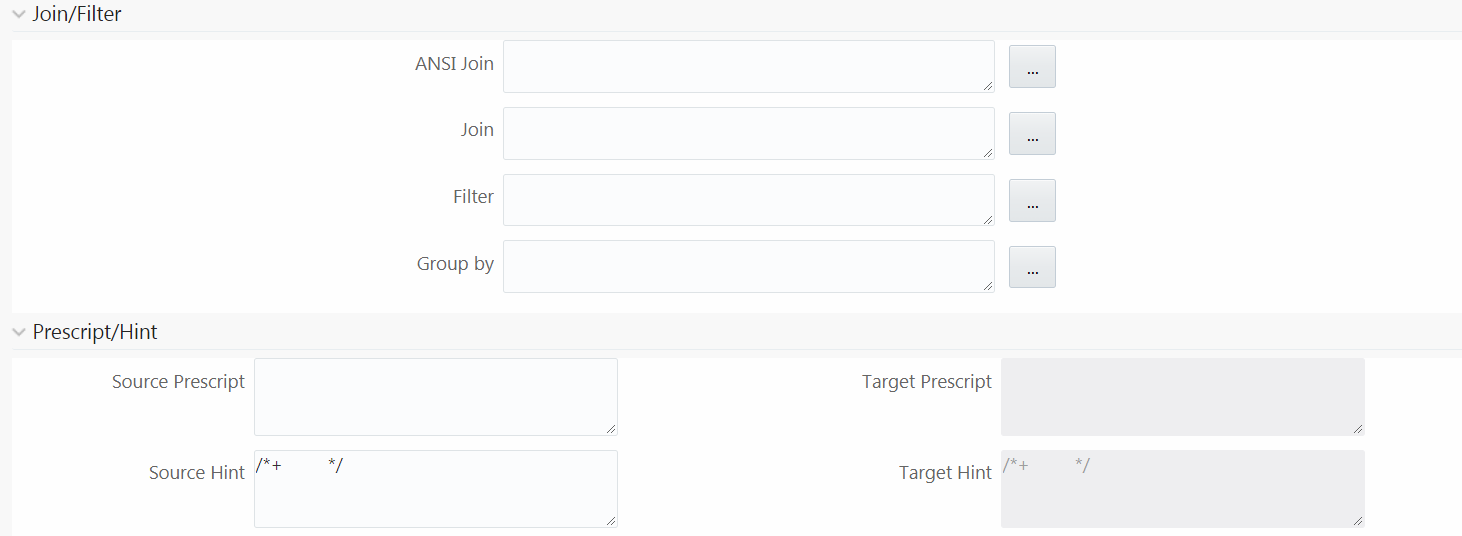
7. Specify the ANSI Join or Join to join the source tables and enter the Filter criteria and Group By to include during extraction. For example, “$MISDATE” can be a filter for run-time substitution of the MIS Date.
NOTE |
If the defined expression uses function that has a placeholder or calls a stored procedure that has a placeholder for String data type, enclose the placeholder in single quotes. Using double-quotes would generate error during extract definition or batch execution. Also expressions with Date/Timestamp data type placeholders are not supported. |
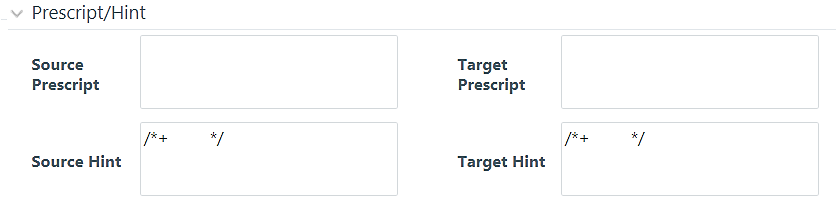
8. Specify any Source Prescript or Target Prescript if you want to use. Prescripts are supported for all HIVE based target Infodoms, that is, H2H and T2H. In case of H2T the prescripts are fired on the source. For more information, see Prescripts.
9. Specify Source Hint and Target Hint (if any), for faster loading. Oracle hints follow (/*+ HINT */) format. The mapping level hint is applicable for T2T, H2T, and H2H only.
For example, /*+ PARALLEL */.
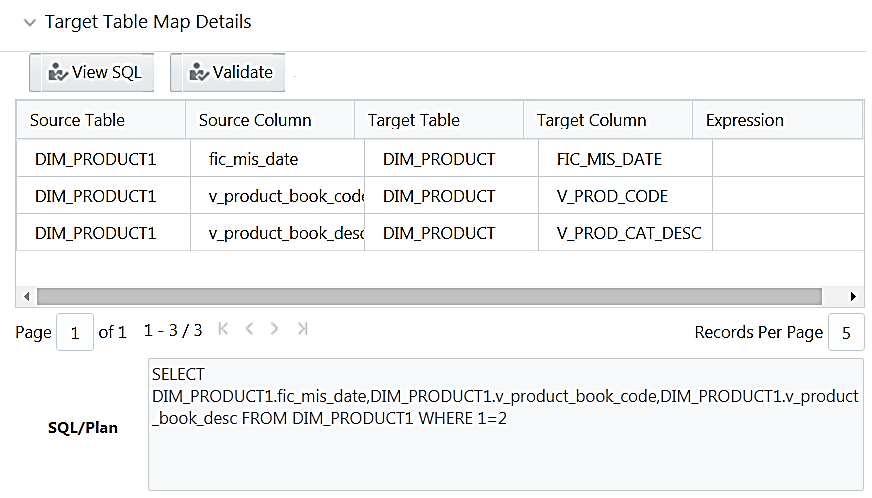
The Target Table Map Details pane displays the mapping details.
NOTE |
The View SQL and Validate button will be enabled only if your user group is mapped to the User Role DMADV. |
10. Click View SQL to view the complete query in the SQL/Plan pane.
11. Click Validate to validate the query by converting to the selected data source. If Validation is successful, the Explain Plan for the SQL query is displayed. Else, the SQL Exception is displayed.
12. Double-click the Expression column to add a target-level expressions for T2T and F2T definitions. For T2Ts it is recommended to use source level expressions because source and target expressions are similar in T2T. Target expression for T2T is mainly provided to edit the target level expression of the migrated Data Mapping definitions.
13. Click Properties to specify the properties. See Specifying Properties for Load To Table Option section.
14. Click Save to save the mapping details. The Data Mapping definition will be saved as version 1.
NOTE |
1. If a partitioned column is not mapped and the static value is not set for the partitioned column, an alert is displayed. The saving of mapping definition does not fail. You can set a static value at any time before execution. 2. For H2H definition, if the source and target are pointing to two different Hive Schemas, it is mandatory to prefix the schema name to the source tables. Otherwise, the execution will fail. 3. When
you click Save,
if there are Primary Key Columns in the Target Entities which
are not mapped, then the following alert appears: |
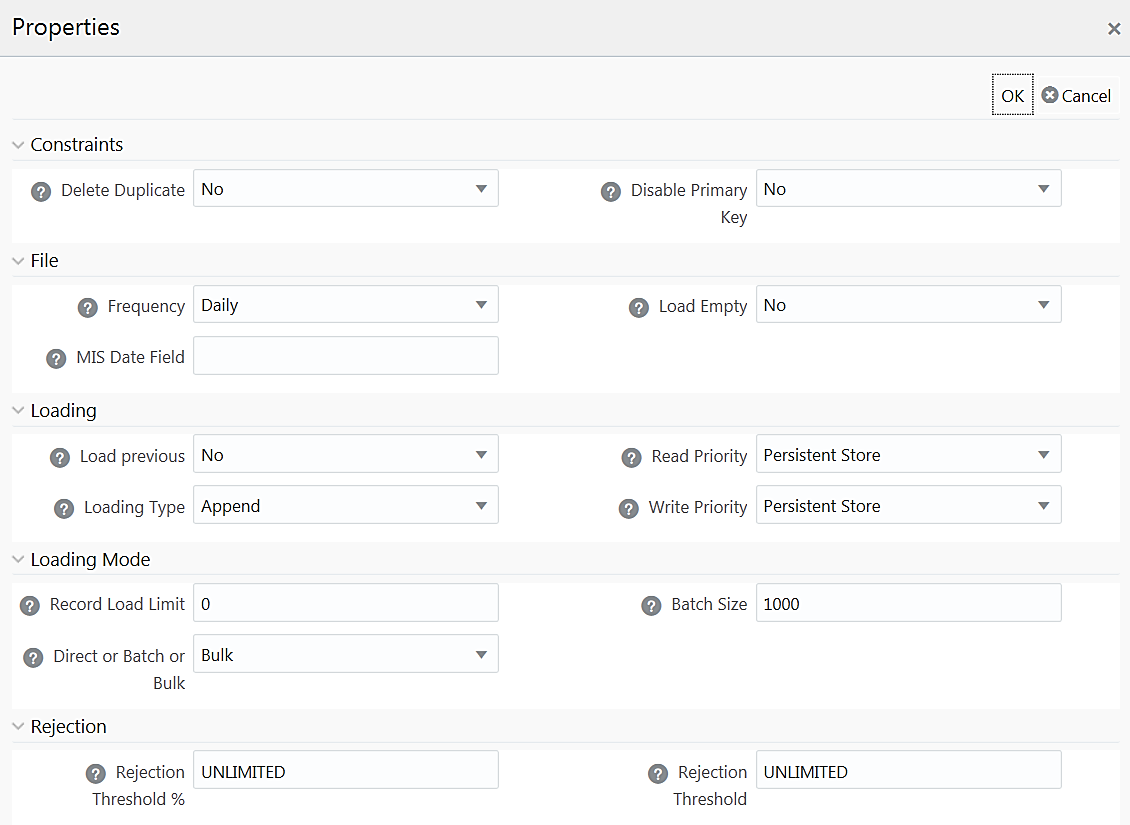
For T2T definition:
Property Name |
Property Value |
Constraints |
|
Delete Duplicate |
Select Yes if you want to delete the duplicate records after insertion if Primary Keys are disabled. |
Disable Primary Key |
Select Yes to disable Primary Key while loading the data. In Batch and Bulk modes if any of the foreign keys are in Disabled state before loading the data using T2T or the property Disable Primary Key is set to Yes, then all the Primary Keys and corresponding Foreign Keys are disabled before loading and are enabled back after loading. Hence the initial status of foreign and primary keys can be changed from Disabled to Enabled. In Direct mode, if the Disable Primary Key property is not set (selected as No), then the Delete Duplicate property is set to Yes automatically, which in turn reports all the duplicate records in the error log table. |
File |
|
Frequency |
Select the frequency of loading the data file into Data Warehouse. This property can be used to schedule Batch operations. The options are Daily, Weekly, Monthly, Quarterly, Yearly, and One Time Load. |
Load Empty |
If this is set to Yes, the task will be successful, even if there are no records to load or if all the records are discarded or rejected. |
MIS Date Field |
Specify the MIS Date field in the source data file. If MIS Date is not part of the download, then you can use the MISDate() function in the Data Mapping window to add MIS Date to the table automatically. |
Loading |
|
Load Previous |
Set to Yes if you want to load the data of the previous period if current period data is not available. |
Loading Type |
Select the loading type from the drop-down list. The options are: Insert- The records will be overwritten. Append- The records will be appended to the target table. |
Read Priority |
Specify the priority of reading data from. The options are Persistent Store and Memory Store. |
Write Priority |
Specify the priority of writing data to. The options are Persistent Store and Memory Store. |
Loading Mode |
|
Record Load Limit |
If the number of records in the source table exceeds Record Load Limit value, the data loading will not happen. If the value is set as 0 or not specified, record count check is skipped. |
Direct or Batch or Bulk |
Specify the Loading Mode as Direct, Batch, or Bulk. In Bulk Mode of loading, note that: · Loading is possible only when the target database and the data source created for the definition are in the same database. · If the schema used for source and target is different but the database is same, then the target schema should be granted “Select” access for the source table. · You cannot specify the Batch Size and commit happens at the end of batch load. Batch loading is faster for lesser records as compared to larger number of records, which sometimes lead to loss of data while loading. |
Batch Size |
Specify the Batch Size if you want to load the records in batches. The ideal values for batch sizes are 1024, 2048, 10000, or 20000. Huge batch sizes may result in failure if the required system resources are not available. If it is not specified, commit is done on the entire set. |
Rejection |
|
Rejection Threshold |
Enter the maximum errors in absolute value that a Data File can have and the Data Load will be marked successful. Once the erroneous record count exceeds the Rejection Threshold value, the data loading task will fail and the inserted values will be rolled back for that table. Inserts for the previous tables won't be reverted. Rejection Threshold will be applied to each of the target table individually in a batch. By default, the value is set as UNLIMITED. Note the behavior of Rejection Threshold and Rejection Threshold %: Rejection Threshold is checked before Rejection Threshold %. If you set a value for Rejection Threshold, it will be considered as the rejection limit and any value given to Rejection Threshold % is not considered. If you set Rejection Threshold as UNLIMITED or blank, it checks for Rejection Threshold % and the value set for Rejection Threshold % will be taken as rejection limit. If you set both Rejection Threshold and Rejection Threshold % as UNLIMITED or blank, the whole Data file will be loaded irrespective of the number of errors. |
Rejection Threshold % |
Set Rejection Threshold as a percentage of the number of rows in the Data file. Enter the maximum errors as a percentage of the number of rows in the data file, which a Data File can have and the Data Load will be marked as successful. By default, the value is set as UNLIMITED. Rejection Threshold % is considered only if Rejection Threshold is set to UNLIMITED or blank. |
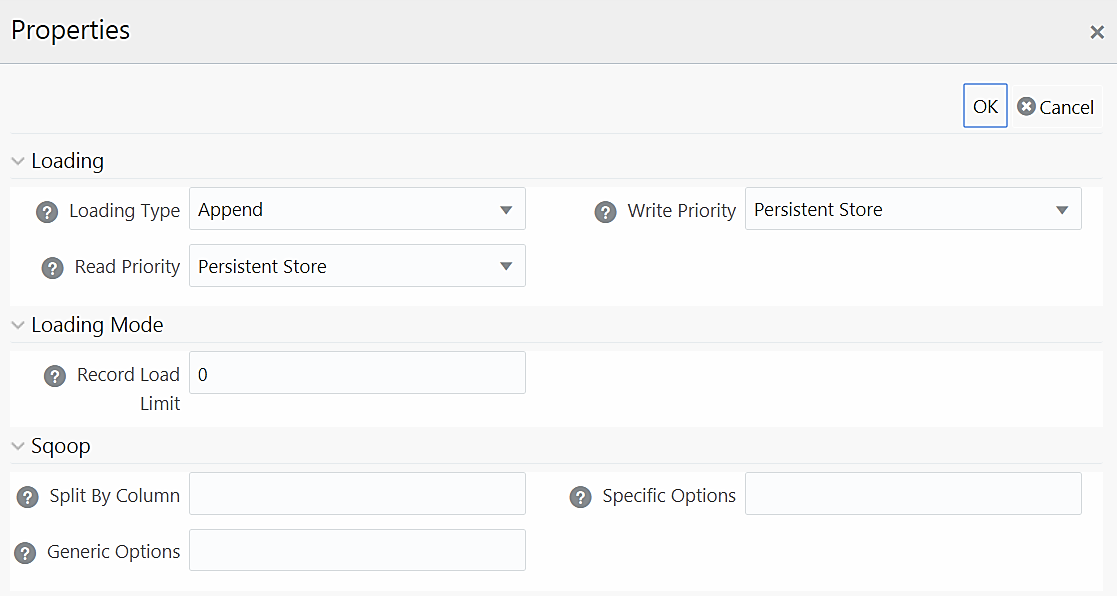
For T2H definition:
Property Name |
Property Value |
Loading |
|
Loading Type |
Select the loading type from the drop-down list. The options are: Insert- The records will be overwritten. Append- The records will be appended to the target table. |
Read Priority |
This field determines the priority of reading the data from Memory Store or Persistent Store. Select Memory Store or Persistent Store from the drop-down list. |
Write Priority |
This field determines the priority of writing the data from Memory Store or Persistent Store. Select Memory Store or Persistent Store from the drop-down list. |
Loading Mode |
|
Record Load Limit |
If the number of records in the source table exceeds Record Load Limit value, the data loading will not happen. If the value is set as 0 or not specified, record count check is skipped. |
Sqoop |
|
Split By Column |
This is applicable only if you are using Sqoop for loading to Hive tables. Specify the split by column in the format “TableName.ColumnName”. It should not be an expression. Additionally, the column should not be of data type “Date” and it should not have Null data. This is a mandatory field for T2H executions using Sqoop. If you have not provided any value for this field, the T2H Sqoop engine defaults the value to the last mapped source column. Ideally, you should set Split-by column to a PK numeric column. If the split by column is String based, Generic Options property needs to be set to -Dorg.apache.sqoop.splitter.allow_text_splitter=true |
Generic Options |
This field is applicable only in Sqoop 1.44SSH mode. Specify the generic arguments which will be appended before all the tool specific arguments. For example, -Doraoop.nologging=true |
Specific Options |
This field is applicable only in Sqoop SSH mode. Specify any tool specific arguments, which will be appended at the end of the Sqoop command. For example, --connection-param-file ora.properties --update-mode allowinsert --update-key <COLUMN_NAME> |
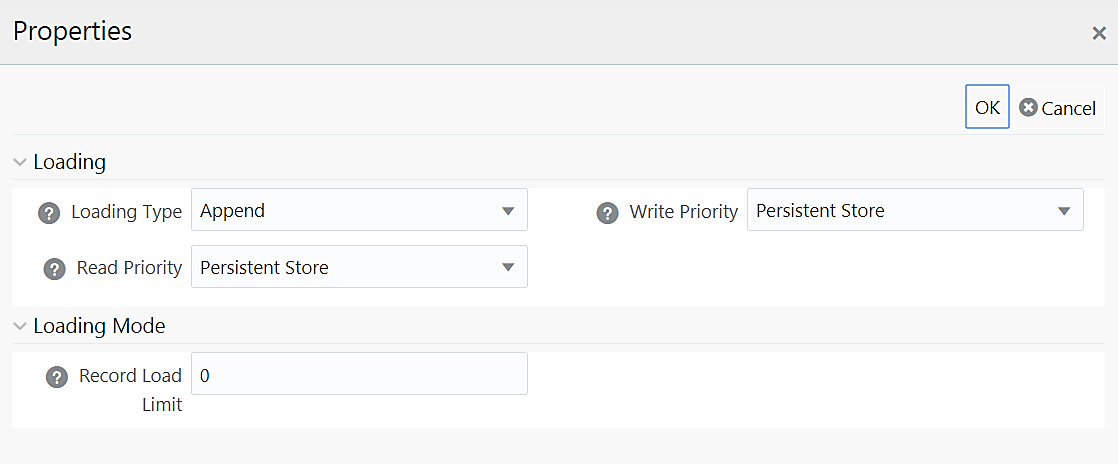
For H2H Definition:
Property Name |
Property Value |
Loading |
|
Loading Type |
Select the loading type from the drop-down list. The options are: Insert- The records will be overwritten. Append- The records will be appended to the target table. |
Read Priority |
This field determines the priority of reading the data from Memory Store or Persistent Store. Select Memory Store or Persistent Store from the drop-down list. |
Write Priority |
This field determines the priority of writing the data from Memory Store or Persistent Store. Select Memory Store or Persistent Store from the drop-down list. |
Loading Mode |
|
Record Load Limit |
If the number of records in the source table exceeds Record Load Limit value, the data loading will not happen. If the value is set as 0 or not specified, record count check is skipped. |
For F2H Definition
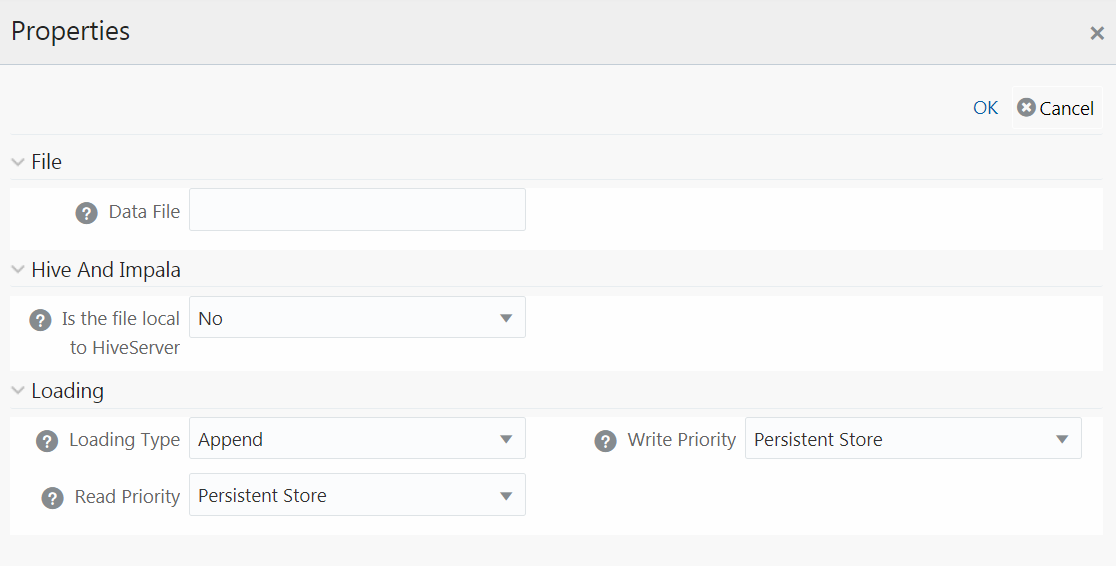
Property Name |
Property Value |
File |
|
Data File |
Enter the name of the Data File which need to be extracted. You can specify multiple files separated by ‘/’. This property is useful to create metadata definitions for multiple Flat-Files of the same structure by copying the Definition File. |
Hive and Impala |
|
Is File Local To Hive Server |
Select Yes if the file is on the server where HiveServer is running, else select No from the drop-down list. This is applicable only for remote file source. |
Loading |
|
Loading Type |
Select the loading type from the drop-down list. The options are: Insert- The records will be overwritten. Append- The records will be appended to the target table. |
Read Priority |
This field determines the priority of reading the data from Memory Store or Persistent Store. Select Memory Store or Persistent Store from the drop-down list. |
Write Priority |
This field determines the priority of writing the data from Memory Store or Persistent Store. Select Memory Store or Persistent Store from the drop-down list. |
For H2T Definition
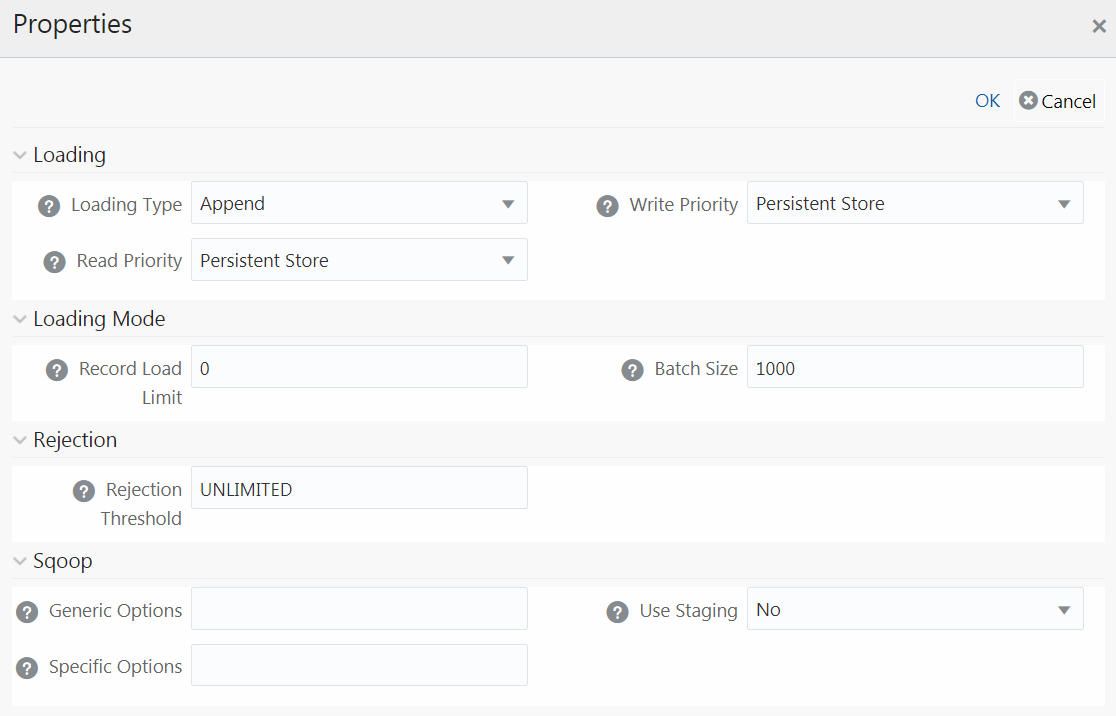
Property Name |
Property Value |
Loading |
|
Loading Type |
Select the loading type from the drop-down list. The options are: Insert- The records will be overwritten. NOTE: Limitation: In the Insert Mode for H2T SQOOP Execution, the Target Tables are truncated. If a Task fails, the changes cannot be rolled back. Append- The records will be appended to the target table. |
Read Priority |
This field determines the priority of reading the data from Memory Store or Persistent Store. Select Memory Store or Persistent Store from the drop-down list. |
Write Priority |
This field determines the priority of writing the data from Memory Store or Persistent Store. Select Memory Store or Persistent Store from the drop-down list. |
Loading Mode |
|
Record Load Limit |
If the number of records in the source table exceeds Record Load Limit value, the data loading will not happen. If the value is set as 0 or not specified, record count check is skipped. |
Batch Size |
Specify the Batch Size if you want to load the records in batches. The ideal values for batch sizes are 1024, 2048, 10000, or 20000. Huge batch sizes may result in failure if the required system resources are not available. If it is not specified, commit is done on the entire set. |
Rejection |
|
Rejection Threshold |
Enter the maximum errors in absolute value that a Data File can have and the Data Load will be marked successful. Once the erroneous record count exceeds the Rejection Threshold value, the data loading task will fail and the inserted values will be rolled back for that table. Inserts for the previous tables won't be reverted. Rejection Threshold will be applied to each of the target table individually in a batch. By default, the value is set as UNLIMITED. |
Sqoop |
|
Generic Options |
This field is applicable only in Sqoop 1.44SSH mode. Specify the generic arguments which will be appended before all the tool specific arguments. For example, -Doraoop.nologging=true |
Specific Options |
This field is applicable only in Sqoop SSH mode. Specify any tool specific arguments, which will be appended at the end of the Sqoop command. For example, --connection-param-file ora.properties --update-mode allowinsert --update-key <COLUMN_NAME> |
Use Staging |
Select Yes to use staging table during Sqoop export. |
For F2T Definition
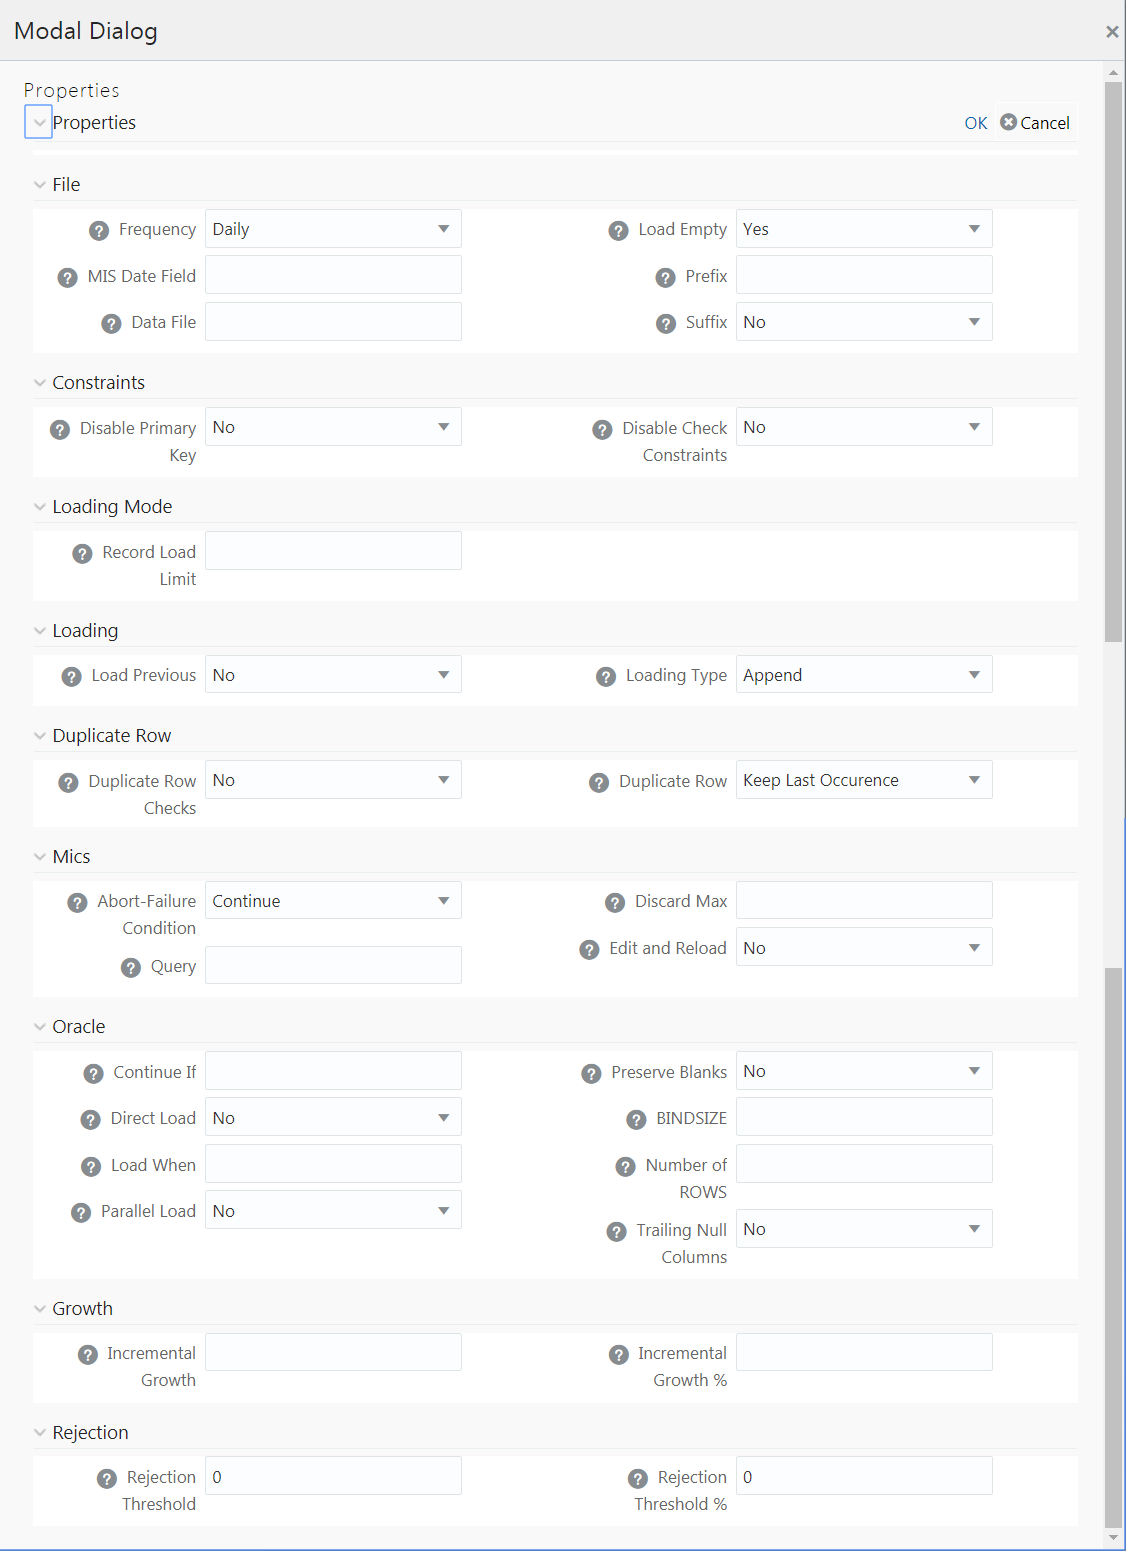
Property Name |
Property Value |
File |
|
Frequency |
Select the frequency of loading the data file into Data Warehouse. This property can be used to schedule Batch operations. The options are Daily, Weekly, Monthly, Quarterly, Yearly, and One Time Load. |
MIS Date Field |
Specify the MIS Date field in the source data file. If MIS Date is not part of the download, then you can use the MISDate() function in the Data Mapping window to add MIS Date to the table automatically. |
Data File |
Enter the data file name if it is different from the Definition name. This property is useful to create metadata definitions for multiple Flat-Files of the same structure by copying the Definition File. Note: For F2T CPP execution, you should not enter “/ “ in the Data File name. |
Load Emplty |
If this is set to Yes, the task will be successful, even if there are no records to load or if all the records are discarded or rejected. |
Prefix |
Enter the string that is prefixed with the data file name separated by an underscore (_). |
Suffix |
Select No if the data file name is not suffixed. Select Information Date if the data file name is suffixed with Information Date or MIS Date in YYYYMMDD format separated by an underscore (_). |
Constraints |
|
Disable Primary Key |
Select Yes to disable Primary Key while loading the data. In Batch and Bulk modes if any of the foreign keys are in Disabled state before loading the data using T2T or the property Disable Primary Key is set to Yes, then all the Primary Keys and corresponding Foreign Keys are disabled before loading and are enabled back after loading. Hence the initial status of foreign and primary keys can be changed from Disabled to Enabled. In Direct mode, if the Disable Primary Key property is not set (selected as No), then the Delete Duplicate property is set to Yes automatically, which in turn reports all the duplicate records in the error log table. |
Disable Check Constraints |
Select Yes if the Check Constraints on columns of the table needs to be disabled or select No to load with the constraints enabled. |
Loading Mode |
|
Record Load Limit |
If the number of records in the source file exceeds Record Load Limit value, the data loading will not happen. If the value is set as 0 or not specified, record count check is skipped. |
Loading |
|
Load Previous |
Set to Yes if you want to load the data of the previous period if current period data is not available. |
Loading Type |
Select the loading type from the drop-down list. The options are: Insert- The records will be overwritten. Append- The records will be appended to the target table. |
Duplicate Row |
|
Duplicate Row Checks |
Select Yes to check for Duplicate Rows and to be removed from the Data File. |
Duplicate Row |
This field determines which of the Duplicate Record(s) to be removed if found. The options are Keep Last Occurrence and Keep First Occurrence. |
Misc |
|
Abort-Failure Condition |
Select Stop to stop the loading on reaching the Rejection Threshold. Select Continue to ensure the reading of the entire Data File. |
Query |
Enter the Query that needs to be executed before file loading. |
Discard Max |
Enter the maximum errors allowed for SQL*Loader Discards while loading. |
Edit and Reload |
Select Yes to have an option of editing the error file and re-loading it. |
Oracle |
|
Continue If |
Enter a condition which when satisfied will continue the file load. |
Direct Load |
Select Yes to do Fast Load into the Oracle Database only if you have not defined any target expressions. Select Force to do Fast Load into the Oracle Database if target expressions have only constant values. Select No if you do not want to enable Fast Load. |
Load When |
Enter a condition which when satisfied will start the file load. |
Parallel Load |
Select Yes to load data in parallel into the Database table for faster Load, else select No. |
Preserve Blanks |
Select Yes to retain blank values in the Data without trimming. |
BINDSIZE |
For conventional path loads, BINDSIZE specifies the maximum size (bytes) of the bind array. The size of the bind array given by BINDSIZE overrides the default size (which is system dependent) and any size determined. |
Number of ROWS |
For conventional path loads, ROWS specifies the number of rows in the bind array. For direct path loads, ROWS identifies the number of rows you want to read from the data file before a data save. The default is to read all rows and save data once at the end of the load. |
Trailing Null Columns |
Select Yes to retain Trailing Null Columns in the Data File. |
Growth |
|
Incremental Growth |
Enter the Incremental Growth of Data in absolute values over the previous period. |
Incremental Growth % |
Enter the Incremental Growth of Data in percentage over the previous period. |
Rejection |
|
Rejection Threshold |
Enter the maximum errors in absolute value that a Data File can have and the Data Load will be marked successful. Once the erroneous record count exceeds the Rejection Threshold value, the data loading task will fail and the inserted values will be rolled back for that table. Inserts for the previous tables won't be reverted. Rejection Threshold will be applied to each of the target table individually in a batch. By default, the value is set as UNLIMITED. Rejection Threshold is considered only if Rejection Threshold % is set to UNLIMITED or blank. If you set both Rejection Threshold % and Rejection Threshold as UNLIMITED or blank, the whole Data file will be loaded irrespective of the number of errors. |
Rejection Threshold % |
Set Rejection Threshold as a percentage of the number of rows in the Data file. Enter the maximum errors as a percentage of the number of rows in the data file, which a Data File can have and the Data Load will be marked as successful. By default, the value is set as UNLIMITED. Note the behavior of Rejection Threshold % and Rejection Threshold: Rejection Threshold % is checked before Rejection Threshold. If you set a value for Rejection Threshold %, it will be considered as the rejection limit and it will not check Rejection Threshold. If you set Rejection Threshold % as UNLIMITED or blank, it checks for Rejection Threshold and the value set for Rejection Threshold will be taken as rejection limit. If you set both Rejection Threshold and Rejection Threshold % as UNLIMITED or blank, the whole Data file will be loaded irrespective of the number of errors. |
You can map data from source table to the specified file in the Data Mapping window. The source can be RDBMS table or HDFS source. To load data to a file along with other sources, you need to define the Data Mapping and specify the Source Entities. Source-Target mapping is not required since the table structure is completely extracted to the specified file. However, if you want to do a F2T after T2F, source- target mapping is required. For example, for DB2 you cannot directly load data from DB2 to RDBMS, so you need to map data from Table to File (T2F) and then File to Table (F2T).
After execution of T2F or H2F definition, the extracted file will be present in /ftpshare/<INFODOM>/dmt/def/<DEFINITIONNAME>/<BATCH_ID>/<DATE_FOLDER>. The column names in the table will not be present in the extracted file.
1. Select Extract to File option as Load Type.
2. Click the Select button. The Entity Selection window is displayed.
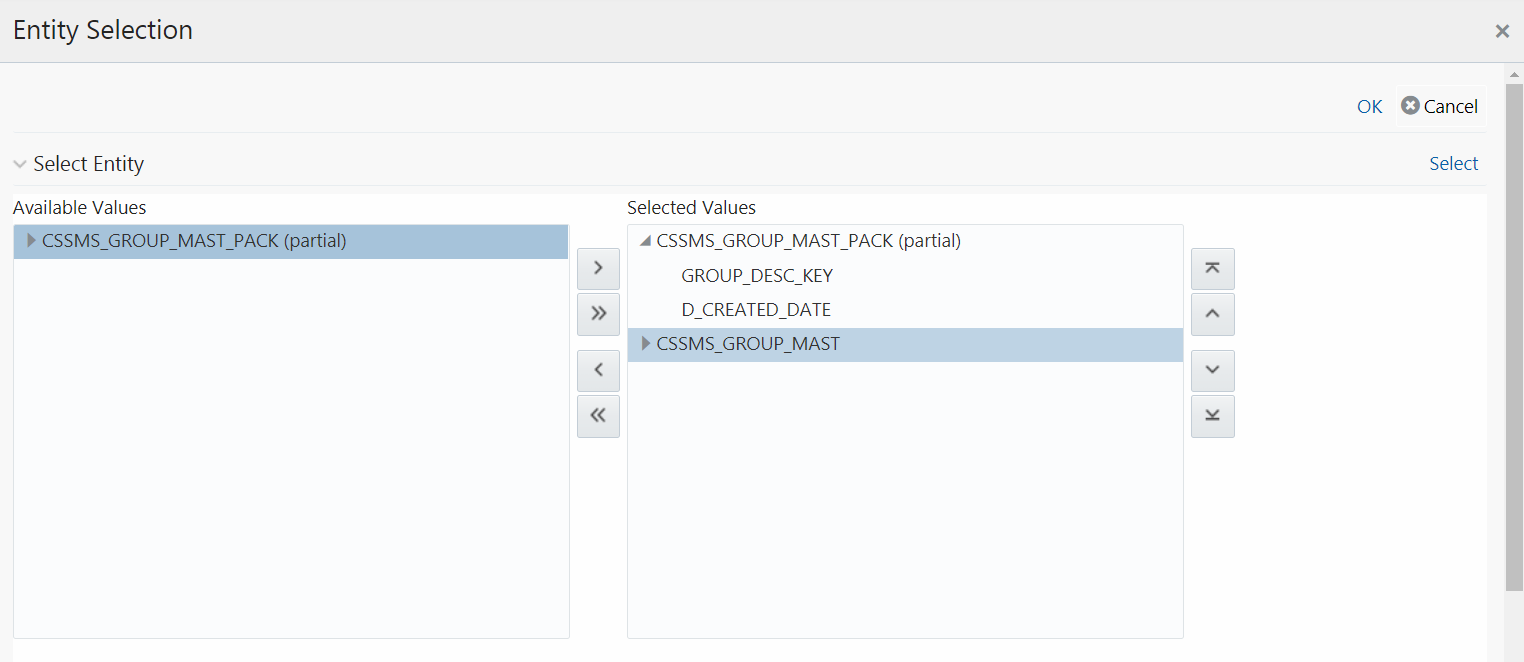
The Select Entity grid displays all entities in the selected Source or Infodom. Expand the Entity name to view the attributes in each entity.
3. Select the required entities or attributes you want to extract to file:
§ Select
an entity and click  if
you want to extract all attributes in an entity.
if
you want to extract all attributes in an entity.
§ For extracting
only selected attributes in an entity, expand the required entity, select
the attribute and click .
§ Click  to select all entities.
§ To remove
an attribute from the Selected Values, select
the attribute and click  or
click
or
click  to remove all selected values.
§ You can
rearrange the selected attributes/entities. Select an attribute or entity
and click  to move it up or click
 to move it down. Click
  to
move it to the top or click
to
move it to the top or click  to
move it to the bottom.
to
move it to the bottom.
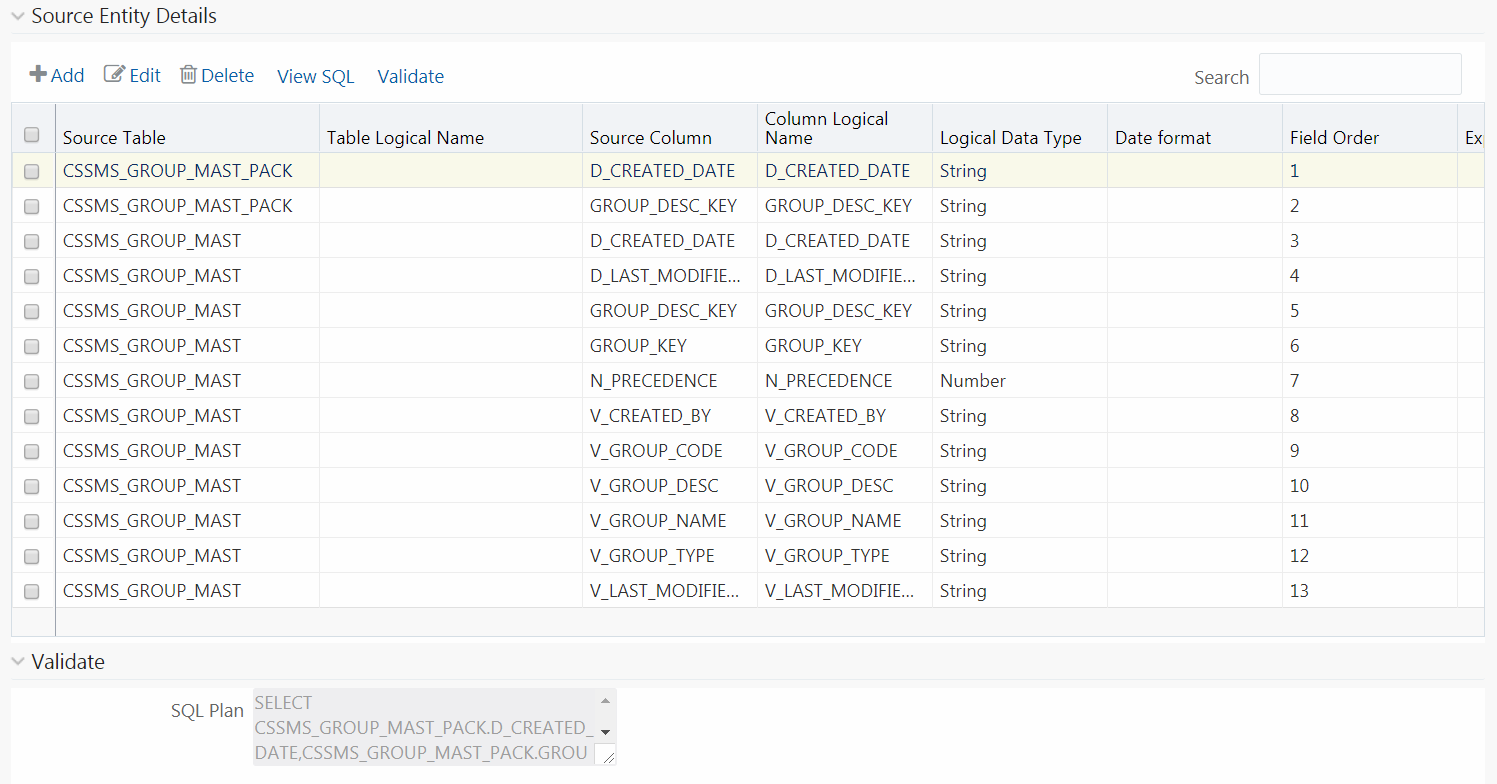
4. Click the Select button to populate the selected entities or attributes in the Source Entity Details grid.
NOTE |
Whenever you make any changes in the Select Entity grid, click the Select button to refresh the Source Entity Details grid to reflect the changes done. |
5. If you are mapping from multiple Source Tables, you need to define an expression to join the column data corresponding to each table. Specify the ANSI Join or Join to join the source tables and enter the Filter criteria and Group By to include during extraction. For example, “$MISDATE” can be a filter for run-time substitution of the MIS Date.
NOTE |
If the defined expression uses function that has a placeholder or calls a stored procedure that has a placeholder for String data type, enclose the placeholder in single quotes. Using double-quotes would generate error during extract definition or batch execution. Also expressions with Date/Timestamp data type placeholders are not supported. |
6. Specify Source Prescript if any. For more information, see Prescripts.
7. Specify Source Hint if any, for faster loading. Oracle hints follow (/*+ HINT */) format. The mapping level hint is not applicable.
For example, /*+ PARALLEL */.
NOTE |
Hints are not supported for T2F definitions. |
NOTE |
The View SQL and Validate button will be enabled only if your user group is mapped to the User Role DMADV. |
8. Click View SQL to view the complete query in the SQL/Plan pane.
9. Click Validate to validate the query by converting to the selected data source. If validation is successful, the Explain Plan for the SQL query is displayed. Else, the SQL Exception is displayed.
10. Perform the following actions if required:
§ Double-click the Field Order number and update if you want to change the order in which columns should appear in the target file.
NOTE |
No validation is provided for missing Field Orders. Hence, during execution those columns after the missing field order will be omitted. Click the Reorder button to sort and reorder the Field Order numbers to fill any missing numbers. |
§ Double-click the Logical Data Type and select the required option from the drop-down list to change the Data Type of the target column. The available Data types are Number, String, Date Time, Integer, and Timestamp.
§ Double-click the Date Format and modify the date format, if required, for the target column.
NOTE |
Date Format should be mentioned for target columns with Logical Data Type as Date Time. Else, the execution will fail. |
§ Select
an attribute and click  if
you do not want that attribute in the target file.
if
you do not want that attribute in the target file.
§ Click  to validate grid data.
11. Click Ok to save the changes in the Entity Selection window.
12. Click Properties to specify the properties. See Specifying Properties for Extract To File Option section.
13. Click Save and save the mapping details. The Data Mapping definition will be saved as version 1.
For T2F or H2F definition:
Property Name |
Property Value |
File |
|
Data File |
Enter the data file name. Data File Name can be different from the Definition File Name. This property is useful to create metadata definitions for multiple Flat-Files of the same structure by copying the Definition File. |
Suffix |
Select No if you do not want to suffix the data file name. Select Information Date if you want to suffix the data file name with Information Date or MIS Date in YYYYMMDD format separated by an underscore (_). |
Prefix |
Enter the string that you want to prefix with the data file name separated by an underscore (_). |
Misc |
|
Field Delimiter |
Enter the field separator used in the Data File. By default, comma (,) is selected. |
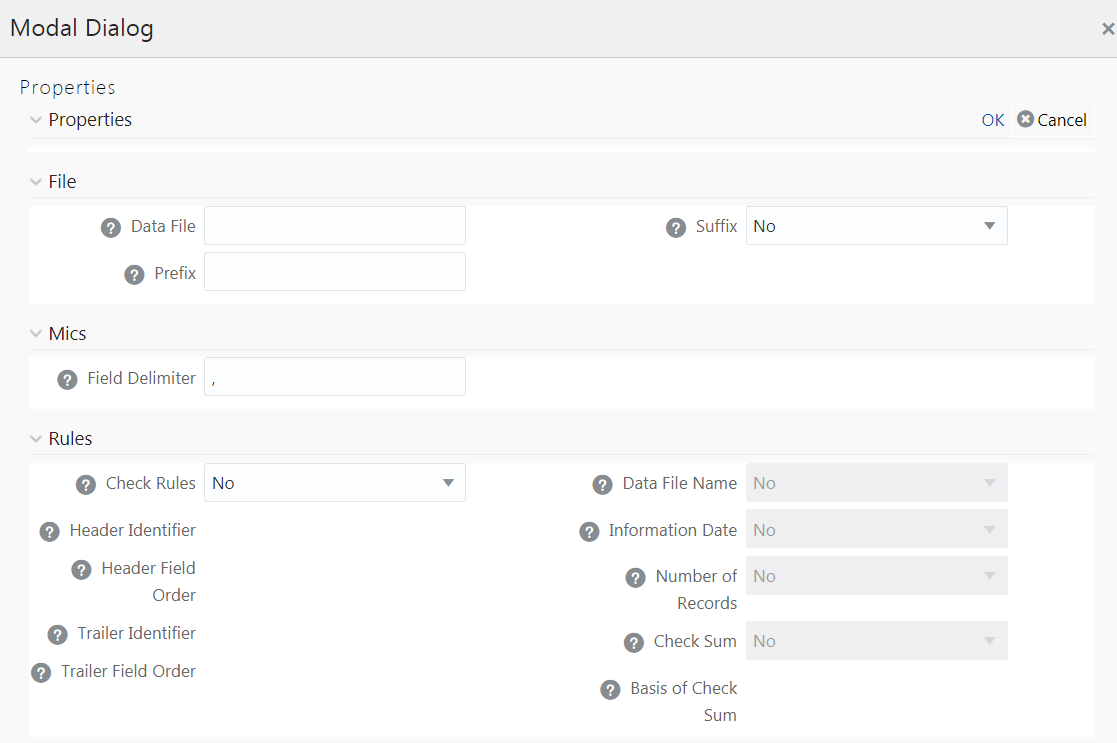
Rules |
|
Check Rules |
Select Header, Trailer, Header and Trailer or No from the drop-down list depending on where the Validity rules are specified in the Data File. |
Header Identifier |
This field is enabled only if you select Header or Header and Trailer options for Check Rules. Specify the first Character or String that identifies the Header Record. |
Header Field Order |
This field is enabled only if you select Header or Header and Trailer options for Check Rules. Specify the header field order as comma separated values-: 1-Header Identifier,2-Data File Name, 3-Information Date, 4-Number of records, 5-Value of Checksum, 6-Basis of Checksum. For example, if you specify 1,3,2,4,5,6; the header fields will be Header Identifier, Information Date, Data File Name, Number of records, Value of Checksum, Basis of Checksum. |
Trailer Identifier |
This field is enabled only if you select Trailer or Header and Trailer options for Check Rules. Specify the first Character or String that identifies the Trailer Record. |
Trailer Field Order |
This field is enabled only if you select Trailer or Header and Trailer options for Check Rules. Specify the Trailer field order as comma separated values-: 1- Trailer Identifier,2-Data File Name, 3-Information Date, 4-Number of Records, 5-Value of Checksum, 6-Basis of Checksum. |
Data File Name |
Select Yes if the name of the data file should be provided as part of the Header/Trailer. |
Information Date |
Select Yes if the Information (MIS) Date in the Data File should be provided as part of the Header/Trailer. |
Number of Records |
Select Yes if the number of records in the Data File should be provided as part of the Header/Trailer. |
Checksum |
Select Yes if a Check Sum Value should be provided as part of the Header/Trailer. |
Basis of Checksum |
Specify the Source Column Name on which the Check Sum is computed. It has to be a Numeric column. |
Data Quality rules can be associated to Data Mapping definitions so that Data Quality(DQ) checks are done on the source and Data Correction (DC) is done while loading to the target table. Thus DC is segregated from DQ checks. This is supported for both RDBMS and HIVE based Data Mapping definitions. However, DC on DQ Generic Check is not supported in T2H, H2T, and H2H. Also, associating DQ Rules to Data Mapping is not supported for H2T OLH (Oracle Loader for Hadoop) mode.
If we associate DQ Rules with T2T and execute the batch, both T2T and all the DQ rules defined on the Source table are executed. You have an option to include or exclude the Associated DQ rules. If we exclude a DQ check and execute the batch, then only T2T operation is performed and not the DQ.
Prerequisites
· De-select the Allow Correction on DI Source checkbox from the Configuration window. For more information, see the Updating Others Tab section.
· The DI Source should exist as an information domain.
To associate DQ rules to Data Mapping definition:
1. Click  button in the Associated DQ Rules toolbar. The
Data Quality Rule Association window is displayed.
button in the Associated DQ Rules toolbar. The
Data Quality Rule Association window is displayed.
2. All DQ Rules defined on the source table are displayed.
3. Select the Exclude checkboxes corresponding to the DQ rules to exclude them being executed along with the T2T operation.
4. Enter the sequence in which the selected DQ Rules should get executed in the Sequence column.
5. Click Save.
NOTE |
When a DQ rule is associated with a T2T mapping and the Allow Correction on DI Source checkbox is not selected in the System Configuration> Configuration > Others tab, DQ rule checking is done on source, but data correction is done while loading to the target table. |
You can replace the source of the Data Mapping definition during execution by using the run time parameter EXEC_ENV_SOURCE. Thus you can convert a T2T definition into H2T or T2H into H2H or H2H into T2H. But if the resultant definition is T2T, execution of T2T using CPP engine is not supported.
Similarly, you can replace the target of the Data Mapping definition during execution by using the run time parameter EXEC_ENV_TARGET. Thus you can convert a T2T definition into T2H or H2T into H2H or H2H into H2T. But if the resultant definition is T2T, execution of T2T using CPP engine is not supported.
If you are executing the Data Mapping definition through RRF module, you should pass the parameter with double quotes.
For example,
“EXEC_ENV_SOURCE”,”newSourceName”
“EXEC_ENV_TARGET”,”newTargetName”
If you are executing the Data Mapping definition through ICC module, you should pass the parameter with square brackets. For more information, see Component: LOAD DATA section.
NOTE |
Ensure the structure of the source/target in the mapping definition is same as that of the replacing source/target. Note that you can use both EXEC_ENV_SOURCE and EXEC_ENV_TARGET together as well. Only limitation is if the resultant definition is T2T, it cannot be executed using CPP engine. |
Following are the configurations required for executing H2H on Spark:
1. Register a cluster from DMT Configurations > Register Cluster with the following details:
§ Name- Enter name of the target information domain of the H2H mapping.
§ Description- Enter a description for the cluster.
§ Livy Service URL- Enter the Livy Service URL used to connect to Spark from OFSAA.
2. To execute H2H on spark, set the EXECUTION_ENGINE_MODE parameter as SPARK from ICC or RRF.
§ Execution through Operations module- you should pass [EXECUTION_ENGINE_MODE]=SPARK while defining the H2H tasks from the Task Definition window. For more information, see Component: LOAD DATA section.
§ Execution through RRF module- you should pass the following as a parameter while defining H2H as jobs from the Component Selector window:
“EXECUTION_ENGINE_MODE”,”SPARK”
3. Spark Session Management- In a batch execution, a new Spark session is created when the first H2H-spark task is encountered, and the same spark session is reused for the rest of the H2H-spark tasks in the same run. For the spark session to close at the end of the run, set the CLOSE_SPARK_SESSION to YES in the last H2H-spark task in the batch.
§ Execution through Operations module- you should pass [CLOSE_SPARK_SESSION]=YES while defining the last H2H-Spark task from the Task Definition window. For more information, see Component: LOAD DATA section.
§ Execution through RRF module- you should pass the following as a parameter while defining the last H2H-spark job from the Component Selector window:
“CLOSE_SPARK_SESSION”,”YES”
NOTE |
1. Ensure that the task with “CLOSE_SPARK_SESSION”,”YES” has less precedence set from all the rest of the H2H-spark tasks. 2. By default, the created spark session will be closed when any of the H2H-spark tasks fail. 3. Execution of H2H with large number of mappings may fail because Spark restricts the length of the SQL code in the spark.sql file to maximum 65535 (2^16 - 1). 4. When you run an H2H Load with Hive and Apache Spark, it fails with the following error: Error executing statement : java.lang.RuntimeException: Cannot create staging directory 'hdfs://<HOST_NAME>/user/hive/warehouse/hivedatadom.db/dim_account/.hive-staging_hive_2020-07-06_22-44-57_448_3115454008595470139-1': Permission denied: user=<USER_NAME>, access=WRITE, inode="/user/hive/warehouse/hivedatadom.db/dim_account":hive:hive:drwxrwxr-x Provide the required permissions to the logged-in user in the Hive Database Storage, which enables the user to access and perform tasks in the storage. |
This option allows you to create a new table on the fly if the target Information Domain of the Data Mapping or Data File Mapping definition is based on HDFS database. You can use the newly created table for mapping. The newly created table will be part of the OFSAAI data model and it is made visible and available to all other modules.
You cannot create a table with partition.
To dynamically create a table
1. From the DI Mapping window, click  in
the Target Entities pane. The Create Table
window is displayed.
in
the Target Entities pane. The Create Table
window is displayed.
2. Enter a table name and click Generate. The new table name is displayed on the Target Entities pane.
3. Select the
required attributes from the Definition pane and map them to the new Table
in the Target Entities pane by clicking  button.
4. After defining all mappings, click Save. The table will be created in the HDFS/ HIVE system, with the structure/data types of the mapped columns and it will be added to the metadata repository (both database xml and the object registration tables). The newly created table will be available for use in other metadata like Datasets, Hierarchies, and so on.
Prescripts are fired on a Hive connection, before firing a select from or insert into a hive table. While defining Prescript, note the following:
· Prescripts should mandatorily begin with the keyword "SET".
· Multiple Prescripts should be semi-colon separated.
· Prescripts are validated for SQL Injection. The following key words are blocklisted:
"DROP","TRUNCATE","ALTER","DELETE","INSERT","UPDATE","CREATE", "SELECT"
All validations applicable in the UI are checked on execution also. If a prescript fails any of the validations or if there is an error in firing the pre-script, the load operation is exited.
NOTE |
For H2T, the Prescript is fired on the source. |
Data loading into a partitioned Hive target table is supported. The partitioned columns are indicated using a superscript P in the DI Mapping window.
You can set a static value to a partitioned column from the REV_TAB_PARTITIONS table. If it is set, you can view it from the DI Mapping window by pointing the mouse over the column name. You need not to map the target column to any source column. If you map a source column to a target partitioned column which already has a static value, the static value will get precedence.
If no static value is set to a partitioned column, you can pass a dynamic partitioned valued. You should map a source column to the target partitioned column. If there is no mapping and static value is not set, the empty or blank is passed as the partition value. Hive defaults the partition to _HIVE_DEFAULT_PARTITON_. There is no loss of data in the non-partitioned columns.
NOTE |
If you need to enable dynamic partition in non-strict mode, set the below property as a Prescript in the Data Mapping window: set hive.exec.dynamic.partition.mode=nonstrict |
Static partition value can also be set with placeholders. The placeholders supported in Data Mapping are $RUNID, $PHID, $EXEID, $RUNSK, $SYSDATE, $TASKID, and $MISDATE. Additionally, partition value can be provided as a parameter within square brackets. For example, [PARAM1]. Passing the parameter values at runtime from RRF/ Operations module is same as for the other run time parameters in Data Management Framework. Value for the placeholders/ additional parameters will be substituted as the static partition values during the run time. For more information, see Passing Runtime parameters in Data Mapping.
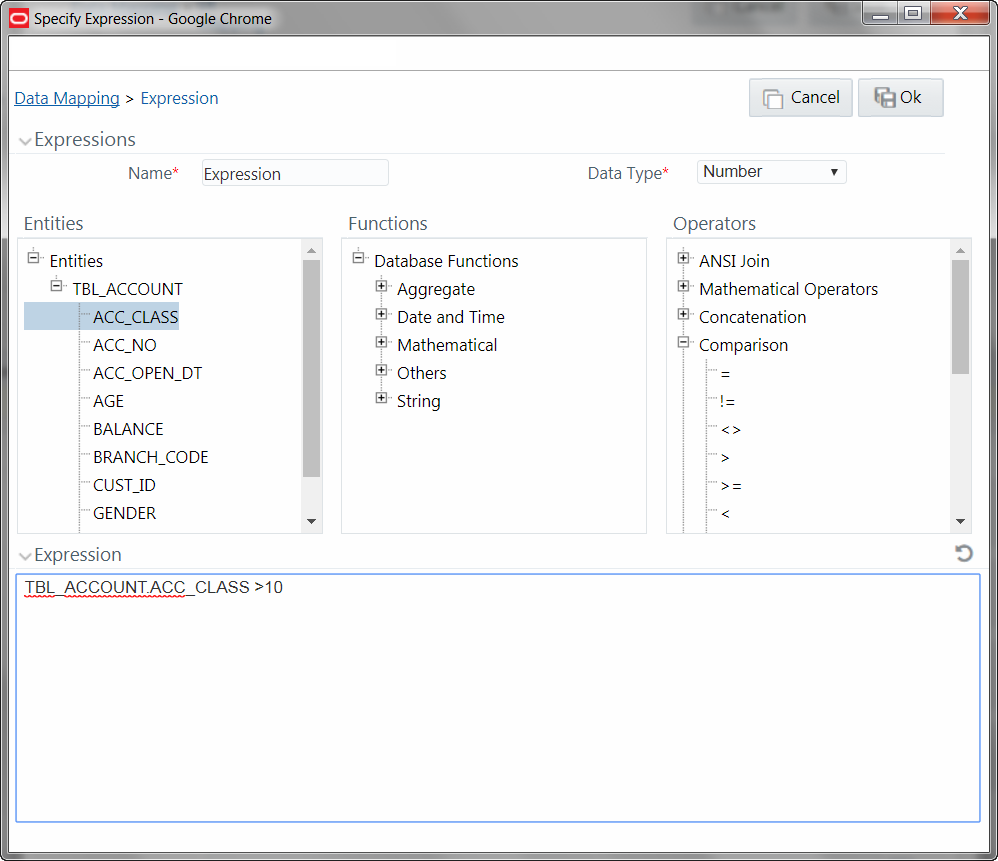
1. In the Specify Expression window, do the following:
§ Enter the Expression Name.
§ Select the Data Type from the drop-down list. The available options are String, Date Time, Number, Integer, and Timestamp. If you have selected Date Time as Data Type, you need to set the Date Format by double clicking the attribute/field from the Source Entities pane.
2. Define an expression by doing the following:
§ Select the Table in the Entities section.
§ Select the Function. You can select Transformations, Database Functions, or Extraction Functions. Extract functions are populated from the “DATABASE_ABSTRACT_LAYER” table which resides in config schema.
§ Define the Operators by selecting Arithmetic, Concatenation, Comparison, Logical or others operators.
§ Specify the ANSI Join or Join to map the table columns and enter the filter criteria to include during extraction. For example, “$MISDATE” can be a filter for run-time substitution of the MIS Date.
NOTE |
If the defined expression uses function that has a placeholder or calls a stored procedure that has a placeholder for String data type, enclose the placeholder in single quotes. Using double-quotes would generate error during extract definition or batch execution. Also expressions with Date/Timestamp data type placeholders are not supported. |
3. Click Ok.