
Hierarchies refer to dimension members that are arranged in levels, with each level representing the aggregated total of the data from the level below. One dimension type can have multiple hierarchies associated with it. Hierarchies are available within the Dimension Management section of Infrastructure system.
You can access Hierarchies window by expanding Unified Analytical Metadata and Dimension Management within the tree structure of LHS menu and selecting Hierarchy Maintenance.
The Hierarchies window displays the list of Hierarchies created in all public folders, shared folders to which you are mapped and private folders for which you are the owner, along with other details such as the Name, Display level, Created By, Creation Date, and Last Modification Date. For more information on how object access is restricted, see Object Security in AMHM module section.
You can also search for a specific Hierarchy definition based on Folder, Hierarchy Name, Dimension Member Alphanumeric Code, Dimension Member Numeric Code, or Dimension Member Name and view the existing definitions within the system.
In the Hierarchies window, you can create Hierarchy Definition up to 15 levels by default. The maximum permissible levels are up to 58 Hierarchies. To create a hierarchy, the Write role should be mapped to your user group.
NOTE |
When an AMHM hierarchy is created, implicitly a UAM Business hierarchy also gets created and will be listed in the Summary window of Business Hierarchy. |
To create a Hierarchy definition in the Hierarchies window:
1. Click  Add button in the Hierarchies toolbar. The New – Hierarchy Details window is displayed.
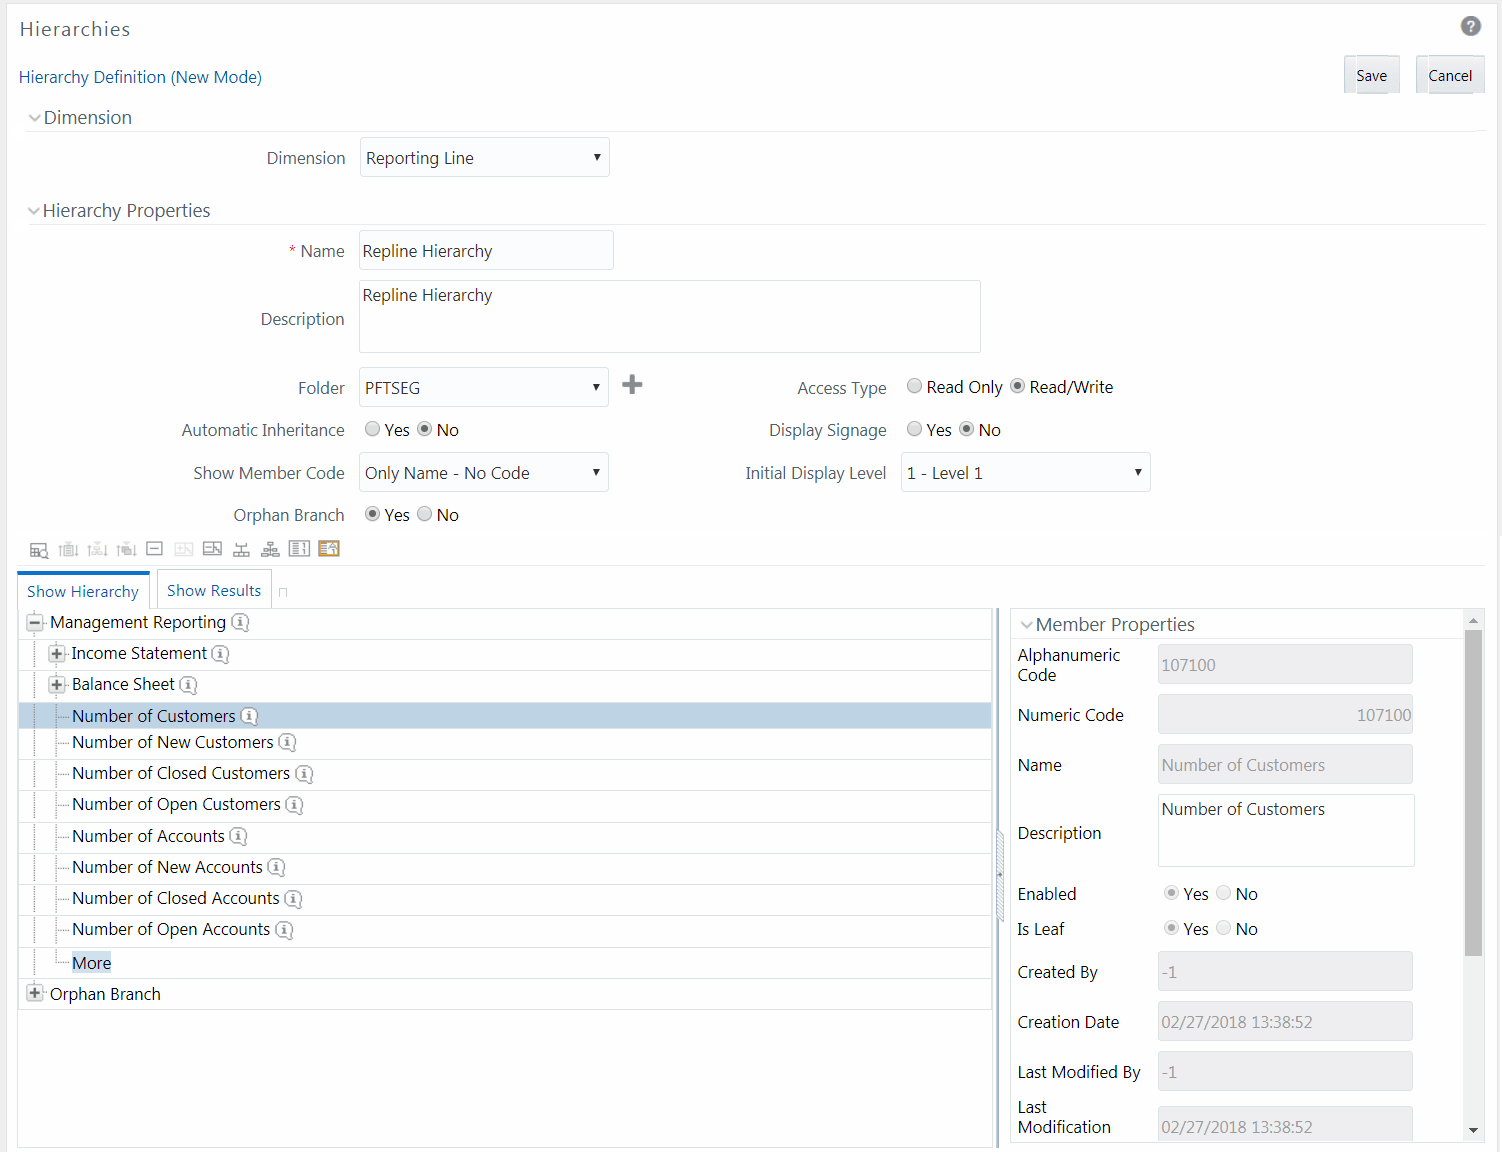
2. Select Dimension from the drop-down list. The selected Dimension from the New – Hierarchy Details window is displayed as the default dimension for which member has to be defined. Enter the Hierarchy Properties as tabulated:
Field |
Description |
Fields marked in red asterisk (*) are mandatory. |
|
Name |
Enter the Name of the Hierarchy. Note: The characters &’ ” are restricted. |
Description |
Enter the required Description for the Hierarchy. Note: The characters ~&+' " @ are restricted. |
Folder |
Select the folder where the hierarchy is to be stored from the drop-down list. The Folder selector window behavior is explained in User Scope section. Click Note: You can select Segment/Folder Type as Private and the Owner Code as your user code only. |
Access Type |
Select the Access Type as Read Only or Read/Write. Read-Only: Select this option to give other users access to only view the hierarchy definition. Note: A user with Phantom and Write role can modify or delete the hierarchy even though the access type is selected as Read-only. Read/Write: Select this option to give all users the access to view, modify (including Access Type), and delete the hierarchy definition. |
Automatic Inheritance |
Click Yes to inherit the hierarchy properties of the parent to the child. Click No if you want to define a new hierarchy. |
Display Signage |
Click Yes to display the Signage to the right hand side of the member in the Show hierarchy panel. Else, click No. |
Show Member Code |
Select from the drop-down list as one of the following: Alphanumeric Code to Left of Name: Displays Alphanumeric Code on the Left side of Member name. Alphanumeric Code to Right of Name: Displays Alphanumeric Code on the Right side of Member name. Only Name - No Code: Displays only the Member Name. Numeric Code to Left of Name: Displays the Numeric Code on the Left side of Member name. Numeric Code to Right of Name: Displays the Numeric Code on the Right side of Member name. |
Initial Display Level |
Select the Initial Display level from the drop-down list. |
Orphan Branch |
Click Yes to display the Orphan Branch in the Show Hierarchy panel. Else, click No. |
3. To add Child under the Show Hierarchy tab:
a. Right-click in the Show Hierarchy tab.
b. Select Add Child option and the Add Member window are displayed.
c. Select the required Member and click  . The Member is displayed
in the Selected Members panel. Click
. The Member is displayed
in the Selected Members panel. Click  to select all Members
which are shown in the Show Members pane. Click
to select all Members
which are shown in the Show Members pane. Click  to
select all nodes/ members in the server.
to
select all nodes/ members in the server.
You can click  to deselect
a Member or click
to deselect
a Member or click  to deselect all
the Members.
to deselect all
the Members.
You can click  to search for
the required member using Alphanumeric code, Numeric Code, Name, Description,
Attribute Name, or Attribute Value.
to search for
the required member using Alphanumeric code, Numeric Code, Name, Description,
Attribute Name, or Attribute Value.
You can also click  button
to toggle the display of Numeric Code left, right, or name and click
button
to toggle the display of Numeric Code left, right, or name and click  button to display Alphanumeric Code
left, right, or name.
button to display Alphanumeric Code
left, right, or name.
d. Click OK. The selected Member is displayed as Child under Show Hierarchy panel in the New – Hierarchy Details window.
4. To add Sibling:
a. Right-click on the Child and select the option Add Sibling. The Add Member window is displayed.
b. Select the required Member and click . The Member is displayed
in the Selected Members panel. You can click
to select all Members which are shown in the
Show Members pane. Click to
select all nodes/ members in the server.
c. You can click to deselect
a Member or click to deselect all
the Members. You can also Click to search for
the required member.
d. Click Apply. The selected Member is displayed as Sibling below the Parent under Show Hierarchy panel in the New – Hierarchy Details window.
5. To add Leaf under a Parent, Child, or Sibling:
a. Right-click the Parent or Child and select Add Leaf. The Add Member window is displayed.
b. Select the required Member and click . The Member is displayed
in the Selected Members panel. You can click
to select all Members which are shown in the
Show Members pane. Click to
select all nodes/ members in the server.
You can click to deselect
a Member or click to deselect all
the Members. You can also Click to search for
the required member.
c. Click Apply. The selected Member is displayed as Leaf below the Parent or Sibling under Show Hierarchy panel in the New – Hierarchy Details window.
6. To define Level Properties:
a. Select Level Properties from the options under Parent, Child, Sibling or Leaf and the Level Properties window is displayed.
b. Enter the valid Name and Description in the respective fields.
c. Click OK and the Levels defined are displayed in the drop-down in Initial Level Display field in Hierarchy Properties grid in New – Hierarchy Details window.
7. To cut and paste Child or Sibling:
a. Right-click on any node and select Cut.
b. Right-click on any node and Paste as Child or Paste as Sibling.
8. To Delete and Undelete:
a. Right-click on the node to be deleted and select Delete Node.
The node deleted is stroked out.
b. Right-click and select UnDelete to cancel deletion of the node.
9. To add Child / Sibling / leaf:
a. Right-click on any node and select Create and add Child. The New - Member Details window is displayed. For more information, see Add Member Definition.
b. Right-click on any node and select Create and add Sibling.
c. Right-click on any node and select Create and add leaf.
10. To view the Member Properties and Member Attributes of a node in the Show Hierarchy panel:
a. Click < button and the Member Property grid is displayed.
b. Click on a Member. The properties such as Alphanumeric code, Numeric Code, Name, Description, Enabled, Is Leaf, Created By, Creation Date, Last Modified By, Last Modification Date, Attribute, and Value of the selected Member are displayed in the Member Properties and Member Attributes grids.
In the Hierarchies window you can also:
1 Click  to
collapse the members under a node.
to
collapse the members under a node.
2 Click  or
or
 to expand a branch or collapse a branch.
3 Click  or
or
 to focus or unfocus a selected node except
the root node.
to focus or unfocus a selected node except
the root node.
4 Click  or
or
 to view the name of members right or left.
5 Click  or
or
 to view the Numeric code values of members
right or left.
to view the Numeric code values of members
right or left.
6 Click  or
or
 to show code or show name of the members.
7 Click  button
to view the Advanced Properties of the nodes.
button
to view the Advanced Properties of the nodes.
11. Click Save in the New – Hierarchy Details window to validate and capture the entries.
The Audit Trail section at the bottom of the window displays the metadata about the Hierarchy with the option to add additional information as comments. The User Comments section facilitates you to add or update additional information as comments.
You can view individual Hierarchy Definition details at any given point. To view the existing hierarchy Definition details in the Hierarchies window:
1. Select the checkbox adjacent to the Hierarchy Name.
2. Click  View button in the Hierarchies tool bar. The View button is disabled if you have selected multiple
Hierarchies.
View button in the Hierarchies tool bar. The View button is disabled if you have selected multiple
Hierarchies.
The View – Hierarchy Details window is displayed with all the hierarchy details.
In the View – Hierarchy Details
window you can click  button
to search for a member using the Alphanumeric Code, Numeric Code, or Member
Name in the Search dialog.
button
to search for a member using the Alphanumeric Code, Numeric Code, or Member
Name in the Search dialog.
NOTE |
The search functionality of this |
You can modify the Name, Description, Folder, Access Type, Automatic inheritance, Display Signage, Show Member Code, Initial Display level, Orphan branch, Show hierarchy details in Edit – Hierarchy Details window.
NOTE |
When you modify a Hierarchy, the implicitly created UAM Business Hierarchy will also get updated. |
1. Select the checkbox adjacent to the Hierarchy Name whose details are to be updated.
2. Click  Edit button in the Hierarchies tool bar. Edit button is disabled if you have selected multiple
Members. The Edit – Hierarchy Details window
is displayed.
Edit button in the Hierarchies tool bar. Edit button is disabled if you have selected multiple
Members. The Edit – Hierarchy Details window
is displayed.
In the Edit – Hierarchy Details
window you can click button
to search for a member using the Alphanumeric Code, Numeric Code, or Member
Name in the Search dialog. Edit the Hierarchy details as required. For
more information, see Add
Hierarchy Definition.
3. Click Save and save the changes.
The Copy Hierarchy Definition facilitates you to quickly create a new Hierarchy Definition based on the existing attributes or by updating the values of the required hierarchies.
To copy an existing Hierarchy Definition in the Hierarchies window:
1. Select the checkbox adjacent to the Hierarchy name whose details are to be duplicated.
2. Click  Copy button in the Hierarchies toolbar to copy
a selected Hierarchy definition. Copy button
is disabled if you have selected multiple Hierarchies. The Copy
– Hierarchy Details window is displayed.
Copy button in the Hierarchies toolbar to copy
a selected Hierarchy definition. Copy button
is disabled if you have selected multiple Hierarchies. The Copy
– Hierarchy Details window is displayed.
In the Copy – Hierarchy Details
window you can click button
to search for a member using the Alphanumeric Code, Numeric Code, or Member
Name in the Search dialog.
3. In the Copy – Hierarchy Details window you can:
§ Create new hierarchy definition with existing variables. Specify a new Hierarchy Name. Click Save.
§ Create new hierarchy definition by updating the required variables. Specify a new Hierarchy Name and update the required details. For more information, see Add Hierarchy Definition. Click Save.
The new Hierarchy definition details are displayed in the Hierarchies window.
You can view the dependencies of Hierarchies. To view the dependency of hierarchy in the Hierarchies window:
1. Select the checkbox adjacent to the Hierarchy Name.
2. Click  button
in the Hierarchies toolbar. The Check Dependencies
button is disabled if you have selected Hierarchy definitions. The Hierarchies Dependency Information window is
displayed.
button
in the Hierarchies toolbar. The Check Dependencies
button is disabled if you have selected Hierarchy definitions. The Hierarchies Dependency Information window is
displayed.
You can remove the Hierarchy Definitions which are not required in the system by deleting from the Hierarchies window.
NOTE |
When you delete an AMHM Hierarchy, the implicitly created UAM Business Hierarchy will also get deleted, if it is not used in higher objects. |
1. Select the checkbox adjacent to Hierarchy Name(s) whose details are to be removed.
2. Click  Delete button in the Hierarchies tool bar.
3. Click OK in the information dialog to confirm deletion.
To delete an existing Business Hierarchy in the Business Hierarchy window:
1. Select the checkbox adjacent to the required Business Hierarchy code.
2. Click  button from the Business
Hierarchy tool bar. A confirmation dialog is displayed.
button from the Business
Hierarchy tool bar. A confirmation dialog is displayed.
3. Click OK. The Business Hierarchy details are marked for delete authorization.
 to create a
new private folder. The
to create a
new private folder. The