| Agile Product Lifecycle Management Agile Recipe Management for Pharmaceuticals Recipe Management Guide Release 9.3.4 E39303-02 |
|

 Previous |
 Next |
| Agile Product Lifecycle Management Agile Recipe Management for Pharmaceuticals Recipe Management Guide Release 9.3.4 E39303-02 |
|
Previous |
Next |
This chapter covers Recipe Variables and Parameters.
Variables in recipes are links to various objects in the application such as material, equipment and standards. Since these objects can vary with geographical location, availability, restrictions or standards, a variable helps in picking up a qualified object for successful execution of a recipe. The qualified object value depends on the restrictions that you have formulated. Thus, variables provide recipes the flexibility of adapting to multiple environments and conditions.
Variables are of two types:
Input Variables - Input variables are the resources required to make a material or perform tasks during the development of a material.
Output Variables - Provides flexibility in case there are by-products being made which are still unknown.
|
Note: Variables and parameters are defined in Instructions which appear in the Recipe Action Template. For more details, see Creating Recipe Action Template. |
In the Instructions tab, you specify the material, equipment and standards that you will use as input for producing the product and also specify the material that will be the result of the recipe.
For example, you may write the following instruction:
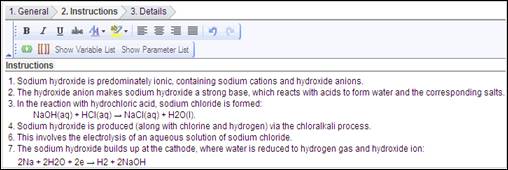
This instruction contains the following objects whose variables need to be created:
Material
Input - Sodium Chloride, water, hydrogen
Output - Sodium Hydroxide
Equipment - cathode
Standards - none
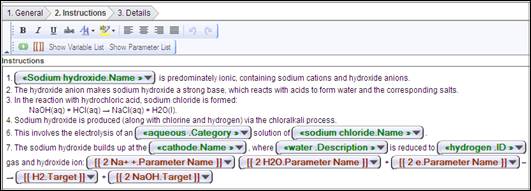
After you create the variables for the object, the object names are replaced by variable objects and appear as shown below:
On clicking Next button, BOP: Parameters tab will be displayed, this tab list the parameters created for recipe actions, User can edit/ delete these parameters.
The variable you create consists of two parts:
Variable Name - A unique name defined for variable. For example, var_H2O.
Label - A Label represents the attribute of the object to which a variable is resolved. These are:
ID - Object ID, for example, 'Material_Water_001'.
Name - Object name, for example, 'Pure Water'.
Description - Complete description of the object, for example, 'Condensed vapors from solar desalination plant'.
Category - Object category, for example, 'Chemical'.
Example:

In the above image, hydrochloric acid is the variable name and Current Resolution is the default label.
You create variables during the creation of Instructions in Recipe Action Template or when you edit a recipe or a recipe action template.
To create a new input variable:
Click the New Variable icon. Alternatively, you can also create a new variable from the Show Parameter List.
In the New Variable window, enter a unique Variable Name.
Depending upon your requirement, select one of the variable categories - Equipment, Material or Standards.
Click OK.
Using the above steps, you cannot set the variable resolution criteria and can only create input variables for different types of objects - equipment, material and standards. To set the variable resolution criteria and create any input or output variable for Material, use More Variable Info feature in the New Variable window. For more details, see the Agile Recipe Management for Pharmaceuticals Administrator Guide.
To create a new input or output variable:
Click the New Variable icon.
In the New Variable window, click More Variable Info.
Select one of the variable categories from Equipment, Material or Standards.
Click Next.
In the General tab, enter the required information.
Significant inputs:
VariableName - A unique name for the variable.
Critical Processing Variable - If the variable is critical in arriving at the end results in recipe execution.
VariableResolution Criteria - Variables can only be resolved manually.
The following additional fields appear only when you create a material variable:
VariableType - Input or output.
Is Consumable - If the material is used as raw material for producing the end product or is a consumable.
Click Next.
In the Criteria tab, click New to select the variable resolution criteria.
The Define Criteria page appears.
In the General tab, the application generates a name for the criteria.
Click Next.
In the Criteria tab, click Show Possible Resolutions to select the material to which the variable will be resolved.
Select a record and click Load Selection into Criteria.
If you select multiple records as possible resolution for the variable, a Compare Records window appears. The criteria of the selected records is loaded in the search criteria. You can compare the attributes of the materials and decide on a suitable material.
Once you compare and decide the material you wish to associate to the material variable, select that material's column and click Copy to Criteria Value. The values appear under the column Criteria Value.
Modify the values, if required.
Click OK.
Click Finish. The criteria appear in the Criteria tab.
Click Finish to save the variable.
To insert an existing variable from the variable list, click Insert at Cursor. It appears at the location of the cursor in the instructions area. Click the Variable button to edit or delete the variable, or change its label.
To change the label of a variable:
Click the Variable button.
From the drop down menu, select Change Label and choose an appropriate label.
See "Formulation of a Variable," for label descriptions.
A Recipe can be executed only when all its variables are resolved to the actual objects. You can resolve them in the recipe.
Raw Material variable and Consumable Material variable, of the type Input, can be resolved only from the Materials and Consumables sub-tabs of BOM tab, respectively. Material variables can further be resolved to lots and containers through secondary resolution.
Material variable of the type Output can be resolved from the Output tab.
Equipment variable can be resolved only from the BOE tab.
Standard variable can be resolved from Standards sub-tab of BOS tab.
When you create a variable, it is associated to a Category in the library. At the time of its resolution, the variable will search only the selected equipment category to let you pick the desired equipment. You can associate the variable to the whole library or to a specific category under it.
For example, when you create a variable for Equipment, the variable is associated to a Category in the Equipment library, such as Blender.
To resolve a variable:
Go to Recipes > Library and run a search. From the search results select a Recipe.
Click either Edit > Current Version or As New Version.
Based on the type of variable you wish to resolve, go to the corresponding tab. Select a record of an unresolved variable.
|
Note: You can also resolve a resolved variable to a new object. |
Click Resolve Variable.
In the Resolve Variable window, click OK.
The Criteria edit page appears.
During variable creation, or variable edit, if you define the variable resolution criteria in the Criteria tab; the application automatically populates those criteria components.
Click Search.
From the list of Possible Resolutions, select a resource that meets your requirements and click OK.
The object appears in place of unresolved variable.
Merge Variables
You can name variables with the same name across two or more Recipe Actions, and the system auto-merges them to be the same resource.
Parameters can be settings used to control or measure conditions during the execution of the recipe and can be used to define Quality, Process, Safety or Efficacy of a recipe.
For example, in a recipe action, a material variable Glucose can be further referenced by its pHvalue.pH is the parameter which is eventually measured, in order to control the work request.
Similarly, when a parameter, such as Oven temperature of 160 deg Celsius is assigned to an equipment it substantiates the equipment condition.
Parameters define the attributes for a variable. For example, if you choose an Oven as the variable, the parameter you set is 50 degree Celsius.
To create a new parameter:
In the Instructions tab, enter instructions.
Select the text that you wish to parameterize.
Click the New Parameter icon.
In the New Parameter window, choose one of the following:
Use Parameter Template - to copy parameter and its attributes from a parameter template defined for material analysis.
Copy Specification Plan Parameter - to copy the parameters used in the specification plan.
Copy Recipe Parameter - to copy a parameter from another recipe.
Select one of the following:
Parameter Name - to specify a name of your choice.
Use Original Name - to retain the original name of parameter. This option is applicable when you copy a recipe parameter.
You can also create a new variable from Parameter List.
Click Show Parameter List.
In the parameters table, click New.
Enter a unique Parameter Name.
Click OK.
Using the steps given above, you can create only the parameters but cannot specify its constraints or associate it to a variable. To provide complete details of a parameter, use the More Info feature in the New Parameter window.
To create a new parameter and set its details:
In the Instructions tab, enter instructions.
Select the text you wish to parameterize.
Click the New Parameter icon.
In the New Parameter window, click EnterMore Info.
In the General tab, enter the required information.
Significant inputs:
Associated Variable from Action - The variable to which this parameter acts as additional constraint.
Critical Processing Parameter - Whether this parameter is critical in processing of the recipe.
Forward Processing Parameter - Whether the value of this parameter will match the criteria to go forward in the processing.
Parameter has Constraints - If you select Yes, the Constraints sub-tab appears in the Details tab.
Assay Reference - The Reference ID of the assays you wish to associate with the parameter.
Click Next.
In the Data Definition sub-tab under Details tab, enter the required information.
Significant inputs:
Data Type - Type of data that will be captured during execution.
Float Precision - A decimal level precision of data values. Enter the number of digits allowed after the decimal place. This field is active only when you select Float as the Data Type.
UOM Group - The unit of measurement group that is used for carrying out data conversion. For example, the Currency group allows you to carry out conversions between two defined currencies.
Compound Tested For - Indicates if the parameter is used for measurements on experiments done for compounds. For example, the parameters could be % contaminant, % of salt, % of water. This parameter would be testing for the presence or absence of certain materials.
Entry Field Size - The length of the data value that you can record. For example, if the parameter for volume is set to 3, the system will not accept a value more than 999.
Click Next.
In the Constraints sub-tab under Details tab, specify the following:
Value UOM - The applicable unit of measurement of the data value. Results recorded in any UOM other than that set in this field will not be accepted by the application.
Constraints - Select the constraints that will be applied to the variable. If the constraint is a constant, specify its value in Constant. Select appropriate Operand to define the constraint limits.
Click Next.
In the Results sub-tab under Details tab, enter the required information. These are sent to an execution system in case the recipe is being executed by an MES system. These values determine what you need to do while processing the recipe.
Significant inputs:
Allow Range Results - option to record only a data value from given range limits.
Measurement Frequency - if you select At Set Interval, fill the time value in the Take Measurements Every field and select a time unit from the dropdown list.
Take Measurements in Time Window (plus or minus%) - specify the allowed deflection in measurement time, in percent.
Click Finish.
Once created, use the Parameter button to edit, delete the variable, or change label.
To change the label of a parameter:
Click the Parameter button.
From the drop-down menu, select Change Label and click the appropriate label.
The Parameter List stores the parameters you create. To see all the parameters available in RMW, click Show Parameter List in the Instructions tab. To hide the list, click Hide Parameter List, which appears when the parameter list is open. To insert an existing parameter from the parameter list into the instructions, select the parameter and click Insert at Cursor. You can edit and delete variables from variable list or save it as a template using the Parameter > Save As Template option.
|
 Copyright © 2010, 2015, Oracle and/or its affiliates. All rights reserved. Legal Notices |
|