| Agile Product Lifecycle Management Agile Recipe Management for Pharmaceuticals Recipe Management Guide Release 9.3.4 E39303-02 |
|

 Previous |
 Next |
| Agile Product Lifecycle Management Agile Recipe Management for Pharmaceuticals Recipe Management Guide Release 9.3.4 E39303-02 |
|
Previous |
Next |
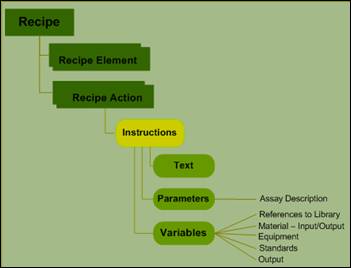
Recipe authoring involves creation of recipe actions and recipe elements - the essential components of a recipe. Instructions or the procedures for recipe execution are created in recipe action template. These instructions include:
Variables - material, equipment and standards.
Control Parameters - to set the control settings within the Recipe.
In-process parameters - quality parameters you need to be measure during the process or the actual values that the operator used for the control parameters or measured parameters.
Results - analytical result measurements for the sample taken from the material being made.
Since recipe actions are embedded in the elements of a recipe, the recipe author adjusts the recipe action template to suit the requirements of each recipe. Phases can also exist as templates and can be reused.
The sequential flow of recipe actions is created in recipe element template. This flow can include other recipe elements as well. You can further modify these components in the recipe and then later optionally save a recipe element as a template.
A Recipe is authored by creating a sequential flow of recipe elements and the recipe actions embedded within, and added externally, if required. The instructions defined in recipe actions become bill of processes. The resources associated with the variables form bills of material, equipment and cautions (standards). All tests associated with recipe elements form the bill of assays.
A Recipe Action template is a recipe object that defines the procedures to create a recipe. Since Recipe Actions are embedded in the elements of a recipe, the recipe author adjusts the Recipe Action template to suit the requirements of each given Recipe. Phase, Operation and Unit Procedures exist as templates and can be re-used in higher level elements/ recipe library. When the Phase or Recipe Action template objects are included in a Recipe, the contents are copied into the Recipe.
The author can further modify these components in the Recipe and later optionally save the element as a template.
To create a recipe action template:
Go to Create New menu, select Recipes > Action Template.
In the General tab, enter the required information.
Significant inputs:
Mode - Method of recording activities.
Second Person Verification Required - If you require another person to verify the recipe actions.
Category - The group of resources, such as material, to which this recipe action template belongs.
Click Next.
In the Instructions tab, enter instructions in the Text Editor.
Click Next.
In the Characteristics sub-tab under the Details tab, enter the required information.
Click Next.
In the Acknowledgments sub-tab under the Details tab, enter the required information.
You can define acknowledgments to ensure that proper procedure is followed during recipe execution. This allows the recipe author to add an acknowledgment that will be required by the operator to acknowledge the instructions/statements while executing the current recipe action. You can also specify if this acknowledgment requires a second person verification or electronic signature.

You can edit a Recipe ActionTemplate only when it is in the Draft status.
|
Note: The usage of a Recipe Action in a Recipe is referred to as an Instance, which does not have a status. |
To edit a recipe action:
Go to Recipes > Action Template and run a search. From the results, select a Recipe Action.
Select a Recipe Action Template and click Edit. An Edit Action Template page appears.
In the General tab, modify fields as required.
In the Instructions tab, modify fields as required. You can add new variables, parameters, and edit or delete existing ones.
Click New Variable to add a new variable or New Parameter to add a new parameter.
In the Details tab, you can redefine characteristics and acknowledgments.
Click OK.
While editing a recipe action instance within a recipe, you can add new Material, Equipment or Standards directly to the BOM, BOE or BOS, without creating a variable.
To add material to a BOM of a recipe:
Go to Recipes> Library and run a search.
Select a Recipe record which is in the Draft status and click Edit.
In the Edit Recipe page, click the BOP tab.
In the Instructions sub-tab, select a Recipe Action and click Edit.
In the Edit Action page go to Instructions tab click the New Material icon to add material.
From the palette, choose the Material Type - Input or Output, click OK.
In the Search Material page, choose criteria and click Search.
From the search results, select a Material and click OK. A variable place button mentioning the Material appears in the Instructions (Text editor) area.
Click OK button in edit Recipe Action page.
Click the BOM tab. Material added in edit Recipe Action instance page appears under this tab.
Click Save BOM to save the BOM.
Click OK.
A message confirms you have updated the recipe successfully. Similarly, you can add NewEquipment and NewStandard within a Recipe Action.
A Recipe Action template goes through the following phases in its lifecycle:
Draft - the lifecycle phase of a newly created recipe action template. You can roll back a template to the Draft state only from Submitted and Approved status.
Submitted - when the recipe action template is submitted for approval.
Approved - when the recipe action template is approved.
Rejected - not accepted for use.
Obsolete - not valid for execution, however, can be used for reference purposes. Obsolete status actions cannot be revived for approval.
To change the lifecycle phase of a recipe action template:
Go to Recipes > Action Template and run a search. Select a recipe action template from the search results.
Click Change > Lifecycle Phase and select an applicable lifecycle phase.
The lifecycle phase of the RAT appears on the page along with the chosen category.
The sequential flow of recipe actions is created in recipe element template and can include other recipe elements as well. You can further modify the components in the recipe and optionally save the recipe element as a template.
To create a recipe element template:
Go to the Create New Menu, select Recipes > Element Template.
In the General tab, enter the required information.
Significant inputs:
Recipe Element Level - The level identifying the position of a Recipe object in the Recipe hierarchy, as prescribed by ISA-88. Recipe Element levels: Unit Procedure, Operation, and Phase. (A phase contains only actions. An operation is a combination of phase and actions and Unit Procedure comprises of operation, phase and actions).
Life Cycle Point - The stage of target molecule development.
Usage:
Small Molecule = Chemical Product
Large Molecule = Biologics
Formulation = Drug Product
Mode - Method of recording activities.
Click Next.
In the Instructions sub-tab under BOP tab,
Select the recipe element record and click Edit SFC.
In the right pane of the SFC Editor, click on Start is Complete and click Delete or hit the Delete key on your keyboard.
Click New > Recipe Action From Template and select a recipe action template.
You can add more than one recipe action template to a recipe element.
Click anywhere in the right pane to insert the recipe action template. The recipe action template(s) appear under the recipe element in the left pane.
Click Add > Connection to create the sequence of flow and click OK.
To edit a recipe action template, select the recipe action and click Edit.
To save the recipe element together with the recipe actions, select the desired records and click Save As Template.
Clicking the Next button displays the BOP: Parameters tab. this tab lists the parameters created for recipe actions. User can edit/ delete these parameters.
Click Next. The Target tab is displayed.
In the Targets tab,
Click Add Target Material to select the material from material library.
Click Finish.
You can edit a Recipe Element Template only when it is in the Draft status.
To edit a recipe element:
Go to Recipes > Elelment Template and run a search. From the results, select a Recipe Element Template.
Select a Recipe Element Template and click Edit. An Edit Element Template page appears.
In the General tab, the Level of the Recipe Element is displayed. Modify fields as required.
|
Note: Unit Procedure can contain Operation, Phase and Action; while a Phase, which is the lowest element can contain actions. |
In the BOP tab, click the Instructions sub-tab.
Select a recipe element and click Edit SFC. For more details on working with SFC, see "Working with SFC Editor."
Click the Parameters tab. It displays a list of associated parameters.
To edit a parameter, select a parameter row and click Edit. For more details, see Parameters.
To delete a parameter, select a parameter row and click Delete.
Click OK.
Click the Target Material tab.
Click the Add Target Material sub-tab. Enter a criteria and run a search for Material.
From the search results, select a Material and click OK. The Material appears in the table.
Click OK.
A message informs you that you have successfully updated the recipe element template.
A Recipe Action template goes through the following phases in its lifecycle:
Draft: the lifecycle phase of a newly created recipe element template. You can roll back a template to the Draft state from any other lifecycle phase.
Submitted: when the recipe element template is sent for approval.
Approved: when the recipe element template is approved.
Rejected: not accepted for use.
Obsolete: not valid for execution, however, can be used for reference purposes. You can also revive it for approval.
|
Note: You can edit a recipe element template only when it is in the Draft status. |
To change the lifecycle phase of a recipe element template:
Go to Recipes > Element Template and run a search. Select a recipe element template from the search results.
Click Change > Lifecycle Phase and select an applicable lifecycle phase.
Recipes instruct you about the processes involved in the manufacture of a product. Creating a recipe involves specifying the purpose, acquiring specific raw material and equipment, the quantities of each raw material, and standards you need to follow.
To create a new recipe:
Go to Create New menu, select Recipes > Library.
In the Preface tab, select the following mandatory fields:
· Purpose - The usage of the recipe - Processing, Cleaning, or Other.
· Type - General, Site, or Master Recipe.
|
Note: Cleaning or "Other" types of recipes do not target a Target Material. |
|
Note: A Processing type recipe requires an approved raw material in the BOM tab and an approved target material in the Output tab for approval. |
Click Next.
In the General sub-tab enter the required information for mandatory fields.
Significant inputs:
Operating Mode - Early or late product development stage.
Regulatory Design - Indicating if it is starting, penultimate or final material.
Click Next.
If you selected Site or Master as the Type of recipe in the Preface tab, the Sites tab appears. Use the Lookup icon and select the Site of Execution of this recipe.
If you selected General as the Type of recipe in the Preface tab, the Company tab appears. Use the Lookup icon and select the Company where this recipe will be executed.
Click Next.
Bill of Processes (BOP)
In the Instructions sub-tab of the BOP tab, select the recipe record and click Edit SFC to create a sequential flow chart of process.
In the right pane of SFC Editor, click on Start Is Complete and click Delete.
Click New > Element from Template. You can also right-click in the right pane of the editor and select the same option from the menu.
Select a Recipe Element Template and click OK.
Click anywhere in the right pane to add the recipe element object.
For complete details on how to use SFC Editor, see "Working with SFC Editor".
When you add a recipe element template, the recipe action templates associated with it are added automatically. To add more recipe action templates, click New > Recipe Action Template and select the desired templates. You can add recipe actions with recipe elements at the same level, as well as have recipe actions within elements.
Recipe Actions and Recipe Elements can be created and filled in while creating a recipe via the BOP and saved as a template.
4. Click OK.
In the Instructions sub-tab, a table lists recipes and associated recipe elements and recipe actions. The sequence and instructions that you entered in the recipe action template appear in the right column.
Click Next.
In the Parameters sub-tab, a table lists parameters that you defined in recipe action template and its results.
To edit a parameter, select a record and click Edit.
To edit a variable, you first need to edit a recipe action, select the desired record and click Edit.
Click Next.
Bill of Material (BOM)
In the Materials sub-tab, the list of material variables appears. You can resolve the unresolved variables, view sample information of the material to which a variable is resolved. You can add, delete and edit the variables.
|
Note: You can perform a secondary resolution selecting either one of the following options - All Lots and Containers in the Inventory/Allocated Lots and Containers/ Suitable Lots and Containers of a Recipe in the Draft status with a Material variable primarily resolved. |
|
Note: The Instructions column of the BOP tab displays the Container/Lot information embedded with the instruction. |
For each material, enter the Planned Quantity to Consume and the Display Order, in which the items will appear in the recipe list.
To view the information of a material sample, select the desired material variable and click View Sample Information. The Sample Information page displays the Lot ID, Source Container ID and other details from which the selected material was sampled.
To add new material:
Click More > Add Material. The Search Material page appears.
Select the Recipe Action associated with it.
Enter a value in any field and run a search. Select a material from the search results and click OK.
Click Next.
The Consumables sub-tab lists consumable material variables. You can resolve the unresolved variables, and also add, delete and edit the variables.
For each material of type Consumable, enter the Planned Quantity to Consume.
Click Next.
Once you resolve material variables, they appear in the spec plan sub-tab.
Select a material row and add new specification plans.
To delete spec plans, select the row and click Delete.
Click Next.
Bill of Equipment (BOE)
The Equipment sub-tab lists equipment variables. You can resolve the unresolved variables, view disposition of equipment, and also add, delete or edit equipment variables.
To resolve an unresolved equipment variable, select a variable record and click Resolve Variable.
To view the disposition of equipment, select an equipment variable record and click View Equipment Disposition. The Equipment Disposition page displays the equipment name, its availability status, etc. It also contains the OK, Reservations and View Last CleaningActivity buttons.
Click OK to return to the BOE page.
To add new Equipment, click More> Add Equipment.
In Search Equipment Page, select the Recipe Action associated with it.
Enter a value in any field and run a search. Select Equipment from the search results and click OK.
Click Next.
Output
The Output tab, lists output material variables defined in the Instructions tab of recipe action templates. You can edit these variables, add new material variables and resolve the unresolved variables.
To resolve an unresolved output variable, select a variable record and click Resolve Variable.
To add material, click More > Add Material.
In the Search Material page, select the Recipe Action associated with it.
Enter a value in any field and run a search. Select a material from the search results and click OK.
Enter Output Quantity. Select the appropriate UOM from the drop-down list.
Select the Type of the output.
Click Next.
Bill of Standards (BOS)
The BOS tab lists standards defined in the instructions entered in recipe action templates. You can edit these standards, add new standard variables and resolve the unresolved variables.
To resolve an unresolved standard variable, select a variable record and click Resolve Variable.
Click Next.
The Cautions tab displays the caution type standards associated to resolved materials and equipment.
Click Finish.
A message confirms the creation of a recipe. The Recipe is ready for publishing.
|
Note: After you publish a Recipe in RMW, the Recipe BOM table displays both rows of material and consumables. In Product Collaboration, you can view the UOM details of consumable material. Quantity value displays the Unit of Measurement (UOM) and the quantity column value displays the unit. |
While editing a recipe, you cannot save the recipe (root node) as a template; you need to select the children (element/ action) to save as the template.
To edit a recipe:
Go to Recipes > Library and run a search. From the search results, select a Recipe.
Select a Recipe and click Edit > As New Version. You can edit a Recipe in the Draft status as Current Version.
Click Save and Edit.
Make the necessary modifications in the Edit Recipe page.
General
Modify required fields and click OK.
BOP
In the Instructions tab, select a recipe element or recipe action and click Edit.
Modify necessary fields and click Save BOP to save the BOP.
To save the recipe BOP as a template for future use, click Save As Template. In the Save As Template window, enter a unique Name for the recipe template and click OK.
In the Parameters tab, you can edit/delete parameters.
Modify necessary fields and click OK.
|
Note: You can delete recipe actions /elements only from the SFC editor. |
BOM
In the Material tab, click the More drop-down button.
Select Add Material, to add a new material to the BOM.
Select a Recipe Action to associate with the Material.
In the Search Material page, choose criteria and click Search.
From the search results, select a Material and click OK. The Material appears in the BOM table.
In the Specification Plans tab, add or delete variables.
In the Consumables tab, edit and resolve the variables.
Click Save BOM to save the BOM.
BOE
In the Equipment tab, click the More drop-down button.
Select Add Equipment to add new Equipment to the BOE.
Select a Recipe Action to associate with the Equipment.
In the Search Equipment page, choose criteria and click Search.
From the search results, select Equipment and click OK. The Equipment appears in the BOE table.
Click Save BOE to save the BOE.
Only if the Recipe is of the Cleaning type, the Contaminant sub-tab lists parameters associated with equipment variables.
BOS
In the Standards tab, click Add Variable to add a new Standard to the BOS.
To resolve an unresolved standard variable, select a variable record and click Resolve Variable.
|
Note: While editing a Recipe Action instance within a Recipe, you can add Material, Equipment, and Standards directly to the BOM, BOE and BOS and save the BOM, BOE and BOS. |
You can create Work Requests only from Approved Recipes. Once a control recipe moves to the Approved status, the application assigns a system-generated Work Request ID in the In Progress status for the control recipe.
To create a work request:
Go to Recipes > Library and run a search. Select an ApprovedRecipe from the search results.
Select Create Work Request from the More drop down list.
In the Create Work Request from Recipe page, enter the required information.
Significant inputs:
Project - Use the Lookup icon and select a project you wish to associate with the work request.
Scale Factor - Denotes the factor by which the quantities in recipe will be scaled for production purposes. This is required for raising and lowering only BOM and Output tab material quantities. For example, for a recipe action, if the quantity of the material, Sodium Hydroxide, is given as 10 gms, the scale factor of 5 will make the quantity to 50 gms.
Criticality - Indicates the criticality of creating the Work Request.
Target Yield - Net amount of actual produce expected.
If the recipe is for Cleaning purpose, the Target Yield field does not appear:
Click OK.
|
Note: For more details on 'Creating a Control Recipe from a Process Step' and 'Creating a Work Request from a Control Recipe', see the Recipe & Material Workspace Process Management Guide. |
Planned Work Request details, Recipes, Control Recipes, and Process Steps stored in RMW include:
Routings of recipe actions
Material and Equipment required
Standards you need to follow
Assays and parameters you need to measure within the recipe action.
These details can now be executed in other systems by exporting them as XML files. BatchML is an XML using tags specified in S-88. The Import from BatchML feature enables you to integrate Master Recipes authored in RMW with external systems.
Listed below are some of the ways you can use Master Recipes.
Details in Work Requests, Recipes, Control Recipes and Process Steps can be executed in other systems by exporting them as XML files. The results of the execution will be imported back from external sources into RMW directly as a work request. Based on the context of the work request, the import program attaches it to the appropriate campaign/process step.
Converting the contents of a recipe into XML files and sending them to Manufacturing Execution Systems (MES) increases commercial production of material on a large scale.
Working jointly with partners, CMO's, CRO's these files can be outsourced as a collaboration item to companies to manufacture material.
|
Note: The Import/Export BatchML feature is available through Web Services and application User Interface. |
A feature comparing work requests and recipes is supported in Agile. Comparing work requests is achieved by the co-relation view. This compares all the output sample results, BOM quantities used, BOM sample parameter results, BOE and Recipe Action texts.
Comparison of recipes can only be general and not in detail.
|
 Copyright © 2010, 2015, Oracle and/or its affiliates. All rights reserved. Legal Notices |
|