5 STA Alerts
The STA alerts feature notifies you of events and conditions in your tape library system based on user-defined alert policies. You can create as many alert policies as you want. The alert policies identify the types of conditions and events to which you want to be alerted and the frequency at which alerts may be generated. Optionally, you can indicate that you want alerts sent to specified email addresses.
This chapter includes the following sections:
How Alerts Work
The STA alerts process consists of the following parts:
Defining Alert Policies
Users with Administrator privileges perform this part of the process from the Alerts Policies screen on the Setup & Administration tab.
When you create an alert policy, you can enable it immediately or leave it disabled for the time being. In addition, several sample alert policies are delivered with STA, and they are disabled by default (see "STA Sample Alert Policies" for details). Only enabled alert policies are used to generate alerts.
To define an alert policy you specify the following information:
-
Policy name – An alphanumeric identifier for the policy. Policy names must be unique.
-
Policy description – Optional description of the policy.
-
Entity type – Entities are tape library system resources or events. You must designate the types of entities to be evaluated by the alert policy. Options include libraries, drives, media, exchanges, and media validations. See "Alert Policy Entities" for a complete list.
-
Severity – Determines the frequency with which alerts may be generated whenever the criteria defined by this policy are met. See "Alert Policy Severities" for details.
-
Alert criteria – User-defined criteria by which the appropriate library system resources are evaluated. Alert criteria work in much same way as the STA filtering feature. See "Filter Data Dialog Box" for details.
-
Email recipients – Optional list of email addresses to receive emails whenever an alert is generated by the policy. See "Alert Emails" for details.
Alert Generation
This part of the process is done automatically by STA.
STA continuously evaluates enabled alert policies in the background. Specifically, alert policies are evaluated whenever the following types of activities occur:
-
An enabled alert policy is created or modified in any way.
-
A drive/media exchange occurs.
-
A media validation exchange occurs.
-
An SNMP trap is received from a monitored library.
-
A library data collection occurs.
-
An STA application or server event occurs.
STA generates alerts based on the alert policy criteria and severity. If the policy criteria are matched and enough time has passed since the last alert for the same library resource and event, a new alert is generated. The time period is determined by the policy severity. See "Alert Policy Severities" for details:
If the alert policy includes email addresses, an email containing details about the alert is sent to the designated addresses. See "Alert Emails" for details.
For additional details about the alert policy evaluation process, see "Alert Policy Severity Examples".
Monitoring Generated Alerts
Any STA user can perform this part of the process from the Alerts Overview screen on the Tape System Activity tab.
The screen displays a list of generated alerts, and you can sort, filter, export, and print this list according to your needs. Users with Operator privileges can also annotate selected alerts.
If you are using an alerts workflow at your site, you can update the state of selected alerts to reflect current progress. Alerts workflow management is an optional manual process. See "Alerts Workflow" for details.
User Roles for Alerts Management
Table 5-1 summarizes the alert policy definition activities available to each STA user role.
Table 5-1 Alert Policy User Roles
| User Role | Alert Policy Activity | Screen |
|---|---|---|
|
Operator and above |
Display, filter, and print a list of defined alert policies. |
Select Setup & Administration, then select Alerts Policies. |
|
Administrator only |
Define an alert policy. Copy an alert policy. Rename a policy. Change the policy criteria. Change the list of email recipients. Enable or disable an alert policy. Delete an alert policy. |
Select Setup & Administration, then select Alerts Policies. |
Table 5-2 summarizes the alert monitoring activities available to each STA user role.
Table 5-2 Alert Monitoring User Roles
| User Role | Alert Monitoring Activity | Screen |
|---|---|---|
|
Viewer and above |
Display, filter, and print a list of all generated alerts. Export the alerts list to a spreadsheet or document.View detail for a selected alert. Change the state of a selected alert. Show or hide dismissed alerts. |
Select Tape System Activity, then select Alerts Overview. |
|
Operator and above |
Annotate an alert. |
Select Tape System Activity, then select Alerts Overview. |
Details on Defining Alert Policies
This section provides additional detail to help you in creating alert policies. The following information is included:
Alert Policy Entities
You can define alert policies for the following types of entities, or tape library system resources and events:
-
Library complex
-
Library
-
Drive
-
Media
-
Robot
-
CAP
-
PTP – Relevant only to SL8500 libraries.
-
Elevator – Relevant only to SL8500 libraries.
-
Exchange – See "Alert Policy Severities" for information about how Exchange alert policies are processed differently from other policy types.
-
Media validation – Applies only if media validation is enabled in STA. Alerts are triggered by final validation results only, not intermediate results. See "STA Media Validation" for details.
-
STA application itself – To be notified whenever the STA application restarts.
Alert Policy Severities
The policy severity determines the frequency with which alerts may be generated from the policy. The severity levels are as follows:
-
Severe – An alert may be generated once an hour.
-
Warning – An alert may be generated once every 24 hours.
-
Informative – Only one alert is generated; no additional alerts are generated, even if the policy criteria continue to be met.
See "Alert Policy Severity Examples" for examples detailing the effects of the assigned severity levels.
Exchange and Media Validation Activities Alert Policies and Severities
Because exchanges and media validations are discrete events, not persistent resources, exchange and media validation alert policies generate alerts whenever a new exchange or validation is processed and the policy criteria are matched, regardless of time frames. Therefore, the severity levels you assign to these alert policies are irrelevant. See Example 4 and Example 5 below for details.
Additionally with exchange and media validation alert policies, you must take care not to create overlapping policies that might generate multiple alerts from the same exchange or validation. See "Avoiding too many alerts" for details.
Alert Policy Severity Examples
The following examples illustrate how and when alerts are generated based on specific policy criteria and severities. These examples show how a policy's severity level influences the frequency of alert generation. You can use this information to decide which severity levels to assign to your alert policies.
-
Example 4, "Policy for Exchanges Using "Media Health Indicator""
-
Example 5, ""Warning" Policy for Media Using "Media Health Indicator""
- Example 1 "Warning" Policy for Drives
-
This policy generates alerts for drives that require attention because they have ACTION or EVALUATE health.
Policy entity: Drives
Policy severity: Warning – alerts may be generated every 24 hours.
Policy criteria: Drive Health Indicator is ACTION, or Drive Health Indicator is EVALUATE.
| Time | Events | Evaluation | Result |
|---|---|---|---|
| 05:00:17, Day 1 | The policy is created and enabled.
Drive 1 health is EVALUATE. Drive 2 health is MONITOR. |
The policy is evaluated for all drives and matched for Drive 1 but not Drive 2. | An alert is generated for Drive 1 and emails sent to the defined recipients.
No alert for Drive 2. |
| 08:12:24, Day 1 | Drive 1 health goes to ACTION.
Drive 2 health is still MONITOR. |
The policy is evaluated for all drives and matched for Drive 1 but not Drive 2. | Since it has been less than 24 hours since the last alert for Drive 1, no new alert is generated.
No alert for Drive 2. |
| 13:37:01, Day 1 | Drive 1 health is still ACTION.
Drive 2 health goes to EVALUATE. |
The policy is evaluated for all drives and matched for both Drive 1 and Drive 2. | No alert for Drive 1.
An alert is generated for Drive 2 and emails sent to the defined recipients. |
| 05:01:03, Day 2 | Drive 1 health is still ACTION.
Drive 2 health is still EVALUATE. |
The policy is evaluated for all drives and matched for both Drive 1 and Drive 2. | Since it has been more than 24 hours since the previous alert for Drive 1, a new alert is generated and emails sent to the defined recipients.
No new alert for Drive 2 since it has been less than 24 hours since the last alert for Drive 2. |
| 17:08:43, Day 2 | A new email recipient is added to the policy.
Drive 1 health is still ACTION. Drive 2 health is still EVALUATE. |
The policy is evaluated for all drives and matched for both Drive 1 and Drive 2. | No new alert for Drive 1.
Since it has been more than 24 hours since the previous alert for Drive 2, a new alert is generated and emails sent to the defined recipients. |
- Example 2 "Informative" Policy for Drives
-
This example presents the same policy criteria as 0 but with an "Informative" severity.
Policy criteria: Drive Health Indicator is ACTION, or Drive Health Indicator is EVALUATE.
Policy entity: Drives
Policy severity: Informative – alerts are generated only once.
| Time | Events | Evaluation | Result |
|---|---|---|---|
| 05:00:171 | The policy is created and enabled.
Drive 1 health is EVALUATE. Drive 2 health is MONITOR. |
The policy is evaluated for all drives and matched for Drive 1 but not Drive 2. | An alert is generated for Drive 1 and emails sent to the defined recipients. No additional alerts will be generated by this policy for this drive.
No alert for Drive 2. |
| 08:12:24 | Drive 1 health goes to ACTION.
Drive 2 health is still MONITOR. |
The policy is evaluated for all drives and matched for Drive 1 but not Drive 2. | No new alert for Drive 1.
No alert for Drive 2. |
| 13:37:01 | Drive 1 health is still ACTION.
Drive 2 health goes to EVALUATE. |
The policy is evaluated for all drives and matched for both Drive 1 and Drive 2. | No new alert for Drive 1.
An alert is generated for Drive 2 and emails sent to the defined recipients. No additional alerts will be generated by this policy for this drive. |
| 05:01:03 | Drive 1 health is still ACTION.
Drive 2 health goes to USE. |
The policy is evaluated for all drives and matched for Drive 1 but not Drive 2. | No new alerts for Drive 1 nor Drive 2. |
- Example 3 "Severe" Policy for Media
-
This policy generates alerts for exchanges resulting in a 5135 FSC. This FSC indicates issues with the tape leader, and the media should be ejected from the library and examined as soon as possible.
Policy entity: Media
Policy severity: Severe – Alerts may be generated every hour depending on exchange activity.
Policy criteria: Exchange FSC is 5135.
| Time | Events | Evaluation | Result |
|---|---|---|---|
| 08:00:53 | The policy is created and enabled. | The policy is evaluated as new exchanges are processed and no match is found. | No alerts are generated. |
| 08:05:09 | A 5135 FSC occurs on an exchange for Media A. | The policy is evaluated as new exchanges are processed and matched for Media A. | An alert is generated for Media A and emails sent to the defined recipients.
No additional alerts will be generated by this policy for this exchange. Media A will have no more alerts from this policy until it is involved in a new exchange (assuming future exchanges also result in a 5135 FSC). |
| 09:13:17 | A 5135 FSC occurs on an exchange for Media B. | The policy is evaluated for new exchanges and matched for Media B. | An alert is generated for Media B and emails sent to the defined recipients.
No additional alerts will be generated by this policy for this exchange. |
| 10:35:22 | A 5135 FSC occurs on a new exchange for Media A. | The policy is evaluated for new exchanges and matched for Media A. | An alert is generated for Media A and emails sent to the defined recipients.
No additional alerts will be generated by this policy for this exchange. |
- Example 4 "Severe" Policy for CAPs
-
This policy generates alerts for CAPs that require attention.
Policy entity: CAPs
Policy severity: Severe – Alerts may be generated every hour.
Policy criteria: CAP Library Health is NOTOPERATIVE or CAP Library Health is DEGRADED.
| Time | Events | Evaluation | Result |
|---|---|---|---|
| 14:05:10 | The policy is created and enabled.
CAP 1A is in a DEGRADED state. |
The policy is evaluated for all CAPs and matched for CAP 1A. | An alert is generated for CAP 1A and emails sent to the defined recipients. |
| 15:01:12 | CAP 2B goes into a NOTOPERATIVE state. | The policy is evaluated for all CAPs and matched for both CAP 1A and CAP 2B. | No new alert for CAP 1A.
An alert is generated for CAP 2B and emails sent to the defined recipients. |
| 15:05:20 | CAP 1A is still DEGRADED and CAP 2B is still NOTOPERATIVE. | The policy is evaluated for all CAPs and matched for both CAP 1A and CAP 2B. | A new alert is generated for CAP 1A and emails sent to the defined recipients.
No new alert for CAP 2B. |
| 16:01:27 | CAP 1A is still DEGRADED and CAP 2B is still NOTOPERATIVE. | The policy is evaluated for all CAPs and matched for both CAP 1A and CAP 2B. | No new alert for CAP 1A.
An new alert is generated for CAP 2B and emails sent to the defined recipients. |
- Example 5 Policy for Exchanges Using "Media Health Indicator"
-
Exchange alert policies differ from policies for other library system components in that the severity of the policy is irrelevant. Because exchanges are discrete events, exchange alert policies always generate alerts when the policy criteria are met, regardless of policy severity. This example illustrates this point. See Example 5-0 for a similar example that results in fewer alerts.
Policy entity: Exchanges
Policy severity: Because this is an exchange alert, the policy severity is irrelevant. In this case, the severity is "Informative," but the results would be the same for all severity levels: alerts are generated for all exchanges involving media with EVALUATE health.
Policy criteria: Media Health Indicator is EVALUATE.
| Time | Events | Evaluation | Result |
|---|---|---|---|
| 13:13:17, Day 1 | The policy is created and enabled.
Media Z health is EVALUATE. |
The policy is evaluated for all exchanges and no match is found. | No alert is generated. |
| 14:43:09, Day 1 | An exchange occurs for Media Z, whose health is EVALUATE. | The policy is evaluated for all exchanges and matched for Media Z. | An alert is generated for Media Z and emails sent to the defined recipients. |
| 07:20:24, Day 1 | Another exchange occurs for Media Z, whose health is still EVALUATE. | The policy is evaluated for all exchanges and matched for Media Z. | A new alert is generated for Media Z and emails sent to the defined recipients. |
| 15:05:19, Day 2 | Another exchange occurs for Media Z, whose health is still EVALUATE. | The policy is evaluated for all exchanges and matched for Media Z. | A new alert is generated for Media Z and emails sent to the defined recipients. |
- Example 6 "Warning" Policy for Media Using "Media Health Indicator"
-
This policy generates alerts for media with EVALUATE health. This example is similar to Example 5-0, but because it is a Media alert policy, it results in fewer alerts.
Policy entity: Media
Policy severity: Warning – alerts may be generated every 24 hours.
Policy criteria: Media Health Indicator is EVALUATE.
| Time | Events | Evaluation | Result |
|---|---|---|---|
| 13:13:17, Day 1 | The policy is created and enabled.
Media Z health is EVALUATE. |
The policy is evaluated for all media and matched for Media Z. | An alert is generated for Media Z and emails sent to the defined recipients. |
| 14:43:09, Day 1 | An exchange occurs for Media Z, whose health is still EVALUATE. | The policy is evaluated for all media and matched for Media Z. | Since it has been less than 24 hours since the last alert for Media Z, no new alert is generated. |
| 07:20:24, Day 2 | Another exchange occurs for Media Z, whose health is still EVALUATE. | The policy is evaluated for all media and matched for Media Z. | No new alert is generated for Media Z since is has still been less than 24 hours since the last one. |
| 15:05:19, Day 2 | Another exchange occurs for Media Z, whose health is still EVALUATE. | The policy is evaluated for all media and matched for Media Z. | Since it has been more than 24 hours since the previous alert for Media Z, a new alert is generated and emails sent to the defined recipients. |
Alert Policy Criteria
You can define alerts based on any attribute available for the selected alert Entity. However, not all attributes create events that will actually trigger an alert. In addition, for Media Validation alert policies, alerts are triggered by final validation results only, not intermediate results.
STA Sample Alert Policies
Some sample alert policies are delivered with STA. These policies are meant to give you concrete examples for policy creation, and they are all disabled by default. You can enable as many of them as you want and use them as is, or you can use them as starting points for creating policies more specific to your needs.
Caution:
Unlike the predefined templates delivered with STA, the sample alert policies are not write-protected, and you can modify them directly. However, if you modify or delete the sample policies, you cannot restore them to their original state. For any modifications, it is recommended that you copy the sample policy and modify the copy while leaving the original unchanged. See "Copy an Alert Policy" for details.It is also recommended that you print a record of the sample policies as delivered, so you can re-create them manually if necessary. See "Manage the List of Alert Policies" for details.
All STA sample alert policies have names with an "STA" prefix. It is recommended that you preserve this naming convention for the sample policies and not use the "STA" prefix when naming your own alert policies. The Date Created/Updated for STA sample alert policies is the date when the STA application was last installed.
Best Practices for Alert Policies
This section includes tips for creating and managing alert policies.
- Create custom alert policies
-
Create custom alert policies to address site-specific concerns. This is a parallel practice to creating custom templates.
- Customizing the sample alert policies
-
When customizing the sample alert policies provided with STA, make copies rather than modifying the samples directly. Keep the sample policies even if you don't use them. Also, do not use the "STA" prefix when naming your customized versions.
See the following sections:
- Avoiding too many alerts
-
Oracle recommends defining alert policies using criteria specific to the policy entity type. And for exchange and media validation alert policies, Oracle recommends using criteria unique to exchanges and validations and not available for drives and media. Otherwise, you may create overlapping alert policies that result in multiple alerts and emails for the same event or resource attribute.
For example, you could create and enable all three of the following policies:
-
Warning policy for Media: Drive Health Indicator is MONITOR or Media Health Indicator is MONITOR
-
Warning policy for Drives: Drive Health Indicator is MONITOR or Media Health Indicator is MONITOR
-
Policy for Exchanges: Drive Health Indicator is MONITOR or Media Health Indicator is MONITOR
The Media and Drive alert policies would each generate an alert every 24 hours for each drive and media with MONITOR health. In addition, the Exchanges alert policy would generate an alert every time a drive or media with MONITOR health is involved in an exchange. You could potentially get scores of alerts from a single drive or media with MONITOR health.
A better approach would be to create and enable the following policies:
-
Warning policy for Media: Media Health Indicator is MONITOR
-
Warning policy for Drives: Drive Health Indicator is MONITOR
-
Policy for Exchanges: Alert: Drive Dump Available Is True
-
- Alert policies and the "Contains" operator
-
When defining alert policies for drives or media, you can use logical groups in the selection criteria. Because drives and media can belong to more than one logical group at a time, it is usually appropriate to use the "Contains" and "Doesn't Contain" operators when specifying the criteria, rather than the "Is" and "Isn't" operators.
- Duplicate volser alerts
-
It may be useful to define alert policies to notify you of duplicate volume serial numbers (volsers).
Alert Emails
Alerts can be sent to any number of email addresses. Through emailed alerts, users are notified of significant events in the tape library system without having to log in to the STA application. Alerts can even be sent to employees who do not have STA usernames.
The available email addresses must have been previously defined to STA on the Configuration – Email screen. See "Add an Available Email Recipient" for instructions.
Example 5-1 and Example 5-2 are examples of the text of alert emails you might receive.
Example 5-1 Sample Exchange Alert Email
Exchange Started at December 13, 2013 5:52:05 AM MDT and Ended at December 13, 2013 7:15:41 AM MDT
STA Drive Alert - 2013-12-13 07:20:46   (Drive HU1233210W)
Alert Summary:
   Policy Desc:    Generates an alert when the Drive Health Indicator is Evaluate and Drive Health Trend is Worse.
   Criteria Met:   Drive Health Indicator=EVALUATE and Drive Health Trend=WORSE
   STA Server:     sysbiz

DRIVE
   Serial Number:        HU1233210W
   Tray Serial Number:   UNKNOWN
   Model:                HpUltrium6
   Last Annotation:

   Health Indicator:                  Evaluate
   Health Trend:                      Worse
   Suspicion Level:                   90.0
   Exchange Status:                   GOOD
   Exchange Tape Alerts - Warning:    0
   Exchange Tape Alerts - Critical:   0
   Alerts (30 days):                  3
Alerts Workflow
The alerts workflow is an optional manual process that is based on predefined states you can assign to selected alerts on the Alerts Overview screen. You can implement the alerts workflow in whatever manner best works for your site, but a suggested progression of alert states is as follows:
-
New – STA assigns this state to all alerts when they are created.
-
Acknowledged – The alert has been noted.
-
In Progress – The alert has been assigned to a responsible party and is being evaluated.
-
Dismissed – The responsible party has completed all activity on the alert. By default, all dismissed alerts are hidden on the Alerts Overview screen, but you can optionally display them. See "Show or Hide Dismissed Alerts" for details.
See "Change the State of an Alert" for details on using alert states to implement a manual workflow.
Alert Management Tasks
Alert Policy Definition Tasks
Alert Monitoring Tasks
Manage the List of Alert Policies
Note:
This procedure requires Operator or Administrator privileges.-
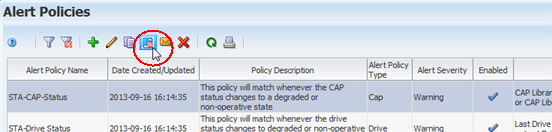
In the Navigation Bar, select Setup & Administration, then select Alerts Policies.
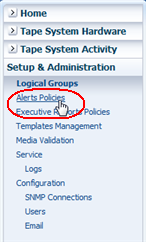
Description of the illustration fg_navbaralrt.png
The Alerts Policies screen appears, showing all sample and user-defined policies at your site.
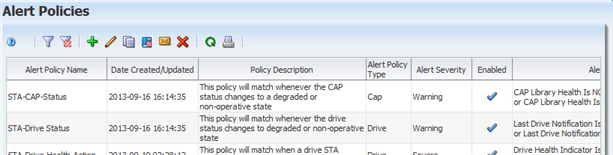
Description of the illustration fg_alrtpolicies.png
-
You can manage the list of alert policies by performing the following tasks:
-
Filter the table records; see "Use the Filter Data Dialog Box to Change a Table Filter".
-
Reset a filter applied to the table; see "Clear the Current Filter".
-
Refresh the table to display new policies; see the STA Screen Basics Guide.
-
Display a printable form of the table in a separate browser tab or window; see the STA Screen Basics Guide.
-
Create an Alert Policy
Use this procedure to create an alert policy. The Alert Policies wizard leads you through the steps to define all information for the policy.
Note:
This procedure requires Administrator privileges.-
In the Navigation Bar, select Setup & Administration, then select Alerts Policies.
Description of the illustration fg_navbaralrt.png
The Alerts Policies screen appears.
-
Click New Alert Policy.
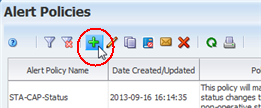
Description of the illustration fg_alrtpoladd.png
-
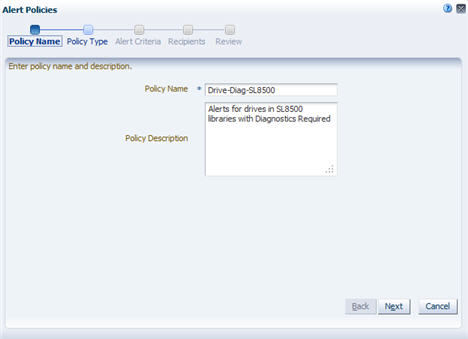
Complete the first screen of the wizard as follows:
-
In the Policy Name field, type a unique name.
Your entry can include any alphanumeric characters up to 250 characters in length.
Note:
All sample alert policies delivered with STA have names beginning with "STA," so it is recommended that the names you assign to your alert policies not start with this prefix. -
In the Policy Description field, enter an optional description of the policy. This information is included in alert emails. You may want to use this field to specify recommended corrective actions for alerts generated by this policy.
-
Click Next.
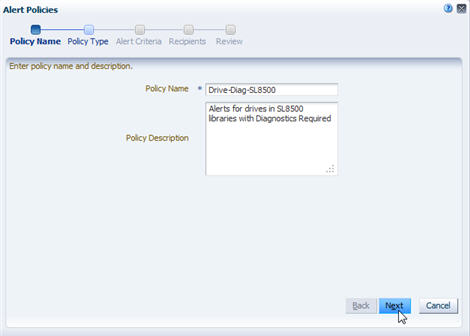
Description of the illustration fg_alrtwiz1.jpg
Note:
On any screen of the wizard, you can select the breadcrumb links at the top of the dialog box to go directly to the next immediate screen or any screen you have already visited.
-
-
Complete the second screen of the wizard as follows:
-
In the Entity Type menu, select the type of library system component for which this policy may generate alerts. See "Alert Policy Entities" for information about the types.
-
In the Select Severity field, select the severity level of the alert policy. See "Alert Policy Severities" for information about severity levels.
-
Click Next.
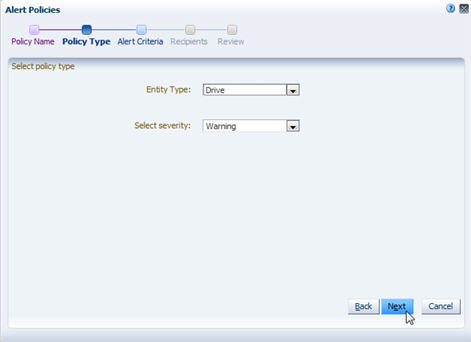
Description of the illustration fg_alrtwiz2.jpg
-
-
On the third screen of the wizard, specify the alert policy criteria as follows:
-
In the Filter Matching field, indicate whether you want to match any or all of the criteria you specify.
-
Click the Add New Filter Criteria Row button to add a new, blank selection criteria row to the dialog box.
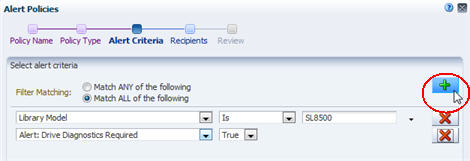
Description of the illustration fg_alrtaddcriteria.jpg
-
Specify the selection criteria using the menus and text fields on the row. See "Filter Operators by Attribute Type" for details on completing each row.
Note:
When selecting an attribute for filtering, if you know the name of the attribute you want to select, you can type the first few letters to quickly move the cursor to that item in the menu. -
You can add as many rows of selection criteria as you want.
Note:
When basing selection criteria on logical groups, it is usually appropriate to use the "Contains" and "Doesn't Contain" operators, rather than the "Is" and "Isn't" operators. This is because drives and media can belong to more than one logical group at a time. See "Filtering by Logical Group" for details. -
To remove criteria, click the Remove This Filter Criteria Row button on the row you want to delete.
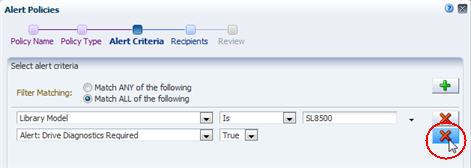
Description of the illustration fg_alrtremcriteria.jpg
-
-
Verify that your criteria are correct and click Next.
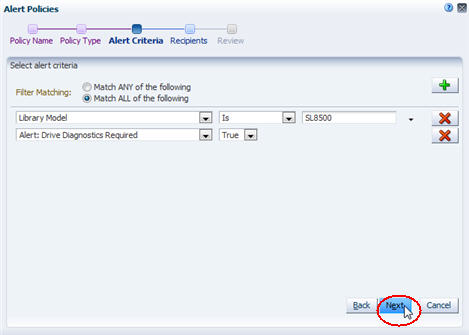
Description of the illustration fg_alrtwiz3.jpg
-
Complete the fourth screen of the wizard as follows:
-
In the Email Recipients menu, select the email addresses to which you want emails to be sent whenever an alert is generated by this policy.
-
Click Next.
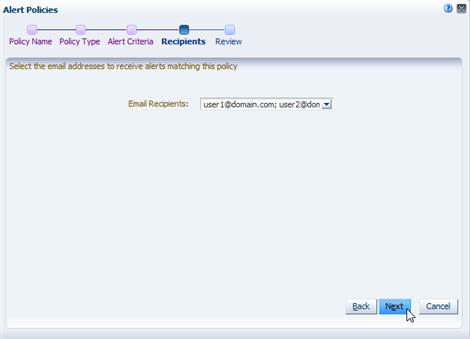
Description of the illustration fg_alrtwiz4.jpg
-
-
Complete the last screen of the wizard as follows:
-
Verify that all the policy information is correct.
-
Use the Enable Alert Policy check box as follows:
-
Select the check box to create the policy and enable it immediately.
-
Deselect the check box to create the policy but leave it disabled for now. You can enable it at a later time. See "Enable or Disable an Alert Policy" for details.
-
-
Click Save.
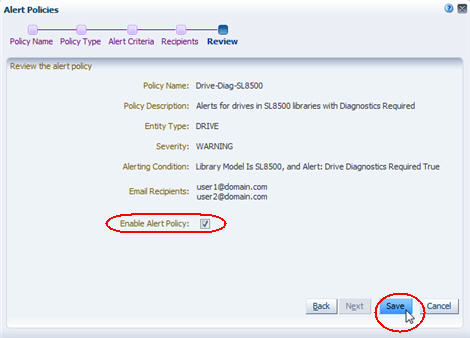
Description of the illustration fg_alrtwiz5.jpg
The policy is created. If the policy is enabled, then the appropriate library system resources are immediately evaluated against the policy and alerts are generated as appropriate. If the policy is disabled, then the policy is not evaluated for now.
-
Copy an Alert Policy
Use this procedure to copy a selected alert policy. You can copy any user-defined policy or STA sample policy, depending on your needs. Following are some uses for this procedure.
-
Use an existing policy as the basis for a new policy. Copy an existing policy that is similar to one you want to create, and then modify the copy. See "Modify an Alert Policy" for details.
-
Copy the STA sample policies to preserve the original versions. The STA sample policies are not write-protected and there is no way to restore the original versions if they are modified, so it is recommended that you keep copies of the original versions even if you do not use them.
Note:
This procedure requires Administrator privileges.-
In the Navigation Bar, select Setup & Administration, then select Alerts Policies.
Description of the illustration fg_navbaralrt.png
The Alerts Policies screen appears.
-
Select the alert policy you want to copy and click Copy Alert Policy.
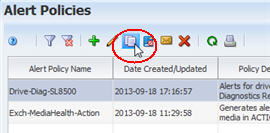
Description of the illustration fg_alrtcopy.jpg
The first screen of the Alert Policies wizard appears. The copy of the policy has all the same information as the original, except for the following:
-
The word "Copy" is added to the end of the Policy Name.
-
No email recipients are defined.
-
The policy is disabled (the Enable Alert Policy check box is deselected).
Description of the illustration fg_alrtcopyd.jpg
-
-
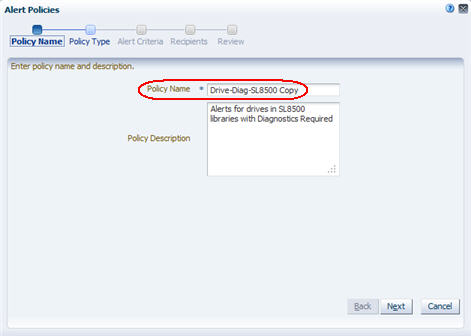
In the Policy Name field, type the name you want to assign.
-
Use the Next button or the wizard breadcrumbs at the top of the dialog box to navigate to the screens with the information you want to modify. See "Create an Alert Policy" for details on completing these screens. You can also leave all information unchanged if you are simply copying the original policy to preserve it.
-
Click Save when done.
The new policy is created, and the Alerts Policies screen is updated with the information.
In the following example, the Drive-Diag-SL3000 policy was copied from the Drive-Diag-SL8500 policy, and the alert criteria were modified to evaluate drives in SL3000 libraries.

Description of the illustration fg_alrtcopydone.jpg
Modify an Alert Policy
Use this procedure to make any of the following modifications to a selected alert policy.
-
Change the policy name.
-
Change the policy description.
-
Change the tape library system resource or event to be evaluated by this policy.
-
Change the policy severity.
-
Add, delete, or modify the policy selection criteria.
-
Add or delete email recipients; for a more direct method, see "Modify Email Recipients for an Alert Policy".
-
Enable or disable the policy; for a more direct method, see "Enable or Disable an Alert Policy".
Note:
This procedure requires Administrator privileges.-
In the Navigation Bar, select Setup & Administration, then select Alerts Policies.
Description of the illustration fg_navbaralrt.png
The Alerts Policies screen appears.
-
Select the alert policy you want to modify and click Edit Alert Policy.
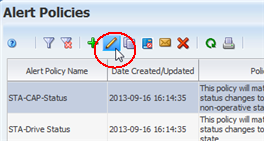
Description of the illustration fg_alrtpoledit.png
The first screen of the Alerts Policy wizard appears, and the policy's current information is displayed.
Description of the illustration fg_alrtwizedit.jpg
-
Use the Next button or the wizard breadcrumbs at the top of the dialog box to navigate to the screens with the information you want to modify. See "Create an Alert Policy" for details on completing these screens.
-
Click Save when done.
The policy is updated, and the changes are displayed on the Alerts Policies screen.
Modify Email Recipients for an Alert Policy
Use this procedure to add or delete email recipients for a selected alert policy. The recipients are notified of all alerts generated by the policy. You can choose any number of addresses that have been predefined to STA in the Configuration – Email screen. See "Alert Emails" for details.
Note:
This procedure requires Administrator privileges.-
In the Navigation Bar, select Setup & Administration, then select Alerts Policies.
Description of the illustration fg_navbaralrt.png
The Alerts Policies screen appears.
-
Select the policy you want to modify and click Email Recipients.
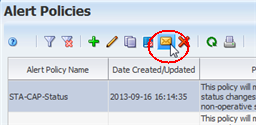
Description of the illustration fg_alrtpolemail.png
The Email Recipients dialog box appears.
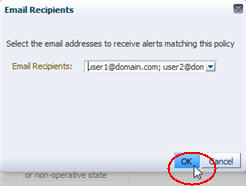
-
In the Email Recipients menu, select the check boxes next to the addresses you want to receive alerts generated from this policy. Deselect the check boxes next to the addresses not to receive alerts.
Description of the illustration fg_alrtemaild.jpg
-
Click OK.
The policy is updated according to your modifications.
Enable or Disable an Alert Policy
Use this procedure to enable or disable a selected alert policy. Only enabled policies can generate alerts.
To ensure email recipients are notified of all alerts generated by a particular policy, you should add the recipients to the policy before enabling it. See "Modify Email Recipients for an Alert Policy" for instructions.
Note:
This procedure requires Administrator privileges.-
In the Navigation Bar, select Setup & Administration, then select Alerts Policies.
Description of the illustration fg_navbaralrt.png
The Alerts Policies screen appears.
-
Select the policy you want to modify.
If the policy is currently enabled, the Disable Alert Policy icon in the Alerts Policies toolbar becomes active. If the policy is currently disabled, the Enable Alert Policy icon becomes active.
-
Click Enable/Disable Alert Policy.
Description of the illustration fg_alrtpoldisable.png
The policy is updated according to your selection.
-
If you have enabled the policy, the corresponding tape library resources or events are immediately evaluated against the policy criteria, and alerts are generated as appropriate.
-
If you have disabled the policy, alerts are no longer generated for the policy.
-
Delete an Alert Policy
Use this procedure to delete an alert policy. Deleting a policy does not delete alerts already generated from this policy; they are still available for viewing on the Alerts Overview screen. You do not have to disable an alert policy before deleting it.
Note:
This procedure requires Administrator privileges.Caution:
Be careful not to delete any of the STA sample alert policies because they cannot be restored except by manually re-creating them. All STA sample alert policies have names with an "STA" prefix.-
In the Navigation Bar, select Setup & Administration, then select Alerts Policies.
Description of the illustration fg_navbaralrt.png
The Alerts Policies screen appears.
-
Select the alert policy you want to delete and click Delete Alert Policy.
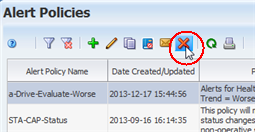
Description of the illustration fg_alrtpoldelete.png
The Delete dialog box appears.
-
Verify your selection and Click Yes to confirm the deletion.
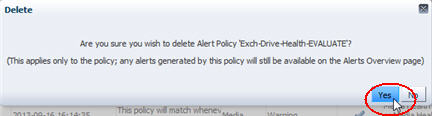
Description of the illustration fg_alrtdeleted.jpg
The policy is deleted and the list on the Alerts Policies screen is updated.
Manage the List of Generated Alerts
Note:
With the exception of annotating an alert, this procedure can be done by any STA user. Annotating requires Operator privileges.-
In the Navigation Bar, select Tape System Activity, then select Alerts Overview.
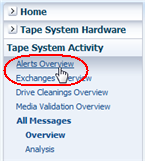
Description of the illustration fg_navbaralrtovw.png
The Alerts Overview screen appears, showing all active (not dismissed) alerts that have been generated to-date.
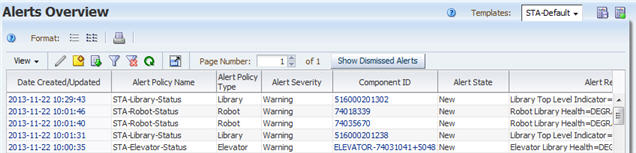
Description of the illustration fg_alrtlist.jpg
-
You can manage the list of alerts by performing the following procedures:
-
Display a printable form of the table in a separate browser tab or window; see the STA Screen Basics Guide.
-
Annotate an alert, see the STA Screen Basics Guide.
-
Export the list of alerts; see the STA Screen Basics Guide.
-
Filter the list of alerts; see "Use the Filter Data Dialog Box to Change a Table Filter".
-
Reset a filter applied to the table; see "Clear the Current Filter".
-
Refresh the table to display new alerts; see the STA Screen Basics Guide.
-
Detach the table from the screen and display it in a separate window in the browser foreground; see the STA Screen Basics Guide.
-
Go directly to a specific page on the screen; see the STA Screen Basics Guide
-
Display Detail For an Alert
Use this procedure to display an alert and trace it to the tape library system event or condition that triggered it.
Note:
This procedure can be performed by any STA user with Viewer privileges or above.-
In the Navigation Bar, select Tape System Activity, then select Alerts Overview.
Description of the illustration fg_navbaralrtovw.png
The Alerts Overview screen appears.
-
Select the alerts you want to view and click Detail View.
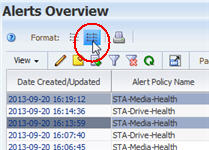
Description of the illustration fg_alertselect.jpg
In the Detail View, each record you have selected includes several links to other screens containing related information.
-
Select the link in the Alert Event Type field (in this example, Exchange) to display detail for the event that triggered the alert.
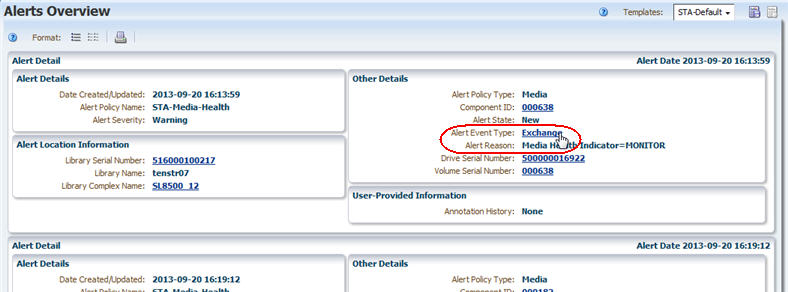
Description of the illustration fg_alrtexchange.jpg
You can use the information that is displayed to trace the cause of the alert and determine whether you need to take any action.
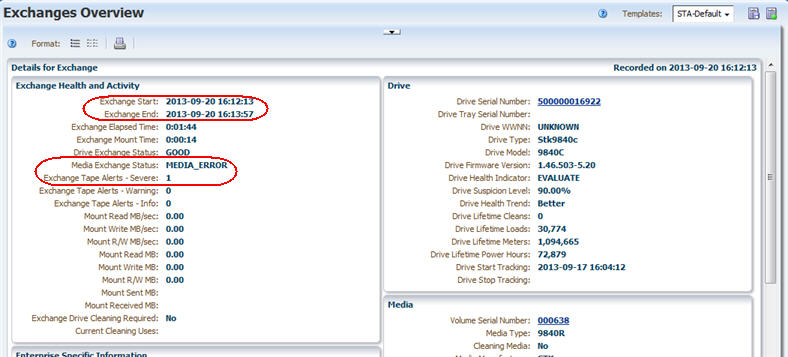
Description of the illustration fg_alrtexchdetail.jpg
Change the State of an Alert
Use this procedure to change the state of selected alerts according to the alerts workflow process implemented at your site. See "Alerts Workflow" for details on this process.
Note:
This procedure can be performed by any STA user with Viewer privileges or above.-
In the Navigation Bar, select Tape System Activity, then select Alerts Overview.
Description of the illustration fg_navbaralrtovw.png
The Alerts Overview screen appears.
-
Select the alerts you want to modify and click Change Alert State. You can select multiple alerts.
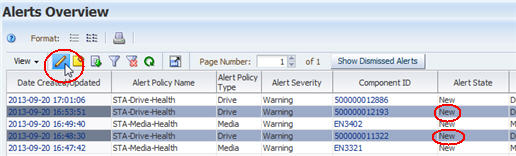
Description of the illustration fg_alrtchangestate.jpg
The Change Alert State dialog box appears.
-
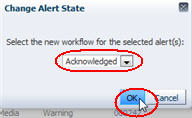
In the menu, select the state you want to assign to the selected alerts. You can assign any available state, and then click OK.
Description of the illustration fg_alrtack.jpg
The alerts are updated, and their new state is displayed in the Alerts Overview screen.
Note:
If you changed the selected alerts to "Dismissed," and the Alerts Overview screen is set to hide dismissed alerts, the alerts are removed from the display. See "Show or Hide Dismissed Alerts" for details on displaying dismissed alerts.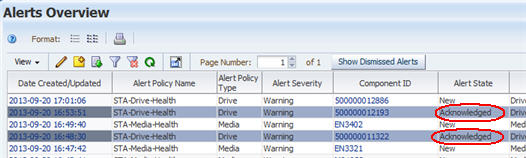
Description of the illustration fg_alrtackdone.jpg
Show or Hide Dismissed Alerts
Use this procedure to toggle the display of dismissed alerts on the Alerts Overview screen. See "Change the State of an Alert" for details on how alerts are dismissed.
Note:
This procedure can be performed by any STA user with Viewer privileges or above.-
In the Navigation Bar, select Tape System Activity, then select Alerts Overview.
Description of the illustration fg_navbaralrtovw.png
The Alerts Overview screen appears, and by default, all dismissed alerts are hidden from view.
-
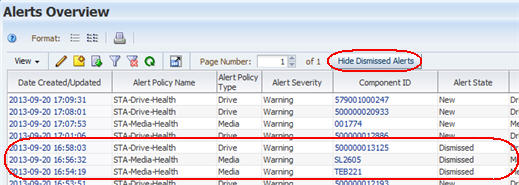
Click the Show Dismissed Alerts button in the table toolbar.

Description of the illustration fg_alrtshowdism.jpg
Dismissed alerts are now visible on the screen, and the button label has changed to Hide Dismissed Alerts.
Description of the illustration fg_alrtshowdismdone.jpg
-
To hide the dismissed alerts again, click the Hide Dismissed Alerts button.

Description of the illustration fg_alrthidedism.jpg