7 Logical Groups
STA's logical group feature allows you to create any number of user-defined groups of drives and media. Logical groups are useful for filtering and reporting STA data. If your site has enabled the optional STA media validation feature, you can use logical groups when defining automated media validation policies. See "Validating Media by Logical Group" for details.
Logical groups can contain any combination of drives, media, or both. Individual drives and media can belong to more than one logical group at a time.
Anyone with Operator or Administrator privileges can perform the activities described in this chapter.
This chapter includes the following topics:
Using Logical Groups
Following are some ways logical groups can help you to organize and report your STA data:
-
Use logical groups to filter data on the following screens. See "Filtering by Logical Group" for details.
-
Drives Overview and Drives Analysis
-
Media Overview and Media Analysis
-
Selected Dashboard portlets
-
-
Save screen layouts that have been filtered by logical group as templates. The filters are saved as part of the templates. See "Screen Characteristics Included in the Template Definition" for details.
-
Create Executive Reports based on Dashboard templates that are filtered by logical group. See "Executive Reports"for details.
Logical Group Examples
- Example 1 Logical Groups for Library Partitions
-
A library has eight partitions, and users would like to produce STA reports for drives and media in each partition. To do so, you could create one logical group for each library partition.
- Example 2 Logical Groups for Libraries in Different Geographic Locations
-
Two library operators manage libraries at one site and three other operators manage another site. The operators would like to see STA data that apply to drives and media at their site only. To do so, you could create one logical group for each site.
- Example 3 Logical Groups for Archival Media
-
An archival site creates two copies of each archived media. To help manage the two sets of media, you could create one logical group for all copy #1 media and another logical group for copy #2 media.
- Example 4 Logical Group for Calibration Media
-
If you choose to enable drive calibration and qualification, which is part of the STA media validation feature, you must define a logical group of media to be used for this purpose. All drive calibration and qualification activities will be done exclusively with these media, and the media should not be used for production data. See "Calibration Media Logical Group" for details.
Logical Group Creation Process
The process for creating a logical group is as follows.
-
Create the logical group from the Logical Groups screen. You assign a name and designate whether it is a manual or dynamic group. See "Types of Logical Groups" and for details.
-
Add drives and media to the group using either of the following methods:
-
If the group is manual, then you select individual drives and media to add to the group. This is done from the Drives Overview and Media Overview screens. See "Add Drives and Media to a Manual Logical Group" for details.
-
If the group is dynamic, then you define the selection criteria by which drives and media are assigned to the group. This is also done from the Logical Groups screen. STA then automatically builds the group. See "Create and Define a Dynamic Logical Group" for details.
-
Logical Group Ownership
A logical group is owned by the STA username that created it, and the ownership cannot be changed except when the owner is deleted. The logical group owner is displayed on the Logical Groups screen.
Note:
When an STA username is deleted, all logical groups owned by that username are automatically deleted or made public, according to the selection made by the Administrator user performing the deletion. See "Delete an STA Username" for details.Types of Logical Groups
When you create a logical group, you designate whether it is manual or dynamic. Once you have created a group, you cannot change its type.
Manual Logical Groups
Manual logical groups are relatively static—membership does not change except through direct user intervention. You build manual logical groups by manually assigning selected drives and media to the group. You can add or delete drives and media from a group at any time. See "Create a Manual Logical Group" for details.
Dynamic Logical Groups
Dynamic logical groups evolve over time as drive and media attributes change. Membership in a dynamic logical group is based on selection criteria that you define. Logical group selection criteria work in much same way as the STA filtering feature, and they can range from simple to very complex. See "Create and Define a Dynamic Logical Group" for details.
Depending on the size of your tape library system, it may take some time to build a dynamic group for the first time. The group is built in the background, so you can proceed with other STA activities while the group is being built.
Updates to Dynamic Group Membership
Dynamic group membership is automatically updated as drives and media are added and removed from your library environment, and as the attributes of individual drives and media change. When drives and media meet the selection criteria for a group, they are automatically added to the group, and when they no longer meet the criteria, they are automatically removed.
Group membership updates occur once per hour, but you can manually initiate a group update at any time. See "Force a Dynamic Logical Group Update" for details.
You cannot manually add or delete individual drives and media from a dynamic group. To change the membership of a dynamic group, you can revise the selection criteria. See "Change the Selection Criteria for a Dynamic Logical Group".
Dynamic Group Selection Criteria
A variety of drive and media attributes are available for creating selection criteria. Some attributes apply only to drives, some only to media, and some to both. Following are some examples:
-
Matching on Library Name selects both drives and media.
-
Matching on Drive Type selects only drives.
-
Matching on Cleaning Media selects only media.
Table 7-1 identifies the available criteria and whether they apply to drives only, media only, or both.
Table 7-1 Dynamic Logical Group Selection Criteria
| Attribute | Drives Only | Media Only | Both |
|---|---|---|---|
|
Cleaning Media |
X |
||
|
Drive Firmware Version |
X |
||
|
Drive Health Indicator |
X |
||
|
Drive Serial Number |
X |
||
|
Drive Type |
X |
||
|
Drive Suspicion Level |
X |
||
|
HLI Address |
X |
||
|
Library Complex Name |
X |
||
|
Library Model |
X |
||
|
Library Name |
X |
||
|
Library Number |
X |
||
|
Library Serial Number |
X |
||
|
Media Health Indicator |
X |
||
|
Media Suspicion Level |
X |
||
|
Media Type |
X |
||
|
Partition Name |
X |
||
|
Partition Number |
X |
||
|
Partition Type |
X |
||
|
Physical Address |
X |
||
|
Rail Number |
X |
||
|
SCSI Element ID |
X |
||
|
STA Start Tracking (Number of Fays) |
X |
||
|
STA Start Tracking (Date) |
X |
||
|
Volume Serial Number |
X |
Filtering by Logical Group
While only users with Operator or Administrator privileges can create and manage logical groups, all users, including those with Viewer privileges, can use existing logical groups to filter STA data. Filtering screens by logical group allows you to focus on just the drives and media in that group.
The data on the following screens can be filtered by logical group:
-
Drives Overview and Drive Analysis
-
Media Overview and Media Analysis
-
Selected Dashboard portlets – See "Dashboard Portlets With Filtering by Logical Group" for a list of the portlets.
In addition, you can use logical groups in the selection criteria for the following types of policies:
-
Alert policies – See "Alert policies and the "Contains" operator" for details.
-
Media validation policies – See "Calibration Media Logical Group" and "Validating Media by Logical Group" for details.
Constructing Filters Using Logical Groups
Drives and media can belong to more than one logical group at a time. Therefore, when you construct selection criteria for filtering by logical group, it is usually appropriate to use the "Contains" and "Doesn't Contain" operators on the Filter Data dialog box, rather than the "Is" and "Isn't" operators. The "Is" and "Isn't" operators require an exclusive match and therefore may result in filters that select no records at all, or all records, rather than records belonging to the logical groups you specify.
The examples below illustrate use of these operators. These examples use the "LTO6-Drives-Media" logical group, which includes three drives and 26 media.
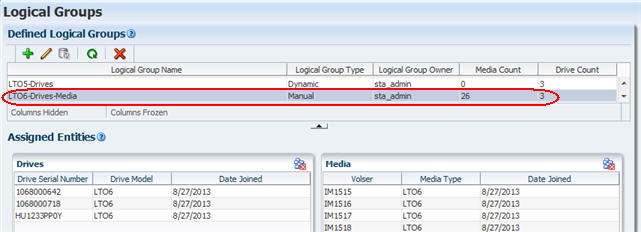
Description of the illustration fg_lglto6drvmed.jpg
- Example 1 Using the "Is" Operator
-
On the Media – Overview screen, using the "Is" operator to filter for the LTO6-Drives-Media logical group selects no records. This is because all media in the LTO6-Drives-Media group also belong to at least one other group.
The "Is" operator selects only drives and media that belong exclusively to the specified logical groups. If the drives and media belong to any other groups as well, they are not selected by the filter.

Description of the illustration fg_lgfilteris.jpg
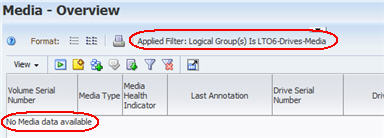
Description of the illustration fg_lgmedislto6.jpg
- Example 2 Using the "Contains" Operator
-
Changing the filter operator to "Contains" selects all 26 media records in the logical group. The "Contains" operator selects drives and media that belong to the specified logical groups, as well as any number of other groups.
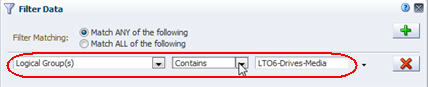
Description of the illustration fg_lgfiltercontains.jpg
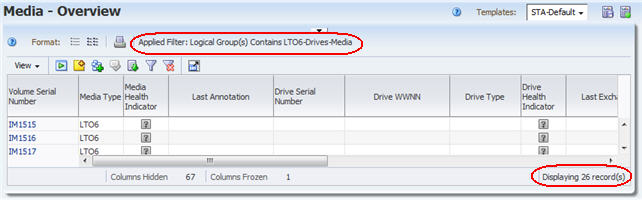
Description of the illustration fg_lgmedcontainslto6.jpg
How Changes to Logical Group Definitions Can Affect Filters
If a filter includes a logical group as part of its selection criteria, modifications to the definition of the logical group affect the behavior of the filter. The following example provides a step-by-step illustration of changes you might see.
- Step 1 Define the Logical Group
-
On the Logical Groups screen, dynamic logical group "LG-Media-T10K-Clean," is created for all T10000 cleaning media. The group has the following definition.
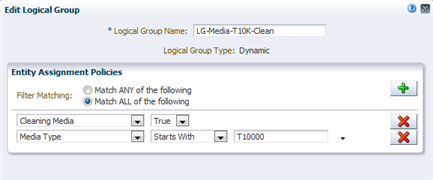
Description of the illustration fg_lgmedtallcleandef.png
There are 51 media included in the logical group.
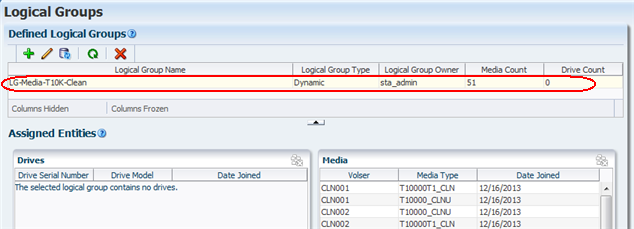
Description of the illustration fg_lgmedtallclean.png
- Step 2 Use the Logical Group in a Filter
-
The Media – Overview screen is filtered by this logical group. The 51 records included in the group are displayed.
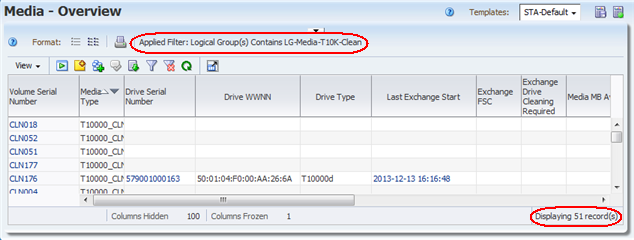
Description of the illustration fg_lgmedovwfiltered.png
- Step 3 Effects of Modifying the Logical Group Selection Criteria
-
On the Logical Groups screen, the logical group definition is modified to include T10000T2 cleaning media only.
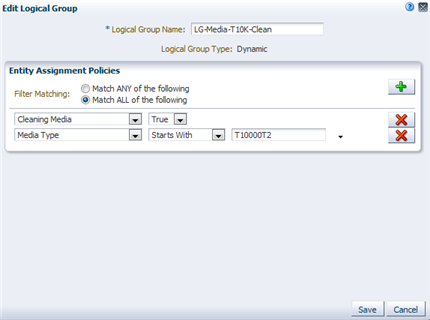
Description of the illustration fg_lgmedtcleanmodified.png
There are now just 11 media in the logical group.
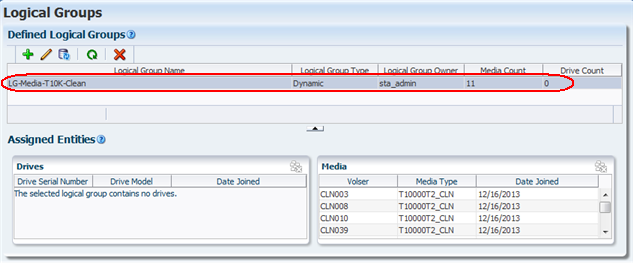
Description of the illustration fg_lgmedt2clean.png
The Media – Overview screen is automatically updated to reflect the new logical group definition included in the applied filter.
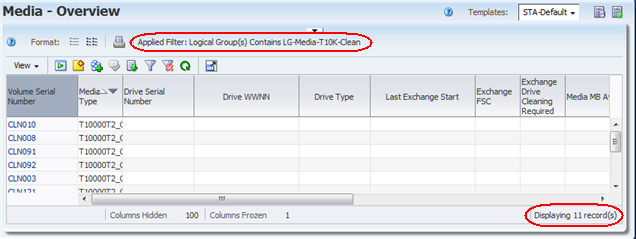
Description of the illustration fg_lgmedovwfilteredt2.png
- Step 4 Effects of Changing the Name of the Logical Group
-
On the Logical Groups screen, the name of the logical group is changed to "LG-Media-T10KT2-Clean." The logical group selection criteria remain the same, and the group still includes the same 11 media.
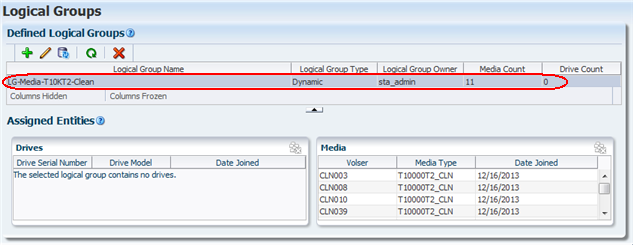
Description of the illustration fg_lgmedt2cleanrename.png
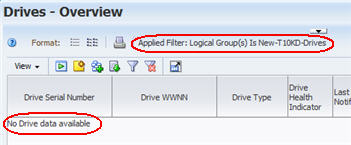
Because the old logical group name is still used in the filter applied to the Media – Overview screen, the screen now displays no records. The filter specifies a logical group name that no longer exists.
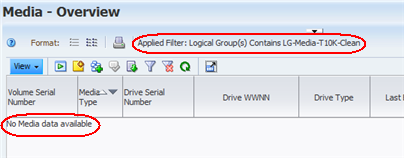
Description of the illustration fg_lgmedovwfilterrename.png
- Step 5 Update the Filter
-
The filter must be updated, either to include the new logical group name in the selection criteria or to make the selection criteria more broad. In the example below, the selection criteria are made more broad by specifying just a portion of the logical group name to match. If the filter were included in a template, the template would also need to be updated and re-saved.
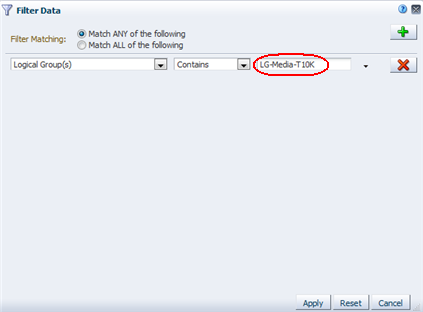
Description of the illustration fg_lgmedfiltert10k.png
Dashboard Portlets With Filtering by Logical Group
You can filter the following Dashboard portlets by logical group. See "Dashboard Portlets"for descriptions.
Graph Portlets
-
Drive Health
-
Drive Utilization
-
I/O Throughput
-
Library Drive Bays
-
Library Media Slots
-
Maximum Mount Times
-
Media Health
-
Mounts
Table Portlets
-
Drives Requiring the Most Cleanings Per Meter
-
Drives Watch List
-
Media Watch List
-
Monitored Device Trends
Report Portlets
-
Data Read Report
-
Data Written Report
-
Drives Health Report
-
Media Health Report
-
Monitored Device Counts
Best Practices for Logical Groups
This section provides tips for creating and managing logical groups.
- Create an example
-
Practice using logical groups, even if you don't see why you need them. Often, in just setting up your first one, you'll recognize how they can be used to simplify your work in STA.
- Logical group names
-
Make logical group names meaningful and easy to distinguish so you can remember the purpose of the group.
- Logical groups and the "Contains" operator
-
Drives and media can belong to more than one logical group at a time; therefore, when you filter by logical group, it is usually appropriate to use the "Contains" and "Doesn't Contain" operators, which perform non-exclusive matches, rather than the "Is" and "Isn't" operators, which perform exclusive matches.
Logical Group Creation and Management Tasks
All tasks in this section require Operator or Administrator privileges.
Manual Logical Groups Only
Dynamic Logical Groups Only
All Logical Groups
Create a Manual Logical Group
Use this procedure to create a manual logical group.
-
In the Navigation Bar, select Setup & Administration, then select Logical Groups.
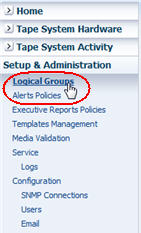
Description of the illustration fg_navbarlg.jpg
The Logical Groups screen appears.
Description of the illustration fg_lgscreen.jpg
-
Click Add Logical Group in the Defined Logical Groups toolbar.
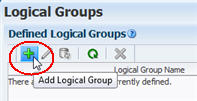
Description of the illustration fg_lgadd.jpg
-
Complete the Create Logical Group screen as follows:
-
In the Logical Group Name field, type a unique name.
Your entry can include a maximum of 249 alphanumeric characters.
-
In the Logical Group Type field, select Manual.
-
Click Save.
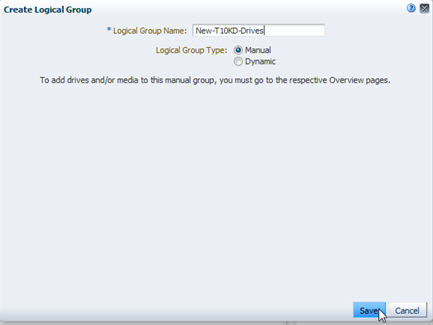
Description of the illustration fg_lgcreateman.jpg
The group is created and is added to the Defined Logical Groups table. For now the group is empty. See "Add Drives and Media to a Manual Logical Group" for details on adding resources to the group.

Description of the illustration fg_lgcreatemandone.jpg
-
Add Drives and Media to a Manual Logical Group
Use this procedure to add drives, media, or both to an existing manual logical group. You can add drives or media one at a time, or you can select multiple resources and add them all at once.
Note:
The logical group must already exist. See "Create a Manual Logical Group" for instructions.Note:
Removing drives and media from a logical group is done on the Logical Groups screen. See "Remove Drives and Media From a Manual Logical Group" for instructions.Note:
You cannot add drives or media to a dynamic logical group. To change the membership of a dynamic group, see "Change the Selection Criteria for a Dynamic Logical Group".-
Go to the appropriate Overview screen, as follows:
-
To add drives to the logical group, select Tape System Hardware, then select Drives – Overview in the Navigation Bar.
-
To add media to the logical group, select Tape System Hardware, then select Media – Overview in the Navigation Bar.
-
-
On the selected screen (Drives – Overview in this example), select the drives or media you want to add to the logical group.
Optionally, you can apply a filter to the screen to narrow down the choices. The example below shows individual drives selected from a filtered list.
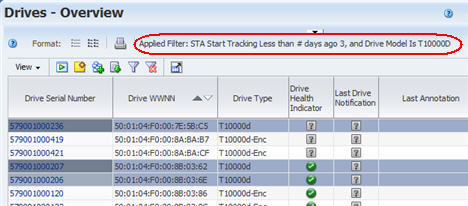
Description of the illustration fg_lgaddfilter.jpg
-
Click Logical Groups in the table toolbar.
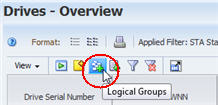
Description of the illustration fg_lgdrvovwlggrps.jpg
The Logical Groups dialog box appears.
-
In the menu, select the logical group to which you want to add the selected drives or media, and then click OK.
Note:
The menu displays manual logical groups only.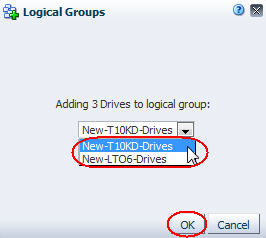
Description of the illustration fg_lgd.jpg
The resources are added to the logical group. See "List All Drives and Media Assigned to a Logical Group" to confirm the update.
-
Optionally, you can add additional resources to the group as follows:
Remove Drives and Media From a Manual Logical Group
Use this procedure to remove selected drives, media, or both from a manual logical group.
Note:
Adding drives and media to a logical group is done on the respective Overview screens. See "Add Drives and Media to a Manual Logical Group" for instructions.Note:
You cannot delete drives or media from a dynamic logical group. To change the membership of a dynamic group, see "Change the Selection Criteria for a Dynamic Logical Group".-
In the Navigation Bar, select Setup & Administration, then select Logical Groups.
Description of the illustration fg_navbarlg.jpg
The Logical Groups screen appears.
-
In the Defined Logical Groups table, select the manual logical group you want to modify.
The drives and media assigned to the group are displayed in the Assigned Entities table.
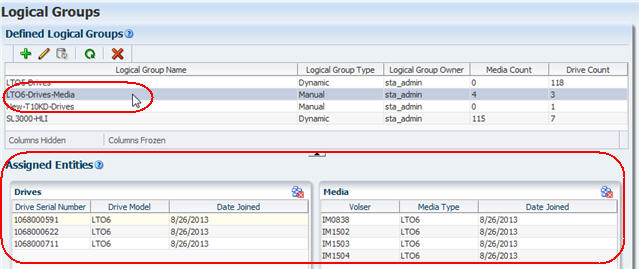
Description of the illustration fg_lgmanselect.jpg
-
In the Drives or Media table, select the resources you want to remove from the group, and then click Unassign Entities. You can select multiple records at once, but they must all be from the same table.
Note:
The Unassign Entities button does not activate for dynamic logical groups. If the button is not activated, check to be sure you have selected a manual logical group.
Description of the illustration fg_lgmanunassign.jpg
The Unassign Entities dialog box appears.
-
Verify that you have specified the correct information and click Yes.
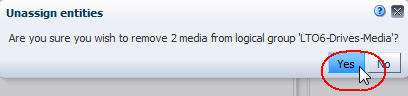
Description of the illustration fg_lgunassignd.jpg
The selected resources are removed from the group, and the Assigned Entities table is updated.
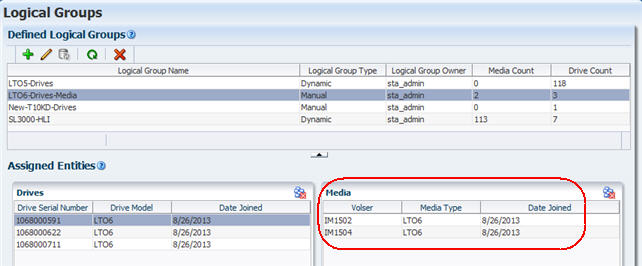
Description of the illustration fg_lgmanremovedone.jpg
-
To remove additional drives or media from the group, return to Step 3.
Create and Define a Dynamic Logical Group
Use this procedure to create a dynamic logical group and define the selection criteria that determine which drives and media are assigned to the group.
-
In the Navigation Bar, select Setup & Administration, then select Logical Groups.
Description of the illustration fg_navbarlg.jpg
The Logical Groups screen appears.
-
Click Add Logical Group in the Defined Logical Groups toolbar.
Description of the illustration fg_lgadd.jpg
-
Complete the Create Logical Groups dialog box as follows:
-
In the Logical Group Name field, type a unique name.
Your entry can include any alphanumeric characters up to 250 characters in length.
-
In the Logical Group Type field, select Dynamic.
The Entity Assignment Policies appear in the dialog box.
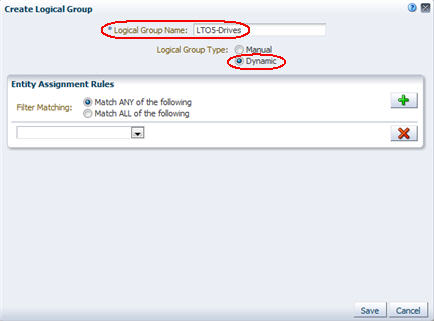
Description of the illustration fg_lgcreatedyn.jpg
-
-
Specify the selection criteria as follows.
-
In the Filter Matching field, indicate whether you want to match any or all of the criteria you specify.
-
Click the Add New Filter Criteria Row button to add a new, blank selection criteria row to the dialog box.
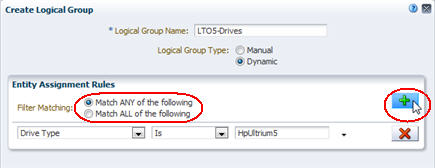
Description of the illustration fg_lgruleadd.jpg
-
Specify the selection criteria using the menus and text fields on the row. See "Filter Operators by Attribute Type" for details on filling out each row.
Note:
When selecting an attribute for filtering, if you know the name of the attribute you want to select, you can type the first few letters to quickly move the cursor to that item in the menu. -
You can add as many rows of selection criteria as you want.
-
To remove criteria, click the Remove This Filter Criteria Row button on the row you want to delete.
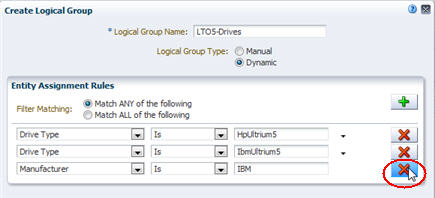
Description of the illustration fg_lgruledelete.jpg
-
-
Verify that your criteria are correct and click Save.
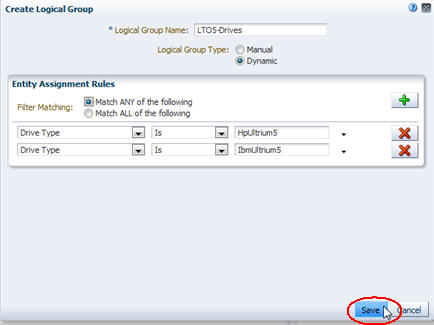
Description of the illustration fg_lgdynsave.jpg
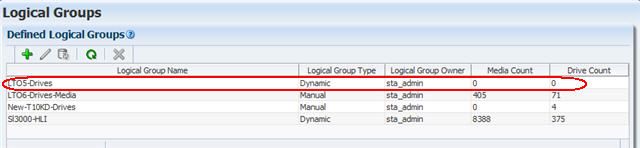
The group is created and added to the Defined Logical Groups table, and STA begins building the group in the background.
Initially, the media and drive counts for the group are displayed as zero. Depending on the size of your tape library system and the complexity of your selection criteria, it may take from a few seconds to many minutes for all qualifying drives and media to be added to the group. Leaving the Logical Groups screen does not interrupt this process.
Description of the illustration fg_lgdyndone.jpg
-
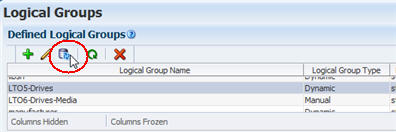
As the logical group is built, you can click the Refresh Table icon to update the screen display with the in-progress drive and media counts.

Description of the illustration fg_lgrefresh.jpg
The display is updated.

Description of the illustration fg_lgrefreshdone.jpg
Change the Selection Criteria for a Dynamic Logical Group
Use this procedure to change the selection criteria for an existing dynamic logical group.
-
In the Navigation Bar, select Setup & Administration, then select Logical Groups.
Description of the illustration fg_navbarlg.jpg
The Logical Groups screen appears.
-
In the Defined Logical Groups table, select the dynamic logical group you want to modify and click Edit Logical Group.
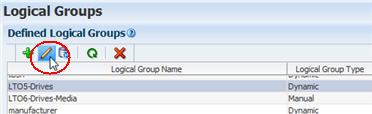
Description of the illustration fg_lgdynedit.jpg
The Edit Logical Group dialog box appears, and the group's selection criteria are displayed.
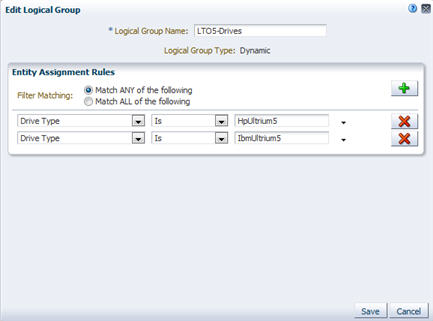
Description of the illustration fg_lgdyneditd.jpg
-
You can add, delete, and modify selection criteria as necessary. See "Create and Define a Dynamic Logical Group" for instructions.
Force a Dynamic Logical Group Update
Use this procedure to initiate an immediate update of a dynamic logical group to reflect any changes in the qualifying drives or media. Dynamic groups are updated automatically every hour, but you can use this procedure to update groups between update cycles.
-
In the Navigation Bar, select Setup & Administration, then select Logical Groups.
Description of the illustration fg_navbarlg.jpg
The Logical Groups screen appears.
-
In the Defined Logical Groups table, select the dynamic logical group you want to update and click Refresh Dynamic Group.
Description of the illustration fg_lgrefreshdyn.jpg
STA begins updating the group in the background. Depending on the size of your tape library system and the complexity of your selection criteria, it may take from a few seconds to many minutes for the update to complete. Leaving the Logical Groups screen does not interrupt this process.
-
As the group is updated, you can click the Refresh Table button to update the screen display with the in-progress drive and media counts.
Description of the illustration fg_lgrefresh.jpg
View Logical Group Assignments for Selected Drives or Media
Use this procedure to view the logical groups to which selected drives or media have been assigned.
-
From the Drives – Overview or Media – Overview screen, select the records you want to display, and click Detail View.

Description of the illustration fg_lgselectdrv.jpg
In the Detail View for each record you have selected, the logical group assignments are listed in the User-Provided Information section at the bottom of the display. All groups to which the resource is assigned are listed.
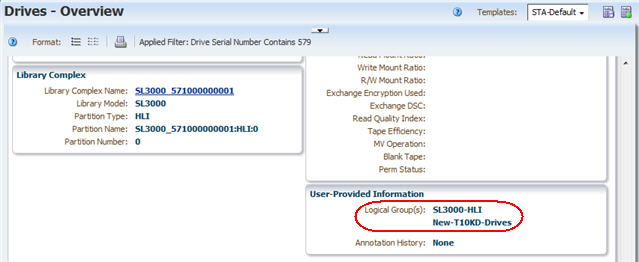
Description of the illustration fg_lgdetailview.jpg
List All Drives and Media Assigned to a Logical Group
Use this procedure to display a list of all drives and media assigned to a selected logical group.
-
In the Navigation Bar, select Setup & Administration, then select Logical Groups.
Description of the illustration fg_navbarlg.jpg
The Logical Groups screen appears.
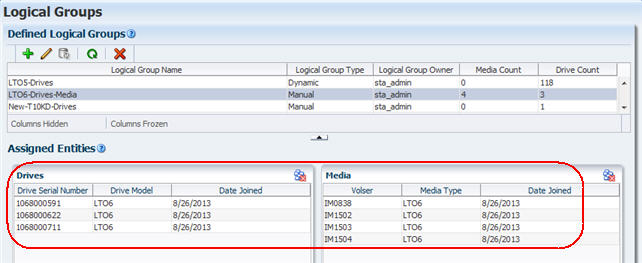
-
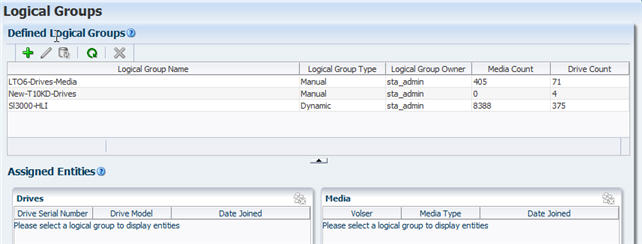
In the Defined Logical Groups table, select the logical group you want to display.
All assigned drives and media are displayed in the Assigned Entities table.
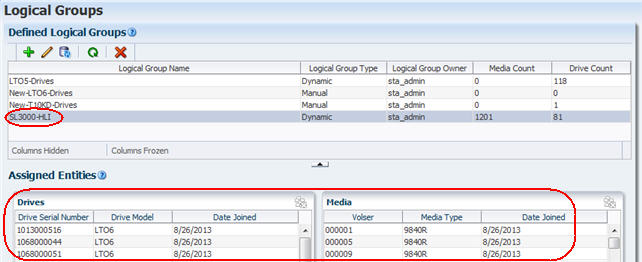
Description of the illustration fg_lgdisplay.jpg
Rename a Logical Group
Use this procedure to change the name of an existing manual or dynamic logical group.
-
In the Navigation Bar, select Setup & Administration, then select Logical Groups.
Description of the illustration fg_navbarlg.jpg
The Logical Groups screen appears.
-
In the Defined Logical Groups table, select the group you want to rename, and then click Edit Logical Group.
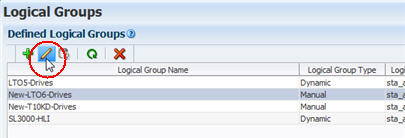
Description of the illustration fg_lgedit.jpg
The Edit Logical Groups dialog box appears.
-
Type the new name in the Logical Group Name field, and then click Save. For dynamic logical groups, do not modify any other fields. For manual logical groups, this is the only field available.
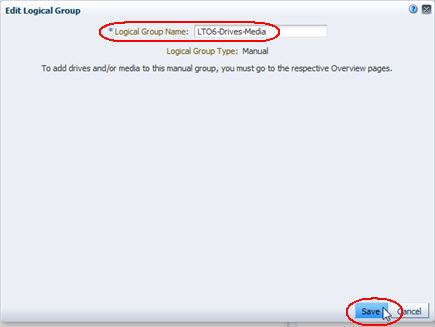
Description of the illustration fg_lgrename.jpg
The Defined Logical Groups table is updated with the new name.
Note:
The Assigned Entities table indicates the group contains no drives nor media. This is just lag in the table display.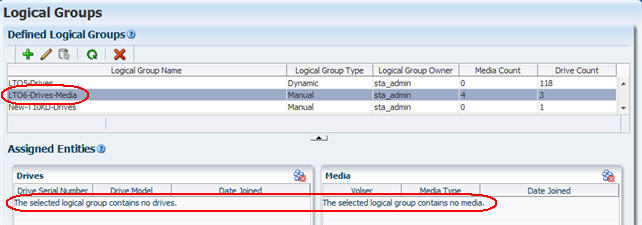
Description of the illustration fg_lgrenamedone.jpg
-
To update the Assigned Entities table display, in the Defined Logical Groups table, deselect the logical group and then re-select it. The display is updated with the assigned drives and media.
Description of the illustration fg_lgentitiesupd.jpg
Delete a Logical Group
Use this procedure to delete a selected manual or dynamic logical group. You can delete only one logical group at a time.
Note:
This procedure deletes the entire logical group. To delete just selected drives or media from a manual group, see "Remove Drives and Media From a Manual Logical Group".-
In the Navigation Bar, select Setup & Administration, then select Logical Groups.
Description of the illustration fg_navbarlg.jpg
The Logical Groups screen appears.
-
In the Defined Logical Groups table, select the group you want to delete, and then click Delete Logical Group.
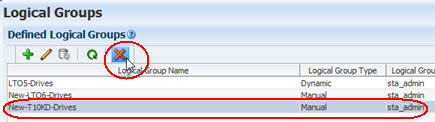
Description of the illustration fg_lgdelgroup.jpg
The Delete Logical Group dialog box appears.
-
Verify that you have selected the correct logical group, and then click Yes to delete.
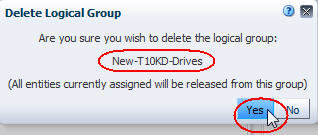
Description of the illustration fg_lgdelgroupyes.jpg
The group is deleted and removed from the Logical Groups screen.
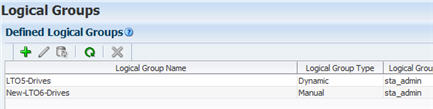
Description of the illustration fg_lgdelgroupafter.jpg
Any screens, Dashboard portlets, or templates filtered by the group now show "No data to display" or "No data available."
Description of the illustration fg_lgdelgroupnodata.jpg