3 Managing Your Mobile Client
The following sections describe how to manage the Oracle Database Mobile Server functionality on the mobile client:
-
Section 3.2, "Synchronize Data for Applications on the Mobile Client"
-
Section 3.3, "Use the mSync GUI to Initiate Synchronization"
-
Section 3.6, "Control Automatic Synchronization for a Specific Mobile Client"
-
Section 3.8, "Improve Performance by Disabling the Resume Feature"
-
Section 3.9, "Use the Device Manager Client GUI to Manage the Client-Side Device"
-
Section 3.11, "Communicate Between the Internet and Intranet Through a Reverse Proxy"
3.1 Starting the Mobile Client
When you installed the mobile client on Linux or Windows, it is configured so that the mobile client always starts automatically when the device is initiated.
3.2 Synchronize Data for Applications on the Mobile Client
You can have an application downloaded onto a device, where data can be synchronized between the mobile client and the back-end Oracle database.
The following describes how to initiate synchronization from each type of mobile client:
-
Java SE and Java ME clients: Refer to Chapter 5, "Synchronization Utilities for Java Sync Client" for information on how to invoke synchronization for pure java clients.
-
Blackberry and Android clients: The application built for these clients initiate synchronization by executing the Mobile Client's Java APIs. For details on synchronization APIs, see Chapter 2, "Synchronization" and Chapter 3, "Managing Synchronization on the Mobile Client" in the Oracle Database Mobile Server Developer's Guide for more information. For full details on the Java APIs, see the Javadoc
-
Win32, Linux, Windows Mobile and iOS clients: The application built for these clients can use the Mobile Client's Java APIs or C/C++ APIs. Thus, start the application as you would start any application on these platforms.
Note:
When you initiate a synchronization from the client, either manually or by scheduling a job, the synchronization cannot occur if there is an active connection with an uncommitted transaction opened from another source. This could be from scheduling two jobs to synchronize at the same time, from mSync, or the client synchronization APIs.Note:
iOS clients: Applications using these clients can use C/C++ APIs to manage manual and automatic synchronization, as described in Chapter 3, "Managing Synchronization on the Mobile Client" in the Oracle Database Mobile Server Developer's Guide.Initiate synchronization through one of the following methods:
-
Execute the
msyncexecutable, described in Section 3.3, "Use the mSync GUI to Initiate Synchronization".
Note:
msync or any other UI tools are not currently supported for iOS clients.-
Implement synchronization within your application using the synchronization APIs, as described in Chapter 2, "Synchronization" and Chapter 3, "Managing Synchronization on the Mobile Client" in the Oracle Database Mobile Server Developer's Guide.
-
Note:
The mobile client device clock must be accurate for the time zone set on the device before attempting to synchronize. An inaccurate time may result in the following exception during synchronization:CNS: 9026 "Wrong user name or password. Please enter correct value and reSync."For more information, see Section 3.2.1, "Synchronization for Pure Java Client."
3.2.1 Synchronization for Pure Java Client
Refer to Chapter 5, "Synchronization Utilities for Java Sync Client" for information on how to invoke synchronization for pure java clients.
3.3 Use the mSync GUI to Initiate Synchronization
You can initiate synchronization for the native mobile client using the mSync GUI, as shown in Figure 3-1.
Figure 3-1 Using the mSync GUI to Initiate Synchronization
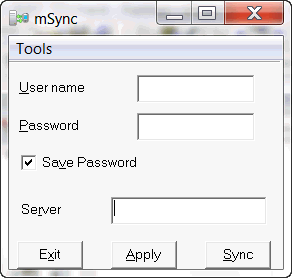
Description of "Figure 3-1 Using the mSync GUI to Initiate Synchronization"
To bring up the mSync GUI, execute msync.exe on Win32 and Windows Mobile or msync on Linux, which is located in the /bin subdirectory under the directory where you installed the mobile client. For Blackberry and Android platforms, start mSync by clicking the mSync application icon.
Modify the following supplied values, if incorrect:
-
User name and password for the user that is starting the synchronization.
Note:
See Section 4.3.1.2.1, "Define User Name and Password" in the Oracle Database Mobile Server Administration and Deployment Guide for conventions for creating the user name or password. -
Check if you want the password saved for future requests.
-
Mobile Server URL, which is http://<mobile_server_hostname>:<port_number>, replace 'http' with 'https' in case SSL is used. If SSL is not used, 'http://' can be skipped.
Click "Sync" to start the Synchronization. Click "Apply" to save any modifications you made to the entries. Click "Exit" to leave the tool.
If there are software updates that are waiting to be downloaded to the client, then the update tool is automatically executed after the end of the synchronization process. See Section 3.10, "Initiate Updates for the Mobile Client" for more information.
Note:
The only time that the client does not check for software updates is if you are using the Synchronization APIs. If you want to launch the update UI, then enterupdate on the command line.You can also modify the tool options by selecting the "Tools" menu, as shown in Figure 3-2.
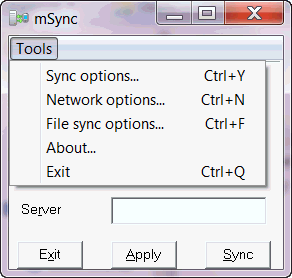
The following sections describe the Tools options:
3.3.1 Network Options for MSync Tool
Figure 3-3 displays the Network options screen where you can specify a proxy if your network provider requires that you use a proxy server to access the internet. Click "Use Proxy" to use a proxy and then enter the proxy server and port number.
Figure 3-3 The mSync Network Options Selection

Description of "Figure 3-3 The mSync Network Options Selection"
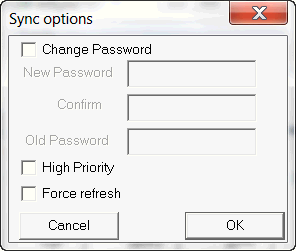
3.3.2 Sync Options for MSync Tool
Figure 3-4 displays the Sync Options screen where you can specify the following:
-
Mobile User Password—Modify the existing password. The mobile user password is stored on both the client and the mobile server. To ensure that both are modified, only change the password when connected to the mobile server. See Section 3.4, "Synchronization Mechanisms on Mobile Client" for details.
-
High Priority—Select this checkbox to specify synchronizing only High Priority data. This specifies under what conditions the different priority records are synchronized. By default, the value is LOW, which is synchronized last. If you have a very low network bandwidth and a high ping delay, you may only want to synchronize your HIGH priority data.
When you select this checkbox, you are enabling pre-defined high priority records to be synchronized first. This only applies for those publication items that have specified a restricting predicate. See Section 1.2.10, "Priority-Based Replication" in the Oracle Database Mobile Server Troubleshooting and Tuning Guide for more information.
-
Force Refresh—The force refresh option is an emergency only synchronization option. Check this option when a client is corrupt or malfunctioning, so that you decide to replace the mobile client data with a fresh copy of data from the enterprise data store with the forced refresh. When this option is selected, any data transactions that have been made on the client are lost.
When a force refresh is initiated all data on the client is removed. The client then brings down an accurate copy of the client data from the enterprise database to start fresh with exactly what is currently stored in the enterprise data store.
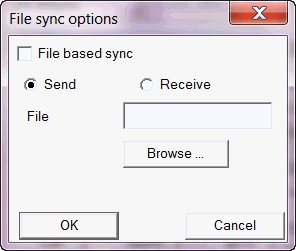
3.3.3 Sync to a File Using File-Based Sync
Once you select "File Based Sync" off the Tools menu, the screen shown in Figure 3-5 is displayed. To synchronize to a file, click on the "File based sync" checkbox and perform the following:
-
If you select the send radio button, then browse for a directory where you want the client to save the upload data file from the mobile client for the mobile server.
-
If you select the receive radio button, then provide the location for the download data file from the mobile server.
For full details on File-Based Sync, see Section 5.10, "Synchronizing to a File with File-Based Sync" in the Oracle Database Mobile Server Administration and Deployment Guide.
3.3.4 Use Mobile Client Tools on Linux
The mobile client for Linux supports the msync, dmagent, update and autosync tools. To use the UI-based tools, use the following executables: msync, dmagent, update, or autosync.
To synchronize on a Linux client with the command line tool, use the msync executable for synchronization, as follows:
./msync username/password@http://server[:port][@proxy:port]
Note:
Substitute https if using HTTP over SSL.For example,
./msync john/john@testserver:8000
The other msync options, such as -save, -a, -password and -force currently will not result in a successful sync. This is a limitation only for the msync executable in the MDK installation on Linux.
3.4 Synchronization Mechanisms on Mobile Client
SQLite, Berkeley DB and Java DB clients support two types of synchronization: state-based (no queues) and queue-based. Both modes implement change capture but use different mechanisms to upload client changes to the server and download server changes to the client. In state-based mode, client changes are taken directly from snapshots and server changes are applied directly to the snapshots. This mechanism is efficient but the drawback is that all snapshots are locked during sync session so that users's applications cannot read or modify snapshots during the sync session.In queue-based mode, synchronization is split into 3 tasks:
-
Compose task: client changes are taken from snapshots and put into the outqueue.
-
Sync task: client changes in the outqueue are uploaded to the server, and the server changes are dowloaded into the inqueue.
-
Apply task: server changes in the inqueue are applied to the snapshots.
The advantage of this mode is that Sync task (the most lengthy of the 3, since it usually involves network trasfers) does not lock the snapshots. During execution of sync task, user's application is free to read or modify the snapshots.
Note:
Compose and apply tasks still require the snapshots to be locked.Also, queue-based mode is transaction-based: client and server changes are split into atomic transactions, each identified by a unique transaction id. This allows compose, sync and apply tasks to run asynchronously. In addition, compose and apply tasks are performed on per-database basis. The main application of this structure is automatic rule-based synchronization that is performed by sync agent. The disadvangage compared to the state-based mode is that more time is needed because of additional compose and apply tasks.
Note:
In queue-based mode, foreground sync (the sync done through msync tool or sync APIs) invokes compose, sync and apply tasks. These tasks are run in sequence: first compose is performed for each database, then sync task and then apply is performed for each database. The snapshots are locked during the whole foreground sync session.The mode is controlled by ose.ini parameter SQLITE.QUEUES for Berkeley DB and SQLite databases, or JAVADB.QUEUES for Java DB database, which can be set to YES or NO. Note that the queue-based mode is the default. To enable state-based mode, set this parameter in ose.ini to NO.
Note:
Currently this setting is permanent. It needs to be set before the first sync and it cannot be changed after that unless the client is removed and reinstalled or all client database are removed (changing SQLITE.QUEUES or JAVADB.QUEUES parameter after the client databases have been used may result in unpredictable behavior).For more details on this parameter, see Appendix A, "QUEUES".
The following section describe metadata structure that is used to implement state-based and queue-based mechanisms:
3.4.1 State-based Mode
For each snapshot a state table is created that references each record in the snapshot through primary key columns of that snapshot. For example, for a snapshot TABLE1, a state table OSE_ST$TABLE1 is created with primary key columns identical to that of TABLE1. Additional columns are created for OSE_ST$TABLE1 and are used for change capture, server and client versioning, and data priority.
Note:
The above applies only to updatable snapshots. For read-only snapshots, the state table is not created. For more information about read-only and updatable snapshots, see Section 2.3.1.1.1, "Read-only Snapshots" and Section 2.3.1.1.2, "Updatable Snapshots" of the Mobile Server Developer's Guide.For versioning, the state table contains the details for all the records in the snapshot and not just records modified by the client. These records are populated and updated with the server's data and versions. The records that are not updated by the client are marked as "clean" (see Section 3.4.1.1).
Another tables used by sync are OSE$TABLES and OSE$TRSEQ. OSE$TABLES meta-table exists in each database where snapshots reside and describes meta-information for every snapshot in the given database. OSE$TRSEQ also exists in each database and contains acknowledgement sequences needed by the server. These tables are only used by sync internally and should not be modified by the user.
The following sections describe state table columns and how data priority should be set by user's application:
3.4.1.1 State Table Columns (except for the primary key columns)
-
OSE$STATE - column to indicate DML type of the record, INSERT ("I"), UPDATE ("U"), DELETE ("D") or CLEAN ("C") ("Clean" meaning, that the record was not updated by client since last sync)
-
OSE$PRIO - priority of the record, set to 0 to indicate high priority, 1 to indicate normal priority
-
OSE$SVER - record's server version
-
OSE$CVER - record's client version
3.4.1.2 Data Priority Handling
The snapshot table itself does not contain extra column(s) to indicate record priority. It is up to the applications to choose what the priority of a client record should be. Currently two priorities are supported - high (value 0) and normal (value 1). The state table for each updatable snapshot includes priority column as described in the previous section. The default priority is normal (value 1). If an application wishes to make a given record high priority, it can find the corresponding state table record by using snapshot record's primary key and set the value of OSE$PRIO column to 0. It can make the record normal priority by setting this value to 1.
Note:
This only applies to the records that were modified on the client, because only those record's changes will be uploaded to the server during sync.Usually, application will have its own criteria on which records need to be of high priority, decided by the application data in the snapshot's record. For example, it could decide that records with certain department id in the employees snapshot table must be of high priority. In this kind of cases, the application to create additional triggers on the snapshot table that will appropriately set OSE$PRIO column in the state table when a new record is inserted or a record is updated in the snapshot table.It is also common to setup automatic sync rules such that high priority records will be uploaded to the server more promptly than normal priority records. See Section 4.5, "Define the Rules Under Which the Automatic Synchronization Starts" of the Mobile Server Developer's Guide for information on automatic synchronization rules.
3.4.2 Queue-based mode
Queue-based mode is a superset of state-based mode: change capture on the client is done the same way as above using state table and triggers, but instead of being synced directly, client changes are put into the outqueue during compose task. The apply task will propagate server changes from the inqueue to the snapshots and will populate their state tables as well.
For Berkeley DB and SQLite, the queue tables for each database are stored in a separate database, "queue database". Each database with snapshot data will have it's own corresponding queue database with the same name prefixed by "OSE$". For example, database TERRY/TESTDB.db, where TERRY is the synchronization id, and TESTDB is the client database name, will have its corresponding queue database TERRY/OSE$TESTDB.db. It is easy to refer to those as data db and queue db.For Java DB, the queue tables for each database are stored in a separate schema, "queue schema", in the user database. Each database with snapshot data will have its own corresponding queue schema with the same name prefixed by "OSE$" in the user database. For example, user database TERRY/TESTDB, where TERRY is the synchronization id, and TESTDB is the client database name, will have two schema, TERRY and OSE$TERRY.
The queue database/queue schema contains the following:
-
OSE$TABLES - for queue-based mode is in queue db instead of data db.
-
OSE$TRSEQ - both data db and queue db have it for using in the recovery mechanism.
-
OSE$TRANS - table describing client and server transactions.
-
OSE$DATAQ - table containing both outqueue and inqueue records for each transaction. Inqueue records are differentiated from outqueue records by having negative values in TRID column.
-
OSE$BLOBQ - table containing BLOBs for both outqueue and inqueue records.
3.5 Manage Snapshots on the Mobile Client
The following are the types of snapshots you can enable for tracking the changes on the client database:
-
State-based. State-based snapshots decipher the difference in the state of the data between subsequent synchronization events. This snapshot type is more resource efficient than queue-based snapshots. To enable state-based snapshots, set the
QUEUESparameter in theOSE.INIfile toNO.Snapshot state tables,
OSE_ST$<snapshot>, are created in the client database and are populated by SQL triggers with primary keys of the modified rows. -
Queue-based: Both client and server changes are stored in a single queue. Whenever the snapshot is not locked by an application, the synchronization retrieves data from the In Queue and applies it to the base snapshot. At this point, the synchronization propagates data from the Out Queue to the server.
Although both snapshot types rely on triggers, queue-based snapshots allow concurrent operations on the client database while any synchronization is in progress. The Sync Agent compose operation places modified data into the Out Queue. Later, the sync session uploads multiple client transactions delineated by a unique transaction id to the server.
To enable queue-based snapshots, set the
QUEUESparameter in theOSE.INIfile toYES. This is the default.When you use queue-based snapshots, a queue database file is created, for Berkeley DB and SQLite, it is a standalone database named OSE$<client_database_name>.db, for Java DB, there is no separate database.
-
Data queue for both In Queue and Out Queue records named
OSE$DATAQ. -
Snapshot registry named
OSE$TABLES. -
Transaction sequences per publication named
OSE$TRSEQ.
The
OSE$DATAQqueue is used for all snapshots and contains both In and Out Queue records. The TRID column is positive when the record is an Out Queue record. When you synchronize with queue-based snapshots enabled, new data from the client is uploaded from theOSE$DATAQqueue table and new data from the Oracle database is downloaded into this queue. -
For more details on this parameter, see Appendix A, "QUEUES".
3.6 Control Automatic Synchronization for a Specific Mobile Client
As described in Section 5.5, "Using Automatic Synchronization" in the Oracle Database Mobile Server Administration and Deployment Guide, you can enable automatic synchronization for mobile clients either in the publication item or for the entire platform.
However, you can disable automatic synchronization for a single client by configuring the DISABLE parameter to YES in the OSE.INI file on the mobile client. This disables the Sync Agent and the only method for synchronization is a manual synchronization.
For more details on this parameter, see Appendix A, "Background Sync Parameter—BGSYNC".
3.7 Providing Security for the Mobile Client
The introduction of handheld devices within the corporate environment can pose a security threat to an organization. Devices are now used to store not only company contacts; but, with external cards, may store up to 60 gigabytes of information or more. Devices also provide a mobile point of entry into the organizational network that is located outside the network security perimeter. It is essential to secure this data if a device is lost or compromised.
Securing a device involves a layered approach. You must secure not only access to the device, but data stored on the device and communications across the network. Most aspects of security for a mobile device must be incorporated before Oracle Database Mobile Server is included within the security infrastructure.
-
Security starts with the device itself. Authentication on the device must be implemented through pin or password authentication, biometric readers, secure digital media for storage, and even how the device is stored, transported, and accounted for.
-
Once access is gained to the device, further security must be implemented within the mobile application to prevent the application from being able to retrieve invalid data. Technologies, such as the Microsoft.Net Compact Framework, incorporate API calls that may be used to encrypt and decrypt any data that will be stored or retrieved from the device.
Oracle Database Mobile Server provides several security features that may be utilized to help in securing data. These features aid in protecting information during synchronization and once access to a device has been obtained. The two most important aspects of security for the mobile infrastructure are the following:
-
Use Secure Socket Layer (SSL) to protect the transmission of data during the synchronization process. For more information, see Section 9.4, "Configuring for Secure Socket Layer (SSL) Communication" in the Oracle Database Mobile Server Administration and Deployment Guide.
-
Encrypt the mobile client database, whether for the Berkeley DB or the SQLite database. For more information, see Section 3.7.1, "Encryption for the Client Databases".
3.7.1 Encryption for the Client Databases
For Berkeley DB, SQLite and Java DB, you can encrypt the data by using the encryption methods provided by the database respectively. To encrypt database created during synchronization, set OSE.ENCRYPTDB to YES in OSE.INI file. Refer to the Development Guide for more information. If OSE.ENCRYPTDB is specified to be YES, and no key is specified, then sync engine uses the password for synchronization as the key to encrypt the client database. This key must be added to the connection URL when accessing the client database via JDBC driver.For details on encryption for these databases, see the following:
-
SQLite provides a proprietary extension for encryption called SQLite Encryption Extension (SEE). For more information, see the following link:
http://www.hwaci.com/sw/sqlite/see.html
-
The Berkeley DB also supports the SQLite Encryption Extension (SEE) with some limitations. Berkeley DB encryption is discussed in the following documentation:
http://docs.oracle.com/cd/E17076_04/html/bdb-sql/sql_encryption.html
-
The Java DB encryption is discussed in the following documentation:
http://docs.oracle.com/javadb/10.10.1.2/devguide/cdevcsecure24366.html
For Berkeley DB and SQLite databases, specify password=<encryption key> property in the JDBC connection URL to access an encrypted database. For Java DB database, specify dataEncryption=true key> and dbootPassword=<encryption key> properties in the JDBC connection URL to access an encrypted database.
3.8 Improve Performance by Disabling the Resume Feature
The resume feature manages intermittent network failures. If resume is enabled on both the server and the client, synchronization will resume automatically within the specified resume timeout period. Also, if sync session was interrupted during a network operation, the next synchronization will try to resume the operation, as long as resume is enabled and the resume timeout has not expired.
The resume transport adds overhead with additional network round trips and additional data to be saved on the client and on the server. Any device with reliable networks may disable the resume feature to improve performance of the synchronization system for this device and improve scalability on the server.
You can disable the resume feature for the mobile client by setting the RESUME parameter in the OSE.INI file to NO. For more details on the resume feature and disabling it for your mobile client, see Section A.1.1, "OSE Parameters - OSE" and Section 5.7, "Resuming an Interrupted Synchronization" in the Oracle Database Mobile Server Administration and Deployment Guide.
3.9 Use the Device Manager Client GUI to Manage the Client-Side Device
On Win32, Windows Mobile, or Linux client platforms, you can manage the client software using the Device Manager. See Section 7.7, "Using the Device Manager Agent (dmagent) on the Client" in the Oracle Database Mobile Server Administration and Deployment Guide for more information.
3.10 Initiate Updates for the Mobile Client
You can initiate a request for software updates from the mobile client by executing the Oracle Database Mobile Server Update tool. For more information, see Section 7.6.3, "Initiate Updates of Oracle Database Mobile Server Software for Mobile Clients" in the Oracle Database Mobile Server Administration and Deployment Guide.
Note:
This function is not available to Blackberry, Java SE and Java ME clients since they do not have any Update tool.3.11 Communicate Between the Internet and Intranet Through a Reverse Proxy
If a Win32, Windows Mobile or Linux mobile client is on either side of the firewall, set up a proxy or reverse proxy to facilitate communication between the mobile client and mobile server. For more information, see Section 9.6, "Using a Firewall Proxy or Reverse Proxy" in the Oracle Database Mobile Server Administration and Deployment Guide.