3 VLE Planning
This chapter provides information about VLE planning and information, with emphasis on the Oracle Cloud. For Cloud Extended Storage, make sure that the Cloud Storage account is in place before setting up VLE for Cloud access. See "Preparing for Cloud Extended Storage" and "Network Requirements for Cloud Extended Storage"for further details on setting up an account, or "Oracle Storage Cloud Service – Archive Storage" for Archive information.
Software and Hardware Requirements for Virtual Library Extension (VLE)
The following sections will review requirements that must be adhered to for successful implementation of the Oracle's Virtual Library Extension (VLE) features.
Satisfying Mainframe Host Software Requirements
-
For ELS 7.2 and higher, support for VLE 1.5 is included in the base level. For ELS 7.1 and higher, get the latest
SMP/EreceiveHOLDDATAand PTFs L1H16J6 and L1H1674 andSMP/E APPLYwithGROUPEXTEND.
Satisfying Network Infrastructure Requirements
If possible, do any configuration of IP addresses, network switch(es) for VLANs or other setup (running cables, and so forth) before the VLE arrives to minimize the installation time. Ensure that the network is ready for connection to the VLE, as follows:
-
Valid Cloud Storage Account from Oracle (which will include account name, user name, password and a URL)Gigabit Ethernet protocol is required on all network switches and routers that are directly attached to VSM 5 IFF cards. The network interfaces are all 10 Gb. The copper interfaces can and will negotiate down to 1 Gb (or slower) but optimally all traffic will take place over 10 Gb connections
-
Name of the Ethernet port (1 Gig or 10 Gig), the subnet the cloud traffic will be routed through, and with the following details:
Name Values Comment Port Host Name May or may not be in DNS - check with the Network Administrator Static IP Address Should be a valid value - check with the Network Administrator Net Mask Check with the Network Administrator Prefix Length Example: 24/23/... - check with the Network Administrator Gateway Address Should be a valid value - check with the Network Administrator jumbo Enabled or not - check with the Network Administrator -
Switches and routers should support Jumbo(mtu=9000) packets for best performance. If the network is not capable of handling Jumbo Frames, turn off this capability at the VTSS and VLE
If network redundancy is required, then each IP connection (between VSM 5 or 6 and VLE, VLE-to-VLE, and VLE-to SMC) must be configured on separate subnets.If Jumbo Frames are enabled, then all switches, hubs, or patch panels (including the VLAN and the port channel) between the VLE and its target component must also have Jumbo Frames enabled.
Note:
When a number of static IP address connections are set in the same subnet, the connections will work properly. If one of the cables is pulled or otherwise disrupted, the other connections in that subnet will be lost. -
Check that you are using the proper (customer-supplied) 1 GigE Ethernet cables:
-
CAT5 cables and below are not acceptable for GigE transmission.
-
CAT5E cable: 90 meters is acceptable if run through a patch panel, 100 meters if straight cable.
-
CAT6 cable: 100 meters is acceptable regardless of patch panel configuration.
-
-
Oracle recommends that if a switch or router is used in the configuration, at least two switches or routers be part of the configuration at each location so that the loss of one unit will not bring down the entire configuration.
-
Only one TCP/IP connection is required between a VTSS and a VLE. However, for redundancy, Oracle strongly recommends that you have at least two connections between the VTSS and VLE, where the VTSS connections are separate IP addresses. Each TCP/IP connection from a specific VTSS to a specific VLE should be to separate VLE interfaces. If you connect all of the VTSS connections to the same VLE interface, you have a single point of failure at the VLE interface.
In a VLE multi-node system, the VTSS connections should be spread evenly across all nodes. For example, in a two-node VLE, the VTSS connections should be two on node 1, and the other two on node 2. On a four-node VLE, 1 VTSS connection to each node is recommended. If a switch is involved between the VTSS and VLE, then it is possible to have all four connections to each node of a four-node VLE. Due to each VTSS connection representing four drives total, there would be one drive from each connection to each node, for a total of four drives for each node on a four-node VLE.
IP addresses, however, must never be duplicated on separate nodes in the VLE for UUI or VTSS. For example, if you have a UUI connection of
192.168.1.1going to node 1, then do not make a UUI connection on another node using192.168.1.1as the IP address. Additionally, if possible, you should never have two interfaces on the same node within the same subnet when configuring IP addresses. -
Similarly, only one UUI connection is required between a VLE and the host, but two are recommended for redundancy, preferably using two independent network paths.
Note:
These network paths are separate from the connections to the VTSS. For VLE multi-node configurations, if there are multiple UUI connections, make them from separate nodes in the VLE.Satisfying Oracle Switch Hardware Requirements
An Oracle ES2-72 Oracle switch is required for three node or greater VLEs.
-
A two node VLE does not require a switch but one can be added if further expansion of the two node VLE is planned in the future.
-
The Oracle Switch is required for communication and data transfer between nodes (a private network between the VLE nodes); it does not connect to the customer Ethernet infrastructure and is not part of external VLE data transfer operations
-
The Oracle Service team will have detailed instructions for installing and configuring the ES2-72 switch.
-
The Oracle sales team will also have access to additional documentation to confirm the necessary switch and components for the planned configuration.
The following equipment will be needed for a multi-node VLE installation. When connecting three or four VLE nodes together, you'll need:
-
One 7110593 – ES2-72 switch
-
One 7110595 – Rear to Front fan unit
-
Two SR-JUMP-2MC13 – Power cables
-
Two 2124A – Transceivers
-
Two X2127 A-10M – QSFP break-out cables
-
Sixteen 10800160N – Couplers for connecting QSFP to VLE Optical cables
When connecting five to eight VLE nodes together, you'll need:
-
One 7110593 – ES2-72 switch
-
One 7110595 – Rear to Front fan unit
-
Two SR-JUMP-2MC13 – Power cables
-
Four 2124A – Transceivers
-
Four X2127 A-10M – QSFP break-out cables
-
Thirty-two 10800160N – Couplers for connecting QSFP to VLE Optical cables
When connecting nine to twelve VLE nodes together, you'll need:
-
One 7110593 – ES2-72 switch
-
One 7110595 – Rear to Front fan unit
-
Two SR-JUMP-2MC13 – Power cables
-
Six 2124A – Transceivers
-
Six X2127 A-10M – QSFP break-out cables
-
Forty-eight 10800160N – Couplers for connecting QSFP to VLE Optical cables
When connecting thirteen to sixteen VLE nodes together, you'll need:
-
One 7110593 – ES2-72 switch
-
One 7110595 – Rear to Front fan unit
-
Two SR-JUMP-2MC13 – Power cables
-
Eight 2124A – Transceivers
-
Eight X2127 A-10M – QSFP break-out cables
-
Sixty-four 10800160N – Couplers for connecting QSFP to VLE Optical cables
The appropriate length of LC/LC optic fiber is needed, but it isn't something ordered here. Two cables that are 25m long are shipped with each VLE appliance. If they have been misplaced, they are available from a variety of sources – the customer may have some available, but they should be a maximum length, including patch panels, of 25M. The fiber cable needs to be OM3, 850nm, multi-mode with LC/LC connectors. You need two cables per VLE node to connect to the switch.
Satisfying Serviceability Requirements
The VLE product uses a standard Oracle service strategy common with other Oracle products. Automated Service Response (ASR) is used by the VLE as the outgoing event notification interface to notify Oracle Support that an event has occurred on the VLE and the system may require service. Additionally, in combination with ASR, an outgoing e-mail containing details about an ASR event and a Support File Bundle containing VLE log information necessary to investigate any ASR event will also be sent.
The advantages of ASR functionality are well documented in the ASR FAQ available on the My Oracle Support site (https://support.oracle.com/CSP/ui/flash.html) in Knowledge Article Doc ID 1285574.1.
Oracle's expectation is that the VLE will be configured to allow outgoing ASR and e-mail communication with Oracle Support. To support VLE outgoing ASR notifications, the customer will need to supply the information in Table 3-1 to the installing Oracle Field Engineer.
Oracle's expectation is that the VLE will be configured to allow outgoing ASR and e-mail communication with Oracle Support. To support VLE outgoing ASR notifications, the customer will need to supply the information in Table 3-1 to the installing Oracle Field Engineer.
Table 3-1 VTASR Configuration Information
| Configuration Value | Example |
|---|---|
|
General Configuration - Site Information |
|
|
Company Name |
Company Inc |
|
Site Name |
Site A |
|
City |
AnyTown |
|
General Configuration - Contact Information |
|
|
First Name |
Joe |
|
Last Name |
Companyperson |
|
Contact email |
joecompanyperson@company.com |
|
Auto Service Request (ASR) Setup - Oracle Online Account Information |
|
|
Customer Oracle CSI Login Name |
joecompanyperson@company.com |
|
Customer Oracle CSI Login Password |
******** |
|
Auto Service Request (ASR) Setup - Internet Connection Settings (Optional) |
|
|
Proxy Host Name |
web-proxy.company.com |
|
Proxy Port |
8080 |
|
Proxy Authentication - User Name |
|
|
Proxy Authentication - Password |
|
Note:
In Table 3-1, some fields are not required if a proxy server is not being used or if it does not require an ID and password. If the customer will not provide the CSI e-mail ID and password, then the customer can enter it directly during the install process. During this part of the install, the VLE will register itself on the Oracle servers as an ASR qualified product.The customer is then required to log in to My Oracle Support (MOS) and approve the registration of the VLE. Until this approval is completed by the customer, the VLE is not capable of auto-generating cases through MOS.
For e-mail notification of event and log information, the customer must also supply the information in Table 3-2. If the e-mail server does not require a user name and password, these fields can remain blank.
Table 3-2 Notification Setup - E-mail Configuration Options / ConfCollectStatus
| Configuration Value | Example |
|---|---|
|
E-mail Configuration - SMTP Server Name |
SMTP.company.com |
|
E-mail Configuration - SMTP Server User Name |
|
|
E-mail Configuration - SMTP Server User Password |
|
|
E-mail Recipients |
vle@invisiblestorage.com and others as needed |
In cases where outgoing communication steps are not completed at the time of installation or not allowed at all, Oracle's options for timely response to events that require support from the Oracle Service team are greatly reduced. The VLE can be configured to send e-mail containing event and log information directly to a designated customer internal e-mail address. A recipient of this e-mail can then initiate a service request directly with Oracle and forward any e-mails received from the VLE to Oracle Support. In this case, the customer must supply the e-mail address where VLE e-mails are sent, where this e-mail address can accept e-mails of up to 5 MB.
Determining VLE Configuration Values
The following sections describe how to determine configuration values for the VLE.
Note:
As noted in the following sections, several software configuration values must match values initially set during configuration of the VLE. Use the worksheet to record these values so you can pass them on to the personnel who will configure the VLE and the host software.Determining Values for the Configuration Scripts
To configure the network for VLE, you run the configure_vle script on each node in a multi-node system (or the only node in a single-node system).
Node name is the name of the individual node, commonly referred to as hostname. This is the name that identifies this node in the IP environment with a unique DNS entry, with a fully qualified name and a unique IP address. During the initial setup, each VLE node is configured to bind the ixgbe0 interface to the fully qualified hostname and IP address.
ASR registration and generated data uniquely identify the hostname of each node. Once set, it is very difficult to change the name and IP address (you may need to stop all of your services and reboot the node).
It is highly recommended that name, DNS entry, and IP address are generated and validated with the corporate IT department for accessibility through firewalls, gateways, and routers well before the VLEs are installed. This will make the process of setting up, configuring, and bringing up VLE much smoother and faster.
Legend:
-
VLE name from
configure_vleinstallation script run on each node -
Node name entered as "hostname" for this node in the
configure_vleinstallation script
VLE Name and VLE Number
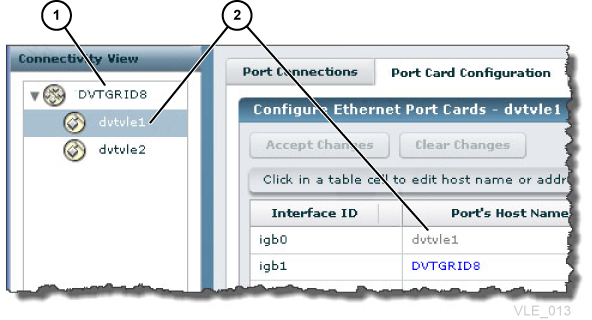
Each VLE node (connected through the same internal network) has a common VLE name and VLE number (1). The VLE name and number must be the same on each node in a multi-node VLE, where the node name is 2.
The VLE Name must be unique and should not be the hostname of any of the servers. The default VLE Name is VLE-NAME. You can reset the VLE Name when you run the setup_vle_node script. The value must be 1 to 8 characters in length, alphanumeric, uppercase. The name can contain a - (dash) but not at the beginning or the end.
Valid values for the VLE number are 1-9
In Figure 3-1, the VLE Name and VLE Number combination is DVTGRID8.
To the host software, the VLE Name and VLE Number combination is known as the subsystem name, and is specified, as follows:
-
The
STORMNGRparameter value on the VTCSCONFIG TAPEPLEXstatement for the TapePlex that connects to the VLE or theNAMEparameter on theCONFIG STORMNGRstatement (ELS 7.1 and higher). -
The
STORMNGRparameter value on the VTCSCONFIG RTDstatement for the VLE. -
The
NAMEparameter value on the SMCSTORMNGRcommand that defines the VLE to SMC. -
The
STORMNGRparameter value on the SMCSERVERcommand for the VLE. -
The
STORMNGRparameter value on the HSCSTORCLASstatement.
Host Name for the Node
As shown in Figure 3-1, the Host Name for the Node, which is entered on the configure_vle script, appears as:
-
The
Port's Host Namefor theixgbe0interface ID for the node. -
The Host Name for the node selected in the node navigation tree.
In Figure 3-1, the Host Name for the node is dvtvle1.
Characters can be alphanumeric (A-Z, a-z, 0-9) or ”.” or ”-”. The first and last characters of the string cannot be ”.” or ”-”. The name cannot be all numeric. The name can be up to 512 characters long, though Internet standards require that the host portion (not including the domain component) be limited to a maximum of 24 characters.
Determining Values for configure_vle
Required values for the configure_vle script include the following:
-
Hostname for the node; see "Host Name for the Node"
-
VLE static IP address for port
ixgbe0 -
Network number, which is the base address of the customer subnet
-
Netmask
-
The default router IP address (Gateway address)
-
The network domain name
-
The Name Server IP addresses
-
Network search names
-
NTP server/client setup (server or client, IP addresses of servers) and date/time values
Determining Values for setup_vle_node
Required values for the setup_vle_node script include the following:
-
VLE number and name; see "VLE Name and VLE Number."
-
Serve Node number (SSN). For multi-node VLEs, each node requires a unique SSN. Valid values for SSN are 1 to 64.
-
Server time and date values.
Determining Values for Port Card Configuration
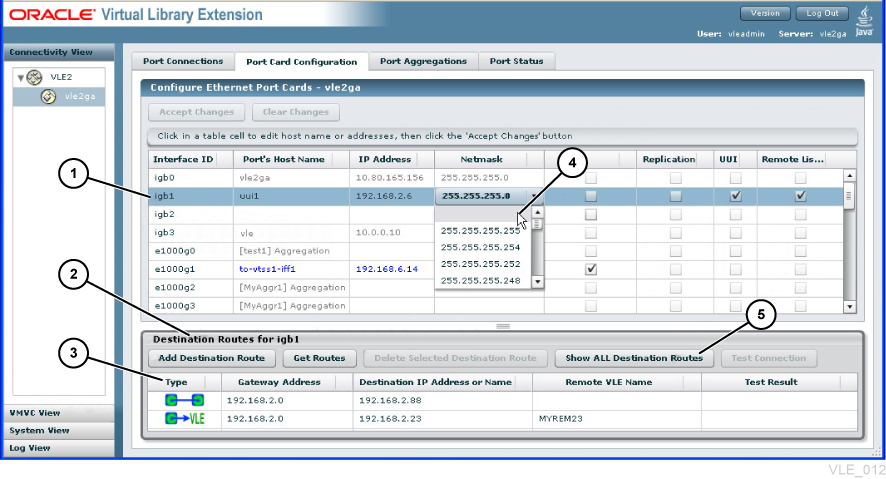
To configure the VLE Ethernet ports, you use the Connectivity View, Port Card Configuration tab shown in Figure 3-2. The following sections describe how to determine port card configuration values.
Legend:
-
Selected interface
-
Destination Routes panel to define remote VLE connections and static routes
-
Type of route shown by icons
-
Clear Netmask field by selecting blank item at the top of the drop-down list
-
Content of bottom pane, filtered by the interface selected in the top pane. Click to show all routes for the node
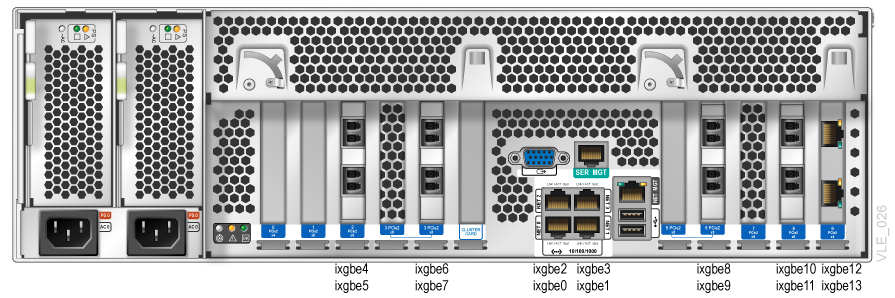
Figure 3-3 shows the 10 GigE Ethernet ports on the rear of the server.
Work with the customers' network engineer to make sure any VLANs are properly cabled and configured. Oracle recommends that the customers' network connections spread the Ethernet traffic to two or more Ethernet switches to ensure that losing one switch does not end all data traffic.
Ethernet Management Ports
Connect Ethernet cables to those ports that you want to configure as follows:ixgbe0 (NET0) - Connection to the customer network for ASR traffic and managing the VLE software. During setup, this interface is bound to the fully qualified hostname and IP address unique to each node. It is highly recommended that you do not change them after the initial setup.
-
ixgbe1(NET1)- Connection to the customer network for UUI (control path) traffic. -
ixgbe2(NET2) - Spare, available for redundant UUI connection, or if the customer wants separate ports for separate network segments for the host network and for the sending of ASR alerts. -
ixgbe3(NET3)- Dedicated port for service (CSE PC connection for ILOM). Do not connect this port to the network.ixgbe3must remain available as an Ethernet port with known access configuration so that it is always be available for service. The pre-configured default IP address forixgbe3is10.0.0.10.
Multi-Node Connections
To connect 2 nodes, do one of the following:Directly connect ixgbe4 on one node to ixgbe4 on the second node, and ixgbe6 on one node to ixgbe6 on the second node.
Note:
the Oracle switch with available ports for 3-node or greater VLEs is required. Connect the nodes (usingixgbe4 and ixgbe6) using the Oracle switch.
When making multi-node connections, you should connect Node 1 to the switch (or the second node, for 2-node VLEs) and run configure_vle on Node 1. Then connect Node 2 and run configure_vle on Node 2, and so on. After all nodes are connected and configure_vle (which calls configure_vle) is complete, then proceed with the rest of the configuration.
This procedure is required because the default Internal network address is the same on all nodes when shipped from manufacturing which causes duplicate addresses until all nodes are configured with configure_vle.
Caution:
When making configuration changes to a multi-node VLE, stop VLE services on all nodes together before starting VLE services on a specific node. That is, you cannot do rolling stop and start(s) ofVLE_services on a per node basis after a configuration update.Data Transfer Connections
To make data transfer connections:
-
ixgbe1,ixgbe2, andixgbe4throughixgbe13are available for data transfer either from VLE-to-VLE or from VLE-to-VTSS.
Note:
Some of these ports may be reserved for other uses, if desired:ixgbe0 through ixgbe3, ixgbe12 and ixgbe13, when directly connected to a 1 GB link, will operate in 1 GB mode.Ports' Host Name
The value is the machine (host) name for each IP address to be connected to a VTSS or another VLE. Characters can be alphanumeric (A-Z, a-z, 0-9) or "." or "-". The first and last characters of the string cannot be "." or "-". The name cannot be all numeric. The name can be up to 512 characters long, though Internet standards require that the host portion (not including the domain component) be limited to a maximum of 24 characters.
Note:
The Ports' Host Name forixgbe0 and ixgbe3 are established during installation, and cannot be changed at the GUI.IP Address
The IP address assigned to the port, which must be a valid IP v4 address, in the form of "192.68.122.0." Each byte must be 0-255, there must be 4 bytes, numeric only, except for the decimal points.
Netmask
The network mask for the port must be a valid IP v4 address in the form of "255.255.255.0." Each byte must be 0-255. There must be 4 bytes, numeric only, except for the decimal points.
UUI
Select the check-box for each port that will be used for UUI activity. This port is usually the one used for product configuration and monitoring (including the port used by the GUI browser connection).
Note:
Each VLE must have at least one UUI connection, and two or more are recommended for redundancy. If you have two or more in a multi-node VLE, spread the UUI connections out over different nodes.Remote
This check-box identifies the port as a ”Listener” destination for a VLE-to-VLE data exchange. For VLE-to-VLE data transfers, any unused connection can be used from any node in a VLE. If each VLE has two or more nodes, Oracle recommends a minimum of one connection from each node to the other VLE. You can run more than one connection from a VLE node to another VLEs' node, but you should never run multiple connections from a VLE node to a single port on the other VLE. If both VLEs have more than one node, Oracle recommends spreading the VLE-to-VLE connections across all nodes in each VLE.
Example: VLE1 node 1 has a connection from 192.168.1.1 to VLE2 node 1 at 192.168.1.2. If a second connection is made from VLE node 1, then the connection should not go to VLE2 at 192.168.1.2.
For VLE-to-VLE data transfers, each VLE requires a UUI connection and a VTSS connection. This will ensure VTCS can migrate and recall VTVs from either VLE.
Determining VMVC Range Configuration Values
Ensure that you assign VMVC names and ranges to fit within the site naming scheme. VMVC names and ranges are set by the CSE during configuration, so it is best to have them assigned before configuration.
As shown in Figure 3-4, you use the VLE GUI's Create New VMVC dialog box(from the VMVC View with a specific node selected in the navigation tree) to specify volser ranges of new VMVCs.
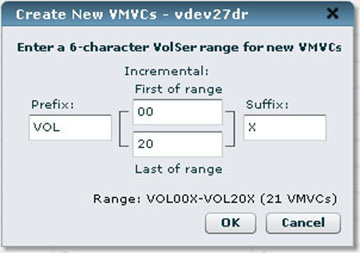
Determine values for each of the fields in Figure 3-4, as follows.
Each of the fields allow 0-6 alphanumeric characters, with ”assembly” limitations:
-
Alphabetic characters are automatically converted to upper case; leading and trailing spaces in all fields are automatically removed.
-
Any of the fields can be empty, allowing the incremental value to be first, last, or in the middle of the
volserrange name. -
Any of the fields can be either alphabetic or numeric, with field validations to restrict their usage where necessary. For instance, embedded spaces and special characters are not allowed. Invalid field entries are shown with a red box around the field, and selecting the OK button will display an error warning.
-
The ”Incremental” range fields (prefix and suffix) can be either alphabetic or numeric. Field validations ensure that alphabetic and numeric characters are not mixed in either field, the first value must be less than the last value, and
maxrange limits are checked. -
The length of the entire
volsername range is constructed by assembly of each field – the length of the prefix + length of ranges + length of the suffix.Example: Enter a prefix of
AB, a first of range of001, a last of range of500and a suffix ofXto build thevolsername range ofAB001X - AB500X. Similar combinations can be built, but the length of the entire assembly must add up to exactly six characters. -
If the built-up name exceeded the valid 6-character
volsername length (likeAB0001XY - AB1500XY), clicking the OK button displays a warning dialog and does not allow the entry. -
As the range is being built by editing fields, the resulting range is displayed on a line of the dialog just above the OK and Cancel buttons. The count of VMVCs in the range being built is also displayed in parentheses with the range. If the count exceeds the maximum allowed for the Wildcat box (shown in the ”VMVC Counts” fields as
Max), the text is displayed in bold orange. At the time the OK button is pressed, the currentAvailablecount is checked, and if the range exceeds this amount, an error dialog is displayed. -
The suffix string must begin with a different character type (alphabetic, not numeric) than the incremental range strings. This is for compatibility with VTCS
volsername range entry capability. If the range contains the same character type as the beginning of the suffix, the beginning characters of the suffix would be incremented in a range before those in the range fields; that is, VTCS volser name processing is based on character type, not by field-entry of ranges.Example: A GUI entry of 1000 for the First of range, 1094 for the Last of range, and a suffix of 55 would make a range of 100055-109455. On VTCS, this would expand to 100055, 100056, 100057…109455 rather than 100055, 100155, 100255…109455. Because it would be difficult for you to match the latter expansion in VTCS
volsername range entry, this construction is prohibited in the GUI. -
If attempting to define overlapping ranges, only new VMVCs in the range will be added to any already-existing VMVCs (existing VMVCs will not be overwritten or cleared).
-
VMVCs have a nominal size of 250 GB (to the host software) and an effective size on the VLE of 1 TB (assuming 4:1 compression). Table 3-3 shows the maximum VMVCs defined for each VLE node capacity.
Table 3-3 VLE Effective Capacities - Maximum VMVCs Per Node
| VLE Effective Capacity | Maximum VMVCs |
|---|---|
|
200 TB |
200 |
|
400 TB |
400 |
|
800 TB |
800 |
|
1600 TB |
1600 |
-
The VMVC volser ranges that are specified in the VLE GUI must match the volser ranges defined to VTCS.
Planning for Encryption
VLE 1.1 and higher provides encryption of VMVCs written to the VLE system. If a VTV is recalled to the VTSS, it is de-encrypted at the VLE before recall; therefore, the MVS host software has no knowledge of encryption.
Note:
Adhere to the following:-
The encryption algorithm used is AES-256-CCM. The access key is a 256 bit file.
-
FIPS 140-2 certification request has been filed with NIST and is in progress.
Encryption is enabled, disabled, and managed at the VLE GUI by an Oracle CSE or other QSP. Encryption is enabled on a per node basis through an encryption key stored on the node, and backed up on a USB device. You can mix encryption and non-encryption nodes in a multi-node VLE because VLE decrypts VTVs, if required, regardless of where they reside on a multi-node VLE.
If, however, you want to encrypt all VTVs on a multi-node VLE, then encryption must be enabled for all nodes.
Some implementation notes:
-
Before encryption is enabled, there must be no VMVCs on the node. Additionally, the USB key backup must be inserted in the node's USB port, and must be writeable and mounted by the operating system.
-
Similarly, before encryption is disabled, recall VTVs that you want to keep to the VTSS, then delete all VMVCs from the node.
-
Encryption keys do not expire, so do not generate a new key unless you must (for example, to meet security audit requirements). Before you assign a new key:
-
The USB key backup must be inserted in the nodes' USB port, and must be available to write and be mounted by the operating system.
-
If you are certain you want to generate a new key, ignore the warning and overwrite the old key.
-
Planning for Deduplication
Deduplication eliminates redundant data in a VLE complex. As the deduplication percentage increases, migration performance can correspondingly improve and network use is reduced.
VLE deduplication is performed at the VLE, so the host job and the VTSS are not affected. When a deduplicated VTV is recalled, the VTV is ”rehydrated” (reconstituted) at the VLE before it is recalled to the VTSS. Deduplication occurs on a tape block-level within each node, and small blocks (less than 4 K after compression) are not deduplicated.
Deduplication, which is controlled by the STORCLAS DEDUP parameter, increases the effective VLE capacity, and is performed by the VLE before the VTV is written to a VMVC. For example, Example 3-1 shows deduplication enabled for two Storage Classes.
Example 3-1 Deduplication Enabled for Local and Remote Storage Classes
STOR NAME(VLOCAL) STORMNGR(VLESERV1) DEDUP(YES)
STOR NAME(VREMOTE) STORMNGR(VLESERV2) DEDUP(YES)
The STORCLAS statements in Example 3-1 specify deduplication for a ”local” Storage Class (VLOCAL) on the VLE VLESERV1 and ”remote” Storage Class (VREMOTE) on the on the VLE VLESERV2.
Example 3-2 shows a Management Class that performs deduplication on the Storage Classes in Example 3-1. Any jobs that specify the DEDUP2 Management Class enable deduplication for the referenced Storage Classes.
Note:
Deduplication occurs only after theDEDUP(YES) policy is set.Deduplication Guidelines
Many sources of mainframe data do not benefit from deduplication, such as syslogs. Generally data streams that contain timestamps (where every record is different) will not benefit from deduplication. Backup data streams (where the same records may be written multiple times) will typically benefit from deduplication.
Using the SCRPT Report
You can monitor the results with the SCRPT report, as shown in the example below.
Storage STORMNGR Node Total Capacity Used Compressed Uncompressed Reduction
Class MVCs (GB) (GB) (GB) (GB) Ratio
PROD1 VLELIB1 0 4 1000 200 800 3200 16.0:1
1 3 750 200 400 1600 8.0:1
2 5 1250 200 400 1600 8.0:1
3 4 1000 0 0 0 1.0:1
VLELIB1 16 4000 600 1600 6400 10.7:1
Total- 16 4000 600 1600 6400 10.7:1
(A11} VLELIB1 0 4 1000 200 800 3200 16.0:1
1 3 750 200 400 1600 8.0:1
2 5 1250 200 400 1600 8.0:1
3 4 1000 0 0 0 1.0:1
VLELIB1 16 4000 600 1600 6400 10.7:1
Total= 16 4000 600 1600 6400 10.7:1
In the above example, the approximate reduction ratio for the data is Uncompressed GB divided by Used GB. The Reduction Ratio, therefore, includes both VTSS compression and VLE deduplication. A larger reduction ratio indicates more effective compression and deduplication.
For example, the VTSS receives 16 MB of data, compresses it to 4 MB, and writes the compressed data to a VTV. VLE, subsequently, deduplicates the VTV to 2 MB, and writes it to a VMVC. Thus, the reduction ratio is 16 MB divided by 2 MB, or 8.0:1.
Because the calculation is done using MB, it is possible to see 0 GB in the Used or Uncompressed fields, yet see a reduction ratio other than 1.0:1.
Using the MEDVERIFY Utility
You can run the MEDVERify utility to verify that VTV data can be read on VMVCs (ELS 7.1 and VLE 1.2 and higher, only). For VLE, MEDVERify ensures that deduplicated VMVCs can be ”rehydrated” (reconstituted) when recalled to the VTSS. MEDVERify reports on VMVCs that pass or fail verification and also produces XML output.
For example, to verify VTVs on the VMVCs defined in Example 3-1, enter:
MEDVER STOR(VLOCAL)
MEDVER STOR(VREMOTE)
In this example:
-
MEDVERifyselects VMVCs in Storage ClassesVLOCALandVREMOTE. -
MAXMVCdefaults to 99. -
CONMVCdefaults to 1 so only a single VMVC is processed at a time. -
No timeout is specified.
Reduced Replication
VLE 1.3 and higher offers Reduced Replication, which, through VLE-to-VLE replication, allows VTVs to be copied in deduplicated format. The only data copied is data that did not reside on the destination VLE when the copy began. Reduced replication, therefore, reduces the amount of data copied, which lowers network use and copy times. To optimize Reduced Replication, ensure that deduplication is enabled for both the source and target Storage Class. Otherwise:
-
If deduplication is enabled for the source but not the destination Storage Class, then VTVs are ”hydrated” (reconstituted) before being copied.
-
If deduplication is enabled for the destination but not the source Storage Class, then VTVs are deduplicated when received at the destination.
For example, Example 3-3 shows a Management Class that performs Reduced Replication using the Storage Classes in Example 3-1.
Example 3-3 Management Class for Reduced Replication
MGMT NAME(REDREP) MIGPOL(VLOCAL,VREMOTE)
In Example 3-3 both Storage Classes are enabled for deduplication. Because the corresponding VLEs are connected and configured for VLE-to-VLE replication, any jobs that specify the REDREP Management Class produce Reduced Replication.
Planning for Link Aggregation
Link aggregation is available for IP configuration in VLE 1.5. A link aggregation consists of multiple interfaces on a VLE node that are configured together as a single, logical unit and share a common IP address. Figure 3-5 shows the Connectivity View, Port Aggregations tab, which you use view the predefined ”internal” aggregation port (such as AggrNode1) and its associated interfaces. You can also define and modify new custom aggregations using this tab.
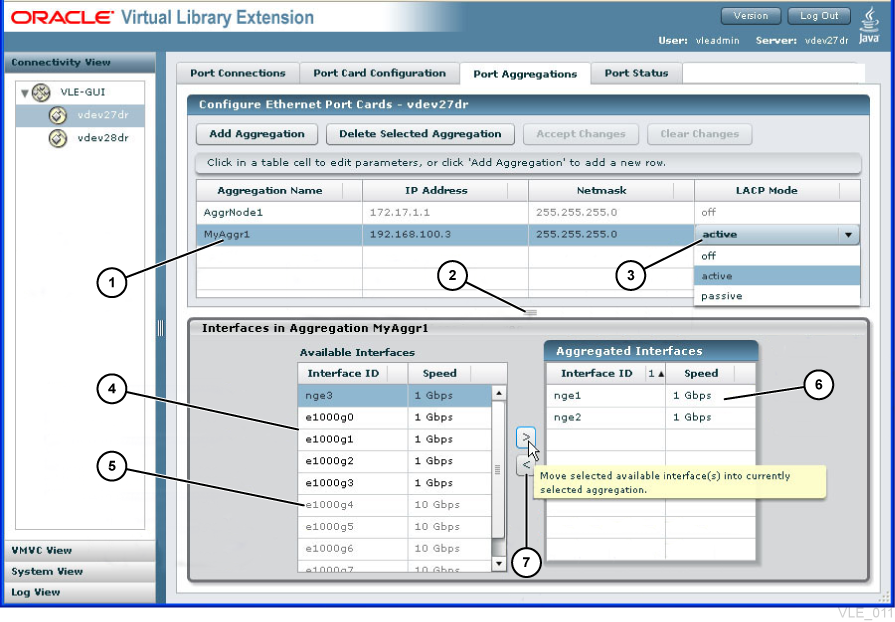
Legend:
-
Currently selected aggregation
-
Drag-up or down to resize panes
-
Drop-down selection of options
-
Pool of port interfaces available for aggregations
-
Interfaces in currently selected aggregation
-
Ports greyed out if wrong speed for aggregation
-
Move interfaces into and out of aggregations with arrow buttons
Benefits of Link Aggregation
Link aggregation provides the following benefits:
-
Less complexity, simpler administration. Aggregations can simplify VLE configurations by reducing the number of IP addresses required to configure a VLE node, which also prevents drain on the customer address pool. Without link aggregation, more than twenty IP addresses can be required for a fully populated VLE node. Link aggregation can reduce the number of IP addresses to 2, 3, or 4 depending on whether the node has unique Replication, UUI, and/or remote VLE IP requirements.
-
Fault tolerance. With link aggregation, a link can fail and the traffic will switch to the remaining links, thus preventing an outage or job failure.
-
Load balancing and Bandwidth optimization. The load is balanced by distributing the load of both inbound and outbound traffic across all links in the aggregation. Using all links as one effectively increases bandwidth because traffic is spread evenly across the aggregated links. You can also increase effective bandwidth by increasing the number of links in the aggregation.
Link Aggregation Requirements
Proceed with the following:
-
All links in an aggregation must be the same speed. That is, you cannot configure a 1 GigE and a 10 GigE port in the same aggregation (the VLE GUI does not allow different port speeds in an aggregation).
-
The MTU (Maximum Transmission Unit) is configured for the entire aggregation by the Jumbo Frames check-box of the Port Card Configuration tab (checking this box sets the MTU (Maximum Transmission Unit) value to 9000 for the aggregation. The switch must support and have the MTU size enabled for all ports within the channel group of the switch.
-
An aggregation can consist of a maximum of eight links, which is enforced by the VLE GUI.
-
In a switched environment, the first switch from the VLE must support Link Aggregation Control Protocol (LACP) IEEE
802.3adand be configured for the aggregation mode. The switch is probably a switch in the customer network, and is typically administered by a customer network administrator, who will administer the VLE configuration. Ensure that you provide the details of the configuration to the administrator.
Switch Configuration
The terms in the following sections vary between switch venders. The terms and discussion below are based on CISCO Ethernet switches. Oracle switch terminology is very similar, and can be found at:
http://docs.oracle.com/cd/E19934-01/html/E21709/z40016b9165586.html#scrolltoc
Channel Groups
A channel group is formed in the first switch that is directly connected to the VLE aggregation ports. Other switches or hops in the IPs' path need not be aware of the existence of the aggregation. The first switch is responsible for handling the traffic flow to and from the aggregation links. Each channel group is the logical grouping of an aggregation. A channel group is created for each aggregation and contains only the ports of the aggregation. The channel group ties the ports of an aggregation together so the switch can direct traffic to and from the aggregation. Because all ports connected to a channel group are known to be a part of the aggregation, do not connect ports to a channel group that are not a part of the aggregation. Each channel group has parameters defined for the type of LACP and so forth, and contains the rules for the aggregation.
VLANs
A typical switch configuration can consist of several VLANs (Virtual LANs) that connect the VLE to the system components, such as at VTSS or another VLE. A VLAN is a logical grouping of ports in the switch that appear externally as its own isolated switch. The VLAN is typically comprised of one or more channel groups which were created for an aggregation, along with the ports of the destination or target components such as the VTSS or another switch in a multi-hop environment.
Jumbo Frames
The MTU (Maximum Transmission Unit) is configured for the entire aggregation by the Jumbo Frames check-box of the Port Card Configuration tab (checking this box sets the MTU (Maximum Transmission Unit) value to 9000 for the aggregation. If Jumbo Frames are enabled, then all switches between the VLE and its target components must have Jumbo Frames enabled, as well as for all the ports of the VLAN.
LACP Mode
You can select one of the following LACP modes in the Aggregation Table of the Port Aggregations tab:
-
Off- Sometimes referred to as manual mode, off indicates LACP datagrams (LACPDUs) are not sent.Offis the only valid mode without a switch. The non-switched configuration is only valid for VLE-to-VLE configurations. When using a switch withOffmode, LACP is not enabled in the channel group. The switch must be configured to support the aggregation. -
Passive– In Passive mode, datagrams are only sent when the switch requests one. -
Active– Datagrams are sent to the switch at regular intervals. The timer default of short is used with VLE and is not adjustable with the VLE GUI or CLI.
10 GigE Port Aggregations
The 10 GigE links can be aggregated for VLE-to-VTSS, UUI, or VLE-to-VLE connections. Because UUI traffic is minimal, 10 GigE aggregations for UUI only have minimal benefit. 10 GigE aggregations that include all three types of connections, however, can prove beneficial. For VLE-to-VTSS configurations, the switch environment typically has both 10 GigE and 1 GigE connections. In these configurations, the 1 GigE VLE ports connect to the switch's 1 GigE ports and the VLE 10 GigE ports connect to the switch's 10 GigE ports. The 10 GBE ports would be in a channel group, and a part of a VLAN that contains both the 1 GBE and 10 GBE ports.
Note:
For VLE-to-VTSS configurations, the switch environment typically has both 10 GigE and 1 GigE connections. In these configurations, the 1 GigE VLE ports connect to the switch's 1 GigE ports and the VLE 10 GigE ports connect to the switch's 10 GigE ports. The 10 GBE ports would be in a channel group and part of a VLAN that contains both the 1 GBE and 10 GBE ports.Monitoring Aggregations
Regularly monitor aggregations. If an aggregated link fails, VLE does not generate an ASR because the other links in the aggregation still function, so VLE does not detect the failed link. You cannot monitor the status of the individual links of the aggregation. To display the status of an aggregation, go to the Connectivity View - Port Status tab panel of a VLE node.
If a link goes down, an entry is logged in /var/adm/messages. The message file is a part of the nightly bundle so that the log can be scanned regularly for failed links. The message in the logs look like the following example:
Sep 4 08:30:16 dvtvle3 mac: [ID 486395 kern.infor] NOTICE: ixgbe12 link down
Types of VLE Aggregations
VLE supports three types of connections, each of which can be aggregated, as described in the following sections:
VLE-to-VTSS Aggregations
This section will describe the best practices for VLE-to-VTSS aggregations.
-
Configure a minimum of two aggregations for each VTSS to prevent a total outage if an aggregation fails.
-
You can connect multiple VTSS(s) to the same aggregations. For example, for a VSM5, you can connect
IFF0from each VTSS to one aggregation, and connectIFF2from each VTSS to a second aggregation and so forth. If you are using only two aggregations, then you can connectIFF0andIFF1from each VTSS to the first aggregation, and so forth. -
Configure links to an aggregation horizontally across the VLE (i
xgbe4, ixgbe6, ixgbe8, ixgbe10) to prevent an outage to an aggregation if a network adapter fails.
VLE-to-VLE Aggregations
You can aggregate VLE-to-VLE connections, as follows:
-
Non-switched - In a non-switched configuration, the same interfaces from two VLEs form the connection. The non-switched environment works the same as the internal network of a two-node VLE without a switch. Non-switched environments are limited to point-to-point configurations only.
-
Switched - A switched configuration is similar to the configuration described in "VLE-to-VTSS Aggregations."A channel group is formed in the switch for each aggregation, and both channel groups reside in the same VLAN.
With multi-node VLE, a single aggregation from one node can be connected to multiple nodes of another VLE, or multiple VLEs in a switched environment.
VLE UUI Aggregations
Typically, ports ixgbe1 and ixgbe2 are used to make UUI connections. In this configuration, aggregate ixgbe1 and ixgbe2 to create a fault-tolerant configuration: if one of the links fail, the remaining link still provides the UUI connection. For additional redundancy on multi-node VLEs, aggregate two UUI connections on a second node.
Preparing for Cloud Extended Storage
In order to successfully install VLE 1.5.3, the following requirement must be administered:
Note:
Consult with a field engineer before installing VLE 1.5.3.-
A valid Cloud Storage account from Oracle which will include the account name, user name, password and URL
Note:
Make sure that the Cloud Storage account is in place before setting up VLE for Cloud access.Network Requirements for Cloud Extended Storage
VLE specific Oracle Cloud User and Account Credentials need to be known before configuring the VLE Cloud. These will be different from accounts on the VLE and will need to be made with the Oracle Cloud team before they can be set up and used on a VLE.VLE 1.5.3 must be installed to use the VLE CLI and to support Cloud specific VMVCs.
Note:
In order to setup a Cloud account, refer tohttp://docs.oracle.com/cloud/latest/storagecs_common/index.html for further information.When a number of static IP address connections are set in the same subnet, the connections will work properly. If one of the cables is pulled or otherwise disrupted, however, the other connections in that subnet will be lost.
If network redundancy is required, each IP connection (between VSM 5 or 6 and VLE, VLE-to-VLE and VLE-to-SMC) must be configured on separate subnets.