| Oracle® Argus Mart Installation and Administration Guide Release 8.0 E55662-03 |
|
|
PDF · Mobi · ePub |
| Oracle® Argus Mart Installation and Administration Guide Release 8.0 E55662-03 |
|
|
PDF · Mobi · ePub |
This chapter explains how to upgrade Argus Mart 7.0.3 to Argus Mart 8.0, including ODI Metadata and the Schema Creation Tool.
The following figure explains the process to upgrade from Argus Mart 7.0.3 to Argus Mart 8.0:
This chapter comprises the following sub-sections:
Before you start the upgrade process, perform the Schema Validation for Argus Mart database.
To validate the existing schema, see Section 3.5, "Validating the Schema".
To upgrade the existing Argus Mart application, perform all the steps mentioned in the Section 2.2, "Installing Argus Mart Components" in the following order:
Step 1 to Step 4. (Skip Step 5)
In Step 6, on Specify Home Details screen:
In the Name field, select the name of the existing Argus Mart version.
In the Path field, select the path of the existing Argus Mart version.
Click Next.
The Summary screen appears.
Click Install to start the upgrade process.
After upgrade process is complete, the release version 7.0.3 is updated to 8.0.
Note:
Before upgrading the Argus Mart Database, you must re-create the Argus Mart user (AM_MART_USER) for the Argus Safety database. This user must be the same as the one created in Section 3.4.1, "Creating User for the Argus Safety Database".To upgrade the database from Argus Mart 7.0.3 to Argus Mart 8.0:
Start the Argus Mart Schema Creation Tool.
Click DB Upgrade.
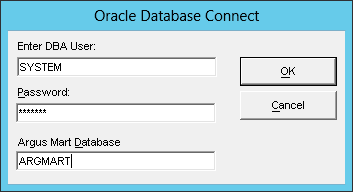
The Oracle Database Connect dialog box appears.
Connect to the Oracle Database:
In the User field, enter the name of Argus Mart SYSTEM or DBA user.
In the Password field, enter the password for Argus Mart SYSTEM or DBA user.
In the Database field, enter the name of your Argus Mart database.
Click OK.
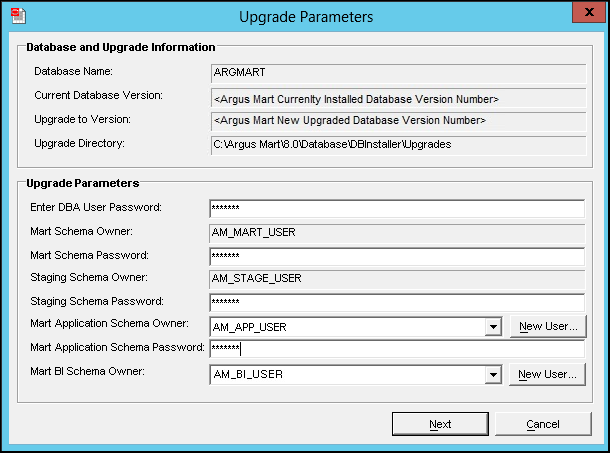
The Upgrade Parameters dialog box appears.
In the Database and Upgrade Information section, verify the following information:
Database Name
Current Database Version
Upgrade to Version
Upgrade Directory
If the information is incorrect, click Cancel.
In the Upgrade Parameters section:
In the Enter DBA User Password field, enter the password of Argus Mart SYSTEM or DBA user.
In the Mart Schema Password field, enter the password of the Mart Schema Owner (AM_MART_USER).
In the Staging Schema Password field, enter the password of the Staging Schema Owner (AM_STAGE_USER).
For the Mart Application Schema Owner field, to create Argus Mart application owner, click New User.
Note:
As this is a new feature, the Argus Mart application owner does not exists in the database. You must create a new user here.The New User dialog box appears.
i. In the New User Name field, enter a user name, such, AM_APP_USER.
ii. In the New User Password field, enter a password for this user.
iii. In the Re-enter Password field, again enter the password (same as in previous step).
iv. From the Default Tablespace drop-down list, select the default tablespace, where you want to store the database objects.
v. From the Temporary Tablespace drop-down list, select the tablespace, where you want to store the database objects temporarily.
vi. Click OK.
A new Argus Mart Application user is created and you return to the Upgrade Parameters screen.
In the Mart Application Schema Password field, enter the password of the Argus Mart application owner (AM_APP_USER), created in the previous step.
For the Mart BI Schema Owner field, to create Argus Mart BI owner (AM_BI_USER), click New User.
Note:
As this is a new feature, the Argus Mart BI owner does not exists in the database. You must create a new user here.The New User dialog box appears.
i. In the New User Name field, enter a user name, such, AM_BI_USER.
ii. In the New User Password field, enter a password for this user.
iii. In the Re-enter Password field, again enter the password (same as in previous step).
iv. From the Default Tablespace drop-down list, select the default tablespace, where you want to store the database objects.
v. From the Temporary Tablespace drop-down list, select the tablespace, where you want to store the database objects temporarily.
vi. Click OK.
A new Argus Mart BI user is created and you return to the Upgrade Parameters screen.
Click Next.
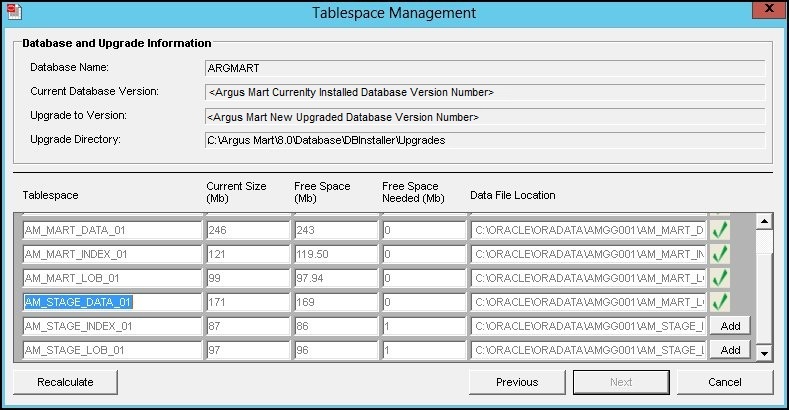
The Tablespace Management dialog box appears.
Verify that all tablespaces have enough free space.
The green check mark indicates that the tablespace has enough free space.
If the tablespace does not have enough free space, increase the size of the tablespace by below mentioned methods:
Click Add to add a new datafile to the existing tablespace.
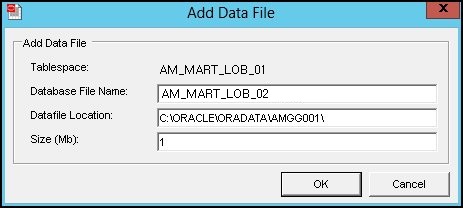
The Add Data File dialog box appears.
Enter a name for the new datafile (such as, AM_MART_LOB_02), containing the required additional space, and click OK.
Note:
In case no datafile exists for any tablespace, click Create.A dialog box appears to create a new datafile containing the tablespace information.Alternatively, if you do not wish to add a new data file, the database administrator can resize the tablespace from the back-end.
The tablespace information is updated.
After resizing, click the Recalculate button to re-evaluate the tablespace size and refresh the tablespace grid, as per the updated tablespace size.
Once updated, the Add or Create button no longer appears and the green check mark appears, indicating that the tablespace has enough free space.
When all the tablespaces have enough free space, the Next button is enabled.
Click Next.
The Argus Mart Database Upgrade screen appears.
Click Continue to start the upgrade process.
During the upgrade process, the system upgrades the database and loads the factory data.
Enter Argus Mart SYSTEM or DBA user password when prompted.
Note:
In case some columns that are to be added during the upgrade process already exists in the Mart tables, then the upgrade process fails. An error message appears listing the name of those columns in a log file.To execute the upgrade process successfully:
Stop the current upgrade process.
Drop or rename the existing columns as listed in the error message. Also, update all the dependent objects where columns are to be renamed, like views.
Re-execute DB Upgrade.
After successful completion of upgrade process, the status information appears.
Click the Book icon to view the log file and check for errors.
Alternatively, you can view the log file at any time at the following location:
<Argus Mart Install>\Database\DBInstaller\UpgradeLog.rtf
Click Finish to close the dialog box.
Note:
Recreate Argus Safety Read-only user using Argus Mart Schema Creation Tool after successful upgrade.Once you have upgraded Argus Mart, validate the schema to ensure that no object is missing except the following:
| Object Type | Object Name |
|---|---|
| Table | UVT_PSUR_PREF_PRODUCT_NAME |
| Table | UVT_DOSE_EXPOS_GENERIC_NAME |
| Table | UVT_DOSE_EXPOS_FAMILY_NAME |
| Table | UVT_DOSE_EXPOS_PRODUCT_NAME |
To validate the upgraded schema, see Section 3.5, "Validating the Schema".
Argus Mart 8.0 does not support upgrade of existing Argus Mart 7.0.3 - ODI repositories. Instead, you can import new ODI metadata.
Note:
Before importing new ODI metadata, verify the ODI version from the supported technology stack. See Table 2-1.To import new ODI metadata perform steps through Section 5.2, "Before Configuring ODI Settings" to Section 5.9, "Managing the ODI Agent".
|
Copyright © 2011, 2015, Oracle and/or its affiliates. All rights reserved. Legal Notices |
|