| Oracle® Retail Xstore Point-of-Service Mobile User Guide Release 18.0 F12257-04 |
|

 Previous |
 Next |
| Oracle® Retail Xstore Point-of-Service Mobile User Guide Release 18.0 F12257-04 |
|
Previous |
Next |
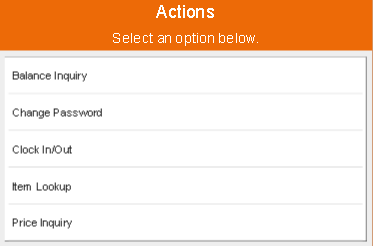
This chapter provides information about the following procedures:
Balance Inquiry - Check the balance of a gift card, gift certificate, or gift receipt.
Change Password - Change the password you use to log in.
Clock In/Out - Clocking in, clocking out, and changing work codes.
Item Lookup - Look up an item.
Price Inquiry - Look up the price of an item.
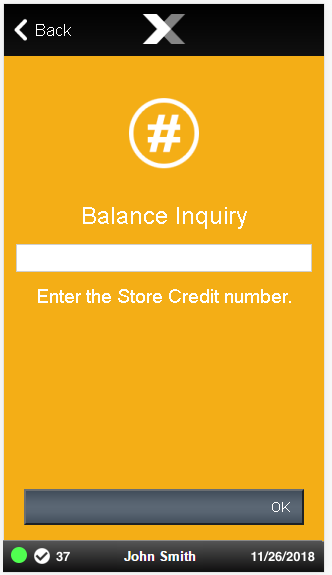
Gift cards and store credit vouchers may be used as a tender until the total value of the account has been used. Since the amount left on a card or voucher cannot be visibly seen, this function electronically checks the account record and tells you the remaining value on the account. You can also use Balance Inquiry to look up an encoded item's price on a gift receipt.
Use the balance inquiry process to check the amount remaining on a customer's store credit voucher, gift card or gift certificate, and an item's price from a gift receipt.
|
Note: Depending upon the configuration of your system, this option may be available from several different locations. |
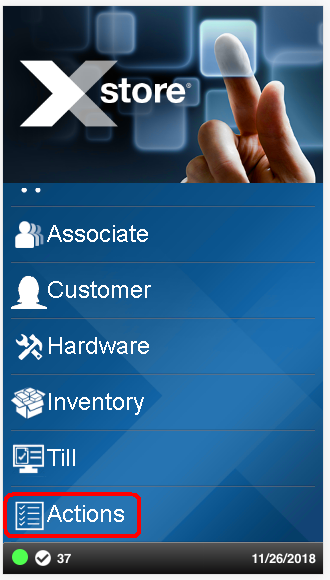
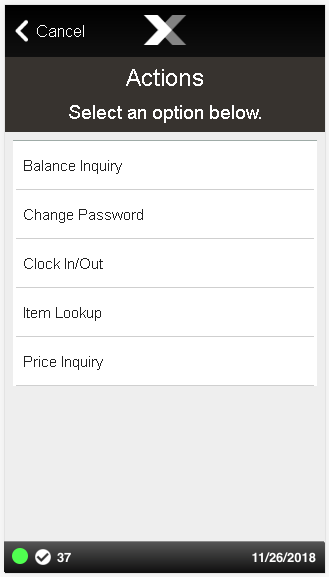
Select Actions from the Context Menu.
Select Balance Inquiry in the Actions menu to view the inquiry functions available in your store.
Select the type of inquiry you want to perform by selecting the appropriate option from the Balance Inquiry menu.
Figure 24-2 Balance Inquiry Menu Options
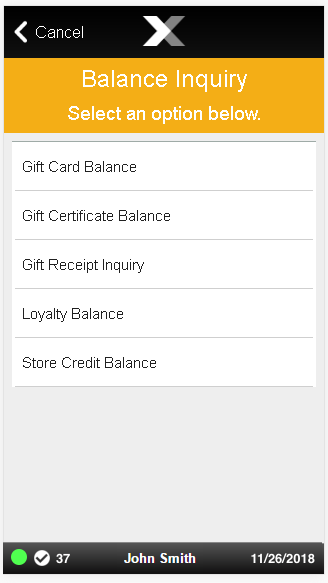
Gift Card Balance: Remaining balance on a gift card.
Gift Certificate Balance: Remaining balance on a gift certificate.
Gift Receipt Inquiry: Redemption amount of a gift certificate.
Loyalty Balance: Loyalty point balance.
Store Credit Balance: Remaining store credit balance.
At the prompt, enter the information as prompted: a card number, account number, or gift receipt information.
|
Note: The information required here varies according to the type of balance inquiry you are performing. Enter the applicable information and press OK to continue. |
The system retrieves the account balance/gift receipt information and displays the information on the screen.
If applicable, press Yes to print a receipt for this balance information.
<OR>
If applicable, press No if you do not need a printed receipt for this balance information.
If the option to print a receipt is not available, press OK to close the prompt.
|
Note: The system displays a message if the account is closed or cannot be located.If a deal or discount was applied to the gift item at the time of purchase, you cannot use Balance Inquiry to look up the price. No item price code is printed on the receipt. 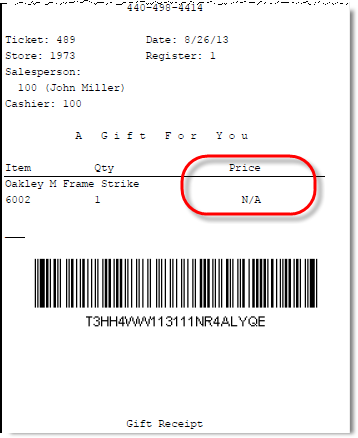 Description of the illustration ''giftreceipt_noprice.png'' When a balance inquiry for a store credit or gift certificate is performed, Xstore Mobile first determines which currency the store credit or gift certificate is in. If this currency is different than your store's local currency, then the foreign tender amount of the store credit or gift certificate is automatically converted to the local tender and amount using the current exchange rate on file. This localization is shown on the screen and on the receipt, if printed. |
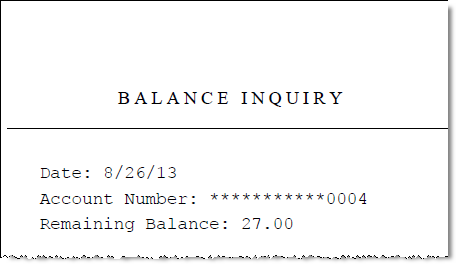
If you chose to print a receipt, the information shown on the receipt includes the date of this inquiry, the card or account information (masked), and the available balance on the card or account.
Figure 24-5 Sample Balance Inquiry Receipt
The Change Password option is available before you log in.
To change your password:
Select Actions from the Context Menu.
Click Change Password in the Action menu.
Xstore prompts for your user ID.
Figure 24-6 Change Password - Employee ID Prompt
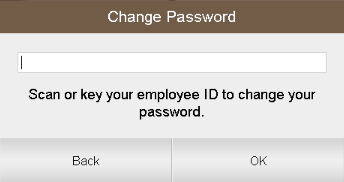
Enter your user ID and press Enter.
Xstore prompts for your password.
Figure 24-7 Change Password - Password Prompt
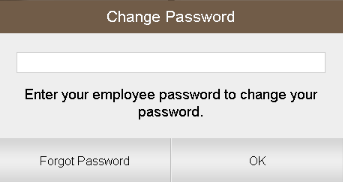
Enter your current password and press Enter.
Figure 24-8 Change Password - New Password Prompt
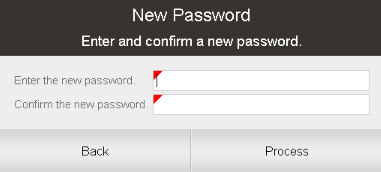
Enter your new password in the Enter the new password and Confirm the new password fields.
Click Process.
The new password is saved.
|
Note: Xstore may enforce certain rules regarding passwords, such as the minimum number of characters required or whether you can reuse an old password. |
If Xstore is configured to use password challenge questions, you can re-set your password without knowing your current password by answering a set of questions whose answers should only be known to you.
To change your password using challenge questions:
Select Actions from the Context Menu.
Click Change Password in the Action menu.
Enter your user ID and press Enter.
Xstore prompts for your password.
Click Forgot Password.
Xstore prompts for your last name.
Figure 24-9 Change Password - Last Name Prompt
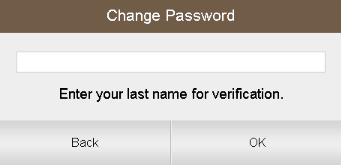
Enter your last name and press Enter.
Xstore asks the challenge questions.
Answer each challenge question:
Enter the answer.
After you have entered the correct answer for each question, Xstore prompts for your new password.
Enter your new password in the Enter the new password and Confirm the new password fields.
Click Process.
The new password is saved.
|
Note: Xstore may enforce certain rules regarding passwords, such as the minimum number of characters required or whether you can reuse an old password. |
This section describes the Clock In and Out function.
Depending upon your store policy, you may be required to clock in before logging in. You may also be required to clock in and out for meal breaks. If meal break clock-out and clock-in is enforced, you cannot clock back in after a meal break until a specified period of time has elapsed.
The time clock area in Xstore Mobile provides users with the ability to clock in, clock out, and change the work code used for logging their time. All time clock options are accessed through the Clock In/Out button on the Actions menu.
The following procedures are covered:
Clock In - Describes how to clock in.
Clock Out - Describes how to clock out.
Change Work Code - Describes how to change the work code under which your time is to be logged.
|
Note: You must be clocked out to clock in. |
In order for your timecard to accurately reflect the number of hours worked, you must clock in and out by performing the following steps.
To clock in:
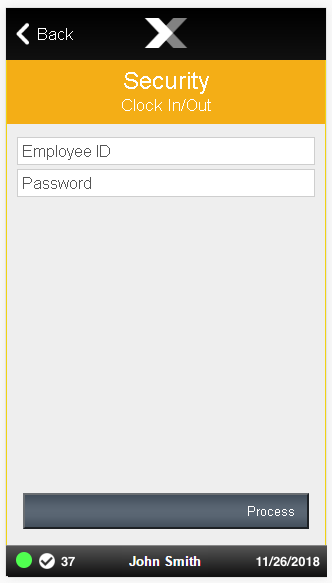
Select Clock In/Out in the Actions menu.
Enter Employee ID and Password.
Select Process.
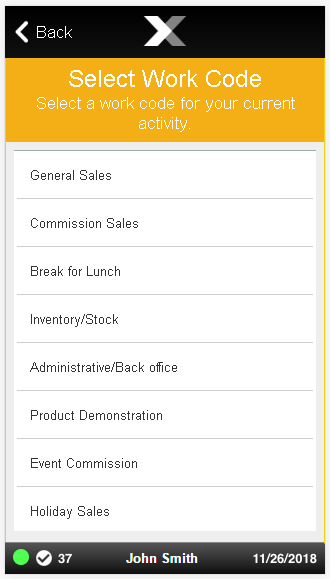
Select the proper work code.
You are now clocked in. Xstore Mobile returns to the Actions menu.
|
Note: You must be clocked in to clock out. |
To clock out:
Select Clock In/Out in the Actions menu.
Enter Employee ID and Password.
Select Process.
Figure 24-15 Change Work Code or Clock Out
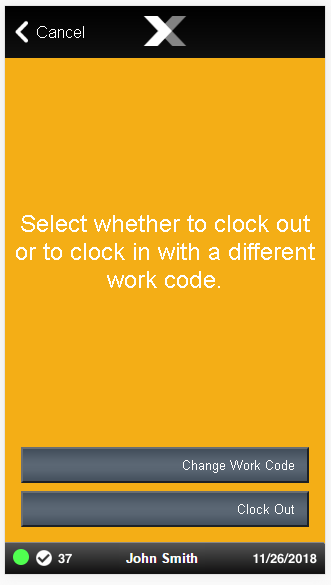
Select Clock Out.
You are now clocked out. Xstore Mobile returns to the Actions menu.
|
Note: You must be clocked in to change your work code. |
To change your work code:
1. Select Clock In/Out in the Actions menu.
Enter Employee ID and Password.
Select Process.
Figure 24-17 Change Work Code or Clock Out
Select Change Work Code.
Select the proper work code.
Your work code has been changed. Xstore Mobile returns to the Actions menu.
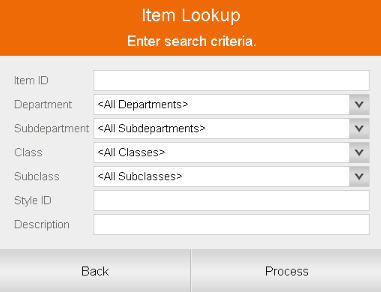
Use the item lookup function to search for an item based on many criteria (SKU, style, department, and so on) and retrieve detailed information about the item.
Select Actions from the Context Menu.
Select Item Lookup in the Actions menu.
Enter the search criteria for the item:
Item ID: ID of the item.
Department: Department to which the item belongs.
Subdepartment: Subdepartment to which the item belongs.
Class: Class to which the item belongs.
Subclass: Subclass to which the item belongs.
Style ID: ID of the style assigned to the item.
Description: Content in the description of the item.
If advanced search options are configured on your systems, use the advanced options to further refine the search:
Select the value for any search criteria you are using.
Click Exclude for any unused search criteria.
Click Process.
If more than one item matches the search criteria, continue with Step 5.
If only one item matches the search criteria, the item opens in the Item Viewer.
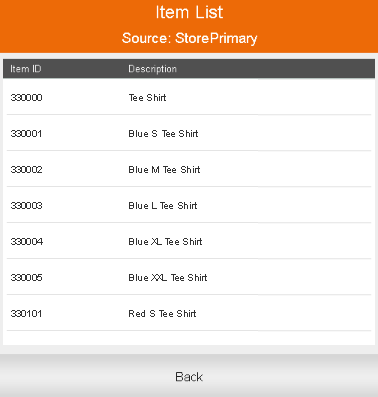
If necessary, select an item in the Item List window:
Select the item. The item opens in the Item Viewer:
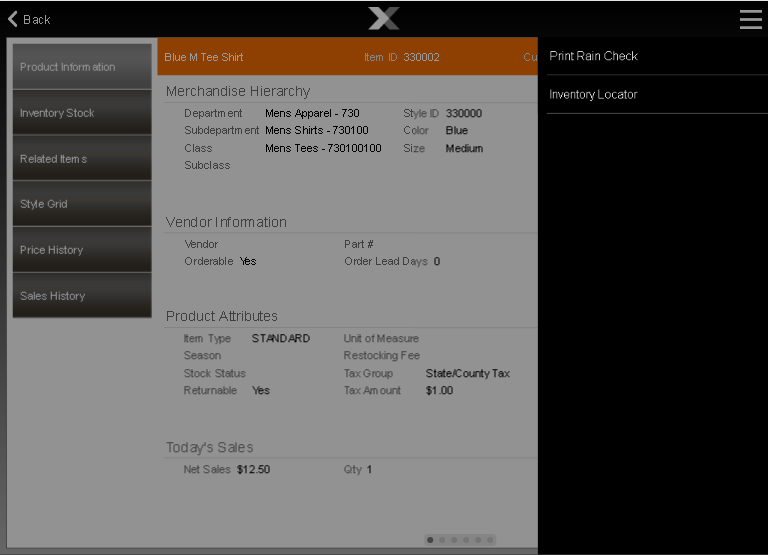
Figure 24-21 Item Viewer - Product Information
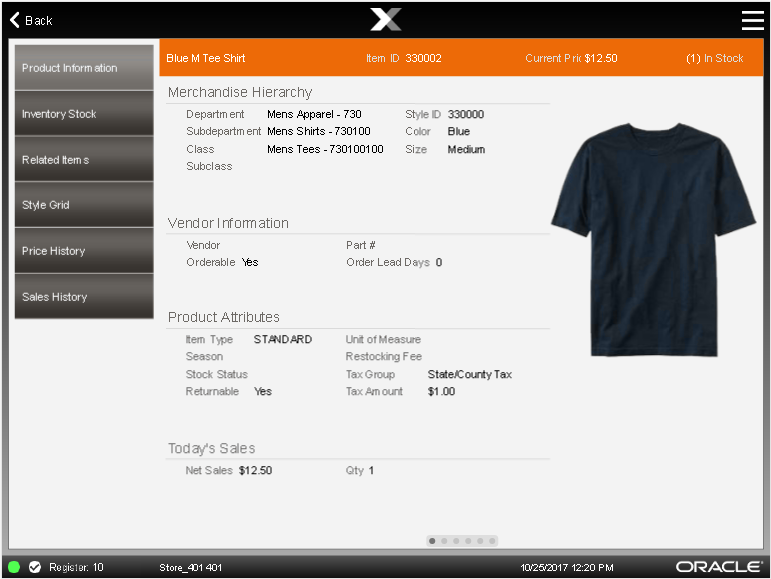
The Item Viewer provides information about an item. The Item Viewer displays the following information along the top of the screen:
Name of the item.
Item ID: ID of the item.
Current Price: Current price of the item.
Quantity of the item currently in stock.
The Item Viewer has the following tabs:
Product Information: Information about the item.
Inventory Stock: Current inventory information for the item.
Related Items: Information about items related to the selected item.
Style Grid: Grid showing on-hand quantities of the item with on dimension cross-referenced with another dimension.
Price History: Past prices for the item.
Sales History: Past sales data for the item.
You can also Print a Rain Check from the Item Viewer Context Menu.
If available, you can print a rain check to purchase out of stock items for the same price at a later date. See Print a Rain Check.
The Product Information tab, (see Figure 24-21), displays the sections that display information about an item:
A picture of the item (if available).
Merchandise Hierarchy: Merchandise hierarchy to which the item is assigned.
Vendor Information: Vendor that provides the item.
Product Attributes: Attributes of the item.
Today's Sales: Sales information for the item on the current day.
The Merchandise Hierarchy section displays the following information:
Department: Item department.
Subdepartment: Item subdepartment.
Class: Item class.
Subclass: Item subclass.
Style ID: ID of the style for the item (if available).
Dimension information for the item.
The Vendor Information section displays the following information about the items:
Vendor: Name of the vendor.
Orderable: Indicates whether the item can be ordered.
Part #: Part number used by the vendor.
Order Lead Days: Number of lead days required when ordering the item.
The Product Attributes section displays the following information:
Item Type: Type of item.
Season: Season for the item.Inventory Stock
Stock Status: Current stock status.
Returnable: Indicates whether the item can be returned.
Unit of Measure: Unit used to measure the item (if applicable).
Restocking Fee: Restocking fee applied to the item when it is returned (if applicable).
Tax Group: Tax group for the item.
Tax Amount: Amount of tax applied to the item.
The Today's Sales section displays the following information:
Net Sales: Net amount of sales minus returns for the item on the current day.
Qty: Number of items sales of the item on the current day.
Figure 24-23 Item Viewer - Inventory Stock
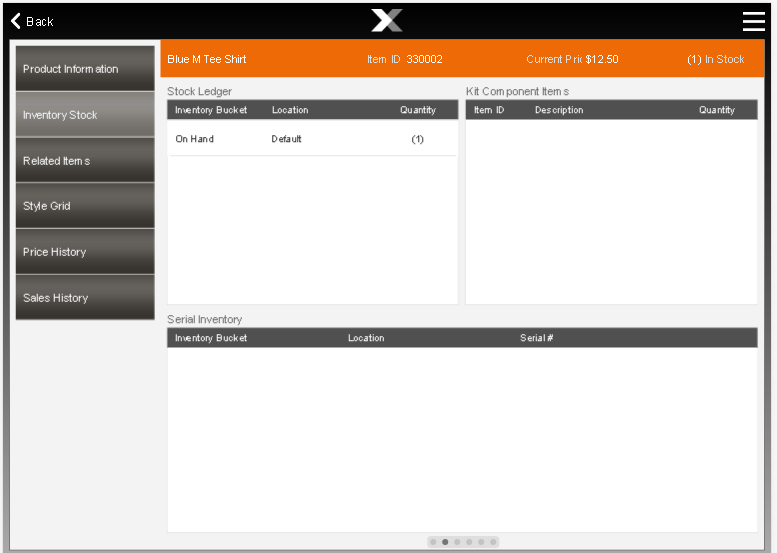
The Inventory Stock tab contains the following areas:
The Stock Ledger table displays the following information for each inventory bucket in which the item is located:
Inventory Bucket: Inventory bucket in which the item is located.
Location: Location of the item.
Quantity: Quantity of the item in the inventory bucket.
If the item is a kit, this table displays information about each item in the kit:
Item ID: ID of the kit item.
Description: Description of the kit item.
Quantity: Quantity of the item included in one kit.
If the item is a serialized item, the Serial Inventory table displays the following information about each serial number:
Inventory Bucket: Inventory bucket in which the serialized item is located.
Location: Location of the item.
Serial #: Serial number.
|
Note: No item quantity is displayed. For all items with one item ID, only one of those items will be assigned an individual serial number. |
Figure 24-24 Item Viewer - Related Items
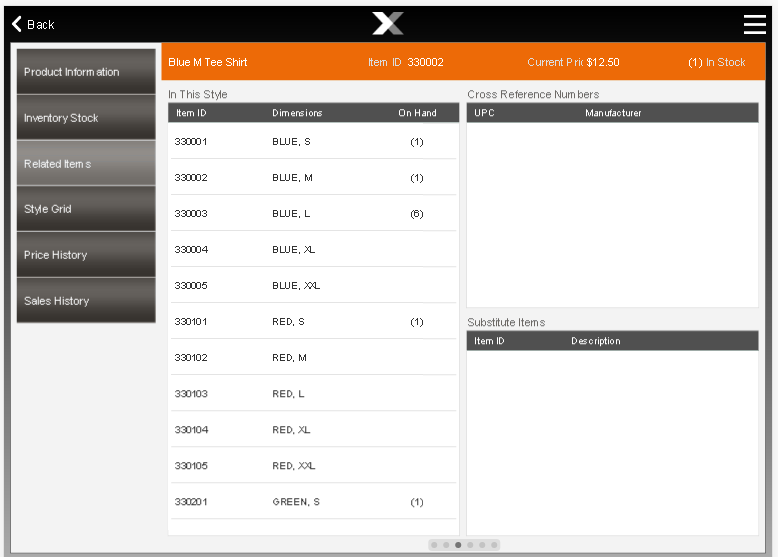
The Related Items tab includes information about items similar to the selected item.
The following tables display information about related items:
In This Style: Displays information about items assigned to the same style as the selected item.
Cross Reference Numbers: Displays information about items cross-referenced with the selected item.
Substitute Items: Displays information about items indicated to be substitutes for the selected item.
The In This Style table displays the following information about each item that has the same style ID as the selected item:
Item ID: ID of the item.
Dimensions: Values of the dimension attributes configured for the item.
On Hand: Count of the item on-hand.
The Cross Reference Numbers table displays the following information about items cross-referenced with the selected item.:
UPC: UPC for the item.
Manufacturer: Manufacturer that produces the item.
The Substitute Items table displays the following information about items that are indicated to be substitutes for the selected item:
Item ID: ID of the substitute item.
Description: Description of the item.
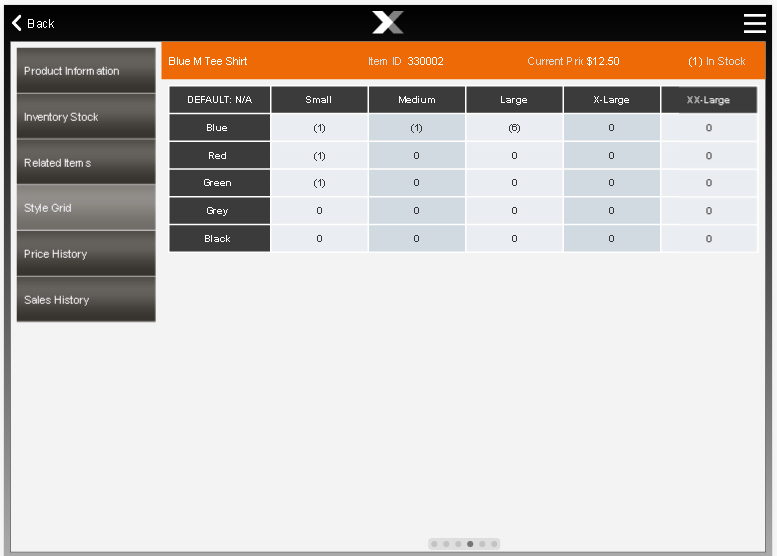
The Style Grid displays a grid showing the grid that shows the on-hand quantity of items with one dimension cross-referenced with another dimension.
Figure 24-26 Item Viewer - Price History
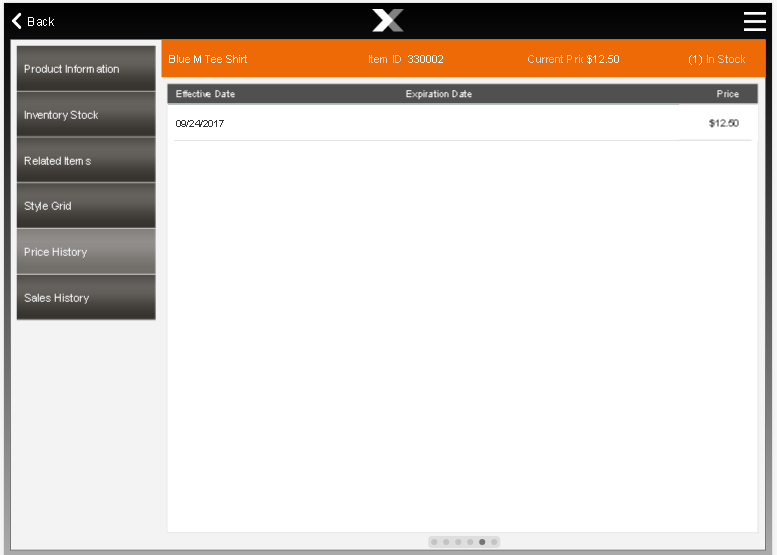
The Price History tab shows the past history of all prices that have been assigned to an item. The Price History shows the following information for each of the past prices:
Effective Date: Date on which the price first became effective.
Expiration Date: Date on which the price was not longer valid. This field will be blank for the current price.
Price: Price for the item from the Effective Date up to the Expiration Date.
Figure 24-27 Item Viewer - Sales History
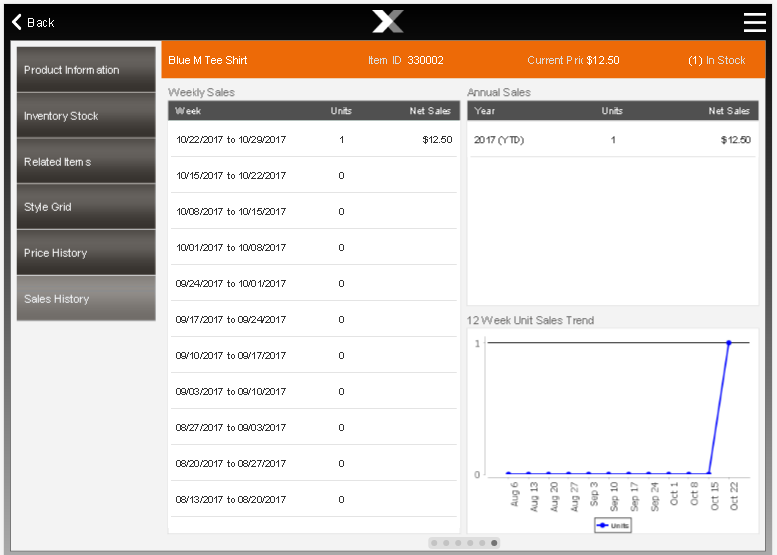
The Sales History tab displays sales data for the item. The Sales History tab displays he following information:
Weekly Sales: Table of weekly sales data for the item.
Annual Sales: Table of annual sales data for the item.
12 Week Unit Sales Trend: Graph of weekly sales data over the past twelve weeks.
Displays sales data for the item by week. This table displays the following sales information for each week:
Week: Date range for the week.
Units: Net quantity of the item sold.
Net Sales: Net amount of all sales and returns of the item.
Displays sales data for the item by year. This table displays the following sales information for each year:
Year: Year of the data.
Units: Net quantity of the item sold.
Net Sales: Net amount of all sales and returns of the item.
Graph displaying week-by-week net sales data for the item over the past twelve weeks. This graph has the following axes:
Start date for the week.
Number of items sold.
A Rain check is an optional feature that allows customers to purchase out of stock items for the same price at a later date. To print a rain check:
Select Print Rain Check in the Item Viewer Context Menu. See Figure 24-22.
A confirmation prompt opens.
Figure 24-28 Item Viewer - Print Rain Check Prompt
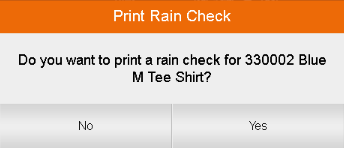
Select Yes to print the rain check.
Xstore Point of Service prints a rain check for the item.
Occasionally an item may not be available in your store inventory, but the customer would like to see which stores in your chain have the item in stock. You can use the Inventory lookup process to search a centralized database to locate these items within a set parameter range. For example, you could locate a specified item at a store within 25 miles of your location that has at least three of the specified item on hand.
To perform an inventory lookup:
Select Inventory Locator in the Item Viewer Context Menu. See Figure 24-22
The Inventory Locator Lookup window opens:
Figure 24-29 Item Viewer - Inventory Locator Lookup Prompt
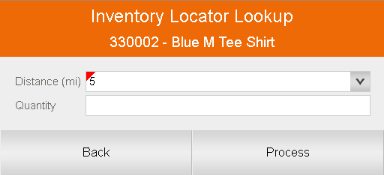
Enter the lookup information for the item:
Distance: Distance from the local store.
Quantity: Minimum quantity of the item that the store must have on hand. For example, if the customer needs three of the item, enter 3.
Select Process.
Figure 24-30 Item Viewer - Inventory Locator Lookup Results
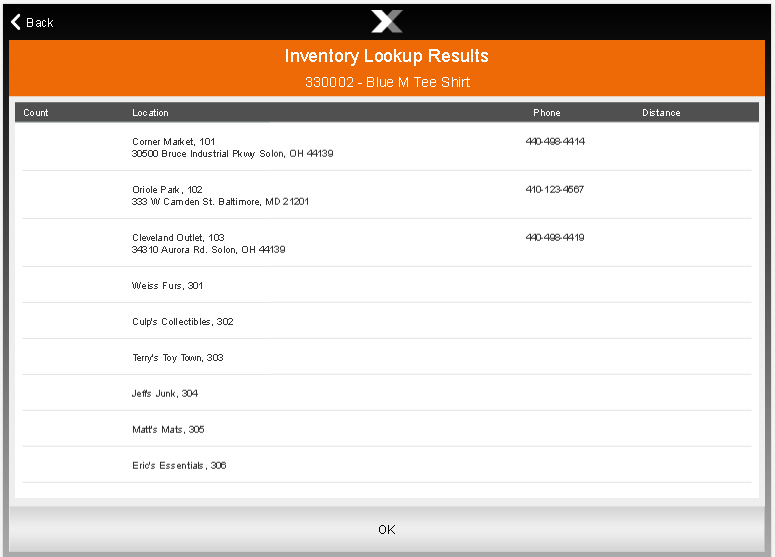
Xstore Point of Service returns a list of stores with the item. The following information will be displayed for each location:
Count: On-hand quantity of the item at the store.
Location: Address for the store.
Phone: Phone number for the store.
Distance: Distance of the store from the local store.
Select OK to close the window.
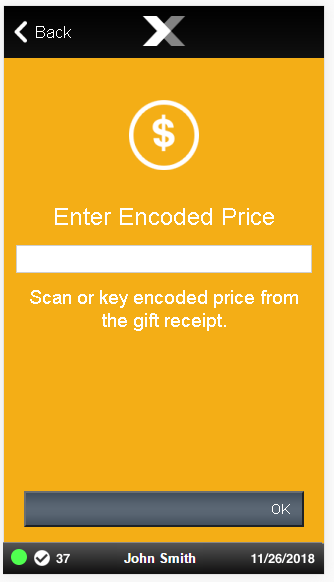
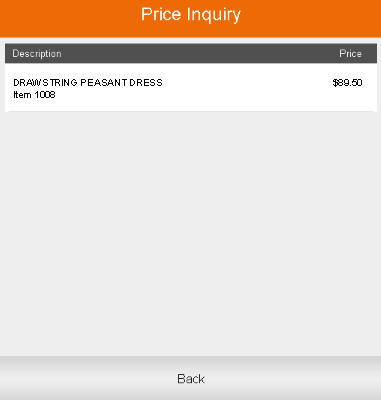
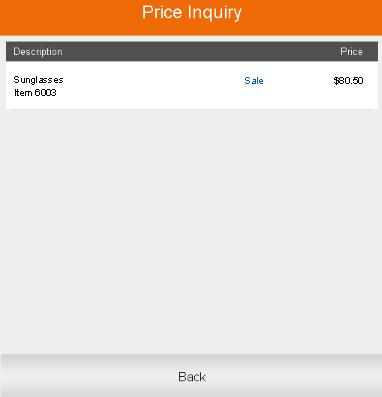
If you want to look up the price of an item, use the function Price Inquiry. You can look up the price for an item when you are logged out as well as when you are logged on to the application. To look up the price of an item, follow the steps below.
Select Actions from the Context Menu.
Select Price Inquiry in the Actions menu.
Your are prompted for the item. Scan, or enter the item and press OK.
The item description, item ID and the corresponding price are displayed.
|
Note: If the displayed price is a deal price, the system marks the price with the text Sale. |
Select Back to close the screen.