| Oracle® Retail Xstore Point-of-Service Mobile User Guide Release 18.0 F12257-04 |
|

 Previous |
 Next |
| Oracle® Retail Xstore Point-of-Service Mobile User Guide Release 18.0 F12257-04 |
|
Previous |
Next |
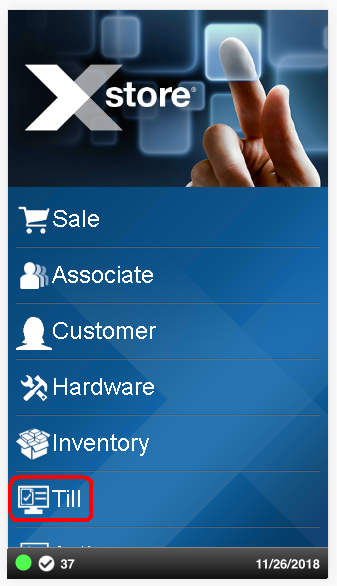
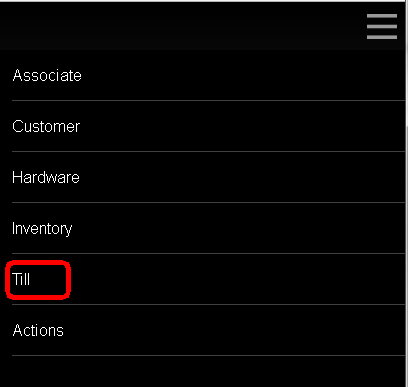
Till options and maintenance functions are primarily related to the movement of money into and out of a till (a cash drawer). Till options include No Sale, Post Void, Attach and Remove Cash Drawer. Additional options such as Change Float, Paid In and Paid Out transactions and Tender Exchange are available on the Mobile Tablet. Several other till maintenance options deal with the control of funds in the till. They include Cash Pickup, Cash Transfer. Finally, the Lock Register option provides physical security for the till. All till options are accessed through the Till button on the Main Menu.
This chapter contains the following procedures:
|
Note: Many Till Maintenance options are controlled by user security and may not be available to all associates. |
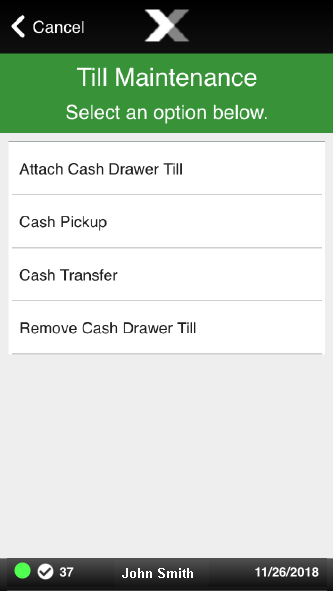
Till Maintenance options control the funds in the till. Select from the following options:
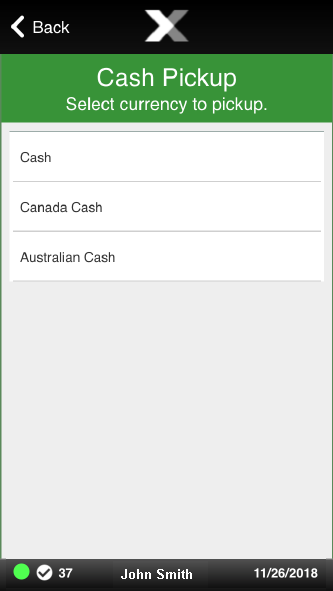
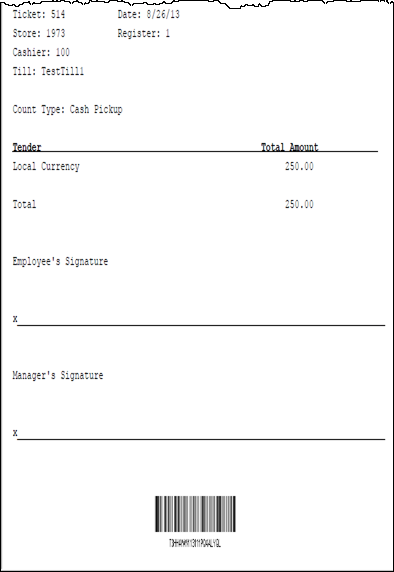
Cash Pickup is a till feature that allows an associate to take cash from a till so that the amount does not exceed a specified threshold amount. The system may be configured to prompt for an associate to make a cash pickup when the amount in the till is greater than the threshold amount.
|
Note: Your system's configuration may specify the maximum amount that should be kept in a till. If that amount is exceeded after completing the tendering process for a transaction, the system may display a prompt indicating that a cash pickup should be made. However, you do not have to wait for this prompt to make a cash pickup. After you have assigned a customer to a transaction or added items to a sale, you cannot perform a cash pickup. |
At the Main Menu screen, select and log in to display the Till menu, then select Till Maintenance to display the Till Maintenance menu. See Figure 25-2.
Select Cash Pickup from the menu.
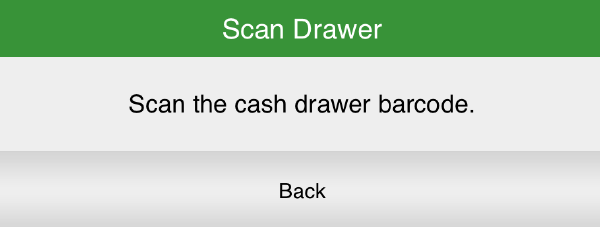
If necessary, scan the cash drawer on which to perform the cash pickup.
If your store is configured for foreign cash currency tenders to be given as change, select the type of tender from the list.
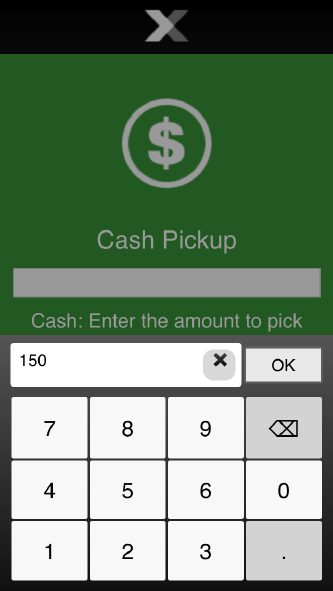
At the Cash Pickup prompt, enter the cash amount that you are picking up and press Enter.
|
Note: Your system's configuration may specify the minimum amount that should be kept in a till. If you try to remove an amount that results in the till amount going below this level, the system displays a prompt indicating the amount that must remain in the till after a pickup. Press Enter to return to the Cash Pickup amount prompt. |
Remove the cash from the till and close the drawer.
The system prints a receipt for this cash pickup transaction.
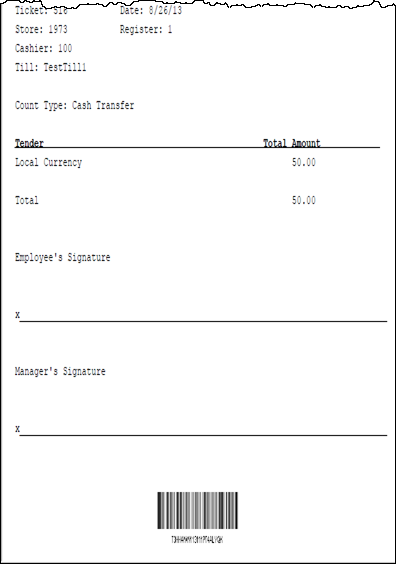
Figure 25-5 Cash Pickup Transaction Receipt
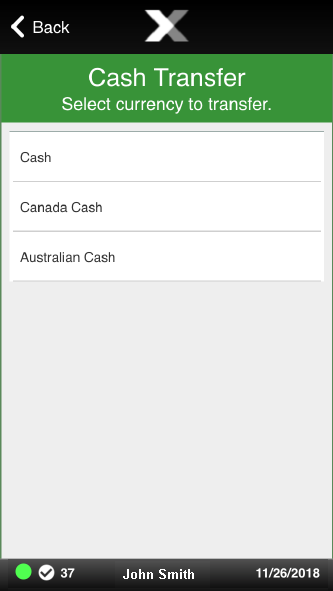
To perform a Cash Transfer from the store bank to a till, do the following:
1. At the Main Menu screen, select Till and log in to display the Till menu, then select Till Maintenance to display the Till Maintenance menu. In the Till Maintenance menu, select the Cash Transfer option. See Figure 25-2.
|
Note: If the register has mor than one cash drawer, you my be prompted to select the till to be used for this process. |
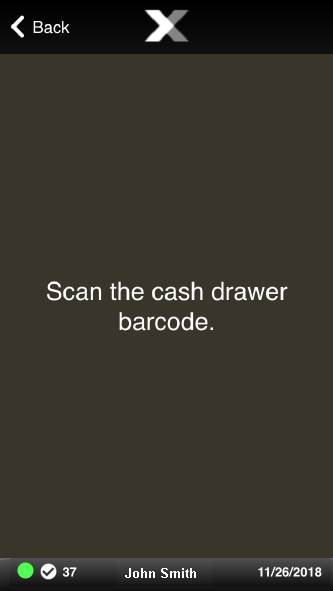
If necessary, scan the cash drawer on which to perform the cash transfer.
If your store is configured for foreign cash currency tenders to be given as change, select the type of tender from the list.
The cash drawer is popped open.
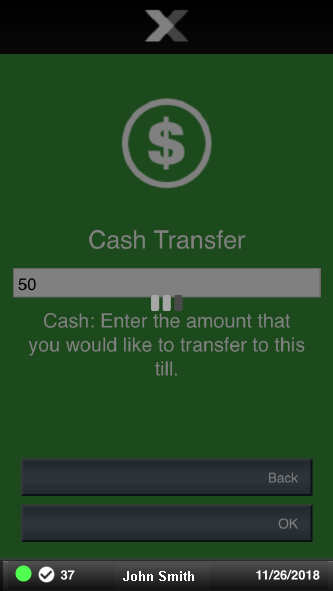
Enter the amount of cash you would like to transfer and then press Enter.
A receipt prints for the cash transfer and Xstore Mobile returns to the Till Maintenance menu. The cash transfer is complete.
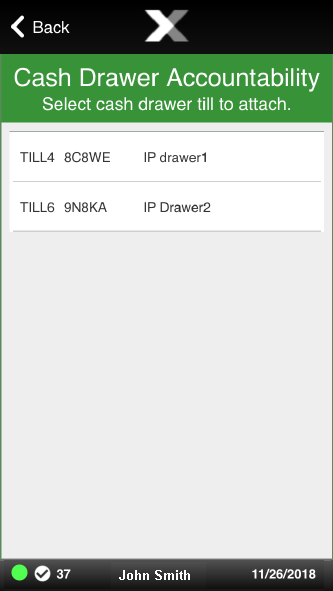
Select Attach Cash Drawer Till from the Till Maintenance menu. See Figure 25-2.
A list of tills opens.
Select the till to open from the list.
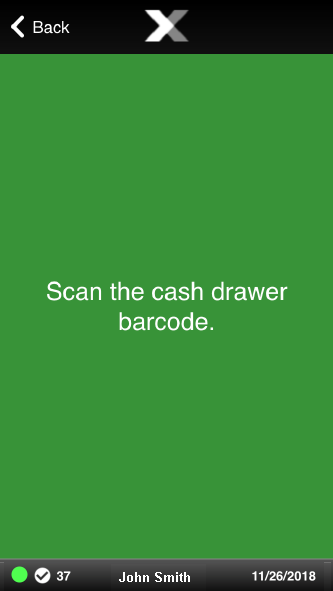
Scan the drawer to which the till will be attached.
A confirmation prompt opens.
Figure 25-12 Cash Drawer Confirmation Prompt
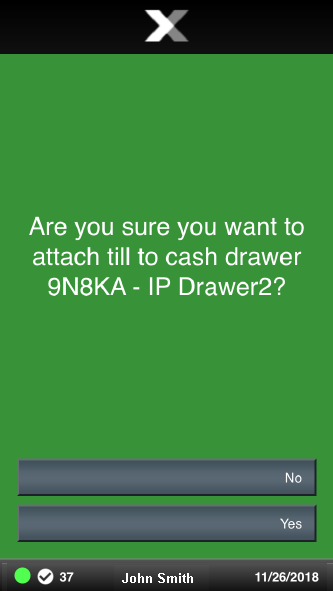
Select Yes.
The cash drawer opens.
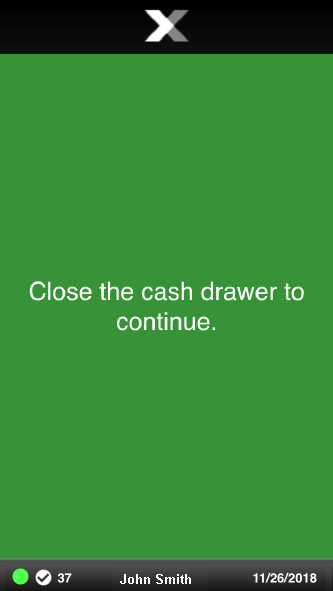
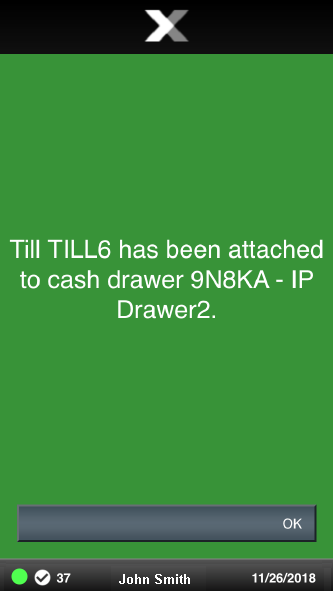
Insert the till into the cash drawer.
Close the cash drawer.
Select OK at the confirmation prompt.
Figure 25-14 Cash Drawer Confirmation Message
This option allows a cashier to physically remove a till from a register so that it can be temporarily stored or reconciled at a different register. When a till is removed, reconciliation is not required. Another till may be attached to the register immediately.
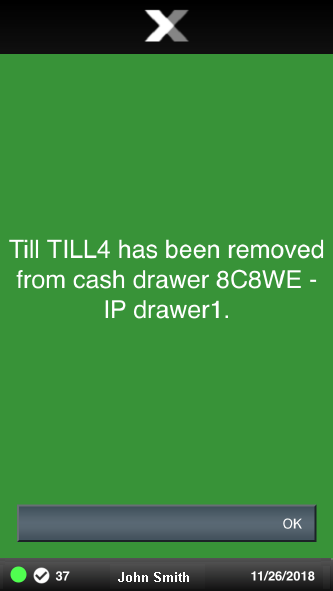
Select Remove Cash Drawer Till from the Till Maintenance menu. See Figure 25-2.
Depending upon the configuration of your system, you may be prompted with a list of cash drawers:
Select the cash drawer from which to remove the till.
Scan the cash drawer when prompted.
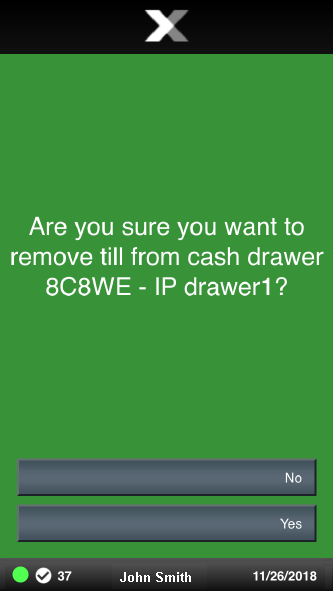
When prompted, Select Yes to confirm you want to remove the till.
Figure 25-15 Remove Cash Drawer Confirmation Message
Remove the till.
When prompted, press OK to confirm you have removed the till from the register.
Close the register drawer.
The till may now be stored or reconciled at a different register.
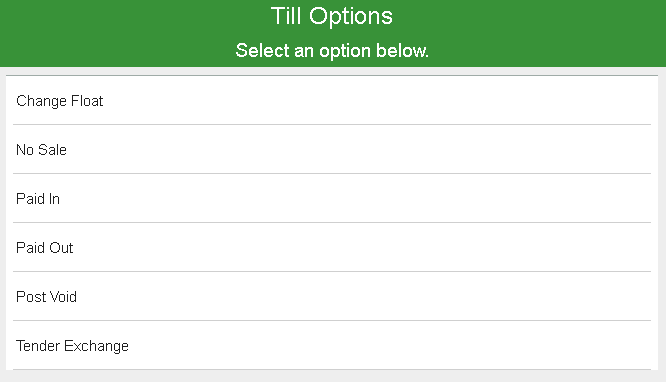
Select from the following options:
Tender Exchange (Mobile Tablet Only)
Figure 25-18 Mobile Tablet Till Options Menu
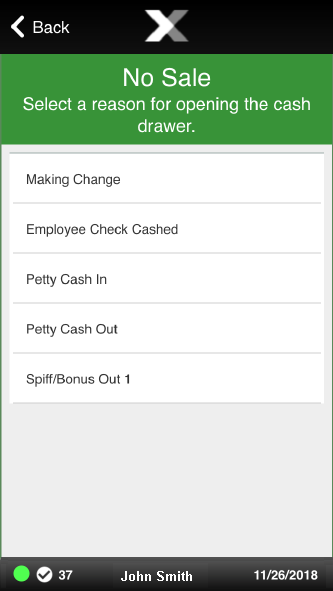
Use the No Sale option to open the cash drawer for a reason other than a normal sale transaction.
At the Main Menu screen, select Till and log in to display the Till menu, then select Till Options to display the Till Options menu. In the Till Options menu, select the No Sale option.
The system prompts you to select the reason you are opening the cash drawer.
Select a reason from the list.
If necessary, scan the cash drawer on which to perform the no sale.
The system may prompt you to enter a comment about the reason for opening the cash drawer. If it is required, enter the pertinent information in the comment entry form and press Enter.
The system prints a No Sale receipt for your records.
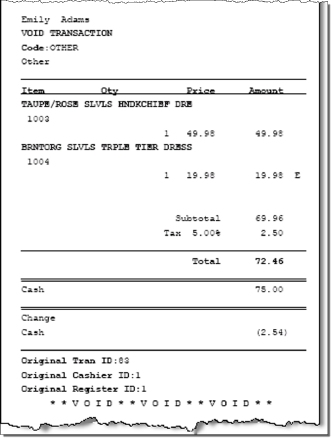
Performing a Post Void transaction changes the status of a sale transaction to Void. All records in the system are reset as if they had never occurred during the original transaction. For example, a post void adjusts the tender totals for the till involved in the transaction.
A transaction may be post voided only on the day it is created. Post Voids may be performed on a different register from the one where the original transaction was executed.
Certain kinds of sale transactions may involve extended transactions that occur outside the system. For example, special orders, work orders and layaways are extended transactions. Although the system checks for such conditions when a post void is executed, some aspects of the transaction may need to be reversed by an additional transaction such as a return. If the system detects an extended transaction, you are prompted about whether or not you want to continue the post void process.
A Post Void transaction may be performed from the Register or from the Back Office, depending upon your system's configuration and store policy. In the Back Office it is available on the Main Menu and also from the Electronic Journal.
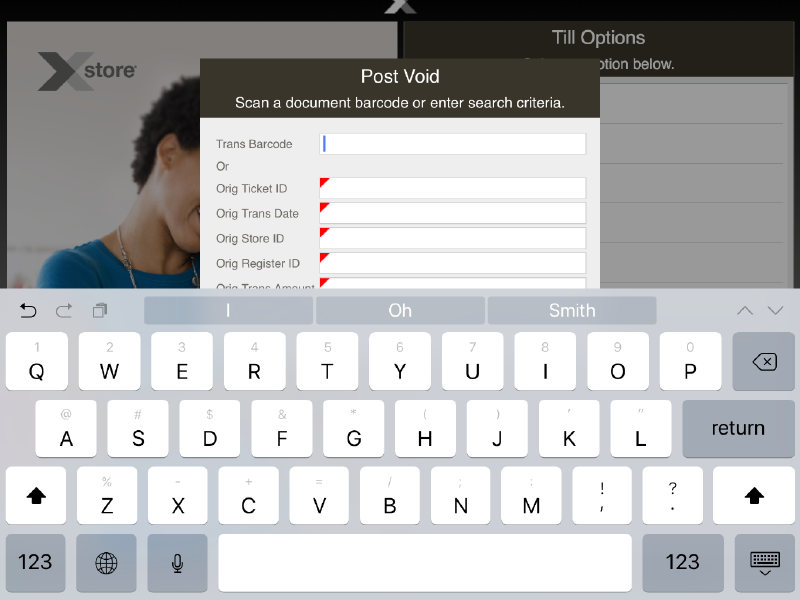
At the Main Menu screen, select Till and log in to display the Till menu, then select Till Options to display the Till Options menu. In the Till Options menu, select the Post Void option.
When the system prompts for the transaction barcode, scan the receipt barcode or enter the information manually and select Process.
Figure 25-21 Mobile Handheld Prompt for Transaction Barcode
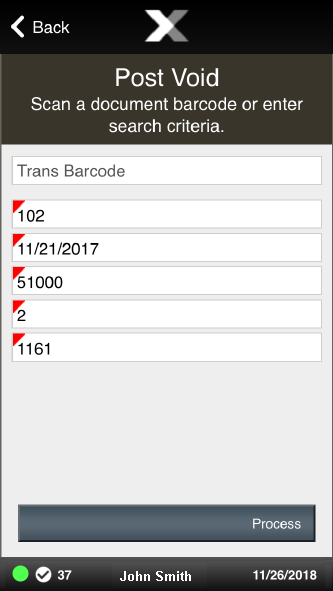
Figure 25-22 Mobile Tablet Prompt for Transaction Barcode
|
Note: If you scan or enter a barcode for a transaction type that cannot be post voided (such as a suspended transaction), the system displays a message informing you that the transaction cannot be post voided. |
The system displays a message that prompts you to confirm that you want to post void the transaction. Select Yes to continue or No if you have changed your mind.
Figure 25-23 Prompt to Confirm Post Void

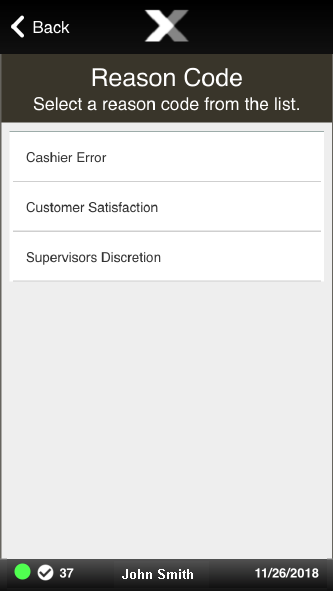
The system may require that you select a reason for post-voiding a transaction, depending upon your store policy. If prompted, select a reason from the list and select OK. Use the up and down arrow keys to scroll through the list.
If necessary, scan the cash drawer with which to perform the post void.
Your system may also be configured to require a comment entry about the Post Void transaction. If it does, a free-form text screen displays where you can type a comment. The kind of information you enter may be determined by your store policy. After entering a comment, select OK.
|
Note: If awards were used to reduce the customer's cost on the original transaction, the awards are reversed after the Post Void transaction and added back to the customer's account. |
The system voids the transaction, prints void receipts for your records, and returns to the previous screen where you can continue working.
To open the Till Options menu from the Register Login Screen:
Select Till in the Register Login screen Context Menu.
Do one of the following, depending upon the configuration of your system:
Enter your user ID and press Enter.
Xstore prompts for your password.
Enter your password and press Enter.
The Back Office Main Menu opens.
Click Till Options.
The Till Options menu opens.
Figure 25-27 Mobile Tablet Till Options Menu
The Float is the total value of cash counted and removed from the till, but not included in the bank deposit. This cash remains in circulation to be used the next time the till is opened. This option can be used whenever you need to change the amount withheld from the bank deposit, and can be adjusted per till. For example, you may want to change the float amount during the holiday shopping season to plan for increased sale activity.
To change the float:
Open the Till Options Menu, see Open the Till Options Menu (Mobile Tablet Only).
Click Change Float.
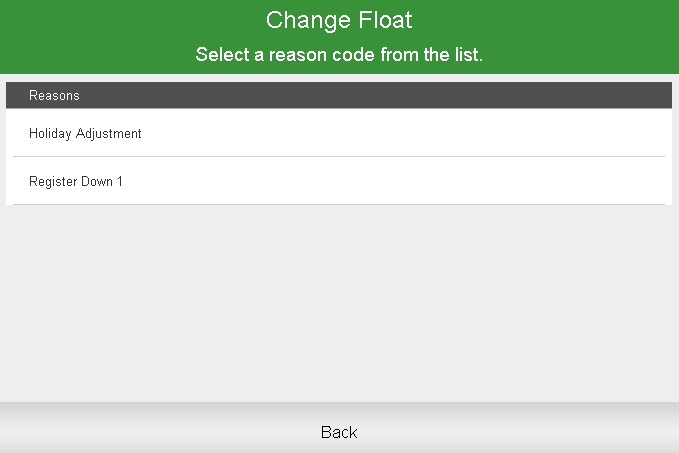
Select the reason for changing the float:
If you are prompted to enter more information, continue with Step.4
If you are prompted for the amount of the float change, continue with Step 6.
Enter more information about the reason for the float change transaction.
Figure 25-29 Change Float Add Comment Prompt
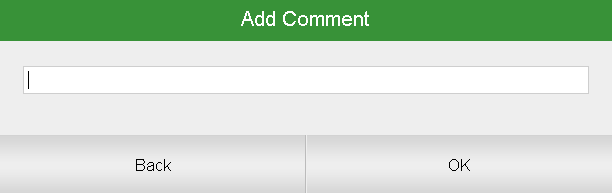
Select OK.
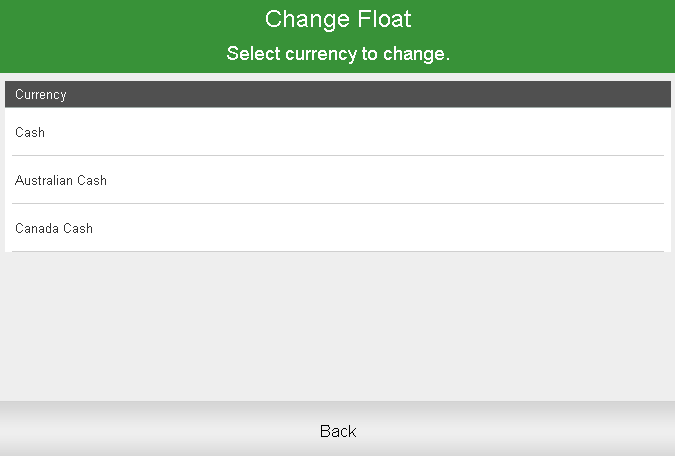
If you are prompted for a currency, select the currency:
Figure 25-30 Change Float Select Currency Prompt
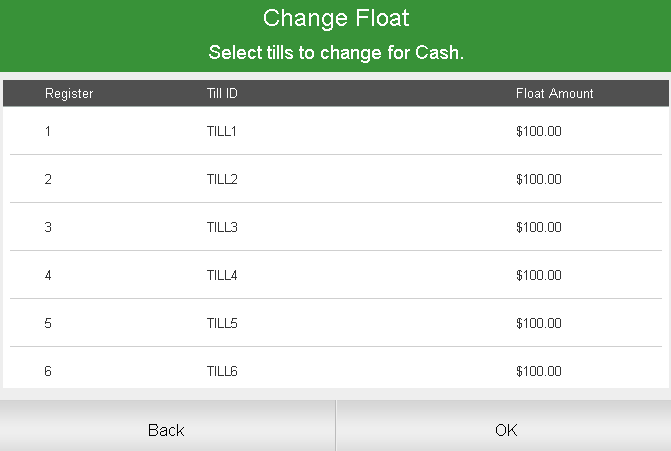
Xstore prompts for the tills.
Select the tills:
Click OK.
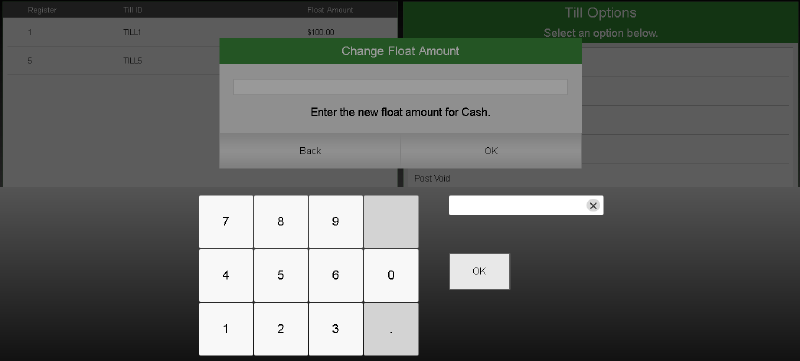
Xstore prompts for the new float amount for the selected tills.
Enter the new float amount, then select OK.
A confirmation prompt opens.
Select Yes.
The float is changed and the change float process completes.
A paid in transaction allows you to move funds into a till from non-sale sources. A paid out transaction moves funds out of a till for non-refund purposes. The system's configuration controls which associates are allowed to move funds in or out of the till. It also specifies the list of valid reasons that an associate can select when performing a paid in or paid out transaction. In addition, the system's configuration controls whether or not receipts are produced by these two transaction types.
To perform a paid-out transaction:
Open the Till Options Menu, see Open the Till Options Menu (Mobile Tablet Only).
Click Paid Out.
If you are prompted to scan a cash drawer, continue with Step 3.
If you are prompted to select a reason for the paid out, continue with Step 4.
If necessary, scan the cash drawer to use for the paid out transaction.
A reason code selection window opens.
Select the reason for the paid out transaction:
If you are prompted to enter more information, continue with Step 5.
If you are prompted for the amount of the paid out, continue with Step 7.
Enter more information about the reason for the paid out transaction.
Click OK.
Enter the amount of the paid out, then press Enter.
|
Note: If you exceed your store's maximum amount allowed for a paid out transactions a notification window opens. Click OK to close the prompt and reenter a new paid out amount. |
The cash drawer opens.
Remove the entered amount of the paid out from the cash drawer, then close the cash drawer.
The paid out transaction is complete.
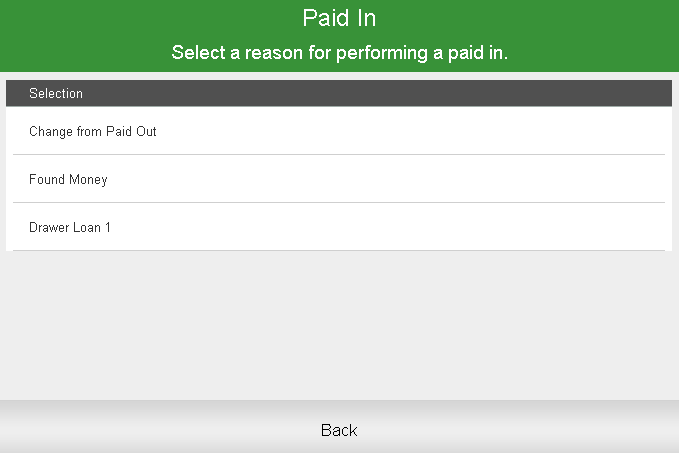
To perform a paid-in transaction:
Open the Till Options Menu, see Open the Till Options Menu (Mobile Tablet Only).
Click Paid In.
If you are prompted to scan a cash drawer, continue with Step 3.
If you are prompted for a tracking number for the paid in, continue with Step 4.
If necessary, scan the cash drawer to use for the paid in transaction.
Xstore prompts for a paid in tracking number.
Do one of the following:
Enter a tracking number for a previous paid-out transaction from which you are returning funds:
Scan the paid-out transaction receipt barcode and select OK.
Enter tracking number for the paid-out transaction and select OK.
Press Enter to skip entering a tracking number.
A reason code selection window opens.
Select the reason for the paid in transaction:
If you are prompted to enter more information, continue with Step 6.
If you are prompted for the amount of the paid in, continue with Step 8.
Enter more information about the reason for the paid in transaction.
Figure 25-36 Paid In Reason Comment Prompt
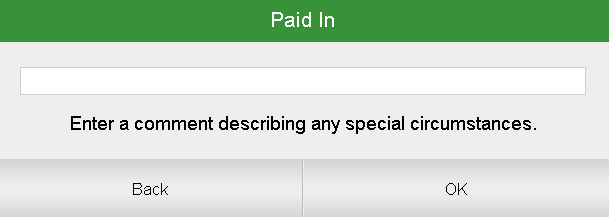
Click OK.
Enter the amount of the paid in, then select OK.
The cash drawer opens.
Put the paid-in money in the cash drawer, then close the cash drawer.
The paid in transaction is complete.
The Tender Exchange function permits an associate to exchange one form of tender for another. The types of tender that may be exchanged and the threshold exchange amounts are determined by your store policy.
To perform a Tender Exchange:
Open the Till Options Menu, see Open the Till Options Menu (Mobile Tablet Only).
Click Tender Exchange.
A Tender Exchange Incoming Tender window opens.
Figure 25-37 Tender Exchange Incoming Tender Screen

Select the incoming tender type from the tender exchange list.
If a check tender was selected in Step 3, enter information about the check:
Enter the check MICR number, then press Enter.
Enter the state or province that issued the ID being used to verify the customer's identity, then press Enter.
Enter the ID number, then press Enter.
Enter the birthdate on the ID, then press Enter.
Enter the amount of the incoming tender.
If necessary, select whether to add another incoming tender to the exchange:
Click Yes to add another tender. Return to Step 3.
Click No to continue with the current tenders.
A Tender Exchange Outgoing Tender window opens. Continue with Step 8.
Select the outgoing tender.
Click OK.
Xstore prompts for the amount of the outgoing tender.
|
Note: The default value is equal to the maximum amount that can be redeemed in the selected tender. |
If necessary, change the amount to return to the customer.
Press Enter.
If necessary, scan the cash drawer with which to perform the tender exchange.
If the entered outgoing amount was less than the maximum, a Tender Exchange Outgoing Tender window opens. Return to Step 8.
If the outgoing amount was the maximum amount, Xstore prompts whether the tender exchange is complete. Continue with Step 13.
Indicate whether the tender exchange is complete:
Click Yes to complete the transaction.
Receipts will print.
Click No a Tender Exchange Incoming Tender window opens. Return to Step 3.
Indicate whether the tender exchange is complete:
Click Yes to complete the transaction.
Receipts will print.
Click No a Tender Exchange Incoming Tender window opens. Return to Step 3.