| Oracle® Retail Xstore Point-of-Service Mobile User Guide Release 18.0 F12257-04 |
|

 Previous |
 Next |
| Oracle® Retail Xstore Point-of-Service Mobile User Guide Release 18.0 F12257-04 |
|
Previous |
Next |
A layaway item is a sale item that cannot be taken from a store when it is purchased because the customer does not pay the entire cost of the item at that time. Instead, the store reserves the item for the customer until the customer pays for the item in full.
Usually the customer is required to fully pay for the items in a layaway within a specified time period. Once an item in a layaway has been fully paid, the customer takes possession of it from the store.
A layaway account is a customer account that includes one or more layaway items. A layaway account for which the customer does not pay the requisite amount within a given time frame is considered delinquent; the items in the layaway are restocked as saleable inventory and any non-refundable deposit or setup fees are kept by the store. Any refundable deposits or setup fees are reserved for the customer.
This chapter covers the following topics:
To create a layaway:
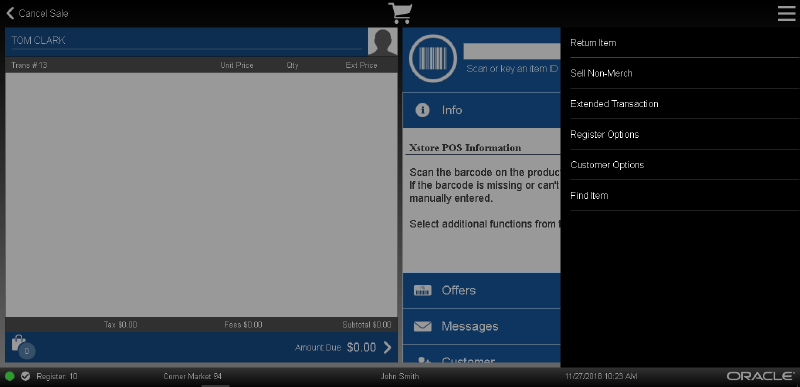
Click Extended Transaction in the Register Sale Context Menu.
Figure 12-1 Extended Transaction Context Menu
Click Layaway.
Enter criteria to search for an existing layaway.
Xstore will open a prompt listing open layaways for the customer, or an indication that there are no open layaways.
Choose the correct option:
Click Set Up New if the customer has open layaways.
|
Note: If the customer has an existing layaway account and Xstore is configured for a Single layaway account, a new layaway cannot be created. |
Click New if there are no layaways associated with the customer, or no customer has been associated with the transaction.
If no customer is associated with the transaction, perform Associating a Customer with a Transaction and associate a customer with the transaction.
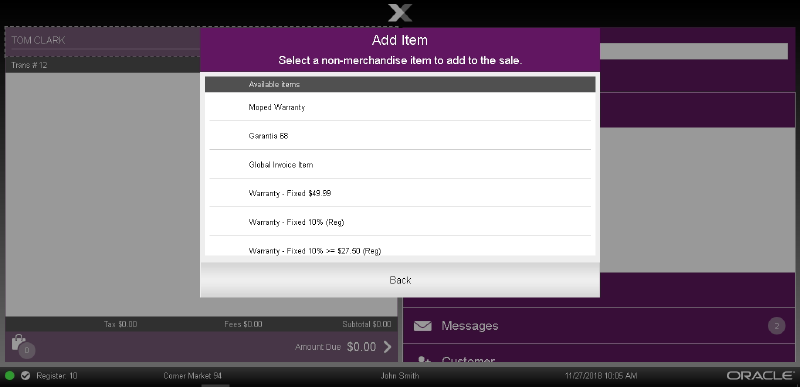
Add items to the transaction by entering item IDs or scanning an item. Select Sell Non-Merch option rom the Context Menu to add non-merch items such as gift cards or gift wrapping:
|
Note: If an item cannot be added to a layaway, the system prompts with a message or reason the item is ineligible. |
While Xstore is in layaway mode, all items entered are entered as layaway items. The View Port only shows items and information for the current layaway transaction while in layaway mode.
|
Note: If adding an item would exceed the total amount or item quantity permitted in a layaway, Xstore displays a warning message. Click OK to confirm the message, then either complete the layaway or remove items to add additional items. |
After entering all the items, do one of the following:
Select Exit Layaway from the Context Menu to exit layaway mode and perform additional transaction processing.
Select Complete Transaction to tender the transaction. See Tendering the Transaction.
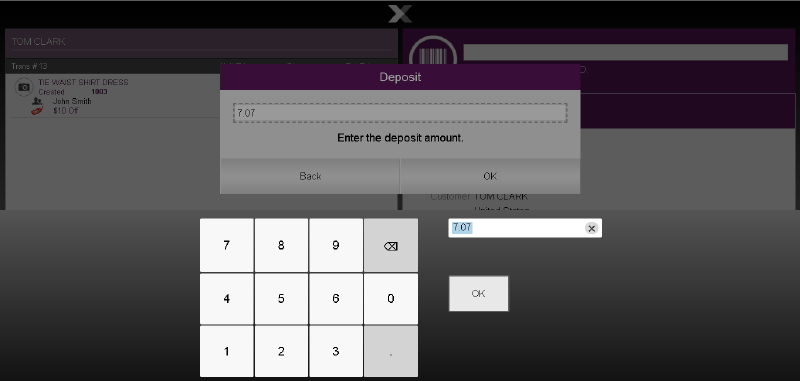
Xstore prompts for a deposit amount.
If necessary, change the layaway deposit amount.
Press Enter.
If the entered deposit amount is less than the minimum deposit amount, Xstore opens a warning prompt. Click OK and return to Step 7 to enter a larger deposit.
If you changed the deposit amount was changed in Step 7, Xstore prompts whether to continue with a deposit amount other than the default.
Click Yes to continue the transaction.
Click No to return to Step 7 and enter a new amount.
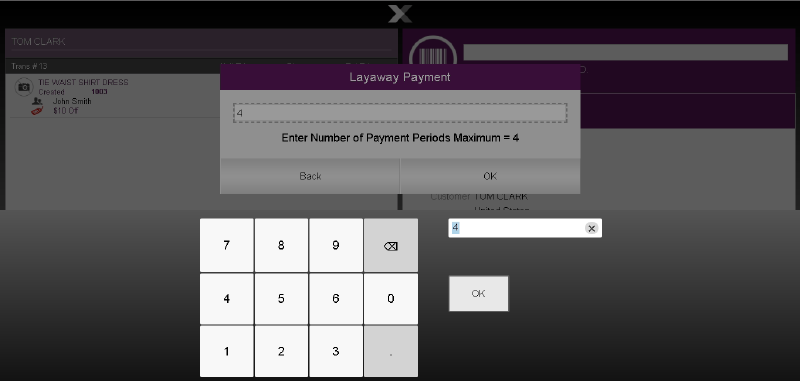
If Xstore prompts for the number of days in the payment period:
Enter the number of days in the payment period.
Press Enter.
|
Note: Xstore displays a confirmation prompt if the entered number exceeds to maximum payment period. Click OK and enter a new payment period. |
If Xstore prompts for the number of payment periods:
Enter the number of payment periods.
Press Enter.
|
Note: Xstore displays a confirmation prompt if the entered number exceeds the maximum number of payment periods. Click OK and enter a new payment period. |
Select an option to continue the transaction:
Click Exit Layaway from the Context Menu to continue adding non-layaway items to the transaction.
Click Complete Transaction to proceed to tendering.
To open an existing layaway:
Click Extended Transactions in the Register Sale Context Menu. See Figure 12-1.
Click Layaway.
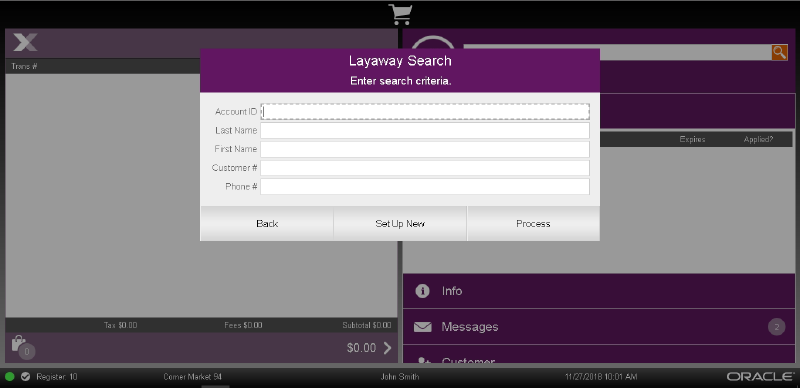
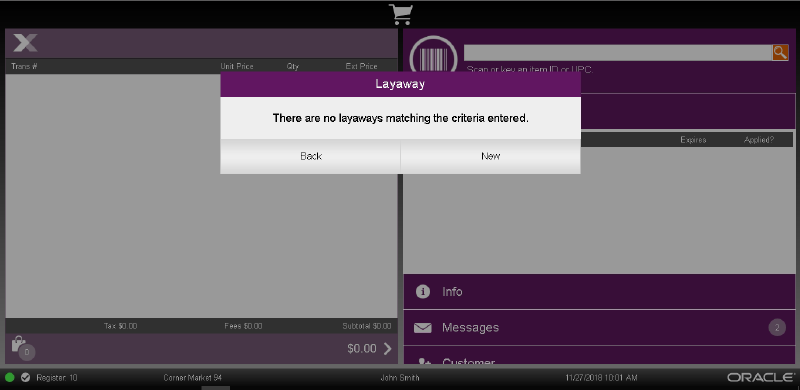
Xstore will open a prompt listing open layaways for the customer, or an indication that there are no open layaways:
Select the layaway:
Click the layaway.
Use the up and down arrows to highlight the correct layaway, then press the Spacebar.
Continue with Step 6.
Scan the customer's layaway receipt. Continue with Step 7.
Click Layaway Search to search for a layaway. Continue with Step 3.
Enter the search criteria:
Layaway ID - ID of the layaway.
Last Name - Last name of the customer associated with the layaway.
First Name - First name of the customer associated with the layaway.
Customer ID - ID of the customer associated with the layaway.
Phone # - Phone number of the customer associated with the layaway.
Click Process.
The system displays a list of all layaways that match the entered criteria.
Select the layaway.
Click Select and Continue.
Perform the appropriate action.
Customers may need to may regular payments to their layaway account between setting up and picking up the layaway. To add a layaway payment to a transaction:
Open a Layaway, see Open a Layaway.
Click Make Payment.
If necessary, change the amount of the payment.
Press Enter.
If the entered amount is less than the recommended amount, Xstore prompts whether to continue the transaction.
Click Yes to continue the transaction.
Click No to return to Step 3 and enter a new amount.
If the entered amount is less than the minimum payment amount, Xstore opens a prompt indicating the amount is too low. Click OK to return to Step 3.
The payment amount is added to the transaction. Continue the transaction.
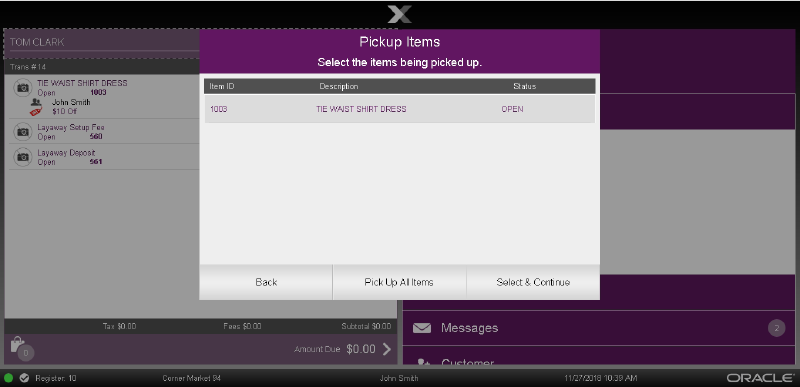
To pick up items in a layaway:
Open a Layaway, see Open a Layaway.
Click Pick Up Item.
Xstore displays a list of items in the transaction.
Select the items to be picked up:
Click the items.
Use the up and down arrows to highlight each item, then press the Spacebar.
Click Pick Up All to select all items.
Click Select and Continue.
Each selected item is listed as Picked-Up in the View Port.
Select an option to continue the transaction:
Click Exit Layaway in the Context Menu to continue adding non-layaway items to the transaction.
Click Complete Transaction to proceed to tendering.
To add items to a layaway that was created in a previous transaction:
Open a Layaway, see Open a Layaway.
Enter the items:
Scan each item.
Enter each item ID and press Enter.
Select an option to continue the transaction:
Click Exit Layaway in the Context Menu to continue adding non-layaway items to the transaction.
Click Complete Transaction to proceed to tendering.
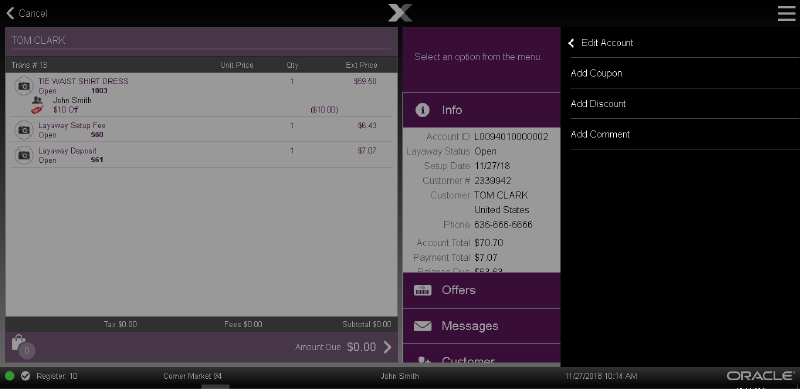
To change the items assigned to a layaway:
Open a Layaway, see Open a Layaway.
Click Edit Account.
The Edit Account Menu Options window opens.
Perform the appropriate action:
Add Coupon - Add a coupon to a layaway.
Add Discount - Add a discount to a layaway.
Change Item - Make a change to a layaway item.
Repeat Steps 2 to 3 for each action to perform.
Select an option to continue the transaction:
Click Exit Layaway in the Context Menu to continue adding non-layaway items to the transaction.
Click Complete Transaction to proceed to tendering.
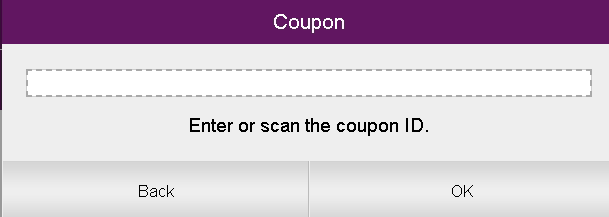
To add a coupon to a layaway:
Click Add Coupon in the Edit Account Menu Options window.
Enter the coupon:
Scan the coupon.
Enter the coupon ID and press Enter.
The coupon is applied to the layaway.
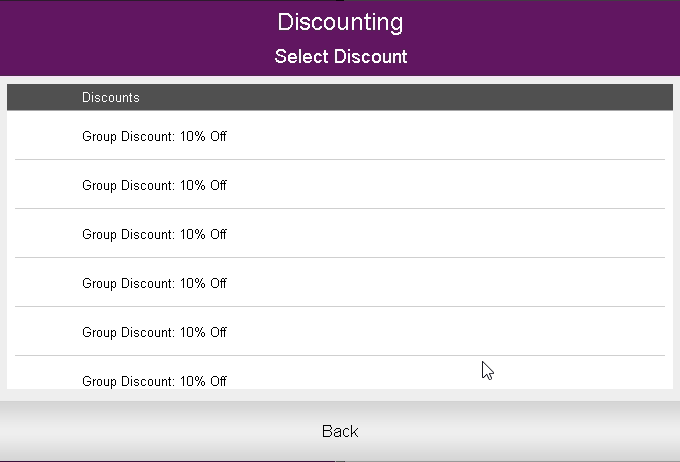
To add a discount to a layaway:
Click Add Discount in the Edit Account Menu Options window.
Select the type of discount to add:
Click Add Item Discount to add an item discount.
Click Add Group Discount to add a group discount.
Perform the appropriate procedure in "Chapter 8, "Discounts":
To change an item in a layaway:
Click Change Item in the Edit Account Menu Options window. See Figure 12-8.
Select the appropriate option in the Menu Buttons. See Modifying Line Items in a Sale for information about the available options and procedures.
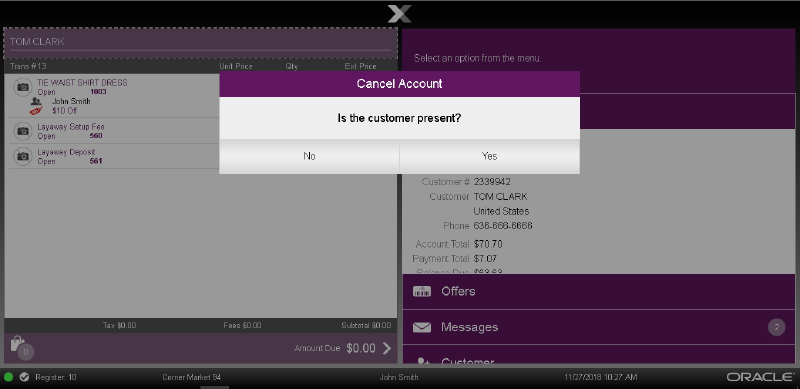
To cancel a layaway:
Open a Layaway, see Open a Layaway.
Click Cancel Layaway.
A confirmation prompt opens.
Click Yes if the customer is present.
Click No if the customer is not present.
Indicate whether the customer is present:
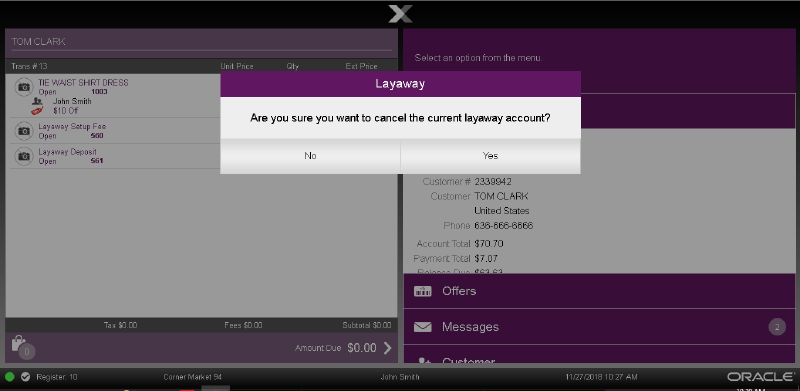
If the customer is present, a second confirmation prompt opens.
Indicate whether to cancel the layaway:
Click Yes to cancel the layaway.
The layaway is canceled and the refund amount is applied to the transaction.
Click No to return to the layaway without canceling it.
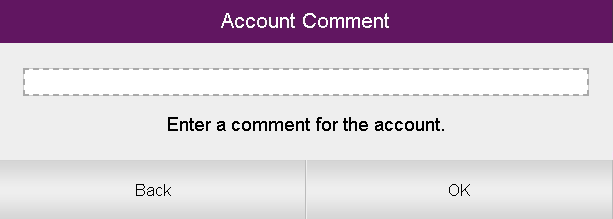
To add a comment to a layaway:
Open a Layaway, see Open a Layaway.
Click Edit Account.
Click Add Comment. A comment entry window opens.
Enter the text of the comment.
Select OK.
The comment is added to the layaway.
To view the comments for a layaway:
Open a Layaway, see Open a Layaway.
Click Edit Account.
Click More.
Click View Comments.
The comments for the layaway are displayed in the Message Window.
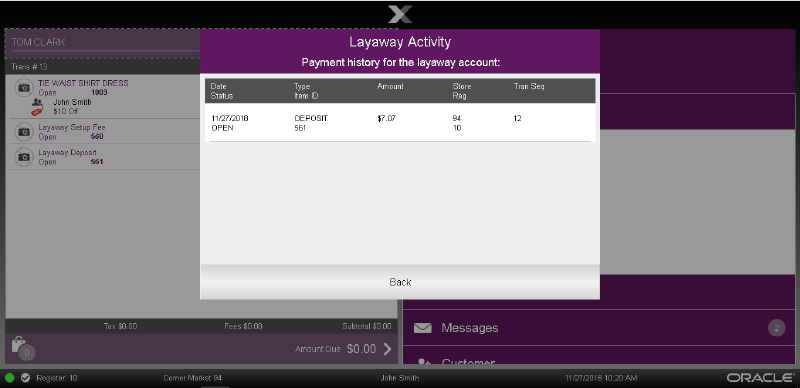
To view the payment history for a layaway account:
Open a Layaway, see Open a Layaway.
Click Layaway Details.
Click View Payment History.
Xstore opens a window showing the payment history for the account:
Date - Date of the payment.
Status - Status of the account when the payment was made.
Type - Type of payment.
Item ID - Item ID for the payment type.
Amount - Amount of the payment.
Store - ID of the store.
Reg - ID of the register.
Tran Seq - Sequence number of the transaction.
Click Back to return to the layaway.
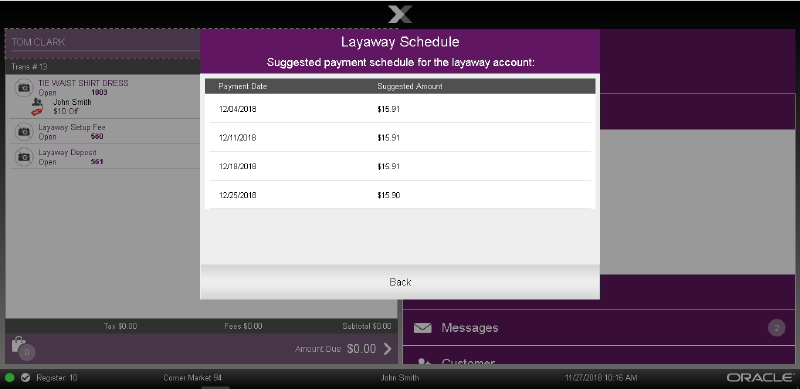
To view the payment schedule for a layaway account:
Open a Layaway, see Open a Layaway.
Click Layaway Details.
Click View Payment Schedule.
Xstore opens a window showing the payment schedule for the account:
Payment Date - Due date for the payment.
Suggested Amount - Suggest amount for the payment.
Click Back to return to the layaway.
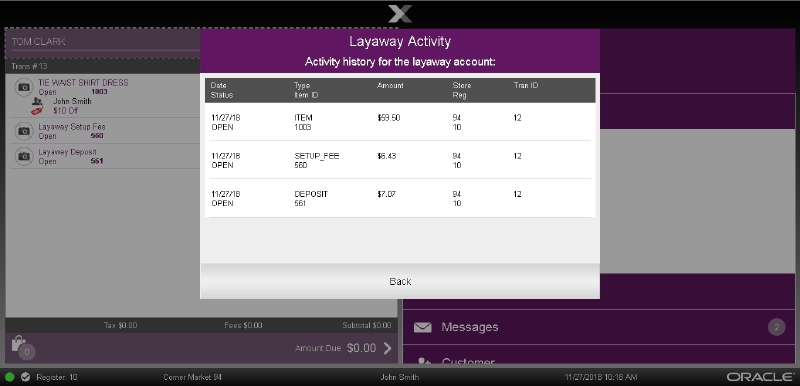
To view the activity history for a layaway account:
Open a Layaway, see Open a Layaway.
Click Layaway Details.
Click View Activity History.
Xstore opens a window showing the history of all actions performed on the account:
Date - Date of the payment.
Status - Status of the account when the action was performed.
Type - Type of activity.
Item ID - Item ID for the action, or the ID of the item used in the action.
Amount - Amount of the activity.
Store - ID of the store.
Reg - ID of the register.
Tran ID - ID of the transaction.
Click Back to return to the layaway.
When you associate a customer with a sale transaction, the system may determine that the customer has a layaway account that requires attention. In this case, the system may display a prompt indicating that action is required on the layaway account. These prompts can include:
A layaway payment is due. If this is the case, indicate whether the layaway payment should be added to the current transaction.
A layaway payment is overdue. If this is the case, indicate whether the layaway payment should be added to the current transaction.
|
Note: This may include an overdue payment fee. |
Layaway items are available for pickup. Indicate whether the items should be picked up in the current transaction.