| Oracle® Retail Xstore Point of Service User Guide Release 18.0 F12254-01 |
|

 Previous |
 Next |
A send sale item is an item that must be shipped to a customer-specified, off-site location after it is purchased.
Send sales are similar to special orders and orders because each of these transaction types may involve the direct shipment of a purchased item to a customer or third party. A send sale, however, implies that the item is in the store's saleable inventory when the purchase is made and is available at the time of purchase.
|
Note: A send sale must be paid for in full at the time of purchase. Special orders and orders may have more flexible payment options. |
Your system may be configured for one-step or two-step send sale processing.
In one-step processing, you enter the ship-to address and select a shipping method (if required) during the sale transaction. No further action is required in Xstore Point of Service after the transaction is completed.
In two-step processing, you enter the ship-to address and select a shipping method (if required) during the sale transaction, just as performed in one-step processing. After the sale is completed, a shipping document is created automatically and must be processed as a separate step in the Back Office Shipping module. Refer to the Oracle Retail Xstore Point of Service Shipping, Receiving, and Inventory Guide for more information about two-step processing and completing the shipping document in the Back Office.
To create a new send sale:
Click Extended Transaction in the Register Sale screen.
Click Send Sale.
Click New Send Sale.
If a customer is not associated with the transaction, add a customer. See Associate a Customer with the Transaction in Chapter 5, "Customer Maintenance".
If the customer has previous send sales, indicate whether to use a previous destination address:
Click Skip to enter a new destination. Continue with Step 7.
Select the destination in the list then click OK.
Click the destination.
Use the up and down arrows to highlight the correct destination, then press the Spacebar.
Enter the destination information for the new send sale by doing one of the following:
Enter Address Information - Enter the address information manually.
Search for a Customer - Search for a recipient that has a customer record.
Enter an into the transaction. See Entering Items in Chapter 2, "Basic Transaction Entry".
|
Note: The system validates every item to ensure that it meets the requirements for send sale items. |
If necessary, enter an originating inventory location:
Select the originating inventory location.
Press Process.
If necessary, add a new send sale, or edit an existing send sale. See Add or Edit a Send Sale.
Continue the transaction.
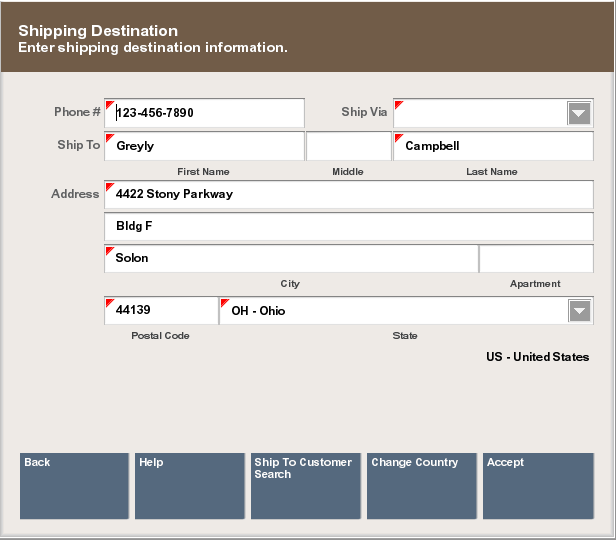
To enter address information into the destination information, do the following:
|
Note: In a new send sale, the fields may be initially populated with the address information for the customer associated with the transaction. |
Enter the address information:
|
Note: Required fields have a red triangle in the upper-left corner. |
Phone # - Phone number for the recipient.
Ship To - Name of the recipient of the send sale:
First - First name.
M.I. - Middle initial.
Last - Last name.
Address - Address for the recipient of the send sale:
First line of the street address.
Second line of the street address.
Zip - Postal or zip code.
State - State or province.
City - Recipient city.
Apt - Apartment.
Country - Country for the recipient. See Change Country in Chapter 1, "Documentation and Screen Conventions".
Ship Via - Shipper. This field is only available if enhanced send sale processing is enabled.
Click Accept.
The transaction continues.
To search for a customer to receive the send sale:
Click Ship to Customer Search.
Perform a customer search. See Associate a Customer with the Transaction in Chapter 5, "Customer Maintenance".
After selecting the customer, the transaction continues.
To add a new send sale to a transaction or edit an existing send sale:
Click Extended Transaction in the Register Sale screen.
Click Send Sale.
Click Edit Sale.
Xstore Point of Service displays a list of existing send sales.
Do one of the following:
Click Set Up New to add a new send sale. Continue with Step 5 in Create a Send Sale.
Select the send sale to edit:
Click the send sale.
Use the up and down arrows to highlight the correct send sale, then press the Spacebar.
Click Select & Continue.
Continue with Step 6 in Create a Send Sale.